To install a Google Nest Camera, simply download the Nest app, create an account, and follow the step-by-step setup instructions. Welcome to the world of Google Nest Cameras!
If you’re eager to enhance your home security and keep a watchful eye on your property, installing a Google Nest Camera is a great choice. With its advanced features and easy setup process, you can have your camera up and running in no time.
In this comprehensive guide, we’ll walk you through the installation process, providing you with all the information you need to get started. So let’s dive in and learn how to install a Google Nest Camera to ensure the safety and security of your home.
Gather The Necessary Tools And Materials
In order to successfully install your Google Nest Camera, you will need to gather the necessary tools and materials. This will ensure a smooth installation process and set you up for success. In this section, we will guide you through checking the package contents and preparing the required tools.
Check the Package Contents
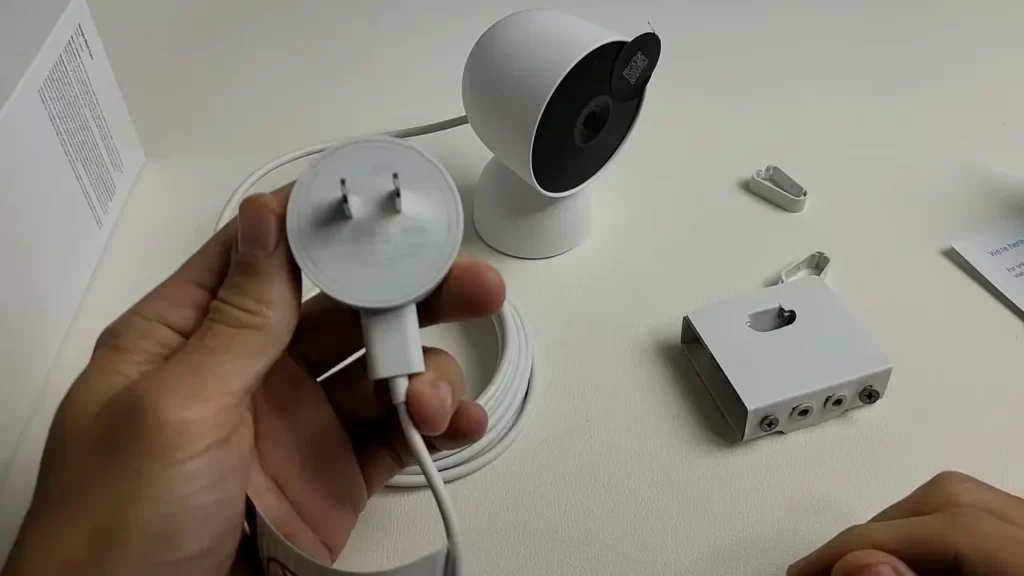
Before you begin the installation process, it is important to ensure that you have received all the necessary components in your Google Nest Camera package. This will help you avoid any surprises or setbacks during the process. Take a moment to carefully go through the package and make sure that it includes the following items:
- Google Nest Camera
- Mounting bracket
- Screws and anchors
- Power adapter
- USB Type-C cable
- Quick start guide
Prepare the Required Tools
Once you have confirmed that all the package contents are present, it is time to gather the necessary tools for the installation. Having these tools ready will save you time and ensure a smooth installation process. Here are the tools you will need:
| Tools | Materials |
|---|---|
| Screwdriver | Screws and anchors |
| Drill | Power adapter |
| Level | USB Type-C cable |
| Measuring tape | – |
Make sure to have these tools and materials readily available before you start the installation process. This will ensure that you have everything you need to complete the installation in a timely manner.
Now that you have gathered the necessary tools and materials, you are ready to move on to the next step of installing your Google Nest Camera. Stay tuned for our next section, where we will guide you through choosing the ideal location for your camera.
Setting Up The Google Nest Camera Hardware
Installing a Google Nest Camera is a simple process that can enhance the security of your home or office. The first step in the setup process is configuring the camera hardware. This involves finding the optimal location, mounting the camera securely, connecting the power adapter, and adjusting the camera angle to ensure the best coverage. In this section, we will walk you through each step of this process to help you set up your Google Nest Camera with ease.
Finding the Optimal Location
Finding the optimal location for your Google Nest Camera is crucial to maximize its effectiveness. Here are a few tips to help you find the perfect spot:
- Identify areas of high traffic or potential entry points, such as doors, windows, or gates.
- Avoid obstructions like trees, bushes, or other objects that could potentially block the camera’s field of view.
- Consider the camera’s range and try to position it within range of your Wi-Fi network.
- Ensure the camera is not easily accessible to potential intruders.
Keep these factors in mind when selecting the ideal location for your Google Nest Camera.
Mounting the Google Nest Camera
Once you have found the optimal location, it’s time to mount your Google Nest Camera securely. Follow these steps to mount the camera:
- Use the provided mounting plate as a guide to mark the position for drilling the screws.
- Drill the holes and insert the screws to attach the mounting plate to the wall or ceiling.
- Align the camera’s mounting magnet with the mounting plate and attach it firmly.
Ensure the camera is securely mounted to prevent any accidental movements or tampering.
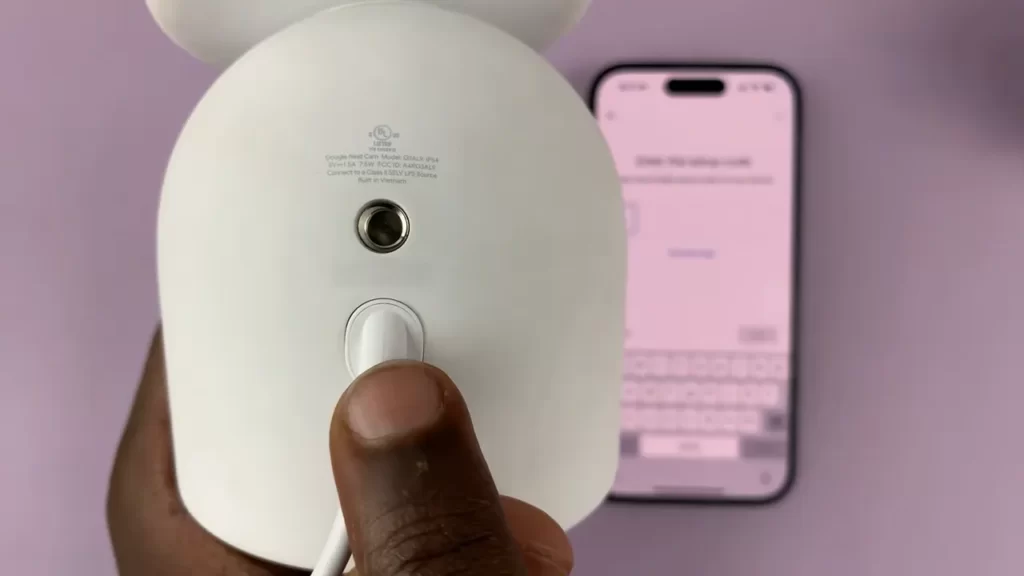
Connecting the Power Adapter
Now that the camera is mounted, you need to connect the power adapter. Follow these steps:
- Locate the power port on the back of the camera.
- Connect the power adapter to the camera’s power port.
- Plug the power adapter into a nearby power outlet.
Make sure the power connection is secure to ensure uninterrupted power supply to your Google Nest Camera.
Adjusting the Camera Angle
After connecting the power adapter, it’s time to adjust the camera angle for the best coverage. Follow these steps:
- Loosen the camera’s angle adjustment ring by turning it counterclockwise.
- Position the camera at your desired angle.
- Tighten the angle adjustment ring by turning it clockwise to secure the camera in place.
Ensure the camera has a clear view of the desired area and that the camera angle aligns with your surveillance needs.
By following these steps, you can easily set up the hardware for your Google Nest Camera and enhance the security of your property.
Configuring The Google Nest Camera
Once you have successfully installed your Google Nest Camera, the next step is to configure it to suit your personal preferences. The configuration process involves downloading the Google Home App, creating or logging into your Google Account, adding the Google Nest Camera to your account, and customizing camera settings. Let’s dive into each of these steps in detail below:
Downloading the Google Home App
To begin the configuration process, you’ll need to download and install the Google Home App on your smartphone or tablet. This app serves as a central hub for managing all your Google Nest devices. Head over to your device’s app store, search for “Google Home,” and click on the download button. Wait for the app to install, and once done, open it to proceed with the setup.
Creating or Logging into Your Google Account
In order to connect and control your Google Nest Camera, you’ll need a Google Account. If you already have a Google Account, simply log in using your credentials in the Google Home App. However, if you don’t have one yet, you can easily create a new account in just a few minutes by following the on-screen prompts. Ensure that you provide accurate and valid information while setting up your account.
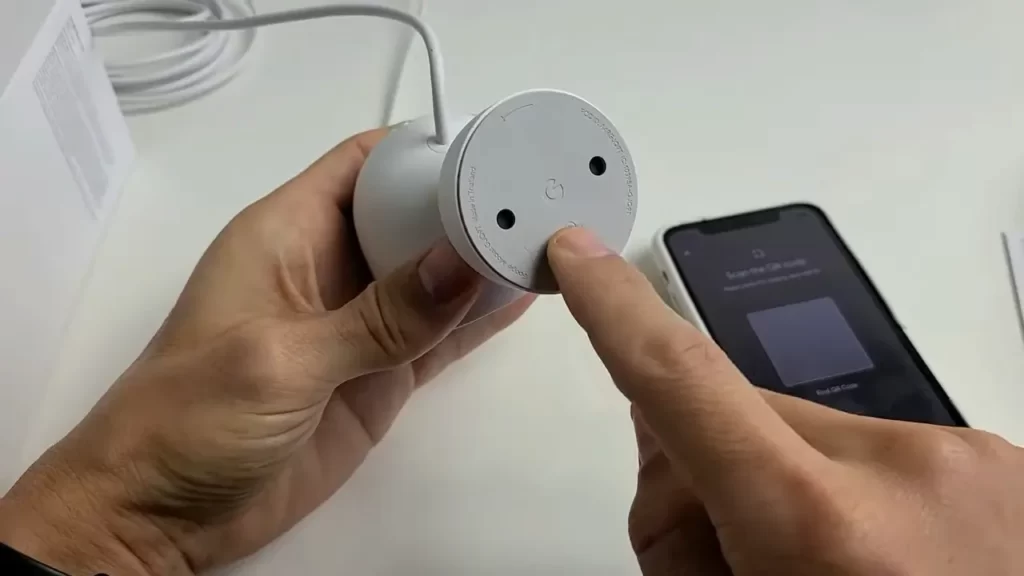
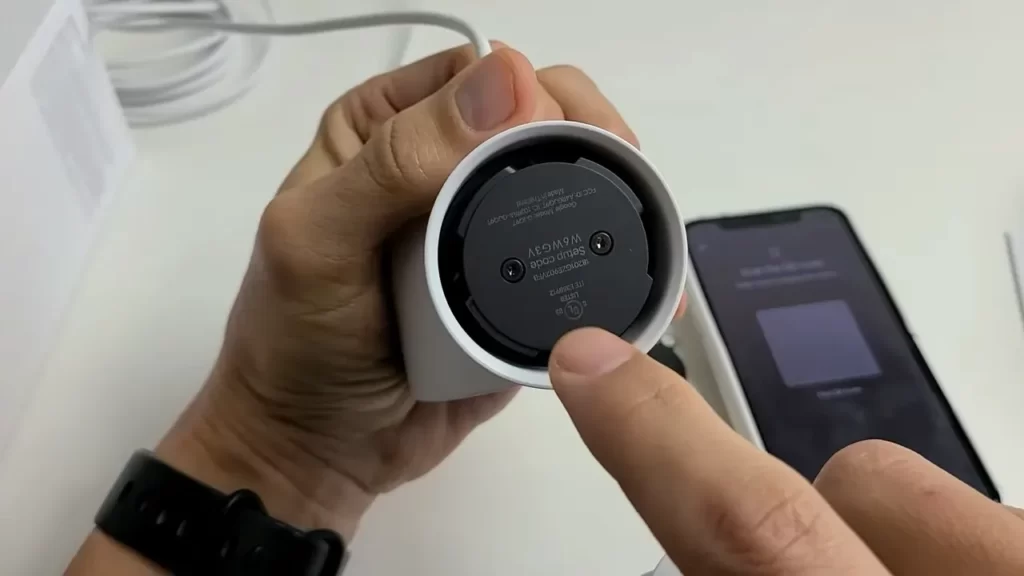
Adding the Google Nest Camera to Your Account
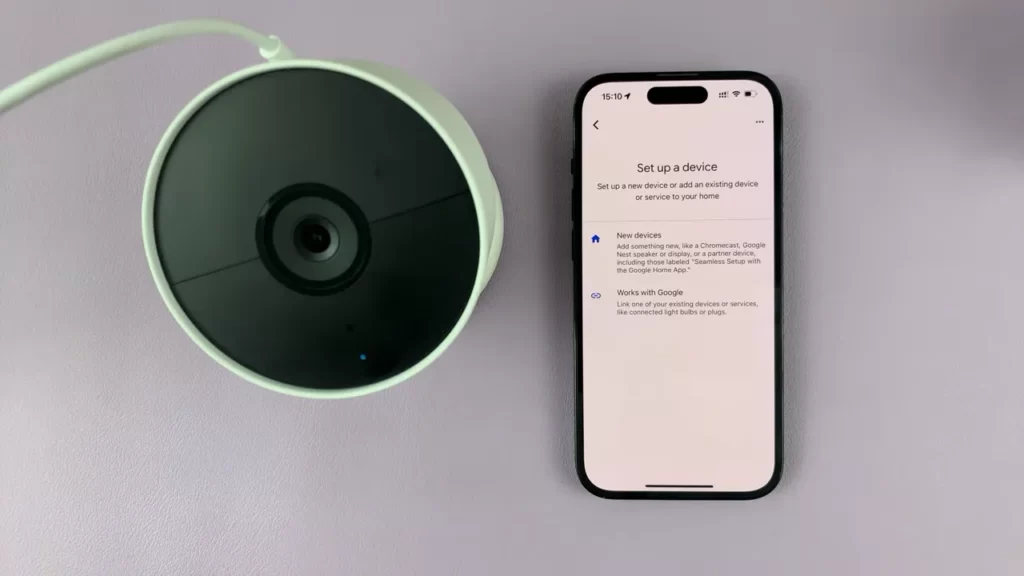
Once you have logged into your Google Account, it’s time to add your Google Nest Camera to your account. Follow these steps:
- Tap on the “Add” button (+) in the Google Home App.
- Select “Set up device” and then choose “Set up new devices.” The app will scan for available devices.
- When your Google Nest Camera is detected, click on it to start the setup process.
- Follow the on-screen instructions to connect your camera to your Wi-Fi network and complete the setup.
- Once the camera is successfully added to your account, you can give it a name that is easy for you to remember and identify.
Customizing Camera Settings
Now that your Google Nest Camera is connected and added to your account, it’s time to customize the camera settings to fit your specific needs. Here are a few settings you may want to consider:
- Camera Placement: Decide where you want to place your camera for optimal coverage of the desired area.
- Home/Away Assist: Set the camera to automatically turn on or off based on your location.
- Activity Zones: Define specific areas within the camera’s field of view where you want to receive alerts or focus on capturing motion.
- Video Quality: Adjust the video quality settings based on your network’s capabilities and storage preferences.
- Notification Preferences: Customize the notifications you receive from the camera, such as motion alerts, sound alerts, or person detection.
These are just a few examples of the customization options available to you. Take some time to explore the settings in the Google Home App to make sure your camera is tailored to your specific requirements and preferences.
By following these simple steps, you can easily configure your Google Nest Camera and make the most of its features. Now you’re ready to start monitoring your home with peace of mind and stay connected even when you’re away.
Ensuring A Stable Wi-Fi Connection
One of the vital steps to a seamless installation of your Google Nest Camera is to ensure a stable Wi-Fi connection. Without a reliable connection, you may face interruptions or limitations in the camera’s performance. In this section, we will look at two essential aspects – Checking Wi-Fi Signal Strength and Troubleshooting Wi-Fi Connectivity Issues – that will help you establish a robust connection for your Nest Camera.
Checking Wi-Fi Signal Strength
Before you begin with your Google Nest Camera installation, it is crucial to assess the strength of your Wi-Fi signal. A strong signal ensures smooth video streaming and reliable communication with your camera. Follow these steps to check your Wi-Fi signal strength:
- Locate the area where you plan to install your camera.
- Using your smartphone or laptop, connect to the Wi-Fi network.
- Walk around the installation area and check the signal strength on your device.
- If you notice weak or fluctuating signals, consider repositioning your Wi-Fi router to a central location or closer to the camera.
- You can also invest in a Wi-Fi range extender to improve coverage in areas with weak signals.
Troubleshooting Wi-Fi Connectivity Issues
Even with a strong Wi-Fi signal, you may encounter connectivity issues during the installation process. Here are some common troubleshooting steps to ensure uninterrupted communication between your Nest Camera and your Wi-Fi network:
- Power cycle your Wi-Fi router by unplugging it, waiting for a few seconds, and then plugging it back in. This can resolve temporary connectivity issues caused by router glitches.
- Verify that your Wi-Fi network is not overloaded by too many devices or bandwidth-intensive activities. Simplifying your network usage can enhance the stability of your connection.
- Ensure that your Wi-Fi router firmware is up to date. Manufacturers regularly release firmware updates that address bugs and improve performance. Check the manufacturer’s website or the router’s admin panel for any available updates.
- Consider adjusting your Wi-Fi router’s channel settings. Overlapping with neighboring networks can result in interference. Changing the channel to a less crowded one can help improve signal strength.
- Finally, if all else fails, you can try resetting your Wi-Fi router to its factory settings. However, note that this will erase any customized settings, so make sure to have them documented before proceeding.
By following these steps and ensuring a stable Wi-Fi connection, you are setting a strong foundation for the successful installation and operation of your Google Nest Camera. Take the time to evaluate and address any Wi-Fi connectivity issues before proceeding to the next steps.
Addressing Power And Compatibility Issues
When installing a Google Nest camera, it is important to address power and compatibility issues to ensure a smooth installation process. Verifying power supply and ensuring device compatibility are two key aspects that need to be considered. Let’s take a closer look at each of these areas:
Verifying Power Supply
Before installing your Google Nest camera, it is crucial to verify the available power supply. These cameras typically require a continuous power source to function properly. Here are a few important steps to follow:
- Locate the closest power outlet or power source in the vicinity of where you plan to install the camera.
- Check if the power outlet is functional by plugging in another device. Ensure that it is providing a stable power supply.
- Consider the distance between the power outlet and the designated camera location. If the distance is considerable, you may need additional extension cords or professional assistance to ensure proper power supply.
By verifying the power supply beforehand, you can avoid any potential issues or interruptions in the camera’s functionality.
Ensuring Device Compatibility
Another important aspect to address is ensuring device compatibility. Google Nest cameras require compatible devices and a stable internet connection for optimal performance. Here’s how you can ensure compatibility:
- Check the specifications of your Google Nest camera to determine device compatibility. Look for any specific requirements related to smartphones, tablets, or other devices that will be used to access and monitor the camera’s feed.
- Ensure that you have a stable and reliable internet connection. Google Nest cameras typically require a minimum internet speed for smooth live streaming and connectivity.
- If using a wireless connection, ensure that the camera is within range of your Wi-Fi network. If necessary, consider installing a Wi-Fi extender to boost the signal strength in the desired location.
By verifying device compatibility and taking the necessary steps to meet the requirements, you can ensure a seamless experience with your Google Nest camera installation.
Dealing With Camera Performance Issues
While installing a Google Nest Camera can significantly improve the security of your home or office, it’s essential to address any performance issues that may arise. In this section, we will explore some common concerns and provide troubleshooting solutions to ensure optimal camera performance.
Adjusting Camera Placement for Optimal Performance
When it comes to the performance of your Google Nest Camera, the placement plays a crucial role. To ensure you capture the best footage and minimize any potential issues, consider the following:
- Positioning: Place your camera at a height and angle that covers the desired area while minimizing blind spots. Make sure the lens is not obstructed by nearby objects.
- Lighting conditions: Avoid installing the camera in areas with extreme lighting variations, such as direct sunlight or bright artificial light. These conditions can impact the image quality.
- Mounting surface: Ensure the camera is securely mounted on a stable surface, free from vibrations or movements that could affect video stability.
Checking for Obstructions or Interference
Even with an optimal placement, your Google Nest Camera’s performance can be affected by various obstructions and interferences. Here are some factors to consider:
- Wi-Fi signal strength: Make sure your camera is within range of a stable Wi-Fi network. Weak signals can cause performance issues, such as video buffering or interrupted live streaming.
- Physical obstructions: Check for any objects or structures that may obstruct the camera’s view, such as plants, curtains, or furniture. Removing these obstructions can improve camera performance.
- Electromagnetic interference: Keep your camera away from devices that emit strong electromagnetic signals, like microwaves, routers, or cordless phones. Electromagnetic interference can disrupt the camera’s signal reception.
Troubleshooting Video or Audio Quality Problems
If you’re experiencing issues with video or audio quality, try the following troubleshooting steps:
- Check internet speed: Run a speed test on your internet connection to ensure you have sufficient bandwidth for video streaming.
- Restart the camera: Unplug the camera from its power source, wait for a few seconds, and then plug it back in. This action can resolve temporary glitches affecting camera performance.
- Update firmware: Check for any available firmware updates for your Google Nest Camera and install them. Firmware updates often include performance enhancements.
- Verify network settings: Ensure that your network settings are compatible with the camera. If necessary, consult your camera’s user manual or contact customer support for guidance.
By following these tips and troubleshooting steps, you can address performance issues with your Google Nest Camera and enjoy reliable surveillance for enhanced security.
Securing Your Google Nest Camera
The security of your Google Nest camera is crucial to protect your privacy and ensure its smooth operation. In this section, we will discuss two essential steps to secure your Google Nest camera effectively: setting up two-factor authentication and protecting your camera from unauthorized access.
Setting Up Two-Factor Authentication
Enabling two-factor authentication adds an extra layer of security to your Google Nest camera. It requires you to provide an additional verification step to access your camera and its settings. Follow these steps to set up two-factor authentication:
- Open the Google Nest app on your mobile device.
- Tap on the menu icon in the top left corner of the screen.
- Select “Account” from the menu.
- Tap on “Security” and scroll down to find “2-Step Verification.”
- Follow the on-screen instructions to complete the setup process.
Once two-factor authentication is enabled, you will need to provide a verification code in addition to your password when accessing your Google Nest camera. This added layer of security significantly reduces the risk of unauthorized access.
Protecting Your Camera from Unauthorized Access
Protecting your camera from unauthorized access is vital to safeguard your privacy and security. Here are some important measures you can take:
- Create a strong password: Choose a unique and strong password for your Google Nest camera. Avoid common passwords and consider using a combination of uppercase and lowercase letters, numbers, and special characters.
- Regularly update your camera’s firmware: Manufacturers often release firmware updates to address security vulnerabilities. Keep an eye out for updates and install them as soon as they become available.
- Enable automatic software updates: Set up your camera to automatically update its software whenever a new version is released. This ensures that you have the latest security patches and features.
- Secure your Wi-Fi network: Use a strong and unique password for your Wi-Fi network to prevent unauthorized users from accessing your camera’s live feed.
- Change default settings: Modify default settings on your Google Nest camera to personalize it and reduce the risk of unauthorized access. Disable features you do not need and adjust privacy settings according to your preference.
By following these steps, you can significantly enhance the security of your Google Nest camera and enjoy peace of mind knowing that your privacy is protected.
Maximizing The Google Nest Camera’S Features
Exploring Advanced Camera Settings
When it comes to maximizing the features of your Google Nest Camera, it’s important to explore the advanced camera settings that are available. These settings can customize your camera’s performance to suit your specific needs and preferences. By delving into the advanced settings, you can take full control of your camera’s capabilities.
One of the key settings to explore is the motion detection sensitivity. By adjusting the sensitivity level, you can ensure that your camera only captures the important movements that matter to you. Whether you want to be alerted to every movement or only those of significant importance, fine-tuning the motion detection sensitivity is essential.
Another advanced setting to take advantage of is the activity zones feature. This allows you to define specific areas within the camera’s field of view where you want to receive alerts and notifications. By setting up activity zones, you can filter out unnecessary alerts that may be triggered by movements outside of the designated areas, ensuring that you are only notified about the events that matter to you.
Additionally, be sure to explore the options for adjusting video quality and resolution. Depending on your internet connection and storage capacity, you may choose to prioritize high-quality video or opt for a lower resolution to accommodate your needs. This allows you to strike the perfect balance between crisp video footage and efficient data usage.
Integrating with Other Smart Home Devices
The Google Nest Camera is designed to seamlessly integrate with other smart home devices, allowing you to create a truly connected and automated home environment. By harnessing the power of integration, you can enhance the functionality and convenience of your camera.
Start by linking your Google Nest Camera to your smart home hub or assistant, such as Google Home or Amazon Alexa. This allows you to control your camera using voice commands, making it incredibly convenient to monitor your home without even lifting a finger. Whether you want to view a live feed or review past recordings, a simple voice command can do the trick.
Furthermore, consider integrating your Google Nest Camera with smart lights and doorbell systems. This integration allows you to create automations, such as turning on the lights when motion is detected or receiving real-time notifications when someone rings your doorbell. These integrations enhance your camera’s capabilities and create a comprehensive home surveillance system.
Utilizing Google Nest Aware Subscription Service
To truly unlock the potential of your Google Nest Camera, it is highly recommended to subscribe to Google Nest Aware. This subscription service offers a range of features that enhance your camera’s functionality and provide you with additional peace of mind.
One of the primary benefits of Google Nest Aware is the ability to access your camera’s recorded footage. With continuous video recording, you can look back on events that may have occurred while you were away or simply review important moments. Additionally, Nest Aware offers intelligent alerts that can distinguish between different types of movements, such as people or packages, ensuring that you are alerted to the events that matter most.
Another notable feature of Nest Aware is the advanced detection capabilities. This includes familiar face detection, which can identify and notify you when a familiar face is detected in the camera’s field of view. Additionally, Nest Aware enables sound detection, allowing you to receive alerts for specific sounds, such as a smoke alarm or a dog barking.
By utilizing Google Nest Aware, you can truly maximize the potential of your Google Nest Camera and take your home security to the next level.
Frequently Asked Questions Of How To Install A Google Nest Camera
How Do You Install A Nest Camera?
To install a Nest camera, first, download the Nest app on your phone. Then, sign in to your account and select “Add product” from the menu. Follow the app’s instructions to connect your camera to your Wi-Fi network. Place the camera at your desired location and adjust the settings through the app.
How Do I Connect My Google Nest Camera To Wi-Fi?
To connect your Google Nest camera to Wi-Fi, open the Google Home app, tap the camera you want to connect, select “Settings”, then “Wi-Fi” and follow the prompts to connect it to your Wi-Fi network.
Where Do I Put Google Nest Camera?
Place your Google Nest camera in an area that provides a clear view of the desired location. It should be positioned at a height of 7-10 feet and angled downwards for optimal coverage. Ensure it is within range of your Wi-Fi network and protected from extreme weather conditions.
How Do I Enable Google Nest Camera?
To enable your Google Nest camera, follow these steps: 1. Open the Google Home app on your smartphone. 2. Tap on the “+” sign. 3. Choose “Set up device” and select “Have something already set up? ” 4. Scroll down to “Works with Google” and find your camera brand.
5. Follow the instructions to link and enable your camera.
How Do I Install A Google Nest Camera?
To install a Google Nest Camera, start by downloading the Nest app and creating an account. Then, follow the step-by-step instructions provided in the app to connect and mount your camera securely.
Conclusion
Installing a Google Nest Camera is a straightforward process that ensures the safety and security of your home. By following the step-by-step instructions provided in this blog post, you can easily set up your camera without any difficulty. With its advanced features and user-friendly interface, the Google Nest Camera is an excellent choice for anyone looking to enhance their home security.
So go ahead, install your camera, and enjoy peace of mind knowing that you have taken a proactive approach to protecting your loved ones and your property.