To install the ADT doorbell camera, follow these simple steps. Firstly, ensure the camera is powered and connected to your Wi-Fi network.
Then, securely mount the camera in the desired location using the provided screws and wall mount. ADT doorbell camera installation is a straightforward process that allows you to enhance the security of your home. By following a few simple steps, you can have your new camera up and running in no time.
This article will guide you through the installation process for the ADT doorbell camera. With clear, concise instructions, you’ll be able to ensure that your camera is installed correctly and functioning as intended. So, let’s dive in and get started on installing your ADT doorbell camera.
Choosing The Right Location
When it comes to installing an ADT doorbell camera, one of the most crucial aspects is choosing the right location. The placement of your camera plays a vital role in its effectiveness and overall security coverage. In this section, we will discuss the factors to consider when selecting the perfect location for your camera.
Factors to consider when selecting the perfect location for your camera
Ensuring proper coverage and visibility is key to achieving optimal security with your ADT doorbell camera. Here are some important factors to keep in mind:
- Entrance accessibility: Identify the main entrances of your property that you want the camera to monitor. It is recommended to install the camera near the main door or gate so that it captures the face of anyone approaching.
- Line of sight: A clear line of sight is essential for the camera to capture useful footage. Make sure there are no obstacles like trees, bushes, or walls blocking the camera’s view. Keep in mind that the camera should have a wide field of view to cover a larger area.
- Height placement: Mount the camera at an optimal height. Too low, and it may be susceptible to vandalism or theft. Too high, and the camera may not capture faces clearly. Aim for a height around 4 to 6 feet from the ground for the best results.
- Lighting conditions: Consider the lighting conditions in the chosen location. Direct sunlight or intense shadows can affect the camera’s performance. It is ideal to select a spot where the lighting is balanced, providing clear visibility throughout the day and night.
- Weather protection: Ensure that the camera is installed in a location that offers protection from extreme weather conditions such as rain, snow, or direct sunlight. Look for areas with some sort of overhead cover, like an awning or porch.
- Power accessibility: Locate the camera near an electrical outlet or ensure that it is within reach of a power source. If your camera is battery-powered, make sure the chosen location allows easy access for battery replacement or recharging.
- Wi-Fi signal strength: Verify the strength of the Wi-Fi signal in the area where you plan to install the camera. A stable and strong connection is crucial for real-time streaming and remote access to the footage.
By considering these factors when selecting the perfect location for your ADT doorbell camera, you can ensure optimal coverage, visibility, and security for your property. Take the time to assess your property thoroughly and find the best placement for your camera’s effectiveness.
Gathering The Necessary Tools And Equipment
Gathering the necessary tools and equipment is crucial before starting the installation process of your ADT doorbell camera. Having all the required tools at hand will ensure a smooth and hassle-free installation. In this section, we will provide you with a detailed list of essential tools and equipment that you need for the installation. Take the time to gather these items, and you’ll be well-prepared to complete the installation process effortlessly!
Essential tools and equipment needed for the installation process
Before getting started, it’s important to make sure you have all the necessary tools and equipment. Here is a comprehensive list to ensure you have everything you need before starting the installation:
| Tools | Equipment |
|---|---|
| Screwdriver (phillips and flathead)Power drillDrill bits (depending on the type of surface you will be mounting the doorbell camera)LevelTape measurePencil or marker | ADT doorbell cameraMounting bracketScrews and anchorsWiring kitPower supplyWi-Fi networkSmartphone or tablet with the ADT app installed |
Having the right tools will make your installation process more efficient and ensure a secure and stable placement of your ADT doorbell camera. Now that you have all the necessary tools and equipment, you’re ready to dive into the installation process. Continue reading our blog post to learn the step-by-step guide on installing your ADT doorbell camera.
Installing The Doorbell Camera
If you’re looking to add an extra layer of security and convenience to your home, installing a doorbell camera is a great option. With its advanced features and easy-to-use interface, the ADT Doorbell Camera is a popular choice for homeowners. In this guide, we will walk you through the step-by-step instructions for mounting the camera on the wall and ensuring proper positioning and alignment for optimal functionality.
Step-by-step instructions for mounting the camera on the wall
Mounting the ADT Doorbell Camera on your wall is a straightforward process that can be completed in a few simple steps. Here’s a step-by-step guide to help you through the installation process:
- Start by determining the ideal location for your doorbell camera. Look for a spot near your front door that provides a clear view of your entrance while minimizing obstructions.
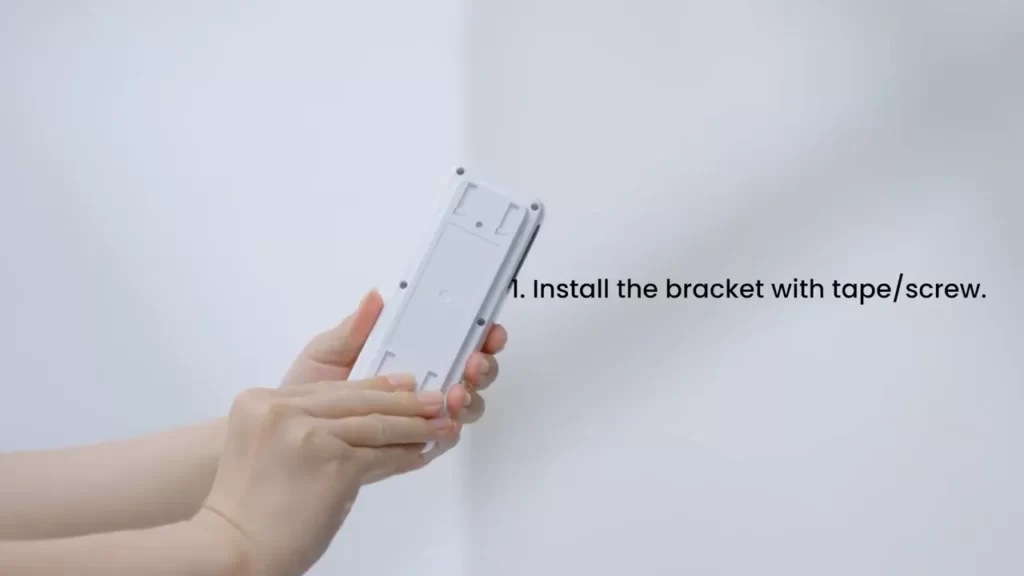
- Once you’ve chosen the perfect location, use a pencil to mark the position of the mounting bracket. Make sure the bracket is level to ensure the camera’s proper alignment.
- Next, grab your power drill and drill pilot holes at the marked spots. These holes will serve as anchors for the screws that will secure the camera.
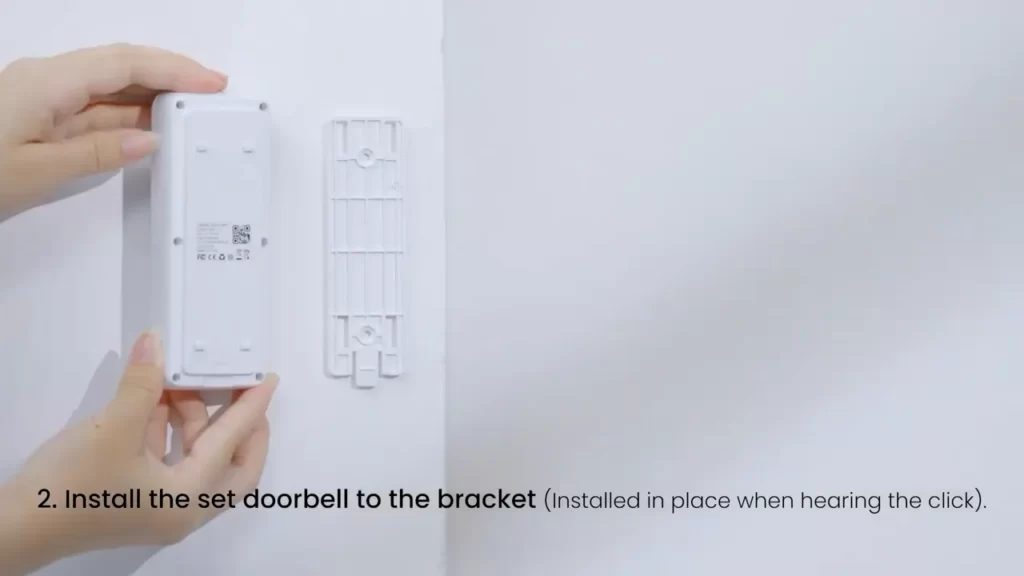
- Align the mounting bracket with the pilot holes and secure it to the wall using the provided screws. Make sure the bracket is tightly affixed for stability.
- Gently attach the ADT Doorbell Camera to the mounting bracket, ensuring that it securely clicks into place.
- Lastly, tighten any adjustable angles or brackets on the camera to optimize its viewpoint and ensure your desired coverage area.
Proper positioning and alignment for optimal functionality
Proper positioning and alignment of your ADT Doorbell Camera are crucial for its optimal functionality. Follow these tips to ensure you get the most out of your camera:
- Position the camera at a height that allows for clear and unobstructed views of anyone approaching your front door.
- Angle the camera slightly downwards to capture a wider field of view and reduce blind spots.
- Avoid placing the camera too close to the ground or too high up, as this can result in suboptimal footage.
- Ensure that the camera is facing the direction you want to monitor and that it is properly aligned with your entrance.
- Regularly check the camera’s position and alignment to make any necessary adjustments.
By following these step-by-step instructions for mounting the camera and ensuring proper positioning and alignment, you can enhance the security and convenience of your home with the ADT Doorbell Camera. Feel free to consult the camera’s user manual for additional support or troubleshooting tips.
Connecting The Camera To Power
When it comes to installing the Adt Doorbell Camera, one of the most crucial steps is connecting it to a reliable power source. This ensures uninterrupted usage and allows you to take full advantage of the camera’s features. In this section, we will explore the different power options available for your Adt Doorbell Camera and guide you through the process of connecting it to power. Let’s get started!
Exploring the Different Power Options Available for Your Adt Doorbell Camera
Before we dive into connecting the camera to power, it’s important to understand the different power options you have for your Adt Doorbell Camera. Depending on your setup and preferences, you can choose between two main power options:
- Hardwiring the Camera: This option involves connecting the camera to your existing doorbell’s electrical wiring. It ensures a continuous power supply to the camera and eliminates the need for battery replacements. However, it may require professional installation if you’re not familiar with electrical work.
- Using Battery Power: If hardwiring the camera is not feasible for you, or you prefer a more flexible installation, you can opt to power the camera using batteries. This option allows you to place the camera anywhere you like and easily move it if needed. However, keep in mind that you’ll need to periodically replace the batteries for uninterrupted usage.
Connecting the Camera to a Power Source for Uninterrupted Usage
Now that you’re familiar with the different power options, let’s move on to connecting the Adt Doorbell Camera to a power source. Depending on your chosen power option, follow the respective steps below:
Hardwiring the Camera:
- Turn off the power to your doorbell at the breaker box to ensure your safety during the installation process.
- Remove your existing doorbell by unscrewing the mounting screws and disconnecting the wires.
- Connect the wires from your Adt Doorbell Camera to the corresponding wires from your existing doorbell. Secure the connections using wire nuts or electrical tape.
- Mount the camera to the desired location using the provided mounting bracket and screws.
- Finally, restore power to your doorbell by turning on the breaker and test the camera to ensure it’s working properly.
Using Battery Power:
- Insert the required batteries into the battery compartment of your Adt Doorbell Camera, following the correct polarity.
- Ensure the battery compartment cover is securely closed to prevent any water or dust from entering.
- Mount the camera to the desired location using the provided mounting bracket and screws.
- Lastly, power on the camera by pressing the power button or following the manufacturer’s instructions.
With the camera successfully connected to power, you can now enjoy uninterrupted usage and peace of mind knowing that your Adt Doorbell Camera is always ready to capture any activity at your doorstep.
Connecting The Camera To Wi-Fi
Step-by-step instructions to connect the camera to your home Wi-Fi network
Connecting your ADT Doorbell Camera to your home Wi-Fi network is a critical step in ensuring its proper functionality. By following these step-by-step instructions, you’ll have your camera connected in no time:
- Ensure your Wi-Fi network is functioning properly and that you have the necessary login credentials readily available.
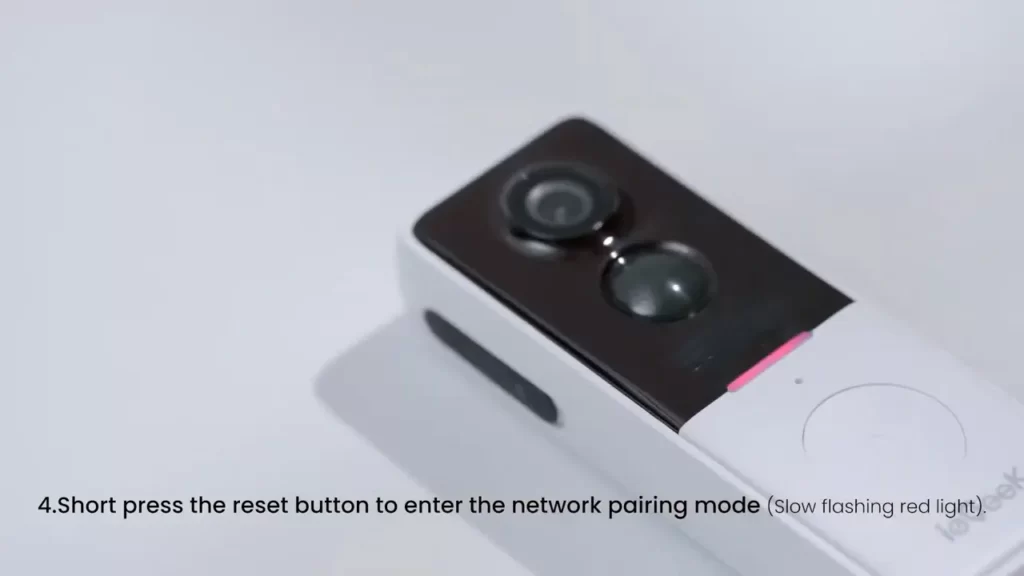
- Remove the mounting plate of the ADT Doorbell Camera from the back of the unit. This will expose the configuration button.
- Using a small tool or the provided pin, press and hold down the configuration button until you hear a chime. This will enable the camera to enter pairing mode.
- On your smartphone or tablet, navigate to the Wi-Fi settings and locate the network name labeled “ADT Doorbell Camera“.
- Select the “ADT Doorbell Camera” network and enter the default password provided in the installation manual.
- Once connected to the camera’s network, open the ADT mobile app on your device.
- Follow the prompts within the app to enter your home Wi-Fi network information, including the network name (SSID) and password.
- Ensure that the entered information is correct and click “Connect” to initiate the connection process between the ADT Doorbell Camera and your home Wi-Fi network.
- Wait for the camera to connect to your network. This may take a few moments, so be patient during this process.
- Once connected, you will receive a confirmation message in the ADT app indicating that the camera is successfully connected to your home Wi-Fi network.
- Mount the camera back onto the mounting plate, following the manufacturer’s instructions.
- Congratulations! You have successfully connected your ADT Doorbell Camera to your home Wi-Fi network. Enjoy the added security and convenience it brings to your doorstep.
Troubleshooting tips for common connectivity issues
While the connection process is usually straightforward, there might be instances where you encounter connectivity issues. Here are some troubleshooting tips to help you resolve common issues:
| Issue | Possible Solution |
|---|---|
| No Wi-Fi networks listed | Make sure your smartphone or tablet is within range of your Wi-Fi network and that it is enabled. Restart the camera and try connecting again. |
| Incorrect network password | Double-check that you have entered the correct password for your home Wi-Fi network. It should be case-sensitive, so ensure uppercase and lowercase letters are correctly entered. |
| Weak Wi-Fi signal | Move your router closer to the ADT Doorbell Camera to ensure a stronger signal. Additionally, ensure there are no physical obstructions that may be blocking the signal. |
| Interference from other devices | Turn off or move other devices that may be causing interference, such as cordless phones or microwaves. These devices can sometimes disrupt the Wi-Fi connection. |
| Router compatibility issues | Check if your router supports the required Wi-Fi standards (e.g., 2.4GHz or 5GHz). If not, you may need to upgrade your router or consult with your internet service provider. |
| Camera firmware update | Ensure that the ADT Doorbell Camera has the latest firmware installed. Check the manufacturer’s website or contact customer support for instructions on updating the firmware. |
By following these troubleshooting tips, you should be able to overcome common connectivity issues and successfully connect your ADT Doorbell Camera to your home Wi-Fi network. Enjoy the enhanced security and peace of mind that comes with having a reliable connection.
Configuring The Doorbell Camera Settings
Once you have successfully installed your ADT doorbell camera, it’s time to configure its settings to optimize its performance and customize it according to your preferences.
Accessing the camera’s settings and customization options
Before you start tweaking the settings of your doorbell camera, you’ll need to access its configuration menu. Follow these steps to begin:
- Open the ADT mobile app on your smartphone or tablet.
- Log in to your ADT account using your credentials.
- Once logged in, navigate to the “Devices” section of the app.
- Find your installed doorbell camera from the list of devices and select it. This will open up the camera’s settings menu.
By following these steps, you’re now able to access the various settings and customization options for your doorbell camera.
Adjusting motion detection, notifications, and other important settings
Now that you have accessed the settings menu, you can fine-tune the key features of your doorbell camera to better suit your needs. Here are some essential settings you should consider adjusting:
Motion Detection
One of the most important aspects of your doorbell camera is its ability to detect motion accurately. You can adjust the motion detection sensitivity to filter out false alarms or make it more responsive to movement. Experiment with different settings until you find the level that works best for your situation.
Notifications
To receive alerts and notifications on your mobile device when someone approaches your front door, ensure the notification settings are enabled and configured correctly. You can choose to receive real-time push notifications or email alerts, depending on your preference.
Video Recording and Storage
If your ADT doorbell camera supports video recording, you can customize the duration of the recorded clips and manage their storage. Determine how long you want the camera to record after motion is detected and choose whether you want the footage stored locally or in the cloud.
These are just a few of the important settings you can adjust in your doorbell camera. Take your time to explore the various customization options available and make the necessary adjustments to tailor the camera’s functionality to your specific needs.
Integrating With Other Smart Home Devices

Imagine a world where your smart home devices seamlessly communicate with each other, making your life more convenient and secure. With the Adt Doorbell Camera, this dream becomes a reality. The Adt Doorbell Camera is not only a top-of-the-line security solution but also a smart home integration powerhouse. In this section, we will explore the compatibility of your Adt Doorbell Camera with other smart home devices and provide you with step-by-step instructions for connection and integration.
Exploring the Compatibility of Your Adt Doorbell Camera with Other Smart Home Devices
Before diving into the integration process, it is crucial to ensure that your Adt Doorbell Camera is compatible with the smart home devices you wish to connect it with. Adt has carefully designed its Doorbell Camera to work seamlessly with a wide range of smart home devices, making it easy for you to expand your connected home ecosystem. Here are just a few examples of compatible devices:
| Device | Compatibility |
|---|---|
| Amazon Echo | Yes |
| Google Home | Yes |
| Apple HomeKit | Yes |
| Smart Locks | Yes |
These are just a few examples, and the Adt Doorbell Camera integrates with many other smart home devices. Now that you know your Doorbell Camera is compatible, let’s move on to the connection and integration process.
Step-by-Step Instructions for Connection and Integration
Connecting and integrating your Adt Doorbell Camera with other smart home devices is a straightforward process that can be completed in just a few simple steps. Follow these instructions to get started:
- Make sure your Adt Doorbell Camera is properly installed and connected to your home’s Wi-Fi network.
- Open the companion app for your Adt Doorbell Camera on your smartphone or tablet.
- Navigate to the settings menu within the app, where you will find an option for “Device Integration.”
- Select the device you wish to integrate with, such as Amazon Echo or Google Home.
- Follow the on-screen instructions to complete the integration process, which may involve linking your Adt account with the smart home device’s corresponding app.
- Once the integration is complete, you can start enjoying the benefits of a fully connected smart home ecosystem.
It’s important to note that the specific steps may vary slightly depending on the device you are integrating with, but the overall process is similar across most smart home devices. If you encounter any difficulties during the integration process, consult the user manual or contact Adt customer support for further assistance.
With your Adt Doorbell Camera seamlessly integrated with other smart home devices, you can expect a truly interconnected and automated home experience. From using voice commands to control your Doorbell Camera via Amazon Echo to unlocking your smart locks directly from the Doorbell Camera app, the possibilities are endless. Take your smart home to the next level with the Adt Doorbell Camera and let the integration revolution begin.
Testing The Camera And Troubleshooting
Once you have successfully installed your ADT Doorbell Camera, it’s important to conduct a thorough test to ensure that the camera is functioning properly. This step is crucial as it allows you to detect any potential issues and address them before relying on the camera for your home security. In this section, we will guide you through the process of testing the camera and troubleshooting common issues that may arise.
Conducting a thorough test to ensure the camera is functioning properly
Before relying on your ADT Doorbell Camera, it’s important to conduct a comprehensive test to verify that all the features are working as expected.
To begin, follow these steps:
- Ensure that the camera is properly connected to your home’s Wi-Fi network. Check the signal strength to guarantee a stable connection.
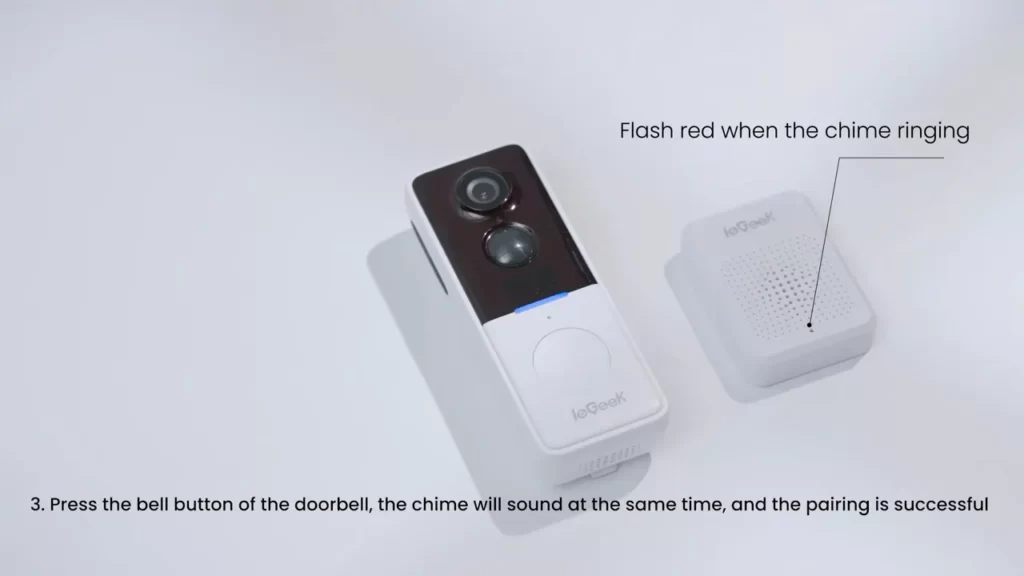
- Press the doorbell button and verify that the camera captures a live video feed within a few seconds. Make sure that the feed is clear and of high quality.
- Test the two-way audio feature by speaking through the camera’s microphone and listening through the speaker. Confirm that the sound is clear and audible on both ends.
- Try out the motion detection functionality by walking in front of the camera’s field of view. Check that the camera alerts you promptly and records the motion correctly.
- Confirm that the night vision feature activates when there is limited light or darkness. The camera should provide a clear view even in low-light conditions.
- If your ADT Doorbell Camera has additional features, such as facial recognition or package detection, make sure to test these as well.
By conducting a thorough test of your ADT Doorbell Camera, you can rest assured that it will perform reliably when you need it the most.
Troubleshooting common issues and resolving them effectively
While ADT Doorbell Cameras are designed to be user-friendly, occasional issues may still arise. Understanding how to troubleshoot common problems will help you promptly resolve any difficulties you encounter. Here are some common issues you may face and how to address them:
| Issue | Solution |
|---|---|
| The camera is not connecting to Wi-Fi | Check if the Wi-Fi password is entered correctly. Ensure that the camera is within range of the Wi-Fi router. Restart the camera and try connecting again. |
| Poor video quality | Verify that your internet connection is stable and has sufficient bandwidth. Adjust the camera’s position to optimize the field of view. Clean the camera lens to ensure clarity. |
| Audio issues | Ensure that the microphone and speaker are not obstructed. Check your device’s volume settings. Restart the camera and test the audio again. |
| Frequent false alarms | Adjust the motion detection sensitivity settings to avoid capturing unnecessary movements. Clear any obstructions in the camera’s field of view, such as overhanging branches or moving objects. |
If you encounter any other issues with your ADT Doorbell Camera, refer to the user manual or contact ADT’s customer support for further assistance. They will guide you through the troubleshooting steps specific to your camera model.
By following these guidelines and troubleshooting common issues effectively, you can ensure that your ADT Doorbell Camera functions optimally and provides you with the peace of mind you deserve for your home security.
Maintaining And Caring For Your Doorbell Camera
Installing an ADT doorbell camera is just the first step to enhancing the security of your home. To ensure your doorbell camera continues to function optimally and provides you with clear and reliable footage, proper maintenance and care are essential. In this section, we will discuss some essential tips and practices for cleaning and maintaining your ADT doorbell camera, allowing you to enjoy its benefits for years to come.
Essential Tips for Cleaning and Maintaining Your ADT Doorbell Camera
Cleaning your ADT doorbell camera regularly is crucial to keep it free from dust, dirt, and other contaminants that can affect its performance. Here are some essential tips to help you maintain a clean and well-functioning doorbell camera:
- Use a microfiber cloth: When cleaning the camera lens or the body of your doorbell camera, always use a soft microfiber cloth. This type of cloth is gentle on the surface and will help remove fingerprints, smudges, and dust without scratching the camera.
- Avoid harsh chemicals: Do not use any harsh cleaning agents or solvents on your doorbell camera, as they can damage the lens or the housing. Stick to mild soap and water solutions for cleaning, if necessary.
- Regularly check for obstructions: Make it a habit to inspect your doorbell camera for any physical obstructions that may impair its functionality. Ensure that the lens is clean and free from any blockages such as spider webs or dirt accumulation.
- Keep the doorbell camera dry: Your ADT doorbell camera is designed to withstand various weather conditions, but excessive exposure to moisture can still affect its performance. Make sure the camera remains dry and protected from rain, snow, or dripping water.
Regular Maintenance Practices to Ensure Longevity and Optimal Performance
Maintaining your ADT doorbell camera goes beyond cleaning. Here are some regular maintenance practices to ensure the longevity and optimal performance of your device:
- Check the battery level: If your doorbell camera is battery-powered, regularly check the battery status to ensure it is adequately charged. Replace the batteries as needed to avoid any interruptions in the camera’s operation.
- Update firmware: Stay on top of any firmware updates for your ADT doorbell camera. Manufacturers often release software updates to improve performance and address any security vulnerabilities. Check for updates regularly and follow the instructions provided by the manufacturer to install them.
- Secure mounting: Periodically check the mounting of your doorbell camera to ensure it is still securely in place. Over time, vibrations or extreme weather conditions may cause the camera to become loose. Tighten any loose screws or brackets to maintain a stable and secure installation.
- Test functionality: Regularly test the functionality of your doorbell camera by checking the live feed, motion detection, and two-way audio features. This helps identify any issues early on and allows you to address them promptly.
By following these essential tips and regular maintenance practices, you can keep your ADT doorbell camera in top-notch condition, ensuring it continues to provide you with the peace of mind and security you deserve.
Frequently Asked Questions On How To Install Adt Doorbell Camera
How Do You Install A Doorbell Security Camera?
To install a doorbell security camera, follow these steps: 1. Choose a suitable location near your front door. 2. Make sure the doorbell is compatible with your existing wiring or opt for a wireless option. 3. Install the camera by following the manufacturer’s instructions.
4. Connect the doorbell camera to your home Wi-Fi network. 5. Download the accompanying app to monitor and control the camera remotely.
How Do You Install A Hardwired Doorbell Camera?
To install a hardwired doorbell camera, follow these steps: Turn off power, remove existing doorbell, connect camera wires to doorbell transformer, mount the camera, connect it to the existing doorbell chime, and test the system. Ensure safety precautions are taken and consult a professional if needed.
How Do You Install A Ring Doorbell Without Existing Wiring?
To install a ring doorbell without existing wiring, you can use a battery-powered option. Simply mount the doorbell, connect it to your Wi-Fi network, and follow the setup instructions on the Ring app. This allows you to enjoy the convenience and security of a doorbell camera without the need for electrical wiring.
Does Adt Have Wireless Doorbells?
Yes, ADT offers wireless doorbells. These doorbells use wireless technology to provide convenient and secure functionality. ADT’s wireless doorbells are easy to install and enable you to monitor your front door remotely.
How To Install The Adt Doorbell Camera?
To install the ADT Doorbell Camera, simply follow these steps: (1) Remove the existing doorbell, (2) Connect the wires to the camera, (3) Install the mounting bracket, (4) Attach the camera to the bracket, (5) Connect the camera to your WiFi network.
Conclusion
Installing an ADT Doorbell Camera is a straightforward process that can greatly enhance the security of your home. By following the step-by-step guide outlined in this blog post, you can ensure a hassle-free installation and enjoy the many benefits that come with a doorbell camera.
From increased peace of mind to the ability to monitor your doorstep remotely, the ADT Doorbell Camera is a valuable addition to any home security system. So, don’t wait any longer – take the necessary steps to install your ADT Doorbell Camera today!