To install wired security cameras, first, gather the necessary equipment and tools such as a drill, screwdriver, and cables. Then, position the camera at the desired location, drill holes for cables, and attach the camera to the wall.
Assessing Your Security Needs
Before you jump into the installation process of wired security cameras, it is important to assess your security needs. Taking the time to carefully evaluate your requirements will help you make informed decisions about the number of cameras you need, the areas you want to monitor, and the type of camera that will best suit your specific security requirements.
Determine the number of cameras needed for your property size and layout
One of the first considerations when installing wired security cameras is determining how many cameras you need for your property. Assess the size and layout of your property, including any outdoor areas, entrances, and vulnerable spots that need surveillance. Consider whether you want to cover every angle or if focusing on specific areas would suffice. For larger properties, you may need multiple cameras strategically placed to provide comprehensive coverage.
Consider the areas you want to monitor and potential blind spots
When planning your security camera installation, it is crucial to consider the specific areas you want to monitor. Identify the main entry points, such as doors and windows, as well as any potential blind spots where individuals could go unnoticed. These blind spots could be areas that offer limited visibility or are hidden from direct view. By carefully assessing these areas, you can determine the best camera placement to ensure maximum coverage and eliminate any potential vulnerabilities.
Identify the type of camera suitable for your specific security requirements
Not all security cameras are created equal, and choosing the right type of camera is essential to meet your specific security requirements. Different types of cameras offer varying features, resolutions, and functionalities. When selecting a camera, consider factors such as whether you need indoor or outdoor cameras, if night vision capabilities are necessary, and whether you require additional features like pan, tilt, and zoom. Assessing your security needs will allow you to choose the camera that best fits your requirements and provides the desired level of surveillance.
In conclusion, assessing your security needs is a critical step before installing wired security cameras. By considering the number of cameras needed, the areas to monitor, and the type of camera to use, you can ensure comprehensive coverage and enhanced security for your property.
Choosing The Right Equipment And Tools
Selecting the appropriate wired security camera system
Choosing the right equipment is crucial when it comes to installing wired security cameras. With so many options available in the market, it can be overwhelming to make the right choice. However, by considering a few essential factors, you can select a system that fits your needs perfectly.
Firstly, assess the area you want to monitor and determine the number of cameras required. This will help in deciding whether you need a single-camera system or a multi-camera setup. Additionally, consider the coverage range and resolution you desire. Higher resolution cameras offer clearer images, making it easier to identify any intruders or suspicious activities.
Moreover, consider features like night vision capability, motion detection, and remote access. Night vision is especially important if you want round-the-clock surveillance. Motion detection alerts you whenever any movement is detected in the camera’s field of view, ensuring real-time notifications.
| Features | Importance |
|---|---|
| Night vision | Essential for 24/7 surveillance |
| Motion detection | Real-time alerts for any movement |
| Remote access | View footage from anywhere, anytime |
Understanding the key features and specifications to look for
Once you have decided on the type of wired security camera system you require, it is important to understand the key features and specifications to look for. By paying attention to these details, you can ensure that you invest in a high-quality system that meets your security needs.
Firstly, consider the camera’s resolution. Higher resolution cameras provide sharper images and allow for better identification of faces and details. It is recommended to choose a camera with at least 1080p resolution for optimal clarity.
Next, pay attention to the camera’s field of view (FOV). This determines the area that the camera can cover. A wider FOV is suitable for large areas, while a narrower FOV may be sufficient for small spaces.
In addition, consider the camera’s weather resistance capabilities if you plan to install them outdoors. Look for cameras with an IP66 or higher rating, as they are designed to withstand harsh weather conditions.
| Specifications | Importance |
|---|---|
| Resolution | Determines image clarity |
| Field of view (FOV) | Determines coverage area |
| Weather resistance | Essential for outdoor installations |
Gathering the necessary tools for the installation process
Before starting the installation process, it is vital to gather all the necessary tools to ensure a smooth and efficient setup. Having the right tools at hand will save you time and effort during the installation.
Here is a list of essential tools you will need:
- Drill and appropriate drill bits for mounting the cameras
- Screwdrivers for attaching brackets and securing cables
- Ladder or step stool for reaching high spots
- Cable clips or staples for organizing and securing cables
- Measuring tape for precise camera placement
- Power drill for creating holes to route cables
- Cable tester to ensure proper cable connections
By gathering these tools beforehand, you can streamline the installation process and avoid any delays or inconvenience.
Conducting A Site Survey
Conducting a Site Survey
A site survey is an essential step in the process of installing wired security cameras. This survey allows you to inspect the areas where you plan to install the cameras, determine the best camera placements for optimal coverage, and ensure proper power and network connectivity.
<h3>Inspecting the areas where you plan to install the cameras</h3>
Before installing the security cameras, it’s important to thoroughly inspect the areas where you intend to place them. This inspection will help you identify potential vulnerabilities and understand the unique characteristics of each location. Take note of any blind spots, high-traffic areas, and entrances or exits that require monitoring.
If you are conducting a site survey for a multi-story building, make sure to observe each floor individually, considering both indoor and outdoor surveillance requirements. A comprehensive inspection will ensure that no crucial areas are left unprotected.
<h3>Determining the best camera placements for optimal coverage</h3>
Once you have inspected the areas, it’s time to determine the best placements for your security cameras. This step requires careful consideration to ensure optimal coverage and minimize any potential blind spots.
Start by prioritizing high-risk areas such as entrances, parking lots, and valuable assets. These areas should receive maximum coverage for effective surveillance. Consider the viewing angles of the cameras, making sure they provide clear visibility of the entire area.
Additionally, take into account any obstacles that may interfere with the camera’s field of view, such as walls, fences, or vegetation. Adjust the camera angles accordingly to overcome these obstacles and optimize coverage.
<h3>Ensuring proper power and network connectivity</h3>
Proper power and network connectivity are essential for the smooth functioning of your wired security cameras. During the site survey, it’s crucial to assess the availability of power sources and network infrastructure.
Locate nearby power outlets to ensure each camera can be properly connected. If necessary, consult an electrician to install additional outlets in strategic locations.
Similarly, check the network availability in the vicinity of the camera placements. Determine the best route for running the network cables from the cameras to your central hub or recording device. Avoid obstructions and ensure that the cables are properly secured to prevent any accidental disconnections.
An effective site survey is the foundation of a successful wired security camera installation. By inspecting the areas, determining optimal camera placements, and ensuring proper power and network connectivity, you can establish a robust surveillance system that offers enhanced security for your property.
Gathering Essential Components
Before you can begin installing wired security cameras, there are several essential components that you need to gather. These components will ensure that your security camera system functions properly and meets your specific requirements. In this section, we will discuss the different components you need to acquire, including cables, connectors, power supply, backup options, and additional equipment like a network video recorder (NVR).
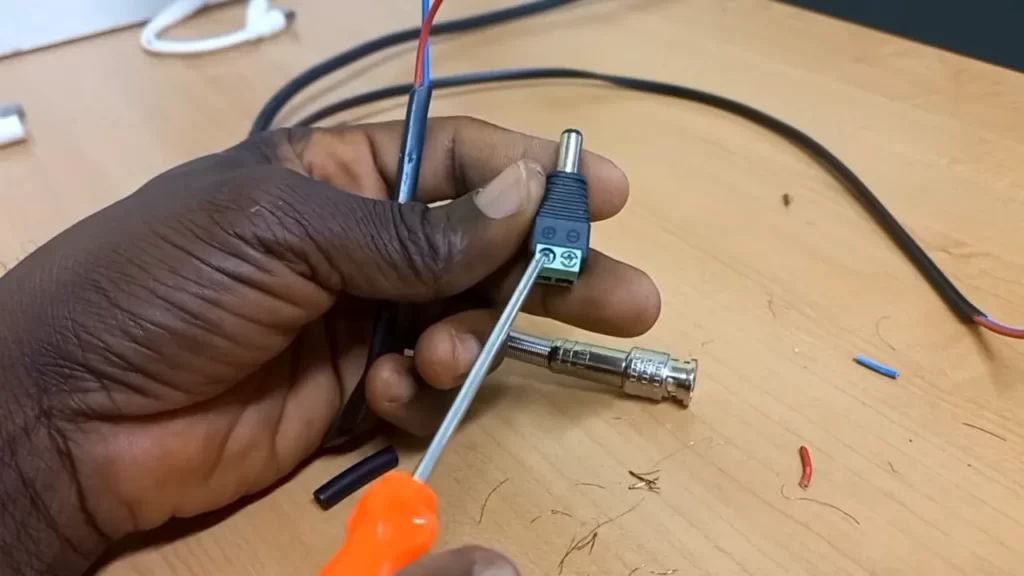
Acquiring the required cables and connectors
One of the first things you need to obtain for installing wired security cameras are the required cables and connectors. These cables serve as the backbone of your system, transmitting both power and data signals between your cameras and other devices.
To connect your cameras to the power supply and video recording equipment, you will need coaxial cables. Coaxial cables are widely used in security camera systems due to their durability and ability to transmit data over long distances. Make sure you choose high-quality coaxial cables with the appropriate length for each camera installation location.
In addition to coaxial cables, you may also need Ethernet cables if you plan to connect your security cameras to the internet or a local network. Ethernet cables are necessary for transmitting video data to a network video recorder (NVR) or other network-connected devices.
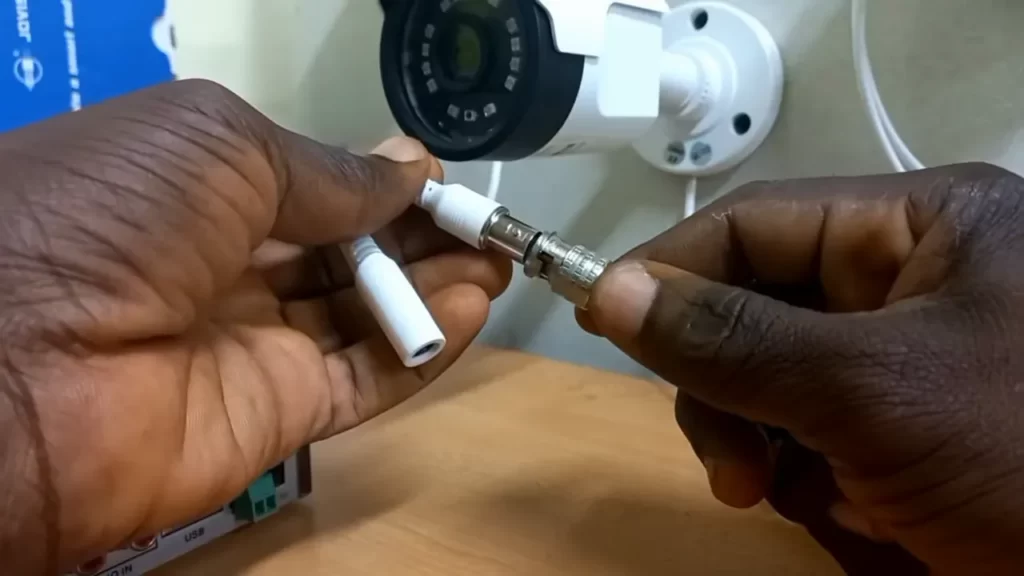
Don’t forget about the connectors! To ensure seamless connections between cables and devices, you will need BNC connectors for coaxial cables and RJ45 connectors for Ethernet cables. These connectors play a crucial role in maintaining signal integrity and preventing data loss or interference.
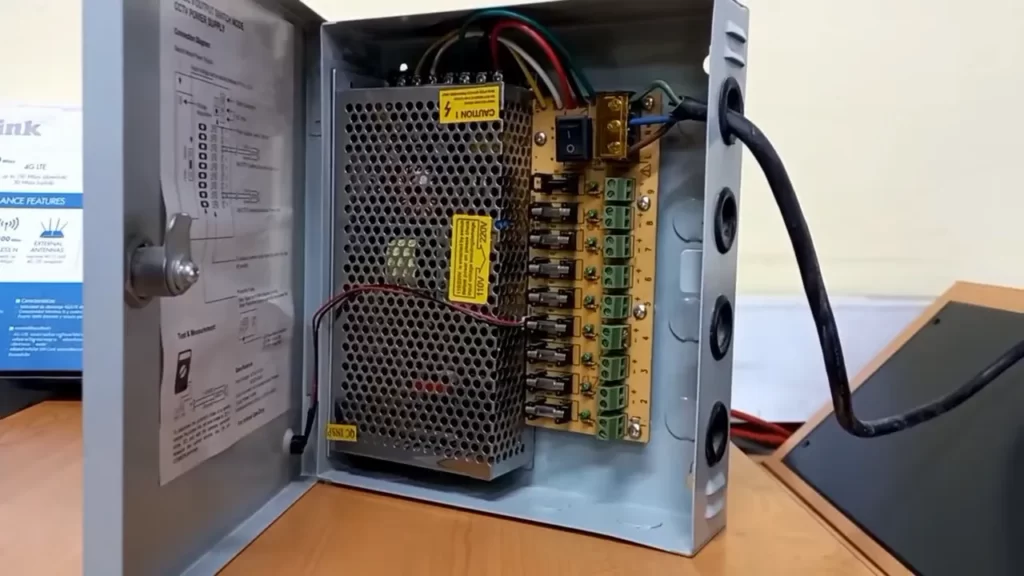
Obtaining a power supply and backup options
Next, you will need to obtain a reliable power supply for your wired security camera system. This will typically involve a power adapter or a power distribution box, depending on the number of cameras you have installed. Make sure to choose a power supply that matches the voltage and power requirements of your cameras and other connected devices.
For added security and peace of mind, it is advisable to consider backup power options. In the event of a power outage or failure, backup power sources like uninterruptible power supplies (UPS) or backup batteries can keep your security camera system running, ensuring uninterrupted surveillance and protection.
Checking for additional equipment such as a network video recorder (NVR)
Depending on your surveillance needs, you may require additional equipment like a network video recorder (NVR). An NVR serves as the central hub for storing and managing video footage from your security cameras. It offers advanced features such as remote access, motion detection, and easy video retrieval.
When choosing an NVR, make sure it is compatible with your security cameras and supports the number of channels you need. Additionally, consider the storage capacity of the NVR to ensure it can handle your recording requirements.
To summarize, gathering the essential components for installing wired security cameras involves acquiring the necessary cables and connectors, obtaining a power supply and backup options, and checking for additional equipment like an NVR. By having all these components in place, you will be well-prepared to set up a reliable and effective wired security camera system.
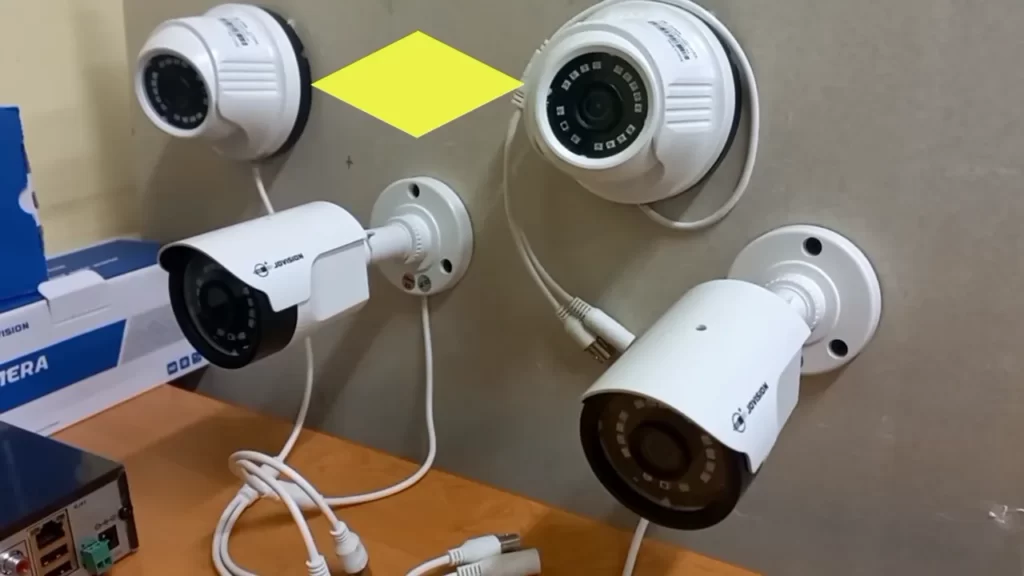
Mounting The Cameras
Mounting your wired security cameras properly is crucial to ensure optimal coverage and functionality. In this section, we will discuss the key aspects of mounting your cameras, including using the appropriate mounting hardware, positioning them at the desired angles and heights, and ensuring stability and proper alignment to capture the intended areas.
Using the appropriate mounting hardware for different surfaces
When it comes to mounting your wired security cameras, using the appropriate mounting hardware is essential for ensuring stability and durability. Different surfaces may require different types of mounting hardware, such as wall anchors, concrete screws, or pole mount brackets. Before proceeding with the installation, make sure to choose the right hardware based on the surface you will be mounting the cameras on.
Positioning the cameras at the desired angles and heights
Proper positioning of your security cameras is crucial for capturing the intended areas effectively. Each camera should be positioned at the desired angle and height to ensure maximum coverage and minimize blind spots. Consider the following factors when determining the ideal positioning:
- The area you want to monitor: Identify the areas that require surveillance and position the cameras accordingly.
- Line of sight: Ensure that the cameras have a clear line of sight to the areas you want to monitor. Avoid obstructions such as trees or walls that could obstruct the camera’s view.
- Camera field of view: Understand the field of view of each camera to position them optimally. Adjust the angle and height to cover the desired area while avoiding unnecessary overlap.
Ensuring stability and proper alignment to capture the intended areas
Once you have installed the cameras and positioned them at the desired angles and heights, it is crucial to ensure their stability and proper alignment. Here are some tips to achieve this:
- Secure mounting: Make sure that the cameras are securely mounted and tightly fastened to avoid any potential movement due to wind or vibrations.
- Aligning the cameras: Regularly check the alignment of the cameras to ensure they are capturing the intended areas. Adjust them if necessary to maintain proper coverage.
- Testing the functionality: Test the cameras after installation to ensure that they are capturing clear footage and functioning as expected. Make any necessary adjustments to improve the camera’s performance.
By following these guidelines for mounting your wired security cameras, you can ensure they are positioned correctly, stable, and aligned to capture the intended areas effectively. Remember to adhere to the manufacturer’s instructions and safety guidelines throughout the installation process.
Running The Cables
Once you have chosen the ideal location for your wired security cameras, it’s important to consider how to effectively run the cables. This crucial step ensures not only the functionality of your security system but also the aesthetics of your space. In this section, we will explore different cable routing options, including running the cables through walls, ceilings, or conduits. We will also discuss the importance of securing and protecting the cables to prevent damage or interference.
Choosing the most suitable cable routing options
When it comes to running the cables for your wired security cameras, it’s essential to choose the most suitable routing options. Consider factors such as the distance between the camera and the recording device, the nature of the environment, and the access points available. Here are a few options to consider:
- Running the cables through walls: This is a popular option that provides a clean and concealed look. It involves drilling holes in the walls and feeding the cables through. Use a fish tape or a cable pulling tool to make this process easier and avoid damaging the walls.
- Running the cables through ceilings: If your security cameras are installed on the ceiling, this may be the most practical route. Identify the cavities in the ceiling and use cable clips or cable hangers to secure the cables neatly along the way.
- Running the cables through conduits: Conduits are protective tubes that help organize and shield the cables from damage. This option is ideal for exposed areas where the cables are more susceptible to physical harm. Use appropriate connectors and fittings to connect the cables to the conduit system.
Securing and protecting the cables to prevent damage or interference
Once you have determined the most suitable cable routing option, it’s crucial to secure and protect the cables to ensure their longevity and functionality. Here are some steps you can take:
- Use cable clips or wire staples: Secure the cables along their designated route using cable clips or wire staples. This minimizes the risk of unnecessary movement and potential damage.
- Install cable protection devices: To further safeguard the cables from external factors, consider using cable protection devices such as cable raceways or conduit systems. These solutions add an extra layer of protection against physical damage or interference.
- Avoid sharp bends or twists: Ensure that the cables are not twisted or bent at sharp angles during installation. This prevents signal loss or damage to the cables’ internal structure, maintaining their integrity for optimal performance.
- Keep cables away from power sources: To minimize interference, keep the security camera cables away from electrical power sources. This helps to avoid electromagnetic interference that could potentially degrade the signal quality.
By carefully considering and implementing these steps, you can ensure that your wired security camera cables are effectively run, secured, and protected. This not only enhances the overall performance and lifespan of your security system but also ensures a clean and organized installation. Now that we’ve covered the essential aspect of running the cables, we can move onto the next crucial step in installing wired security cameras-
Connecting The Cameras And Nvr
Attaching the cables to the designated camera ports
Once you have mounted your wired security cameras in their desired locations, it’s time to connect them to the NVR (Network Video Recorder). The first step is to attach the cables to the designated camera ports on the NVR. Each camera will have its own specific port on the NVR, usually labeled with a number or a corresponding camera name. Make sure to match the camera with the correct port to ensure seamless connectivity and proper recording.
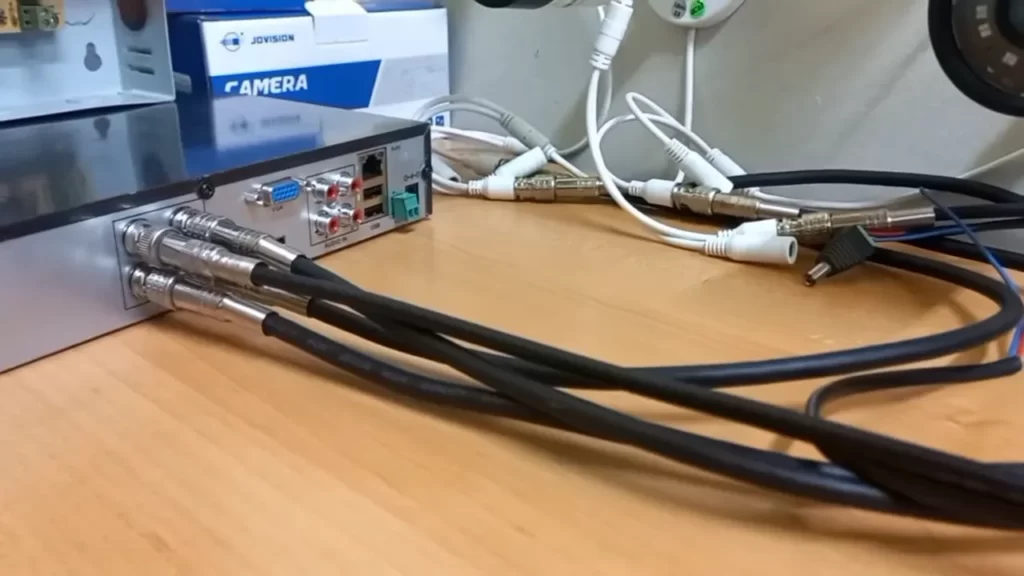
Connecting the other end of the cables to the NVR
With the camera ports on the NVR ready, you can now connect the other end of the cables to the NVR itself. The NVR typically has dedicated input ports for each camera, where you can plug in the cables securely. It’s essential to check the cable connectors and ensure they are securely connected to both the cameras and the NVR. This tight connection ensures a stable signal transmission and reliable video feed.
Verifying the signal strength and video feed on the NVR interface
Once all the cameras are connected to the NVR, it’s vital to verify the signal strength and video feed on the NVR interface. Access the NVR’s interface through a computer or a dedicated monitoring device. Navigate to the live view section where you should see a grid displaying all the connected cameras. Check each camera’s video feed to ensure it’s clear, crisp, and without any disruptions.
If you encounter any issues, double-check the connection of each camera and examine the cables for any damages. It’s also important to verify that the NVR is powered on and functioning correctly. Troubleshooting these potential issues early on can save you time and frustration in the long run.
By following these simple steps of attaching the cables to the designated camera ports, connecting the other end of the cables to the NVR, and verifying the signal strength and video feed on the NVR interface, you’ll have your wired security cameras up and running smoothly in no time.
Fine-Tuning Camera Settings
After successfully installing your wired security cameras, it’s time to fine-tune the settings to ensure optimal performance. Fine-tuning allows you to customize various aspects of your camera’s functionality, such as image quality, motion detection, and recording schedules. In this section, we will explore how to access the camera firmware or settings interface, as well as adjusting image quality, resolution, and other preferences. We will also cover configuring motion detection, recording schedules, and notifications, so let’s dive right in!
Accessing the Camera Firmware or Settings Interface
Accessing the camera firmware or settings interface is the first step towards fine-tuning your wired security camera. To access these settings:
- Ensure your computer or mobile device is connected to the same network as your camera.
- Locate the camera’s IP address by checking the user manual or using a network scanning tool.
- Open a web browser and enter the camera’s IP address in the address bar.
- You will be prompted to enter a username and password, which can again be found in the user manual or set during the initial setup process.
- Once logged in, you will have access to the camera’s firmware or settings interface, where you can make adjustments as needed.
Adjusting Image Quality, Resolution, and Other Preferences
Fine-tuning image quality, resolution, and other preferences can greatly enhance the performance of your wired security camera. To adjust these settings:
- Within the camera’s firmware or settings interface, locate the ‘Image’ or ‘Video’ settings.
- Here, you can adjust parameters like brightness, contrast, saturation, and sharpness to achieve the desired image quality.
- If available, you can also modify the resolution to improve clarity and detail.
- Experiment with different settings and regularly test the camera’s output to find the optimal configuration for your specific needs.
Configuring Motion Detection, Recording Schedules, and Notifications
Motion detection, recording schedules, and notifications are essential features of wired security cameras, allowing you to capture crucial footage and receive alerts when activity is detected. To configure these settings:
- Within the camera’s firmware or settings interface, locate the ‘Motion Detection’ or ‘Alarm’ settings.
- Enable motion detection and specify the areas you want the camera to monitor.
- Adjust sensitivity levels to avoid false alarms or ensure no movement goes unnoticed.
- Next, configure recording schedules to determine when the camera should start and stop recording based on your preferences.
- If supported by your camera, set up instant notifications via email or mobile app, ensuring you stay informed about any detected activity.
By fine-tuning these camera settings, you can maximize the effectiveness of your wired security cameras, providing your property with enhanced protection and peace of mind. Take the time to explore the various options available to you and regularly review and adjust these settings as needed to keep your security system operating at its best.
Testing And Troubleshooting
Once you have successfully installed your wired security cameras, it’s crucial to perform thorough testing and troubleshooting to ensure everything is functioning properly. This process involves verifying the camera feeds on multiple devices, confirming remote access and monitoring functionality, as well as troubleshooting common installation challenges and connectivity issues.
Verifying the camera feeds on multiple devices
After the installation, it’s essential to check whether the camera feeds are displaying correctly on different devices. This step allows you to ensure the cameras are capturing high-quality footage and delivering a clear picture. To verify the camera feeds, follow these steps:
- Access the camera’s live feed using the manufacturer’s mobile app on your smartphone or tablet.
- Check the video feed on a desktop or laptop computer using the manufacturer’s software or a web browser.
- Ensure the camera feeds are accessible and viewable without any issues on all devices tested.
Confirming remote access and monitoring functionality
One of the significant advantages of wired security cameras is the ability to remotely access and monitor your property. To confirm this functionality, follow these steps:
- Enable remote access on your camera system by configuring the necessary settings in the manufacturer’s mobile app or software.
- Connect your smartphone or tablet to a different network, such as your cellular data or a friend’s Wi-Fi, to simulate remote access.
- Launch the manufacturer’s mobile app and ensure you can access the camera feeds and perform necessary functions like live viewing, playback, and adjusting camera settings.
Troubleshooting common installation challenges and connectivity issues
Even with careful installation, you may encounter common challenges and connectivity issues. Here are some troubleshooting steps to address these problems:
- If the camera feeds are not displaying on any devices, check the power and network connections to ensure everything is securely connected.
- If you encounter connectivity issues, confirm that your wired network connections, such as Ethernet cables and switches, are functioning correctly.
- Verify that the camera firmware is up to date by checking the manufacturer’s website for any available updates. Apply the updates if necessary.
- If the remote access functionality is not working, double-check the network settings on your camera system and ensure port forwarding is configured correctly.
- If you encounter poor video quality, adjust the camera’s positioning and focus to optimize the image capture.
By following these testing and troubleshooting steps, you can ensure your wired security cameras are fully functional, providing you with peace of mind and reliable surveillance for your property.
Maintaining And Upgrading The System
Maintaining and Upgrading the System
Once you have successfully installed wired security cameras to protect your premises, it’s crucial to consistently maintain and upgrade your system to ensure its optimal performance. By regularly cleaning and maintaining camera lenses and housings, keeping firmware and software up to date, and regularly evaluating the need for additional cameras or expanding the system, you can effortlessly enhance the reliability and effectiveness of your security setup.
Regular cleaning and maintenance of camera lenses and housings
Regular cleaning and maintenance of your camera lenses and housings play a vital role in preserving the image quality and protecting your investment. Over time, dust, dirt, and debris can accumulate on the lenses and housings, potentially affecting the camera’s performance. To prevent this, follow these steps:
- Gently remove any loose debris or dust by using a soft brush or compressed air.
- Using a microfiber cloth or lens cleaning solution, carefully clean the lenses to remove any smudges or fingerprints.
- Regularly inspect the camera housings for signs of damage, such as cracks or loose fittings. If any issues are detected, it’s essential to address them promptly to ensure the camera’s longevity.
Keeping firmware and software up to date for optimal performance
To maximize the performance of your wired security cameras, it’s crucial to keep the firmware and software up to date. Manufacturers regularly release updates that not only address bugs and security vulnerabilities but also introduce new features and enhancements. To update your system, follow these steps:
- Visit the manufacturer’s website and navigate to the support or download section.
- Locate the appropriate firmware or software update for your specific camera model.
- Download the update onto a USB drive or the computer connected to the camera system.
- Access the camera settings menu and navigate to the firmware/software update section.
- Select the update file and follow the on-screen instructions to complete the installation.
Evaluating the need for additional cameras or expanding the system
Over time, your security needs may change, and it is essential to evaluate whether additional cameras are necessary or if expanding the system is required. By regularly assessing your surveillance needs, you can ensure that every blind spot is covered and guarantee comprehensive coverage. Consider the following factors when evaluating the need for additional cameras or system expansion:
- Review your property layout and identify areas that are not adequately monitored by existing cameras.
- Assess any recent security incidents or vulnerabilities that may indicate the need for additional coverage.
- Consider technological advancements and new features that may enhance your security system’s capabilities.
- Consult with security professionals who can provide expert advice and recommendations based on your specific requirements.
Maintaining and upgrading your wired security camera system is paramount in ensuring its longevity and effectiveness. By regularly cleaning and maintaining camera lenses and housings, keeping firmware and software up to date, and evaluating the need for additional cameras or expanding the system, you can stay ahead in safeguarding your property.
Frequently Asked Questions Of How To Install Wired Security Cameras
Can I Install Wired Security Cameras Myself?
Yes, you can install wired security cameras yourself. It is a straightforward process that doesn’t require professional expertise. Just follow the instructions provided by the manufacturer, and you’ll be able to set up the cameras easily.
How Hard Is It To Install A Wired Security Camera System?
Installing a wired security camera system is not too difficult. It requires basic technical knowledge and tools. Simply connect the cameras to a digital video recorder (DVR) using cables, and then connect the DVR to a monitor for viewing. It’s a simple and effective way to enhance your security.
How Do You Set Up A Wired Security Camera?
To set up a wired security camera: 1. Choose a suitable location for the camera. 2. Connect the camera to a power source. 3. Connect the camera to a monitor or DVR using the provided cables. 4. Adjust the camera’s position and focus.
5. Test the camera to ensure it’s working properly.
How Do Wired Security Cameras Get Power?
Wired security cameras get power through a power cable connected to an electrical outlet. They don’t rely on batteries, ensuring continuous operation.
How Do Wired Security Cameras Work?
Wired security cameras work by transmitting video signals through physical cables, which provide a stable connection and reliable footage.
Conclusion
To sum up, installing wired security cameras is a practical and effective way to protect your property. By following these step-by-step instructions, you can easily set up a reliable surveillance system. Remember to plan the camera placement, gather the necessary tools, and carefully connect the cables.
With the added security and peace of mind these cameras provide, you can rest assured knowing that your property is well-protected. Start installing your wired security cameras today and keep your loved ones and belongings safe.