To install a wireless rear view camera, follow these steps: connect the camera to the reversing lights for power, mount the camera on the rear of the vehicle, and sync the camera with the monitor. Now, let’s delve into the detailed process of installing a wireless rear view camera.
Installing a wireless rear view camera in your vehicle can greatly enhance your driving experience by providing a clear and convenient view of what’s behind you. Whether you’re parking or reversing, a wireless rear view camera eliminates blind spots and increases safety.
We will guide you through the steps of installing a wireless rear view camera in your vehicle. By the end, you’ll be able to enjoy the benefits of this helpful technology. So, let’s get started!
Understanding The Benefits Of Wireless Rear View Cameras
When it comes to road safety, having clear visibility of what’s happening behind your vehicle is crucial. Traditional rearview mirrors can often have blind spots, making it difficult to see approaching vehicles or pedestrians. This is where wireless rear view cameras come in. These state-of-the-art devices offer a range of benefits that enhance safety, eliminate blind spots, and make parking easier.
Enhancing safety on the road
One of the primary benefits of installing a wireless rear view camera is the improved safety it provides on the road. With a camera mounted at the back of your vehicle, you’ll have a clear and unobstructed view of everything happening behind you, allowing you to make better decisions while driving. This is particularly useful when changing lanes, merging into traffic, or reversing your vehicle. You can confidently navigate through tricky situations, minimizing the risk of accidents or collisions.
Eliminating blind spots
Traditional rearview mirrors have their limitations, and blind spots are one of them. These blind spots can be especially dangerous when trying to change lanes or maneuver in tight spaces. However, with a wireless rear view camera, you can eliminate these blind spots entirely. By providing a wide-angle view of the area behind your vehicle, the camera ensures that there are no unnoticed vehicles or obstacles. This gives you peace of mind, knowing that you have a complete view of your surroundings and can make informed decisions accordingly.
Making parking easier
Parking can be a challenging task, especially in crowded areas or tight spaces. Wireless rear view cameras make parking easier and stress-free. With real-time video feed on a display screen, you can accurately judge the distance between your vehicle and any obstacles. This makes parallel parking or maneuvering into a tight parking spot much more precise. You no longer have to rely solely on guesswork, reducing the chances of accidental dents, scratches, or collisions with other vehicles or objects.
In conclusion, wireless rear view cameras offer numerous benefits that enhance road safety, eliminate blind spots, and make parking easier. By providing a clear view of what’s happening behind your vehicle, these cameras enable you to drive with confidence and make informed decisions on the road. Don’t compromise on your safety – consider installing a wireless rear view camera for your vehicle today.
Choosing The Right Wireless Rear View Camera System
Installing a wireless rear view camera can greatly enhance your driving experience, providing you with a clear view of what’s happening behind your vehicle. When it comes to choosing the right wireless rear view camera system, there are several factors you need to consider. By evaluating camera resolution and quality, considering camera angles and coverage, and ensuring compatibility with your vehicle, you can find the perfect wireless rear view camera system that meets your needs.
Evaluating camera resolution and quality
One of the most important factors to consider when choosing a wireless rear view camera system is the camera resolution and quality. A high-resolution camera can provide you with a clearer and more detailed view of the surroundings. Look for cameras with at least 720p or higher resolution for optimal visibility. Additionally, consider the quality of the camera’s lens and image sensor, as these components play a crucial role in capturing sharp and accurate images. A camera with a wide dynamic range (WDR) feature can help provide clear images even in challenging lighting conditions.
Considering camera angles and coverage
Another crucial aspect to consider is the camera angles and coverage provided by the wireless rear view camera system. The camera should offer a wide field of view to capture a broader area behind your vehicle. A viewing angle of at least 120 degrees is recommended to ensure a comprehensive view. Consider cameras with adjustable angles to customize the view based on your vehicle’s height and rear visibility needs. Some systems also offer multiple camera options for additional coverage, such as rear, side, or even 360-degree views.
Ensuring compatibility with your vehicle
Before purchasing a wireless rear view camera system, it’s essential to ensure compatibility with your vehicle. Check the specifications and requirements provided by the manufacturer to determine if the system is suitable for your make and model. Consider aspects such as power source compatibility, mounting options, and any additional accessories needed for installation. Some systems may also require specific wiring or adapters, so be sure to verify that your vehicle supports these requirements.
By evaluating camera resolution and quality, considering camera angles and coverage, and ensuring compatibility with your vehicle, you can confidently choose the right wireless rear view camera system for your needs. Taking the time to select a high-quality system will provide you with reliable and clear visibility, enhancing your safety and driving experience.
Preparing For The Installation Process
If you want to enhance your driving experience and improve your safety on the road, installing a wireless rearview camera is a great idea. This handy device eliminates blind spots and allows you to see what’s happening behind your vehicle with ease. Before you begin the installation process, it’s essential to prepare adequately. This involves gathering the necessary tools and materials, familiarizing yourself with the camera system components, and locating the ideal mounting position.
Gathering the necessary tools and materials
Before you start installing the wireless rearview camera, make sure you have everything you need. Gather all the necessary tools and materials to ensure a smooth and hassle-free installation process. Here’s a list of the items you’ll require:
| Tools | Materials |
|---|---|
| Power drill | Rearview camera kit |
| Screwdriver set | Wireless video transmitter |
| Pliers | Wireless video receiver |
| Tape measure | Power cables |
| Wire stripper | Mounting brackets |
| Wire connectors | Antenna |
Ensure that all the tools and materials are within reach before you get started. This will save you time and prevent unnecessary interruptions during the installation process.
Familiarizing yourself with the camera system components
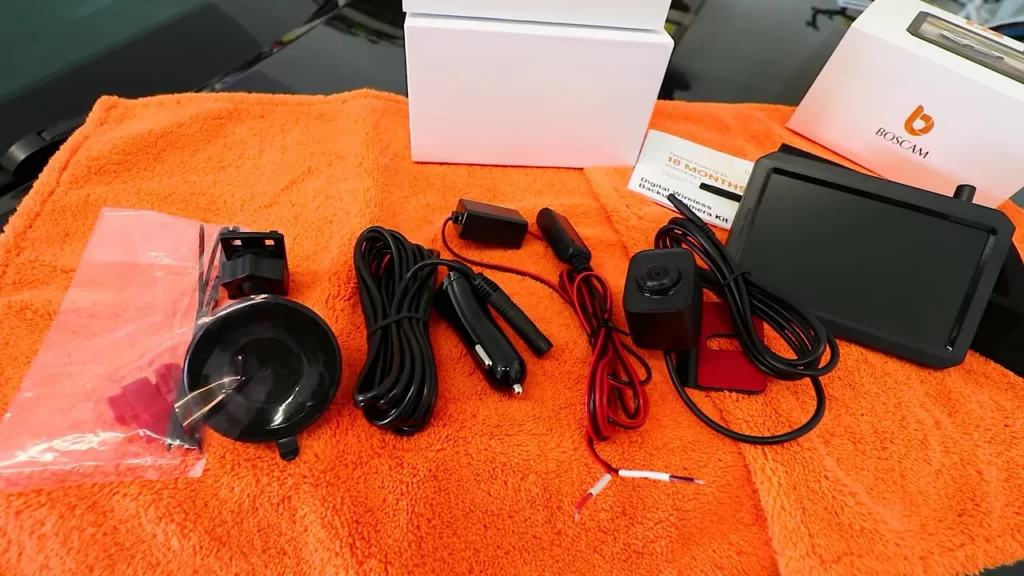
It is essential to have a clear understanding of the camera system components before proceeding with the installation. Familiarize yourself with the different parts to ensure a successful setup. A wireless rearview camera system typically consists of the following components:
- Camera: This is the main unit responsible for capturing the video feed from the rear of your vehicle.
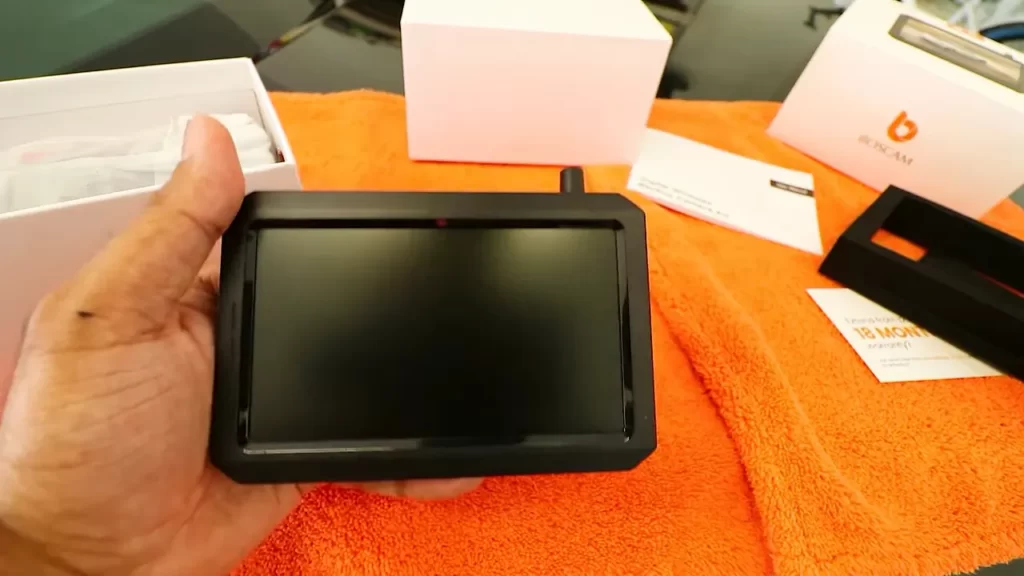
- Monitor: The monitor displays the video feed from the camera, allowing you to see what’s happening behind you.
- Transmitter: The wireless video transmitter sends the video signal from the camera to the receiver.
- Receiver: The wireless video receiver receives the video signal from the transmitter and displays it on the monitor.
- Power cables: These cables provide the necessary power supply for the camera and monitor.
By familiarizing yourself with these components, you’ll have a better understanding of how the camera system works and how to properly install it.
Locating the ideal mounting position
Choosing the right mounting position for your wireless rearview camera is crucial for optimal performance. Find the perfect spot on your vehicle to ensure clear visibility and maximum coverage. Consider the following factors when locating the mounting position:
- Camera angle: The camera should be positioned in such a way that it provides a clear view of the area behind your vehicle.
- Obstructions: Ensure that there are no obstructions, such as license plates, bumper stickers, or other accessories, blocking the camera’s view.
- Protection: Mount the camera in a location where it is protected from damage caused by weather conditions or accidental bumps.
Take your time to assess different mounting positions and determine the one that works best for your specific vehicle and needs. Once you’ve found the ideal spot, you’ll be ready to proceed with the installation.
Now that you have gathered the necessary tools and materials, familiarized yourself with the camera system components, and located the ideal mounting position, you are well-prepared for the wireless rearview camera installation process. In the next section, we will guide you through the step-by-step installation instructions, so you can start enjoying the benefits of this convenient and safety-enhancing device.
Step-By-Step Installation Guide For Wireless Rear View Cameras
If you’re considering installing a wireless rear view camera for your vehicle, you’ve come to the right place. In this step-by-step installation guide, we’ll walk you through the process from start to finish, ensuring that you can easily and successfully install your new wireless rear view camera. So, let’s get started!
Removing the license plate
The first step in installing a wireless rear view camera is removing the license plate. You’ll need to unscrew the screws that are holding the license plate in place. Once the screws are removed, carefully detach the license plate by pulling it away from the vehicle.
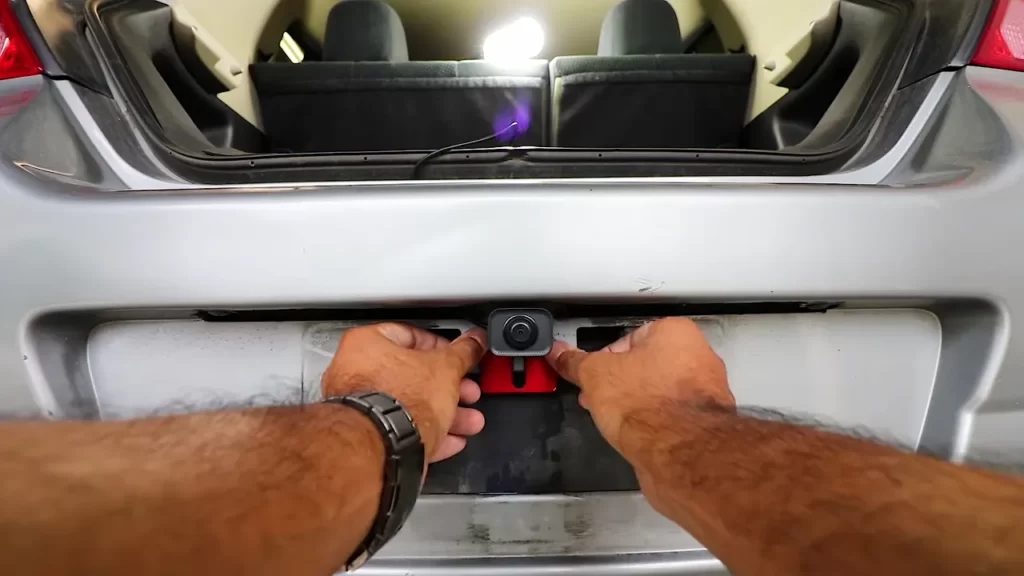
Installing the camera and transmitter
Now that you’ve removed the license plate, it’s time to install the camera and transmitter. Start by attaching the camera to the back of the license plate using the screws that came with the camera. Make sure that the camera is securely fastened to the license plate to ensure optimal performance.
Next, find a suitable location for the transmitter. This is typically located near the rear of the vehicle. Use the adhesive included with the transmitter to secure it in place, ensuring that it is positioned in a way that allows for a clear transmission to the display unit in the front of the vehicle.
Routing the necessary cables
Now that the camera and transmitter are installed, it’s time to route the necessary cables. Start by finding a pathway to route the cables from the rear of the vehicle to the front. This may require some creativity and patience, but it’s important to ensure that the cables are hidden and securely fastened.
Once you’ve determined the best route for the cables, carefully thread them through, taking care to avoid any sharp edges or moving parts. Use zip ties or cable clips to secure the cables along the pathway, keeping them neat and organized.
Connecting the camera to the power source
Now that the cables are in place, it’s time to connect the camera to the power source. Locate the power source you’ll be using for the camera, such as the vehicle’s reverse light. Connect the power cable from the camera to the power source, ensuring a secure and reliable connection.
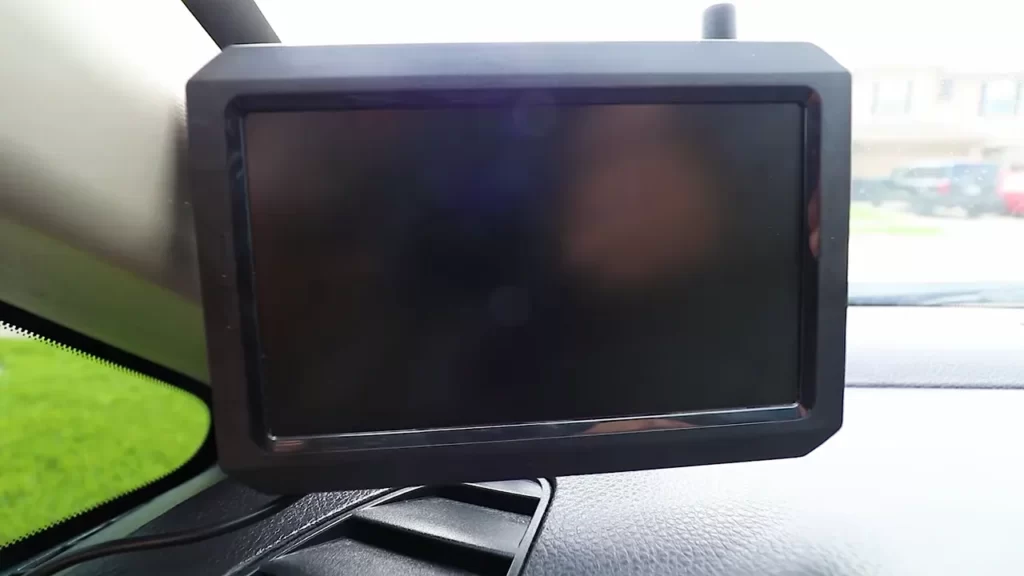
Testing the camera’s functionality
With the camera and cables all connected, it’s time to test the camera’s functionality. Start by turning on the display unit in the front of the vehicle and then engage the vehicle’s reverse gear. You should now be able to see a clear view of the rear of the vehicle on the display unit.
Take a moment to adjust the camera if necessary, ensuring that the viewing angle provides the best visibility. Test the camera’s functionality by moving the vehicle in reverse and checking the display for a clear and accurate representation of the rear view.
Congratulations, you have successfully installed your wireless rear view camera! Enjoy the added convenience and safety that this innovative device provides.
Troubleshooting Common Issues During Installation
Installing a wireless rear view camera can greatly enhance your driving experience by providing you with a clear view of what’s happening behind your vehicle. However, during the installation process, you may encounter some common issues that can affect the performance of the camera. In this section, we’ll discuss the troubleshooting steps for three common issues: poor video quality or signal interference, inconsistent camera operation, and incorrect camera alignment.
Poor video quality or signal interference
If you notice that the video quality is not up to par or if you experience signal interference, there are a few steps you can take to address the issue:
- Check the camera placement: Ensure that the camera is placed in a location where it has a clear line of sight to the monitor or receiver. Physical obstructions such as metal objects or tinted windows can interfere with the wireless signal.
- Inspect the antenna: Examine the camera’s antenna to ensure it is properly connected and not damaged. If necessary, adjust the position of the antenna to maximize signal strength.
- Change the channel: Sometimes, wireless devices in close proximity can interfere with each other’s signals. If you’re experiencing interference, try changing the channel on both the camera and the monitor/receiver to a less congested frequency.
- Eliminate potential sources of interference: Other wireless devices or electronics in your vehicle, such as Bluetooth devices or power inverters, can interfere with the camera’s signal. Try turning off or moving these devices away from the camera to see if it improves the video quality.
- Upgrade to a higher-performance camera: If all else fails, consider upgrading to a higher-quality wireless rear view camera that is designed to minimize signal interference and provide superior video quality.
Inconsistent camera operation

Dealing with inconsistent camera operation? Here are some troubleshooting tips to help you resolve this issue:
- Check the power supply: Ensure that the camera is receiving a stable power supply. Loose connections or inadequate power can cause the camera to operate erratically. Double-check the wiring connections and consider using a dedicated power source for the camera.
- Inspect the camera’s cables: Carefully examine the cables connecting the camera to the power supply and the monitor/receiver. Look for any signs of damage or wear, and replace them if necessary.
- Reset the camera: Some cameras have a reset button that can be used to restore the default settings. Press and hold the reset button for a few seconds to see if it helps resolve the issue.
- Update the camera firmware: If the camera’s firmware is outdated, it could result in inconsistent performance. Visit the manufacturer’s website to check for any available firmware updates and follow the instructions to update the camera.
- Consult the manufacturer: If you have tried all the troubleshooting steps and the camera still doesn’t function properly, it may be a hardware issue. Reach out to the camera’s manufacturer for further assistance and possible warranty options.
Incorrect camera alignment
Proper alignment is crucial for optimal performance of the rear view camera. If you’re facing alignment issues, here’s what you can do:
- Adjust the camera angle: Ensure that the camera is angled correctly to capture the desired view behind your vehicle. Most cameras have adjustable brackets or swivel mounts that allow you to fine-tune the angle.
- Use guidelines or markers: To assist with alignment, some rear view cameras provide on-screen guidelines or markers. These guides can help you align the camera vertically and horizontally to achieve accurate positioning.
- Check the display settings: If the camera’s alignment appears skewed on the monitor or receiver, adjust the display settings to ensure that the image is properly aligned and centered.
- Reposition the camera: If you’ve exhausted all other options and the camera alignment is still off, consider repositioning the camera to a different location that provides better visibility and alignment.
By following the troubleshooting steps outlined above, you’ll be able to address common issues that may arise during the installation of a wireless rear view camera. Remember to refer to the camera’s user manual for specific instructions and recommendations from the manufacturer. A properly installed and functioning camera will enhance your driving safety and peace of mind.
Maintaining And Extending The Lifespan Of Your Wireless Rear View Camera
Installing a wireless rear view camera in your vehicle can greatly enhance your driving experience, providing you with a clear view of what’s happening behind you. However, simply installing the camera isn’t enough. To ensure its longevity and optimal performance, regular maintenance and protective measures are essential. In this article, we will guide you through some crucial steps to maintain and extend the lifespan of your wireless rear view camera.
Regular Cleaning and Maintenance Practices
Regular cleaning and maintenance practices are paramount for the upkeep of your wireless rear view camera. Maintaining a clean lens ensures clear images and prevents distortion. To clean the camera, follow these simple steps:
- Gently remove any dirt or debris from the lens using a soft, lint-free cloth.
- Dampen another cloth with mild soapy water and carefully wipe the lens in circular motions.
- Wipe the lens dry with a clean, dry cloth.
Additionally, keep an eye out for any loose connections or wiring issues. Regularly inspect the camera’s mounting bracket and ensure it remains secure. If you encounter any problems, tighten the connections or seek professional assistance.
Protecting the Camera from Harsh Weather Conditions
Exposure to harsh weather conditions can potentially damage your wireless rear view camera. To safeguard it from the elements, consider these protective measures:
- Install a camera cover or housing to shield it from rain, snow, and extreme temperatures.
- During winter, remove any ice buildup on the camera or cover before use.
- When not in use, park your vehicle in a sheltered area or use a car cover to provide an extra layer of protection.
Implementing these measures will ensure that your camera remains functional and durable, even in unfavorable weather conditions.
Upgrading Firmware and Software as Needed
Regularly updating the firmware and software of your wireless rear view camera is crucial for optimal performance. Manufacturers often release updates to improve functionality and address any bugs or issues. Follow these steps to upgrade your camera’s firmware and software:
- Visit the manufacturer’s website and locate the support or downloads section.
- Download the latest firmware and software update specific to your camera model.
- Follow the provided instructions to install the update onto your camera.
By staying up to date with the latest firmware and software, you can enjoy enhanced features and increased compatibility with your wireless rear view camera.
Remember, proper maintenance and protection are key to extending the lifespan of your wireless rear view camera. Regularly clean the lens, protect it from harsh weather conditions, and upgrade the firmware and software as needed. By taking these measures, your camera will continue to provide you with clear and reliable rear-view footage, ensuring your safety on the road.
Exploring Additional Features And Accessories For Wireless Rear View Cameras
In this section, we will delve into the exciting world of additional features and accessories for wireless rear view cameras. These innovative add-ons enhance the functionality and convenience of your rear view camera, making it an indispensable tool for safe and efficient driving.
Night Vision Capabilities
One of the most important features to consider when choosing a wireless rear view camera is its night vision capabilities. Driving in low light conditions or during the night can be challenging, but with a camera equipped with night vision technology, you can navigate with confidence. These cameras use infrared LEDs to provide a clear and sharp image even in complete darkness. With night vision capabilities, you can confidently reverse and park your vehicle without worrying about obstacles that may be hidden from view.
Integration with Mobile Devices and GPS Systems
Wireless rear view cameras that can be integrated with mobile devices and GPS systems offer an unrivaled level of convenience and connectivity. By connecting your camera to your smartphone or tablet, you can easily view the live feed from your rear view camera, eliminating the need for a separate screen. Additionally, some cameras can be synced with GPS systems, allowing you to view your vehicle’s rear view footage alongside your navigation instructions. This seamless integration ensures that you stay informed and aware of your surroundings at all times.
Wireless Backup Camera Kits for Trucks and Larger Vehicles
For owners of trucks and larger vehicles, wireless backup camera kits specifically designed for these vehicles are an excellent investment. These kits often include a heavy-duty camera with a wider field of view, ensuring that you have a clear and comprehensive view of your surroundings. The wireless feature eliminates the need for complex wiring installations, making the installation process quick and hassle-free. With a wireless backup camera kit, you can confidently maneuver your truck or large vehicle, ensuring the safety of yourself, your passengers, and those around you.
Frequently Asked Questions For How To Install Wireless Rear View Camera
How Do Wireless Backup Cameras Get Power?
Wireless backup cameras are powered by their own built-in battery or receive power from the vehicle’s electrical system.
Do I Need Wifi For Wireless Backup Camera?
No, wifi is not required for a wireless backup camera to function. It uses its own wireless signal to transmit video from the camera to the monitor, providing a clear view of what’s behind your vehicle.
Do Wireless Backup Cameras Work Well?
Yes, wireless backup cameras work well. They provide convenient and effective visual assistance while reversing your vehicle. They eliminate blind spots and enhance safety. With easy installation and no wiring hassle, they are a great addition to any car.
How Does Wireless Rear View Camera Work?
Wireless rear view cameras work by transmitting video signals from the camera mounted on the back of a vehicle to the display screen in the front. The camera captures the view behind the vehicle, providing real-time images to assist with parking, reversing, and enhancing safety.
Q: How Much Does It Cost To Install A Wireless Rear View Camera?
A: The cost of installing a wireless rear view camera typically ranges from $100 to $300, depending on the complexity of the installation.
Conclusion
Installing a wireless rear view camera can greatly enhance your driving experience and increase safety on the road. With the step-by-step guide provided in this blog post, you now have the knowledge and confidence to install your own camera system.
Remember to carefully follow the instructions, check for compatibility with your vehicle, and enjoy the benefits of improved visibility and peace of mind while driving. Happy installing!