To install a doorbell camera with an existing doorbell, follow these steps: (120 words) Installing a doorbell camera can enhance your home security by providing you with real-time video footage of your doorstep. If you already have a doorbell installed, incorporating a camera into it is relatively simple.
Begin by turning off the power supply to your existing doorbell. Next, detach the cover and unscrew the doorbell from the mounting bracket. Connect the wires from the existing doorbell to the corresponding wires on the camera unit, ensuring a secure connection.
Mount the camera in the desired location and reinstall the cover. Finally, restore power and test the camera to ensure it is working correctly. With these steps, you can easily install a doorbell camera alongside your existing doorbell.
Before You Begin
If you’re looking to enhance the security and convenience of your home, installing a doorbell camera is a great move. Not only does it allow you to see who’s at your door, but it also gives you peace of mind knowing that you can monitor your property even when you’re not home. Before you begin the installation process, there are a couple of important things to keep in mind. Familiarizing yourself with your existing doorbell system and checking its compatibility with a camera add-on are crucial steps. Additionally, it’s essential to gather all the necessary tools and equipment needed for the installation. Let’s go over these steps in more detail.
Gather necessary tools and equipment
Before you start installing a doorbell camera, make sure you have all the necessary tools and equipment nearby. This will prevent interruptions and ensure a smooth installation process. Here’s a list of tools you’ll likely need:
| Tools | Equipment |
|---|---|
| Screwdriver (usually Phillips head) | Power drill (if necessary for mounting) |
| Electric drill with a masonry bit (if drilling into brick or concrete) | Wire stripper |
| Wire nuts | Level |
| Electrical tape | Mounting hardware |
| User manual of the doorbell camera |
Familiarize yourself with your existing doorbell system
Before attempting to install a doorbell camera, it’s important to familiarize yourself with your existing doorbell system. This will help you understand how it works and make the installation process easier. Take note of the type of doorbell you have – wireless or wired – as this will determine the steps you need to follow.
Check if your doorbell is compatible with a camera add-on
Not all doorbells are compatible with camera add-ons, so it’s crucial to check the compatibility before proceeding. Refer to your doorbell’s user manual or consult the manufacturer’s website to find out if a camera add-on is available and compatible with your specific model. If your doorbell is not compatible, you may need to consider purchasing a new doorbell that supports a camera integration.
By gathering the necessary tools, familiarizing yourself with your existing doorbell system, and checking compatibility, you’re now ready to install a doorbell camera. Follow the next steps in our detailed guide to ensure a successful installation.
Step 1: Assessing Compatibility
Before you dive into the installation process, it’s crucial to assess whether your existing doorbell system is compatible with a camera add-on. This step will help you determine if your doorbell system can support a camera add-on, whether your Wi-Fi signal is strong enough, and if your existing doorbell meets power requirements. Let’s break down each aspect one by one.
Determine if your doorbell system can support a camera add-on
The first thing you should do is check if your current doorbell system has the capability to support a camera add-on. Not all doorbell models are designed to work with a camera, so it’s essential to do some research before proceeding further. Consult your doorbell’s user manual or contact the manufacturer to confirm if a camera can be added to your specific model.
Check if your Wi-Fi signal is strong enough
A reliable Wi-Fi signal is crucial for the proper functioning of a doorbell camera. To determine if your Wi-Fi signal is strong enough, consider the following:
- Place your smartphone or tablet near your doorbell and check the signal strength. Ensure it is consistently strong, with minimal to no dropouts.
- If you notice weak signal strength or frequent dropouts, try moving your wireless router closer to your doorbell or investing in a Wi-Fi range extender.
- Keep in mind that a strong and stable Wi-Fi connection is necessary for seamless live streaming and accessing the camera’s features and settings.
Ensure your existing doorbell meets power requirements
Another important aspect of compatibility is ensuring that your existing doorbell meets the power requirements for installing a doorbell camera. Some doorbell cameras require a specific voltage or power source, so it’s crucial to verify if your current setup aligns with the camera’s requirements.
If you are unsure about the power requirements or need assistance, consult a professional electrician or reach out to the camera manufacturer for guidance. Installing a doorbell camera with incorrect power requirements could lead to malfunctions or even damage the camera and your doorbell system.
By following these compatibility guidelines, you’ll be on the right track to install a doorbell camera seamlessly with your existing doorbell. Assessing compatibility at the beginning will save you time and ensure a hassle-free installation process.
Step 2: Purchasing The Right Doorbell Camera
Now that you have a good understanding of the basic installation process for a doorbell camera with an existing doorbell, it’s time to move on to the next important step: Purchasing the right doorbell camera. With so many options available in the market, it’s essential to do your research and choose a doorbell camera that meets your specific needs.
Research and Compare Doorbell Camera Options
When it comes to choosing a doorbell camera, it’s important to research and compare different options. Look for cameras that are known for their high-quality video footage, as this will ensure that you can clearly see who is at your door. A doorbell camera with at least 1080p resolution would be ideal to capture clear and detailed images.
Consider the brand reputation and reviews from other customers to gauge the reliability and overall quality of the doorbell camera. Look for models with positive feedback regarding durability and performance. Choosing a reputable brand can give you peace of mind knowing that you are investing in a reliable product.
Consider Features such as Video Quality and Motion Detection
The video quality of the doorbell camera is a crucial factor to consider. A doorbell camera with high-definition video will provide a clear and accurate picture of any visitors at your doorstep. This will enable you to easily identify people and objects in the footage. Look for cameras that have night vision capability, ensuring that you can see clearly even in low light conditions.
Motion detection is another important feature to consider. This allows the doorbell camera to detect any movement near your front door and send you an alert on your smartphone or tablet. This way, you’ll be immediately notified if someone is approaching your home, even if they don’t ring the doorbell. Look for cameras with adjustable motion sensitivity, so you can customize the level of sensitivity according to your preferences.
Check Compatibility with Your Existing Doorbell System
Before finalizing your purchase, ensure that the doorbell camera you choose is compatible with your existing doorbell system. Check the specifications of the camera and make sure it is compatible with the voltage and wiring setup of your current doorbell system. Some doorbell cameras may require a transformer upgrade to function properly. It’s crucial to ensure compatibility to avoid any issues during installation and to make the most of the camera’s features.
In conclusion, choosing the right doorbell camera is a crucial step in the installation process. Research and compare different options, considering factors such as video quality, motion detection, and compatibility with your existing doorbell system. By making an informed decision, you can enjoy the benefits of a reliable and effective doorbell camera system for enhanced security and convenience.
Step 3: Preparing For Installation
Turn off the power to your existing doorbell
Before beginning the installation process, it is crucial to ensure your safety by turning off the power to your existing doorbell. This will prevent any accidental electric shocks or damage to the equipment. To do this, locate the circuit breaker or fuse box in your home and switch off the power supply to the doorbell.
Remove the cover plate from your existing doorbell
Once the power is turned off, the next step is to remove the cover plate from your existing doorbell. To do this, use a screwdriver to carefully unscrew the screws that hold the cover plate in place. Keep these screws in a safe place as you will need them later.
Take a photo of the existing wiring setup for reference
Now that the cover plate is removed, it is essential to take a photo of the existing wiring setup for future reference. This will help you accurately connect the new doorbell camera to the existing wiring later on. Make sure the photo captures all the wires and their connections clearly, so you can easily refer to it during the installation process.
By following these simple preparation steps, you are now ready to move on to the next stage of the installation process. Ensuring the power is turned off, removing the cover plate, and taking a photo of the existing wiring setup will help make the installation process smoother and more efficient.
Step 4: Disconnecting The Old Doorbell
Step 4: Disconnect the wires from the existing doorbell
Before you can remove the old doorbell and install your new doorbell camera, you need to disconnect the wires from the existing doorbell. Follow these simple steps to safely disconnect the old doorbell:
- Locate the main power source for the doorbell. This is typically located in the electrical box or junction box near the doorbell.
- Using a voltage tester, ensure that the power is turned off to the doorbell. This is an important safety precaution to prevent any electrical accidents.
- Once you have confirmed that the power is off, carefully remove the cover of the existing doorbell to expose the wiring.
- Identify the wires connected to the doorbell. Typically, there will be two wires – one labeled “front” and the other labeled “transformer”.
- Gently loosen the wire nuts or screws connecting the wires to the doorbell and carefully remove the wires.
- For future reference, it’s a good idea to label each wire with its corresponding label (“front” or “transformer”) before disconnecting them.
By following these steps, you will safely disconnect the wires from your existing doorbell, preparing it for removal and the installation of your new doorbell camera.
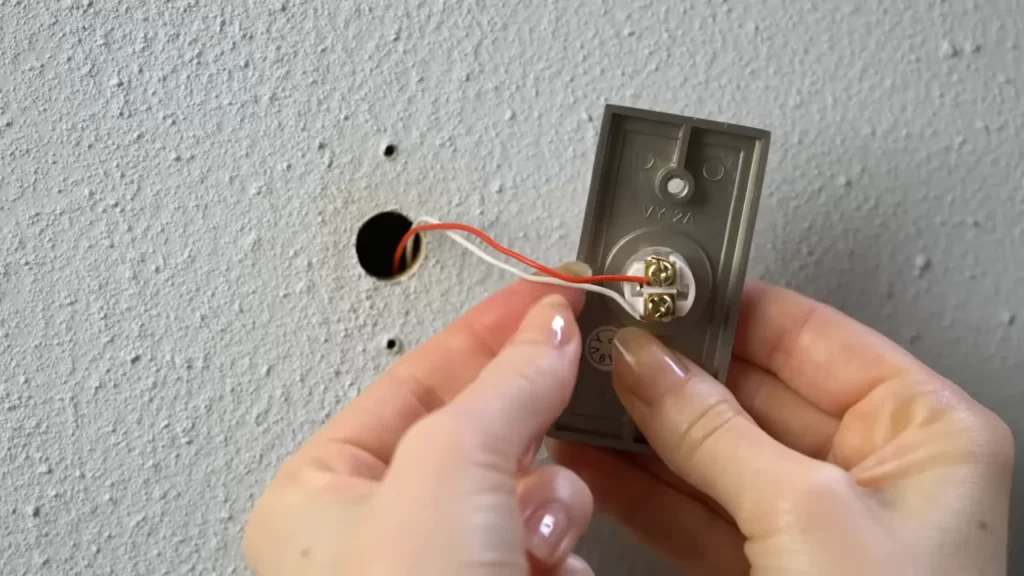
Remove the old doorbell from the wall
Now that you have disconnected the wires, it’s time to remove the old doorbell from the wall. Follow these steps to complete this process:
- Use a screwdriver to remove the mounting screws that are securing the doorbell to the wall.
- Gently pull the old doorbell away from the wall to expose the mounting bracket or backplate.
- Inspect the wall for any damage or holes left behind by the old doorbell. If necessary, fill these in with spackling compound and sand them smooth.
With the old doorbell removed and the wall prepped, you are now ready to proceed with installing your new doorbell camera.
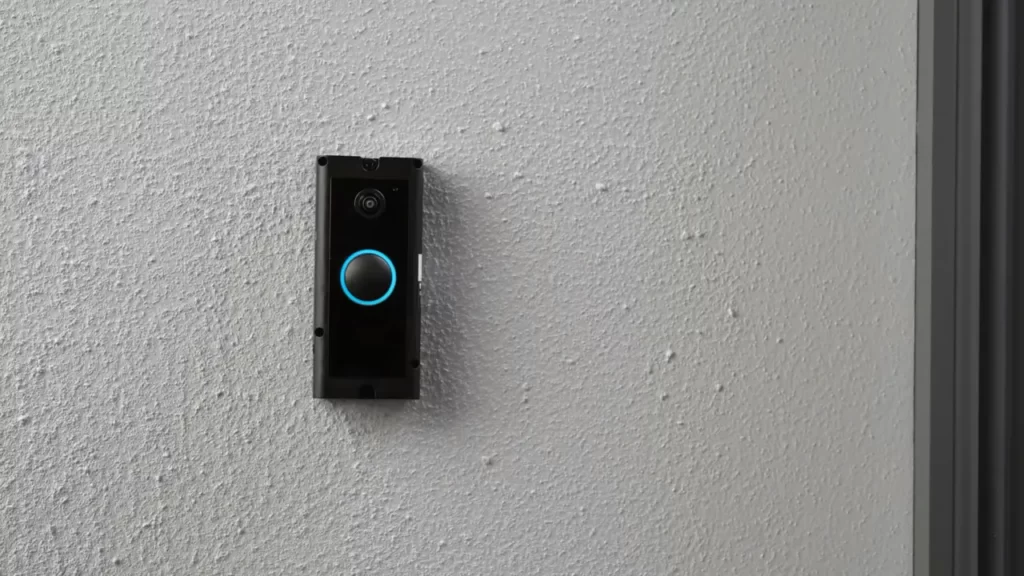
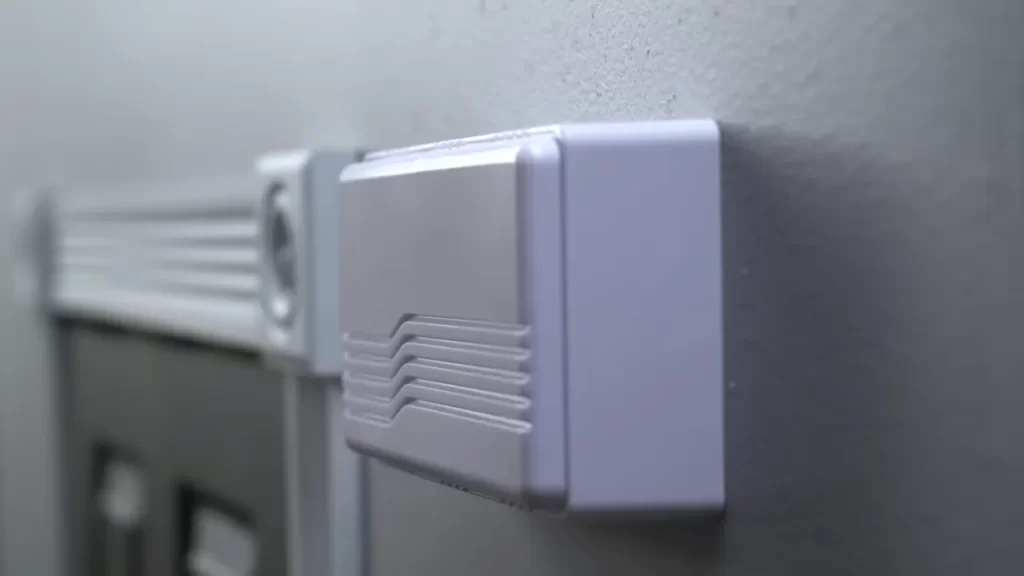
Step 5: Installing The Doorbell Camera
After successfully completing the previous steps of preparing the mounting bracket and connecting the wires, it’s time to move on to the final stage of the installation process – attaching the doorbell camera. This step ensures that your doorbell camera is securely mounted and ready to capture every moment around your doorstep. To simplify the process, we’ve broken it down into three easy sub-steps.
Attach the mounting bracket to the wall
The first step in installing your doorbell camera is to attach the mounting bracket to the desired location on your wall. Using the provided screws and a screwdriver, position the bracket horizontally or vertically, depending on your preference. Make sure it is fixed firmly and level for optimal performance. This bracket acts as the foundation for your doorbell camera, providing stability and support.
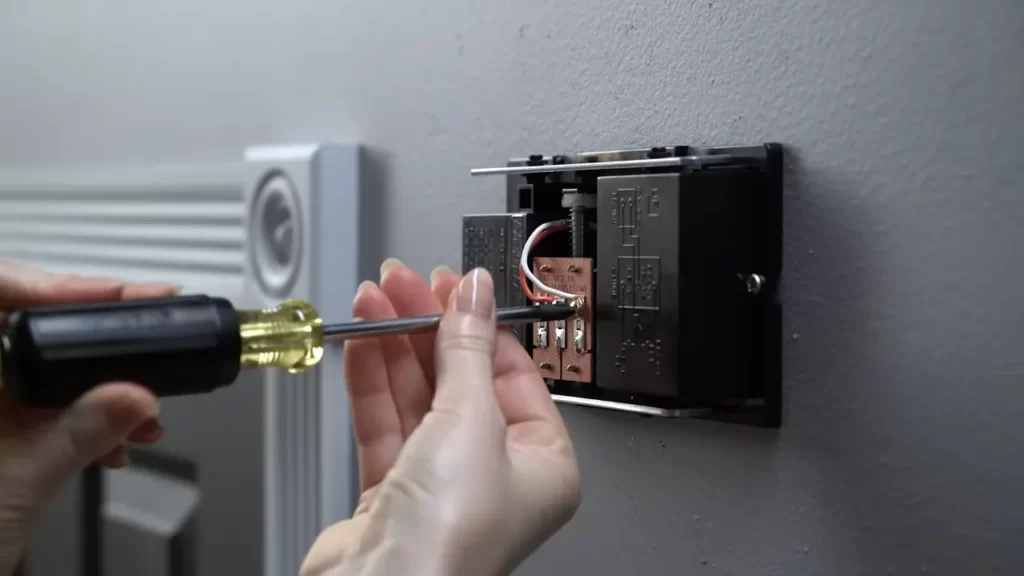
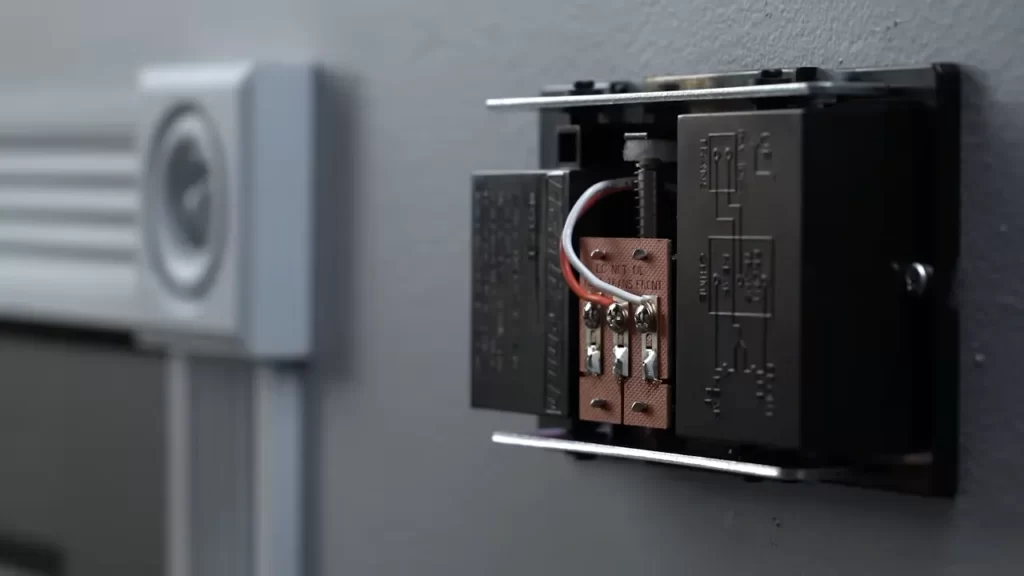
Connect the wires from the existing doorbell to the new camera
Now that the mounting bracket is securely in place, it’s time to connect the wires from your existing doorbell to the new camera. This will enable the doorbell camera to receive power and function properly. To do this, match the corresponding wires from your doorbell camera to the wires from your existing doorbell. Securely connect them by twisting the positive (+) wires together and the negative (-) wires together, ensuring a tight connection. Use electrical tape to insulate the exposed wires, providing an extra layer of protection.
Attach the doorbell camera to the mounting bracket
With the wires successfully connected, it’s time to attach the doorbell camera to the mounting bracket. Gently slide the camera unit into the bracket until it clicks into place. Ensure that it is firmly secured and aligned properly for optimal performance. Double-check that all the connections are secure and that the camera is ready to capture high-quality footage.
Step 6: Setting Up The Doorbell Camera
Follow the manufacturer’s instructions for device setup
Once you have mounted the doorbell camera in its desired location and connected it to your existing doorbell wiring, it’s time to set up the camera itself. Every doorbell camera brand may have slightly different setup instructions, so it is important to carefully read and follow the manufacturer’s guidelines. In most cases, the setup process involves downloading a mobile app specific to your doorbell camera brand and creating an account. Make sure to enter accurate information during the account creation process.
Connect the camera to your Wi-Fi network
To ensure seamless functionality, your doorbell camera needs to be connected to your Wi-Fi network. Open the mobile app you previously downloaded and follow the on-screen prompts to connect the camera to your Wi-Fi network. You will typically be asked to select your network from a list of available options and provide the network password. Once you have successfully connected the camera to your Wi-Fi, it will establish a stable and reliable connection.
Adjust camera settings, such as motion sensitivity and notifications
After the camera is connected to your Wi-Fi network, it’s important to customize the camera settings according to your preferences. Open the mobile app and navigate to the settings section specifically designated for your doorbell camera. Here, you will find options to adjust various settings, such as motion sensitivity, notification preferences, and other camera features. Take the time to fine-tune these settings to optimize the performance of your doorbell camera and ensure it meets your specific requirements. To adjust the motion sensitivity, you may be presented with a range of sensitivity levels. It is advisable to start with a moderate sensitivity and make adjustments based on your needs. This way, you can avoid excessive false alarms triggered by slight movements or wind. Additionally, within the notification settings, you can specify how and when you receive alerts for any detected motion or doorbell rings. Some cameras allow you to differentiate between different types of notifications, such as distinguishing between a package delivery and a regular visitor. By personalizing these settings, you can enhance the overall functionality and usefulness of your doorbell camera. Don’t hesitate to experiment with different configurations until you find the perfect balance between reliable notifications and avoiding unnecessary disturbance. In conclusion, setting up your doorbell camera is an important step in maximizing its effectiveness. By following the manufacturer’s instructions, connecting it to your Wi-Fi network, and adjusting the camera settings to your liking, you can ensure that your doorbell camera is ready to provide you with peace of mind and enhanced security.
Step 7: Testing And Troubleshooting
Once you have successfully installed the doorbell camera with your existing doorbell, it’s time to test its functionality and troubleshoot any potential issues. Follow these steps to ensure everything is in working order.
1. Turn on the power to the doorbell system
To begin testing, make sure the power to your doorbell system is turned on. Locate the circuit breaker that controls the doorbell’s electrical supply and ensure it is in the “on” position. This step is crucial as it allows the camera to receive power and function properly.
2. Test the functionality of the doorbell camera
Now that the power is on, it’s time to test the doorbell camera. Here’s how:
- Stand in front of your doorbell camera and press the doorbell button. You should hear a chime sound, indicating that the camera is connected and working.
- Wait for a few seconds and check your smartphone or tablet, where you have installed the accompanying app for the doorbell camera. The app should display a live video feed from the camera, allowing you to see who is at your door.
- In the app, try initiating a two-way audio communication with the person at your door by speaking into your device’s microphone. The audio should be clear and without any distortions.
- Test the motion detection feature by moving around in front of the camera. The app should notify you of any detected motion and record a video clip if you have that setting enabled.
If all the above tests are successful, congratulations! Your doorbell camera is functioning as intended.
3. Troubleshoot common installation issues, if necessary
If you encounter any problems during testing, here are some common installation issues and troubleshooting steps you can take:
| Issue | Troubleshooting Steps |
|---|---|
| The doorbell camera does not turn on | Check if the power supply to the doorbell is properly connected.Verify that the doorbell camera wiring is correctly installed and securely connected.Inspect the wiring for any damage or loose connections. |
| No video or audio feed in the app | Ensure that your smartphone or tablet is connected to the same Wi-Fi network as the doorbell camera.Confirm that the app is updated to the latest version.Restart your smartphone or tablet and relaunch the app. |
| Poor video or audio quality | Check your internet connection speed. A slow connection can affect video and audio quality.Ensure that the camera lens is clean and free from dirt or smudges.Adjust the camera’s angle or position to optimize the view and audio capture. |
If troubleshooting the issues yourself doesn’t solve the problem, it is recommended to reach out to the manufacturer’s customer support for further assistance. They will have the expertise to guide you through specific troubleshooting steps or provide necessary replacements if needed.
Remember, testing and troubleshooting your newly installed doorbell camera ensures that it is fully functional and ready to enhance the security of your home.
Step 8: Maintaining And Upgrading Your Doorbell Camera
Now that you have successfully installed your doorbell camera, it’s important to ensure its optimal performance by regularly maintaining and upgrading it. By following these simple steps, you can keep your doorbell camera in top-notch condition and benefit from the latest features and improvements it has to offer.
Clean the camera lens regularly for optimal performance
One of the most crucial aspects of maintaining your doorbell camera is to clean the camera lens regularly. Over time, dirt, dust, and debris can accumulate on the lens, affecting the quality of your video feed. To clean the camera lens, follow these easy steps:
- Gently remove the camera cover by following the manufacturer’s instructions.
- Using a microfiber cloth or a lens cleaning solution, carefully wipe the lens in a circular motion to remove any smudges or fingerprints.
- Once the lens is clean, reattach the camera cover securely.
By keeping the camera lens clean, you ensure that your doorbell camera captures clear and crisp video footage, enhancing the overall security of your home.
Keep the firmware of your doorbell camera up to date
Regularly updating the firmware of your doorbell camera is essential to maintain its functionality and security. Manufacturers often release firmware updates to address any bugs or vulnerabilities and to introduce new features and enhancements. To keep your doorbell camera’s firmware up to date, follow these steps:
- Check the manufacturer’s website or app for firmware updates.
- Download the latest firmware version for your specific doorbell camera model.
- Follow the manufacturer’s instructions to install the firmware update on your device.
By keeping your doorbell camera’s firmware up to date, you can ensure that it is equipped with the latest security patches and performance improvements, enhancing its overall functionality.
Explore additional features and upgrades available for your doorbell camera
Your doorbell camera may come with additional features and upgrades that you can explore to enhance its functionality. These features can vary from motion detection settings to integration with smart home devices. To explore additional features and upgrades for your doorbell camera, consider the following:
- Check the manufacturer’s website or app for any available add-ons or upgrades for your specific doorbell camera model.
- Research online forums or communities to get insights from other users about their experiences with different features and upgrades.
- Consider integrating your doorbell camera with other smart home devices, such as door locks or security systems, for a more comprehensive home security solution.
By exploring additional features and upgrades for your doorbell camera, you can personalize its functionality to suit your specific needs and unlock its full potential.
In conclusion, by regularly maintaining and upgrading your doorbell camera, you ensure its optimal performance and stay up to date with the latest advancements in home security technology. Remember to clean the camera lens regularly, keep the firmware updated, and explore additional features and upgrades to enhance your overall experience. By following these steps, you can maximize the value of your doorbell camera and enjoy the peace of mind it brings to your home security.
Frequently Asked Questions On How To Install Doorbell Camera With Existing Doorbell
How Do I Add A Camera To My Doorbell?
To add a camera to your doorbell: 1. Choose a compatible doorbell camera. 2. Install the camera by following the provided instructions. 3. Connect the camera to your Wi-Fi network. 4. Download the camera’s corresponding app on your smartphone. 5. Follow the app’s instructions to set up and customize your camera.
Can You Connect Ring Doorbell 2 To Existing Doorbell?
Yes, you can connect the Ring Doorbell 2 to an existing doorbell.
Do You Need An Electrician To Install Doorbell Camera?
No, an electrician is not required to install a doorbell camera. It can be easily installed by following the provided instructions.
Q: Can I Install A Doorbell Camera Without An Existing Doorbell?
A: Yes, you can install a doorbell camera even without an existing doorbell. There are wireless options available.
Q: Do Doorbell Cameras Work In All Weather Conditions?
A: Doorbell cameras are designed to withstand various weather conditions, including rain, snow, and extreme temperatures.
Conclusion
Installing a doorbell camera with an existing doorbell is a simple and effective way to enhance your home security. By following the step-by-step process outlined in this blog post, you can easily achieve this upgrade. Remember to assess your existing wiring, choose a compatible doorbell camera, and follow the manufacturer’s instructions.
With a little time and effort, you can enjoy the convenience and peace of mind that a doorbell camera provides. Upgrade your home security today!