To install a doorbell camera, first, remove your existing doorbell and disconnect the wires. Then, mount the camera in the desired location and connect the wires to the camera according to the manufacturer’s instructions.
Are you concerned about the security of your home? A doorbell camera can provide you with peace of mind by allowing you to see and communicate with anyone who approaches your front door. Whether you want to keep an eye on deliveries or deter potential intruders, installing a doorbell camera is a simple and effective solution.
We will guide you through the process of installing a doorbell camera, step by step. So, let’s get started and ensure that your home is protected with this cutting-edge technology.
Step 1: Choose The Right Door Bell Camera
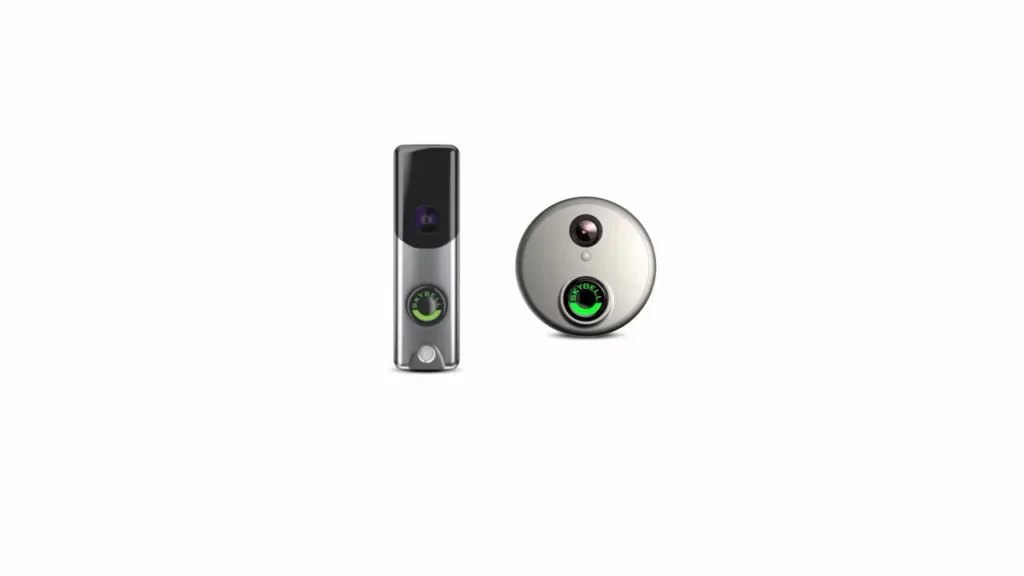
Installing a door bell camera is a game changer when it comes to home security. You can easily monitor who comes to your front door, even when you’re not at home. But with so many options available in the market, how do you choose the right door bell camera for your needs? Follow these simple steps to make an informed decision.
Researching different door bell camera options
Before making a purchase, it’s crucial to conduct thorough research on the various door bell camera options available. Consider factors such as video quality, field of view, connectivity, storage options, and ease of installation. Look for customer reviews and ratings to get an idea of the performance and reliability of different models. Make a list of the cameras that align with your requirements.
Understanding the features and specifications
Take the time to understand the features and specifications of each door bell camera on your list. Look for features like two-way audio, motion detection, night vision, and smartphone compatibility. Consider whether you want a wired or wireless camera, as well as the power source required. Analyze the technical aspects to ensure the camera meets your specific needs, whether it’s an advanced surveillance system or a simpler device.
Considering budget and compatibility
When choosing a door bell camera, it’s essential to take your budget into account. Determine how much you are willing to spend on a camera that meets your security requirements. Compare prices and features to find the best value for your money. Additionally, consider the compatibility of the camera with other devices in your home, such as your smartphone or existing security system. Ensure that the camera you choose seamlessly integrates with your existing setup to make the most of its features.
By following these steps, you can select the perfect door bell camera for your home. Remember to prioritize your security needs, thoroughly research different options, understand the features and specifications, and consider your budget and compatibility requirements. This will help you make an informed decision and install a door bell camera that enhances the security of your home.
Step 2: Prepare For Installation
Before you can start installing your new doorbell camera, it’s essential to prepare and gather everything you need. This step will ensure a smooth and hassle-free installation process. Here’s what you need to do:
Gathering the necessary tools and materials
The first thing you should do is gather all the tools and materials you’ll need for the installation. Having everything within reach will save you time and unnecessary trips back and forth. Here is a list of essential tools and materials you’ll need:
| Tools: | Materials: |
| Screwdriver setDrillTape measurePencilLevelWire strippersWire cuttersWire nutsElectrical tape | Doorbell camera kitMounting bracketScrewsWall anchors (if needed)Drill bit (if needed)Power adapterWiring and connectors (if needed) |
Checking electrical requirements and compatibility
Before proceeding with the installation, it’s crucial to check the electrical requirements and compatibility of your doorbell camera. Ensure that your home’s existing doorbell wiring meets the voltage and power requirements of the camera. Refer to the manufacturer’s instructions or specifications sheet for details.
If your current doorbell system is not compatible with the camera, you may need to install a new transformer or hire an electrician to help with the wiring. It’s essential to address any electrical issues beforehand to avoid potential complications during the installation.
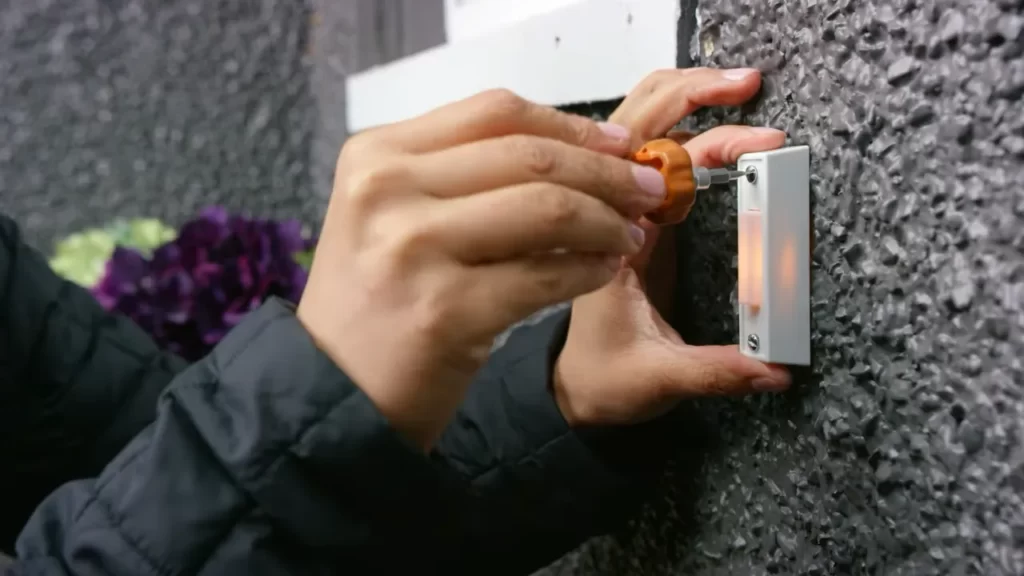
Preparing the door or wall surface for installation
Once you have gathered the necessary tools and confirmed the electrical requirements, the next step is to prepare the door or wall surface for installation. Here are some guidelines to follow:
- Choose the optimal location for your doorbell camera. The ideal spot should provide a clear view of the surrounding area, be easily accessible, and have a stable surface for mounting.
- Clean the chosen area thoroughly to ensure a smooth and secure attachment. Remove any dirt, dust, or debris that may interfere with the installation process.
- Use the included template, if provided, to mark the drilling points on the wall or door. Make sure the template is level and aligned with your desired position.
- If necessary, drill holes at the marked points using the appropriate drill bit for your surface (wood, metal, or masonry).
- If your doorbell camera requires wiring, thread the wires through the drilled holes and connect them securely using wire nuts and electrical tape.
- Attach the mounting bracket or base of the camera to the surface using the provided screws and wall anchors (if needed).
By preparing the door or wall surface properly, you’ll ensure a sturdy and long-lasting installation for your doorbell camera.
Step 3: Mounting The Door Bell Camera
Once you have determined the ideal location for your doorbell camera and prepared the necessary tools, it is time to move on to the next step: mounting the camera. This step is crucial to ensure that your camera is securely installed and optimized for capturing clear and accurate footage. Follow these three simple steps to successfully mount your doorbell camera.
Determining the ideal location for the camera
Before mounting the doorbell camera, it is important to determine the ideal location where it can effectively cover the area you want to monitor. Consider places like the front entrance or driveway where you can get a clear view of people approaching your home. Ensure that the camera is positioned at a suitable height, typically at eye level, for optimal video quality.
Marking the drilling holes and making necessary adjustments
Once you have identified the ideal location, hold the camera against the wall or door and carefully mark the spots where you need to drill the holes for mounting. Use a pencil or marker to make these markings, ensuring they are accurate and aligned. Take into consideration any adjustments you may need to make, such as angling the camera slightly downward to capture the desired field of view.
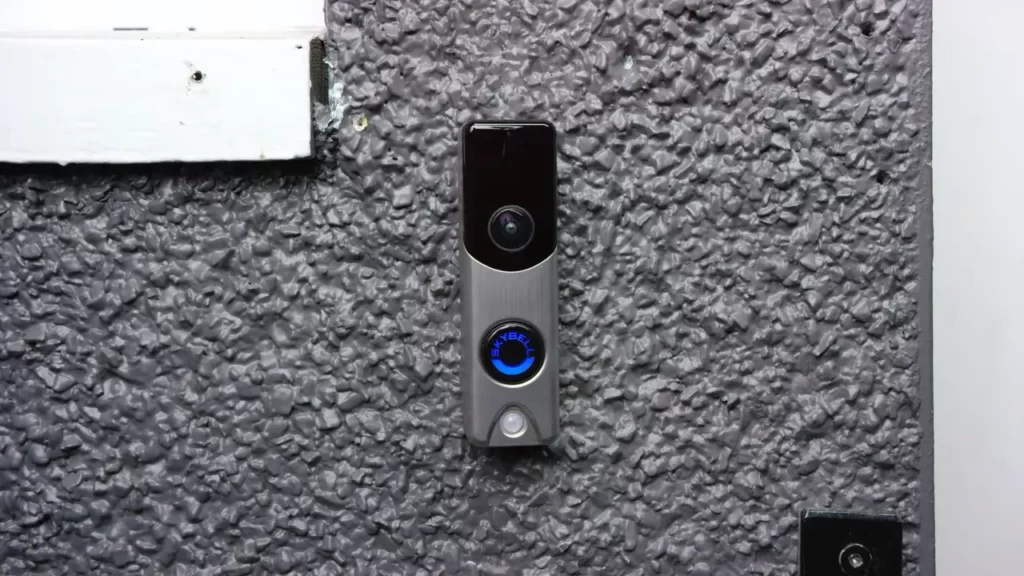
Mounting the camera securely on the door or wall
After marking the drilling holes and making any necessary adjustments, it’s time to mount the doorbell camera securely. Start by drilling holes at the marked spots, ensuring they are the right depth for the screws or anchors you will be using. Next, align the camera with the holes and attach it using the provided screws or anchors, ensuring a tight and secure fit.
Remember to follow the manufacturer’s instructions for mounting the camera, as different models may have specific requirements. Once the camera is mounted, double-check that it is securely fixed to the door or wall, with no wobbling or loose parts. This will ensure stability and prevent any unwanted movement that may affect the camera’s performance.
By following these three simple steps, you can successfully mount your doorbell camera and enhance the security of your home. Now that your camera is securely installed, you can move on to the next step of setting it up and connecting it to your home network for uninterrupted surveillance.
Step 4: Connecting The Door Bell Camera
Once you have installed the door bell camera in its designated location and mounted it securely, it’s time to connect it to the wiring or power source. This step is crucial to ensure the camera functions properly and captures any visitors or suspicious activity at your doorstep. Here’s how you can connect the door bell camera effectively.
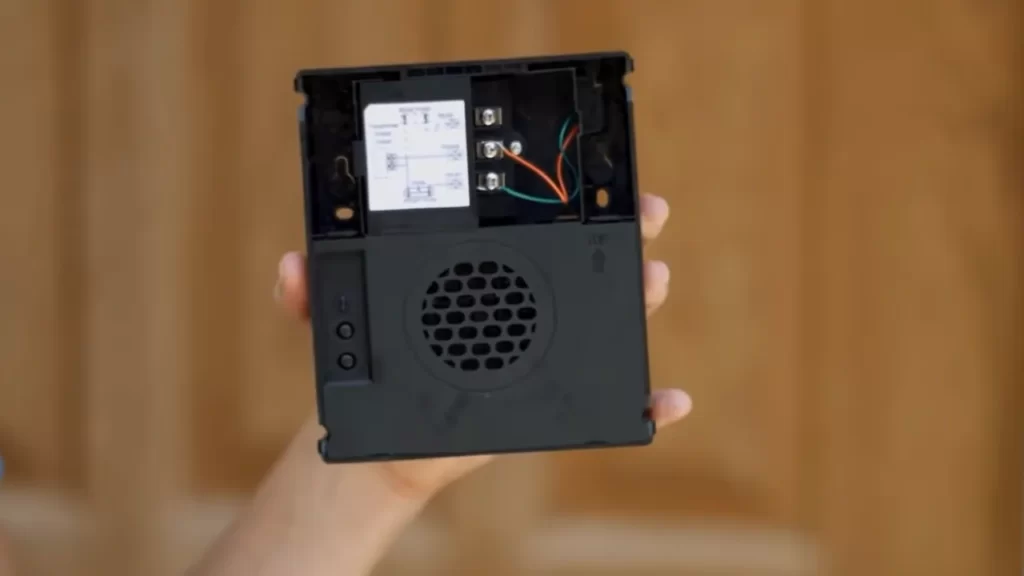
Understanding the wiring and connection requirements
Before proceeding with the connection process, it’s essential to understand the wiring and connection requirements of your door bell camera. Read the instruction manual provided by the manufacturer to get a better understanding of the specific requirements for your camera model.
In general, most door bell cameras require a low-voltage power source, typically ranging from 12-24 volts, which can be provided by either an existing doorbell wiring or a separate power adapter. It’s important to ensure that the power source is compatible with the camera to avoid any damage or malfunction.
Connecting the camera to existing doorbell wiring or power source
To connect the door bell camera to your existing wiring or power source, follow these steps:
- Start by turning off the power supply to the doorbell circuit from the breaker panel. This step is crucial for safety and prevents any potential electrical hazards during the installation process.
- Identify the doorbell wiring terminals or the power source terminals on your camera. Typically, they will be labeled ‘Front’, ‘Transformer’, or ‘Power’.
- Strip the ends of the doorbell wires or the power adapter wires to expose the bare copper ends.
- Connect the stripped ends of the wires to the respective terminals on the camera following the manufacturer’s instructions. In most cases, you will need to screw them securely in place.
- Double-check the connections to ensure they are tight and secure. Loose connections can lead to erratic camera behavior or loss of functionality.
Testing the connection and ensuring proper functionality

Once you have successfully connected the door bell camera, it’s important to test the connection and ensure that the camera is functioning properly. Follow these steps to test the connection:
- Turn the power supply back on from the breaker panel.
- Press the doorbell button or trigger a motion detection event to check if the camera captures the audio, video, and motion as expected.
- Check if the notifications are being sent to your smartphone or any other designated device that you have synced with the camera.
- Verify the quality of the audio and video feed to ensure clear communication and accurate recordings.
If any issues arise during the testing process, double-check the connections and consult the troubleshooting section of the camera’s instruction manual. Making sure the camera is connected and functioning properly will provide you with peace of mind knowing that your doorstep is monitored and secure.
Step 5: Setting Up And Testing The Door Bell Camera
Now that you have successfully mounted your door bell camera, it’s time to set it up and test its functionality. In this step, we will guide you through the process of downloading and installing the camera app on your smartphone or device, configuring the camera settings, and connecting it to your Wi-Fi network. Finally, we will test the camera’s live feed, motion detection, and other features to ensure everything is working as it should.
Downloading and installing the camera app on a smartphone or device
The first thing you need to do is download the camera app on your smartphone or device. Follow these steps:
- Open the app store on your smartphone or device.
- Search for the camera app by entering the camera’s brand name or model number.
- Once you find the app, tap on the “Download” or “Install” button.
- Wait for the app to finish downloading and installing.
Once the app is installed, open it and proceed to the next step.
Configuring the camera settings and connecting to Wi-Fi
Now that you have the camera app installed, it’s time to configure the camera settings and connect it to your Wi-Fi network. Follow these steps:
- Open the camera app on your smartphone or device.
- Follow the on-screen instructions to create an account and log in.
- Navigate to the settings menu within the app.
- Select the Wi-Fi network you want to connect to.
- Enter your Wi-Fi password when prompted.
- Wait for the camera to connect to the Wi-Fi network.
Once the camera is successfully connected to Wi-Fi, you are ready to test its features.
Testing the camera’s live feed, motion detection, and other features
Now comes the exciting part – testing your door bell camera to ensure it’s working properly. Follow these steps:
- Go outside and press the door bell button to trigger the camera.
- Open the camera app on your smartphone or device.
- Check the app for a live feed from the camera to confirm it’s capturing the area.
- Wave your hand in front of the camera to test the motion detection feature. Make sure you receive notifications or alerts on your smartphone or device.
- Explore other features of the camera, such as two-way audio and recording options, to ensure they are functioning correctly.
If everything is working as expected, congratulations! You have successfully set up and tested your door bell camera. Now you can enjoy the added security and convenience it provides.
Frequently Asked Questions Of How To Install A Door Bell Camera
Can You Install A Doorbell Camera Yourself?
Yes, you can install a doorbell camera yourself. It’s a simple process that doesn’t require professional assistance. Just follow the instructions provided with the camera and you’ll be able to set it up easily.
Do You Need An Electrician To Install Doorbell Camera?
No, an electrician is not required for installing a doorbell camera. It can be easily installed by following the provided instructions.
How Do You Install A Wireless Doorbell Camera?
To install a wireless doorbell camera, follow these steps: 1. Attach the mounting bracket to the desired location near your door. 2. Connect the doorbell camera to your home’s Wi-Fi network. 3. Download the manufacturer’s app on your smartphone or tablet.
4. Follow the app’s instructions to pair the camera with your device. 5. Mount the camera on the bracket and adjust its position as needed.
Is There A Ring Doorbell That Doesn T Require Wiring?
Yes, there is a ring doorbell that doesn’t require wiring.
How Do I Install A Door Bell Camera?
Installing a door bell camera is easy. Follow the manufacturer’s instructions, mount the camera, connect the wires, and pair it with your smartphone.
Conclusion
Installing a doorbell camera is a simple and effective solution to enhance your home security. By following these easy steps, you can have the peace of mind knowing that you can monitor your doorstep at all times. With its user-friendly installation process and advanced features, a doorbell camera is a valuable addition to any home.
Be sure to consult the manufacturer’s instructions for specific details and enjoy the benefits of increased safety and convenience. Upgrade your home security today!