To install the Arlo Doorbell Wireless, simply follow the manufacturer’s instructions and connect the doorbell to your Wi-Fi network and existing doorbell wiring, and then install the Arlo app on your smartphone to complete the setup process. Arlo Doorbell Wireless is a convenient and reliable solution for enhancing your home security.
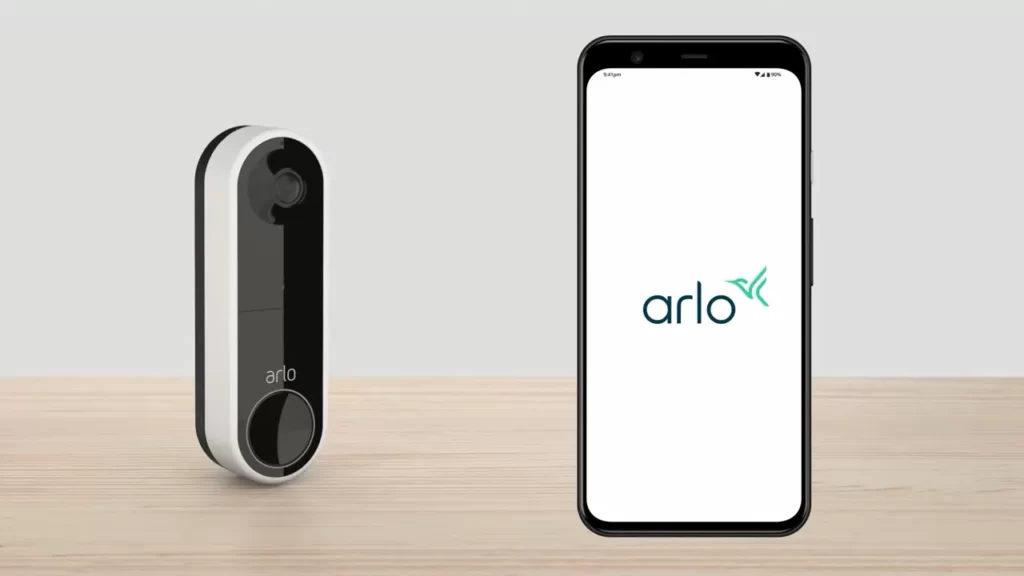
With its wireless design, you can easily install it without the need for complicated wiring. This smart doorbell allows you to see and speak to visitors at your front door from anywhere, using your smartphone or tablet. Whether you’re at home or on the go, you can always keep an eye on who’s at the door.
In this guide, we will walk you through the step-by-step process of installing the Arlo Doorbell Wireless and setting it up on your devices. Let’s get started and enhance your home security today.
Checking Compatibility And Preparing For Installation
Before you begin installing your Arlo Doorbell Wireless, it is crucial to ensure compatibility with your existing setup. This will save you time and effort, and ensure a smooth installation process. In addition, gathering the necessary tools and materials for the installation and familiarizing yourself with the Arlo Doorbell Wireless components will make the process much easier and straightforward.
Ensure Arlo Doorbell Wireless is compatible with your existing setup
First, it is important to verify the compatibility of the Arlo Doorbell Wireless with your existing setup. To do this, check the system requirements provided by the manufacturer. The Arlo Doorbell Wireless is compatible with most existing traditional doorbell setups. However, it is always recommended to double-check and ensure that your power voltage and existing wiring are compatible. This will help you avoid any complications during the installation process.
Gather the necessary tools and materials for installation
Once you have confirmed compatibility, make sure to gather all the necessary tools and materials required for the installation of the Arlo Doorbell Wireless. Having everything at hand will save you from any unexpected trips to the hardware store and will allow you to complete the installation seamlessly. Here is a list of tools and materials you may need:
| Tools | Materials |
|---|---|
| Screwdriver (Phillips or flathead) | Arlo Doorbell Wireless |
| Drill (if necessary) | Screws |
| Electric tape | Power adapter (if needed) |
| Wire stripper | |
| Wire connectors |
Remember, each installation may have specific requirements, so it’s always best to refer to the Arlo Doorbell Wireless instruction manual to ensure you have all the necessary tools and materials.
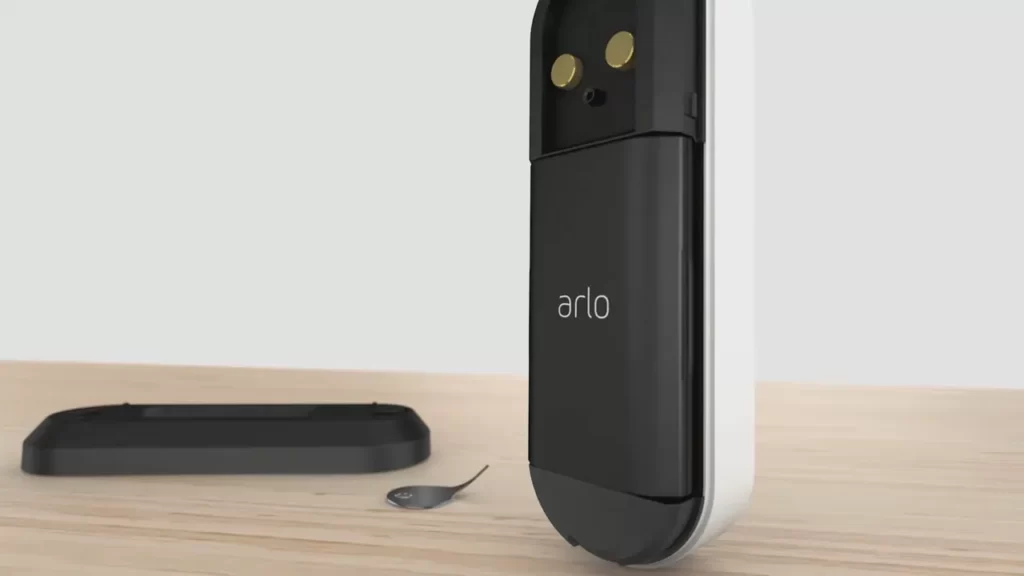
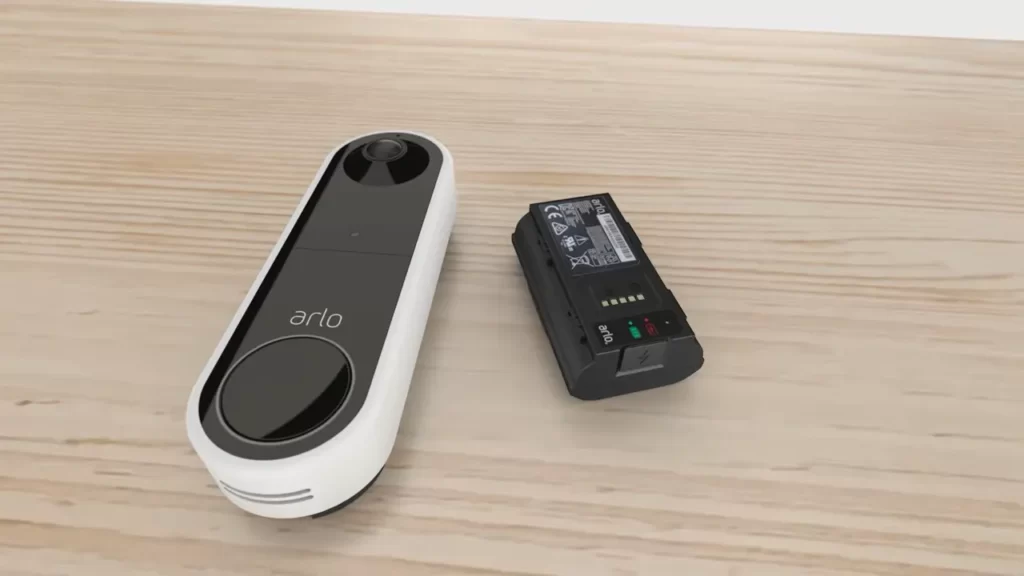
Familiarize yourself with the Arlo Doorbell Wireless components
Before you dive into the installation process, take a moment to familiarize yourself with the components included with the Arlo Doorbell Wireless. This will not only help you understand how everything fits together but also allow you to troubleshoot any issues that may arise during installation. The key components you should be aware of include:
- Main doorbell unit
- Mounting plate
- Wiring connectors
- Mounting screws
By understanding the purpose and functionality of each component, you will be better equipped to handle any challenges and successfully complete the installation of your Arlo Doorbell Wireless.
Setting Up The Arlo Doorbell Wireless Base Station
Setting up the Arlo Doorbell Wireless Base Station is the first step to enabling a convenient and secure doorbell experience. This base station is essential in connecting your Arlo Doorbell Wireless to your home’s Wi-Fi network and establishing a seamless connection between your doorbell and the Arlo app on your smartphone or tablet. In this guide, we will take you through the process of setting up the base station with easy-to-follow steps.
Connect the base station to your Wi-Fi network
To start, ensure that your Wi-Fi network is up and running. Follow the steps below to connect the base station to your Wi-Fi:
- Locate the power adapter and Ethernet cable that came with your Arlo Doorbell Wireless.
- Connect the power adapter to the base station and plug it into a power outlet.
- Take the Ethernet cable and connect one end to the base station’s Ethernet port, and the other end to an available port on your Wi-Fi router.
- Wait for the base station to power on and establish a connection with your Wi-Fi network.
- Once the connection is established, the LED lights on the base station should turn solid green.
- You have successfully connected the base station to your Wi-Fi network.
Pair the base station with your Arlo Doorbell Wireless
Now that your base station is connected to the Wi-Fi network, it’s time to pair it with your Arlo Doorbell Wireless. Follow these steps:
- Launch the Arlo app on your smartphone or tablet.
- Tap on the “Devices” tab at the bottom of the screen.
- Select “Add Device” and choose “Doorbell” from the list of available options.
- Wait for the app to detect the base station and follow the on-screen instructions to complete the pairing process.
- You will be prompted to press the sync button on the base station to establish a connection with the Arlo Doorbell Wireless.
- Once the pairing is successful, you will see a confirmation message on the app.
- Congratulations! Your Arlo Doorbell Wireless is now paired with the base station.
Customize settings and preferences on the base station
After successfully setting up the base station and pairing it with your Arlo Doorbell Wireless, it’s time to customize the settings and preferences according to your needs. Here are the steps to make these customizations:
- Open the Arlo app on your smartphone or tablet.
- Select your Arlo Doorbell Wireless from the list of devices.
- Navigate to the “Settings” or “Preferences” section.
- Explore the available options to personalize your doorbell experience, such as adjusting motion detection sensitivity, enabling push notifications, setting up activity zones, etc.
- Make the desired changes and save your preferences.
- Your Arlo Doorbell Wireless is now customized according to your preferences.
Mounting And Installing The Arlo Doorbell Wireless
Installing a wireless doorbell can be a game-changer for improving the security and convenience of your home. With the Arlo Doorbell Wireless, you can easily monitor and communicate with visitors at your doorstep from anywhere using your smartphone. In this guide, we will walk you through the steps to mount and install the Arlo Doorbell Wireless, ensuring a hassle-free setup process.
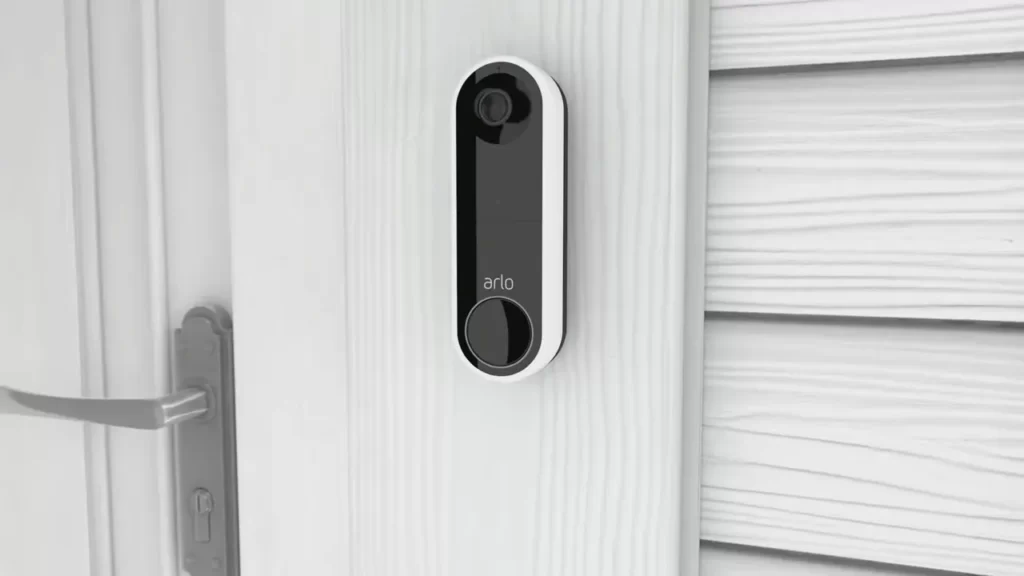
Choose the ideal location for mounting the doorbell
Before diving into the installation process, it is important to choose the ideal location for mounting your Arlo Doorbell Wireless. A well-positioned doorbell can provide optimal coverage of your doorstep area. Consider the following factors when selecting the location:
- Ensure that the doorbell is easily visible to visitors
- Place it at a height that allows for clear capture of visitors’ faces
- Check for any obstructions that might hinder the doorbell’s motion detection capabilities
Install the doorbell bracket and secure it to the wall or door frame
Now that you have selected the ideal location for your Arlo Doorbell Wireless, it’s time to install the doorbell bracket and secure it to the wall or door frame. Follow these simple steps:
- Start by holding the bracket against the desired location
- Using a pencil, mark the screw holes on the wall or door frame
- Drill pilot holes on the marked spots
- Securely attach the doorbell bracket using screws and a screwdriver
Attach the Arlo Doorbell Wireless to the bracket

With the bracket securely installed, it’s time to attach the Arlo Doorbell Wireless to it. Follow these steps:
- Remove the back cover of the doorbell by pressing the release button
- Align the back of the doorbell with the bracket
- Slide the doorbell downwards until it clicks into place
- Ensure that the doorbell is securely attached to the bracket before proceeding
Adjust the angle and position of the doorbell for optimal coverage
Lastly, it’s important to adjust the angle and position of your Arlo Doorbell Wireless for optimal coverage of your doorstep area. Consider the following guidelines:
- Angle the doorbell slightly downwards to capture visitors’ faces
- Ensure that there are no obstructions blocking the field of view
- Test the doorbell’s motion detection by walking towards your doorstep
- Make any necessary adjustments to achieve the desired coverage
By following these simple steps, you can successfully mount and install your Arlo Doorbell Wireless, enhancing the security and convenience of your home. Remember to double-check all the connections and settings before completing the installation process. Enjoy the peace of mind that comes with having a smart doorbell at your doorstep!
Pairing The Arlo Doorbell Wireless With Arlo Cameras And Chimes
The Arlo Doorbell Wireless is a versatile and convenient addition to your home security system. By pairing it with your Arlo cameras and compatible chimes, you can enhance your security and receive audio notifications whenever someone presses the doorbell. In this guide, we will walk you through the simple steps to sync your Arlo Doorbell with your cameras and chimes, as well as how to customize notification settings to fit your needs.
Sync the doorbell with your Arlo cameras for enhanced security
One of the key benefits of the Arlo Doorbell Wireless is its compatibility with Arlo cameras. By syncing the doorbell with your cameras, you can easily see who is at your door from the convenience of your smartphone or tablet. Follow these steps to pair your doorbell with your Arlo cameras:
- Open the Arlo app on your device and log in to your Arlo account.
- Navigate to the Devices tab and select your Arlo doorbell.
- Tap on the Settings icon and choose Camera Settings.
- Select the camera you want to pair with the doorbell.
- Follow the on-screen instructions to complete the pairing process.
- Once paired, you will be able to view live video footage from your camera whenever the doorbell is pressed.
Connect compatible chimes to receive audio notifications
In addition to pairing your Arlo Doorbell with your cameras, you can also connect compatible chimes to receive audio notifications whenever someone presses the doorbell. This ensures that you never miss a visitor, even if you’re not near your phone. Follow these steps to connect your chimes:
- Make sure your chimes are compatible with the Arlo Doorbell Wireless. Refer to the product manual or check the Arlo website for a list of compatible chimes.
- Place your chimes in a location where you can easily hear the audio notifications.
- Open the Arlo app and navigate to the Devices tab.
- Select your Arlo doorbell and tap on the Settings icon.
- Choose Chime Settings and follow the on-screen instructions to connect your chimes.
- Once connected, your chimes will sound whenever someone presses the doorbell, providing you with an audible alert.
Customize notification settings for cameras and chimes
To ensure that your Arlo Doorbell Wireless and connected cameras and chimes work seamlessly with your lifestyle, it’s important to customize the notification settings. You can control when and how you receive alerts, ensuring you are only notified about important events. Here are the steps to customize your settings:
- Open the Arlo app and go to the Devices tab.
- Select your Arlo doorbell and tap on the Settings icon.
- Choose Camera Settings or Chime Settings, depending on whether you want to customize settings for your cameras or chimes.
- Adjust the notification preferences to fit your needs. You can enable or disable notifications, set specific time frames for notifications, and choose the type of alert you want to receive.
- Save your settings and test them to ensure they are working as desired.
By following these simple steps, you can easily pair your Arlo Doorbell Wireless with your Arlo cameras and chimes. This will provide you with enhanced security and the convenience of audio notifications whenever someone arrives at your door. Don’t forget to customize your notification settings to ensure you are only alerted to the events that matter to you. Enjoy the peace of mind that comes with a fully integrated home security system!
Testing And Troubleshooting
Testing and troubleshooting are essential steps when installing the Arlo Doorbell Wireless. These steps help ensure that the doorbell functions properly and enables you to identify and fix any installation issues that may arise. In this section, we will guide you through testing the functionality of the Arlo Doorbell Wireless, troubleshooting common installation issues, and seeking assistance from Arlo support if necessary. **Test the functionality of the Arlo Doorbell Wireless** To make sure your Arlo Doorbell Wireless is working as intended, follow these steps to test its functionality: 1. Ensure that the doorbell is securely installed near your doorway and that it is connected to a power source. 2. Download and install the Arlo app on your smartphone or tablet if you haven’t done so already. 3. Open the Arlo app and sign in to your Arlo account. 4. Tap on the icon for the Arlo Doorbell to access its settings. 5. From the settings menu, select the “Test Doorbell” option. 6. Ring the doorbell, either by pressing the button or by simulating a doorbell press using the app. 7. Listen for the chime on your Arlo Doorbell and check if the live video stream initiates on your smartphone or tablet. 8. If the chime sounds and you can see and hear the live video stream on your device, congratulations! The Arlo Doorbell Wireless is functioning properly. 9. If you experience any issues during the testing process, move on to the troubleshooting steps below. **Troubleshoot common installation issues** Despite its simplicity, the installation of the Arlo Doorbell Wireless may encounter some common issues. Here’s how you can troubleshoot and resolve them: – Make sure the doorbell is securely attached to the wall or door frame. Check if there are any loose screws and tighten them if necessary. – Verify that the power source is functioning correctly and providing a stable power supply to the doorbell. If needed, try connecting the doorbell to a different power source or using a different power adapter. – Check your Wi-Fi connection strength. Weak Wi-Fi signal can cause communication issues between the doorbell and your smartphone or tablet. You can try moving your Wi-Fi router closer to the doorbell or consider using a Wi-Fi extender to improve signal strength. – Confirm that you have properly followed the installation instructions provided by Arlo. Double-check the wiring connections and make sure they are secure. – Restart both the Arlo Doorbell and your smartphone or tablet. Sometimes, a simple restart can resolve minor issues. If the troubleshooting steps above do not resolve your issue, it may be time to seek assistance from Arlo support. **Seek assistance from Arlo support if necessary** If you’ve encountered persistent issues with the installation or functionality of your Arlo Doorbell Wireless, reaching out to Arlo support is the next step. Arlo offers various support options, including live chat, phone support, and an extensive knowledge base. To contact Arlo support: – Visit the Arlo support website at [insert website URL here]. – Navigate to the support options page. – Choose the most suitable support option for your needs, such as live chat or phone support. – Provide the necessary details about your issue, including your Arlo Doorbell model, software version, and any error messages received. A dedicated representative from Arlo will assist you in troubleshooting and resolving your issue. By following these testing and troubleshooting steps, you can ensure that your Arlo Doorbell Wireless functions properly and resolves any installation issues that may arise. Enjoy the convenience and security that this wireless doorbell brings to your home.
Maintenance And Further Customization
Once you have successfully installed your Arlo Doorbell Wireless, it is essential to understand the maintenance requirements that will help keep it in optimal condition. Additionally, exploring further customization options will enable you to personalize the functionality and appearance of your setup. This blog post will guide you through the maintenance tasks you need to know and offer ideas to expand your Arlo system with compatible devices and accessories.
Understand the maintenance requirements of the Arlo Doorbell Wireless
Maintaining your Arlo Doorbell Wireless is crucial to ensure its uninterrupted operation and longevity. By following these simple maintenance tasks, you can keep your device functioning optimally:
- Regularly clean the camera lens and doorbell button. Use a soft and lint-free cloth for cleaning, and ensure the device is powered off before doing so.
- Check the battery level periodically. The Arlo Doorbell Wireless utilizes batteries, and it’s essential to monitor their charge to avoid any disruptions in functionality. When the battery level is low, replace it with a fresh set to ensure continuous operation.
- Inspect the mounting area and doorbell hardware. Over time, environmental factors can impact the installation stability. It is advisable to periodically examine the mounting area and tighten any loose screws or adjust the positioning if necessary.
- Update the firmware regularly. Arlo frequently releases firmware updates to enhance the device’s performance and security. Ensuring your Arlo Doorbell Wireless has the latest firmware will guarantee optimal functionality and protect against any vulnerabilities.
Explore additional customization options for your setup
Customizing your Arlo Doorbell Wireless setup can enhance both its functionality and appearance. Here are a few ideas to personalize your device:
- Adjust the motion detection settings: Fine-tune the sensitivity and detection zones to suit your specific needs, reducing false notifications and ensuring accurate alerts.
- Configure personalized notifications: Customize the notification sounds or set up specific alerts for different events, such as package deliveries or visitors at specific times.
- Create visitor announcements: Utilize the Arlo Doorbell Wireless’s built-in speaker and microphone to record personalized voice messages that play when someone rings the doorbell.
Expand your Arlo system with compatible devices and accessories
Arlo offers a range of compatible devices and accessories to enhance your overall home security system. By expanding your Arlo system, you can create a seamless and comprehensive surveillance network. Consider the following options:
| Arlo Device/Accessory | Features |
|---|---|
| Arlo Security Cameras | Add additional cameras to monitor various areas around your home and property. |
| Arlo SmartHub | Connect multiple Arlo devices wirelessly, simplifying the overall setup and improving communication between devices. |
| Arlo Chime | Extend the audible range of your Arlo Doorbell Wireless with the Arlo Chime, ensuring you never miss a visitor. |
| Arlo Solar Panel | Power your Arlo devices with renewable solar energy, reducing reliance on batteries and ensuring continuous operation. |
By adding these compatible devices and accessories to your Arlo system, you can create a tailored and robust home security solution that meets your specific needs.
Remember, regular maintenance and exploring customization options can enhance your Arlo Doorbell Wireless experience and provide an even more secure and personalized home surveillance solution. Keep these tips in mind to maximize the performance and functionality of your Arlo system.
Frequently Asked Questions On How To Install Arlo Doorbell Wireless
How Do I Install My Arlo Doorbell?
To install your Arlo doorbell, follow these steps: 1. Place the doorbell near your front door. 2. Connect the doorbell to your existing doorbell wiring or use the provided battery pack. 3. Install the Arlo app on your smartphone and create an account.
4. Add the doorbell to your Arlo system using the app. 5. Customize your doorbell settings and start using it.
How Do I Connect My Arlo Doorbell To Wifi?
To connect your Arlo doorbell to WiFi, follow these steps: 1. Download and open the Arlo app on your smartphone. 2. Tap on the “Devices” tab and select your doorbell. 3. Tap on “Settings” and then “WiFi Settings. ” 4. Follow the on-screen instructions to connect your doorbell to your WiFi network.
5. Once connected, you can access your doorbell’s features through the app.
What Do I Need For Arlo Wireless Doorbell?
To set up the Arlo wireless doorbell, you will need the Arlo base station and a compatible Arlo camera. The doorbell integrates with your existing Arlo system for seamless functionality. No additional equipment is required.
Does Arlo Doorbell Need To Be Wired?
No, the Arlo doorbell does not need to be wired.
Can I Install Arlo Doorbell Wireless Without Professional Help?
Yes, you can install Arlo Doorbell Wireless by yourself without requiring any professional assistance.
Conclusion
Installing the Arlo Doorbell wireless is a breeze, and with these simple step-by-step instructions, you’ll have it up and running in no time. Say goodbye to messy wiring and hello to hassle-free installation. By following our guide, you’ll be able to boost your home security with this convenient and modern device.
Don’t wait any longer – get started on enhancing your home’s safety today with the Arlo Doorbell wireless!