To install a hidden door, first, measure and mark the desired location on the wall. Then, cut and frame the opening, install the door panel, hinges, and handle, and finish by concealing the door with trim or a bookshelf.
Hidden doors can add a touch of mystery and intrigue to any space. Whether you want to create a secret hideaway or simply save precious floor space, installing a hidden door can be a fun and creative project. We will guide you through the step-by-step process of installing a hidden door.
From measuring and marking the location to concealing the door with trim or a bookshelf, we’ll cover all the necessary steps to help you achieve a seamless and functional hidden door installation. So, let’s jump right in and unlock the secrets of installing a hidden door!
Planning Your Hidden Door Installation
Planning is a crucial step when it comes to installing a hidden door. Taking the time to carefully plan your installation will ensure that you achieve the desired functionality and aesthetic for your space. In this section, we will walk you through the key considerations when planning your hidden door installation.
Determine the location and function of the hidden door
The first step in planning your hidden door installation is to determine the location and function of the door. Consider the purpose you want the hidden door to serve. Is it for adding a mysterious element to a secret room? Or perhaps for creating additional storage space? Identifying the purpose will guide you in choosing the appropriate design and style.
Measure the available space for the door
Next, carefully measure the available space where you intend to install the hidden door. This step is crucial to ensure that the door fits seamlessly into the surrounding architecture. Measure the height, width, and depth of the space, noting any obstacles or irregularities that may impact the installation process. Remember, accurate measurements are essential for a successful installation.
Choose the type and design of the hidden door
Now comes the fun part – choosing the type and design of your hidden door. There are various options available, including bookcase doors, mirror doors, or panel doors. Consider the overall style and theme of your space, and select a design that complements the existing décor. Additionally, think about the mechanism for opening and closing the door. Options include pivot hinges, sliding mechanisms, or hydraulic systems. Choose a style and mechanism that suits your preferences and aligns with the practicality of your space.
Once you have determined the location and function of the hidden door, measured the available space, and selected the type and design, you are ready to move on to the next step: purchasing the necessary materials and hardware. In our next section, we will guide you through the process of gathering all the required components to bring your hidden door installation to life. Stay tuned!
Choosing The Right Hidden Door Design
When it comes to installing a hidden door in your home, one of the most important aspects to consider is the design. The right design can not only enhance the aesthetics of your space but also create a functional and seamless integration. In this article, we will explore various factors to keep in mind when choosing the right hidden door design for your home.
Consider the architectural style of your home
The first step in choosing the right hidden door design is to consider the architectural style of your home. Whether you have a modern, contemporary, or traditional style, it’s important to select a hidden door that complements the overall look and feel of your space. For example:
- If you have a modern home: Opt for sleek and minimalistic hidden door designs with clean lines and simple finishes that match the contemporary aesthetics of your space.
- If you have a traditional home: Consider hidden door designs with intricate details, such as raised panels or decorative molding, that can blend seamlessly with the classic charm of your interiors.
- If you have a transitional home: Explore hidden door designs that combine elements of both modern and traditional styles, offering a versatile option to match the unique characteristics of your space.
Assess the functionality and purpose of the hidden door
When selecting a hidden door design, it’s crucial to assess the functionality and purpose it will serve in your home. Determine whether you want the door to simply blend in with the existing walls or if you need it to serve a specific function in your space. Here are a few considerations to keep in mind:
- Storage: If you’re looking to maximize storage space, consider hidden door designs that open up to reveal hidden closets or storage areas.
- Privacy: For areas where privacy is essential, such as home offices or bedrooms, opt for hidden doors that provide effective soundproofing and secure locking mechanisms.
- Concealment: If your goal is to hide certain features or rooms in your home, such as a laundry room or a home theater, look for hidden door designs that seamlessly camouflage these spaces.
Explore different design options and materials
Once you have considered the architectural style and functionality, it’s time to explore different design options and materials for your hidden door. Here are a few popular choices:
| Design Option | Materials |
|---|---|
| Bookcase design | Wood, plywood, MDF |
| Mirror design | Glass, aluminum, stainless steel |
| Panel design | Wood, laminate, fabric |
Consider the durability, maintenance requirements, and overall aesthetics of each material to ensure you select the one that best aligns with your preferences and needs.
By considering the architectural style of your home, assessing the functionality, and exploring different design options and materials, you can choose the right hidden door design that seamlessly integrates with your space and enhances its overall appeal.
Gathering The Necessary Tools And Materials
Gathering the necessary tools and materials is an essential step when it comes to installing a hidden door. To ensure a smooth installation process, it is important to create a checklist of tools needed, gather all the required materials, and ensure you have the necessary safety equipment. In this article, we will guide you through each step with the aim of making your hidden door installation project a success.
Create a Checklist of Tools Needed for the Installation
Before you start installing the hidden door, it is important to have all the necessary tools readily available. Creating a checklist will not only help you keep track of what you need but also ensure that you don’t overlook any essential tools.
| Tools | Quantity |
|---|---|
| Screwdriver (Phillips and flathead) | 1 each |
| Drill | 1 |
| Tape Measure | 1 |
| Level | 1 |
| Chisel | 1 |
| Hammer | 1 |
| Safety Glasses | 1 pair |
Gather All the Required Materials for the Hidden Door
Alongside the necessary tools, it is important to gather all the required materials for the hidden door installation. The material list may vary depending on the type of hidden door you are installing, but here are some commonly used materials:
- Lumber for framing
- Hinges
- Door panel
- Handle or knob
- Screws
- Wood glue
- Paint or stain
Ensure You Have the Necessary Safety Equipment
Prioritizing safety is crucial during any home improvement project, and installing a hidden door is no exception. Be sure to have the necessary safety equipment to protect yourself during the installation process. Here are some essential safety equipment to consider:
- Safety goggles
- Protective gloves
- Dust mask
With the checklist complete and the required tools, materials, and safety equipment gathered, you are now ready to proceed with the installation process of your hidden door. In the next section, we will guide you through the step-by-step instructions on how to prepare the opening for your hidden door.
Preparing The Installation Area
Before starting the installation of a hidden door, it is crucial to prepare the area where the door will be installed. This step is often overlooked but plays a vital role in ensuring a smooth and successful installation process.
Clear the area of any obstacles
The first step in preparing the installation area is to clear the space of any obstacles. This includes removing furniture, decorations, or any items that may obstruct the installation process. By having a clear and unobstructed area, you can easily maneuver and work on the door installation without any hindrances.
To ensure a clutter-free area, keep the following in mind:
- Move furniture to another room temporarily, if possible.
- Take down any wall hangings or decorations.
- Clear the floor of any loose items or obstacles.
Remove any existing door or trim
If there is an existing door or door trim in the area where you plan to install the hidden door, it must be removed. Removing the door and trim not only provides a clean slate for the installation but also ensures that the hidden door fits seamlessly into the space.
To remove the existing door and trim, follow these steps:
- Use a screwdriver or drill to remove the hinge pins and detach the door from the frame.
- Carefully remove any screws or nails that secure the door trim to the surrounding walls.
- Gently pry off the trim using a pry bar or a putty knife, taking care not to damage the walls.
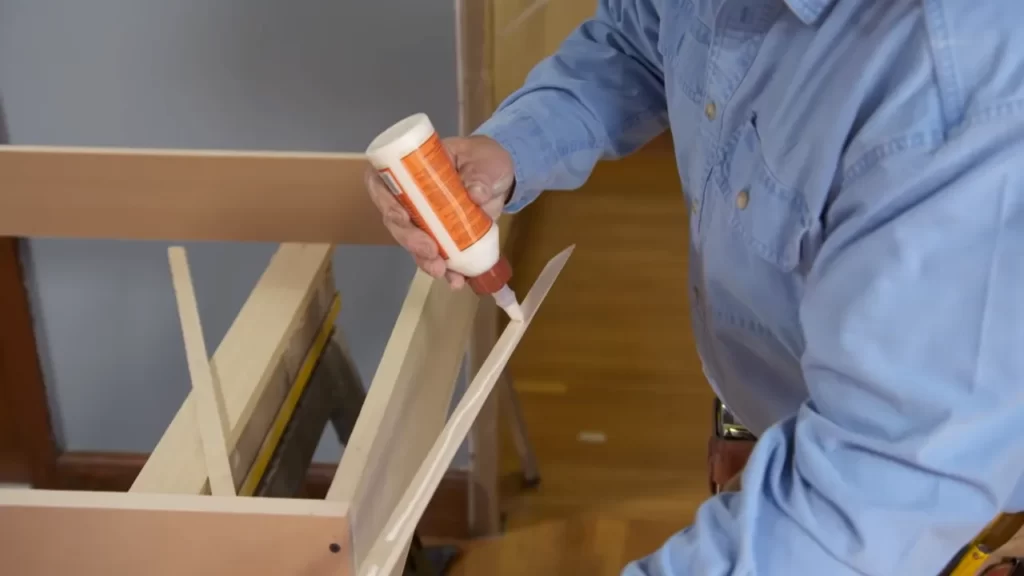
Prepare the frame for the hidden door
Once the area is clear and the existing door or trim has been removed, it’s time to prepare the frame for the hidden door. Properly preparing the frame ensures that the hidden door functions correctly and remains secure.
To prepare the frame for the hidden door installation:
- Inspect the frame for any damage or defects that may need repairs before proceeding.
- Check the levelness and plumbness of the frame, making any necessary adjustments to ensure proper alignment of the hidden door.
- Measure the dimensions of the frame accurately, as this will guide you in choosing the correct size for the hidden door.
By taking the time to clear the area of obstacles, remove any existing door or trim, and prepare the frame for the hidden door, you are setting the foundation for a successful installation. Following these steps will help ensure a smooth and hassle-free process, allowing you to enjoy the convenience and intrigue of a hidden door in your home.
Installing The Hidden Door Frame
When it comes to installing a hidden door, one of the most crucial steps is installing the door frame securely. This step ensures that the hidden door will function properly and seamlessly blend into the surrounding space. In this section, we will guide you through the process, covering key aspects such as marking and cutting out the opening for the hidden door, installing the door frame securely, and checking for proper alignment and levelness.
Mark and cut out the opening for the hidden door
To begin the installation of the hidden door frame, start by marking and cutting out the opening. This can be done by following these steps:
- Measure and mark the dimensions of the opening on the wall. Use a pencil to ensure accuracy and make adjustments as necessary.
- Double-check your measurements to ensure that the opening meets the size requirements for your hidden door.
- Using a saw, carefully cut along the marked lines to create the opening for the hidden door. Take your time and use caution to avoid any damage to the existing structure.
- Once the opening is cut, remove any excess debris or rough edges. Smooth out the edges with sandpaper to ensure a clean finish.
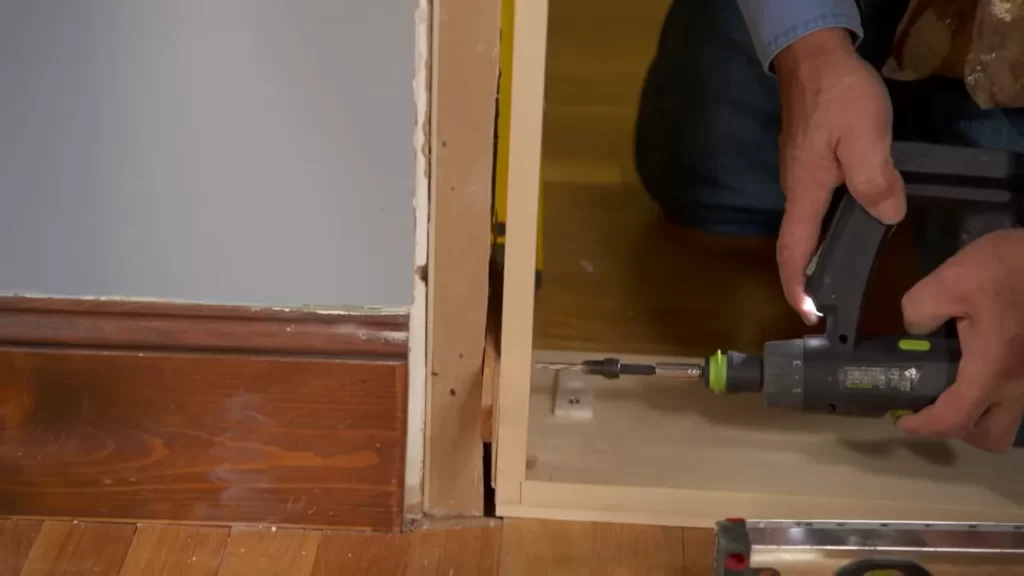
Install the door frame securely
After creating the opening, the next step is to install the door frame securely. Follow these steps to ensure a sturdy and stable installation:
- Place the door frame into the opening and check for proper fit. Make any necessary adjustments to ensure a snug fit.
- Using screws and a screwdriver, attach the door frame to the surrounding structure. Ensure that the screws are long enough to penetrate the wall and provide a secure attachment.
- Work your way around the entire frame, adding screws at regular intervals to ensure stability.
- Check for any gaps or uneven areas and make adjustments as needed. Use shims to level the frame if necessary.
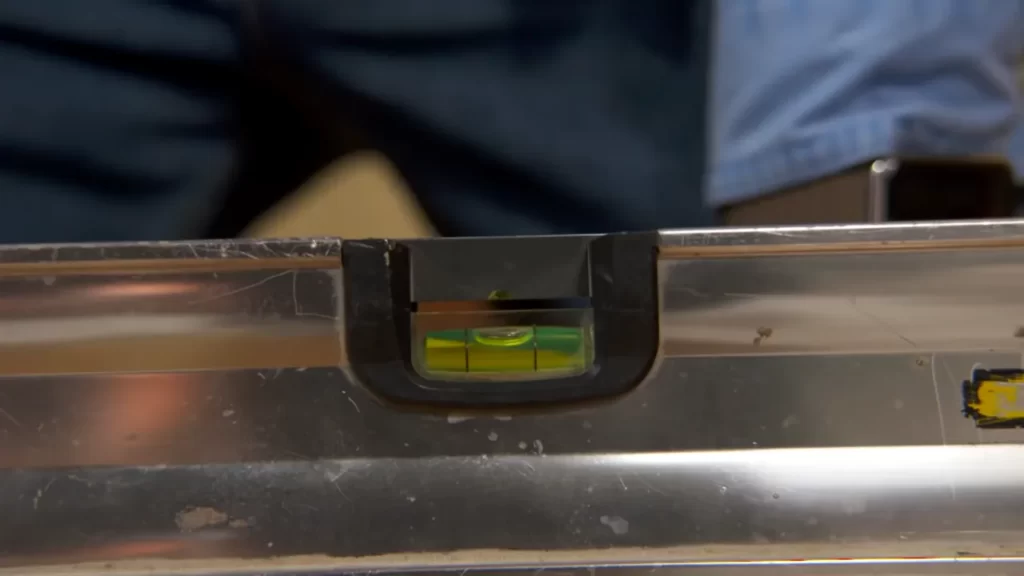
Check for proper alignment and levelness
Once the door frame is securely installed, it’s important to check for proper alignment and levelness. Follow these steps to ensure the hidden door functions smoothly:
- Carefully close the door and check if it aligns properly with the surrounding wall. Adjust the frame if necessary to achieve a seamless fit.
- Use a level to check if the door is plumb and level. Make any adjustments to ensure proper alignment.
- Open and close the hidden door several times to test its functionality. Pay attention to any sticking points or areas that require adjustment.
- Ensure that the door opens and closes smoothly without any obstructions or interference.
By following these steps and ensuring proper alignment and levelness, you can successfully install a hidden door frame that seamlessly integrates into your space. Take the time to complete this step properly, and you’ll enjoy the convenience and intrigue of a hidden door for years to come.
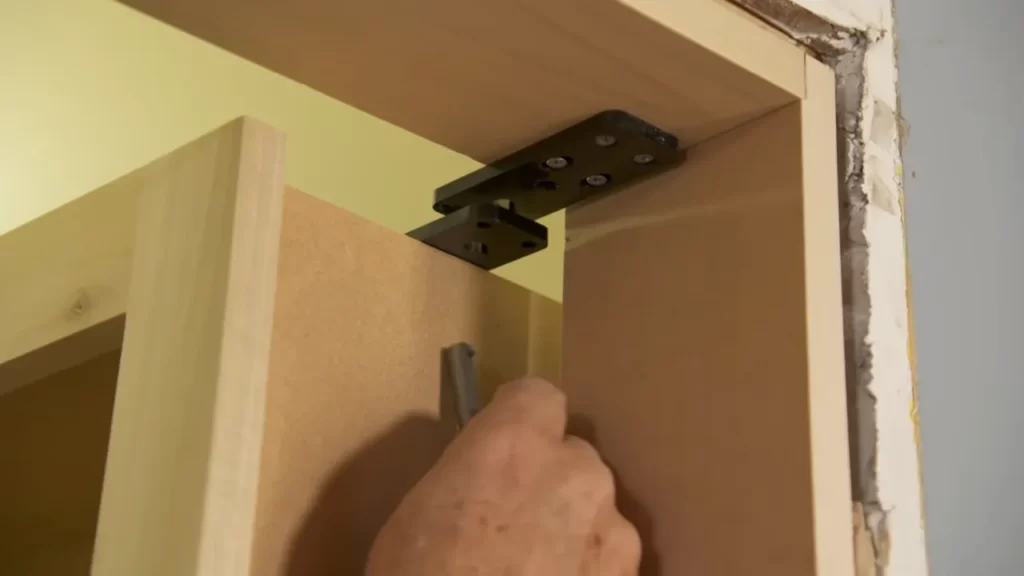
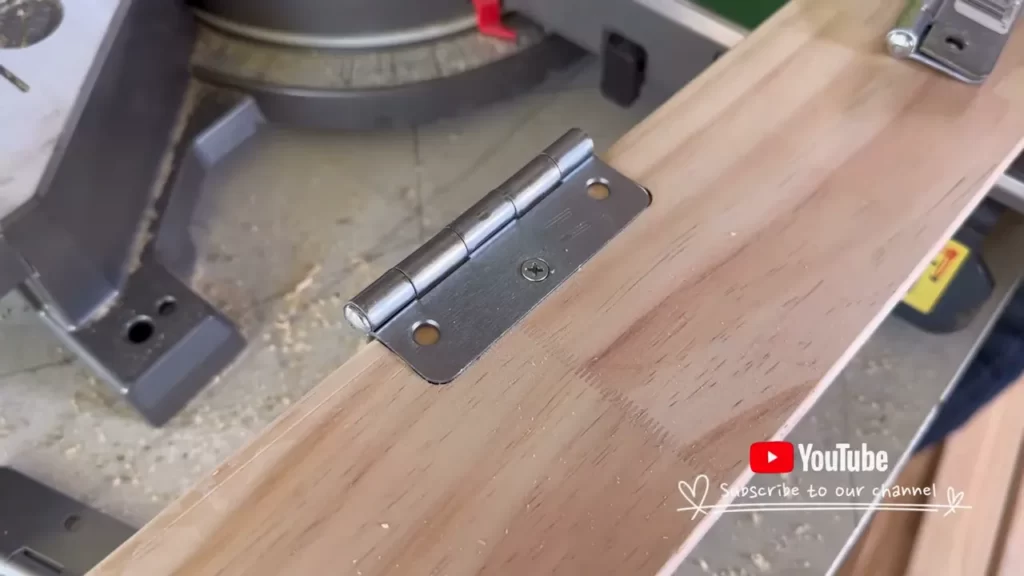
Attaching The Hidden Door Hinges
When it comes to installing a hidden door, one of the key steps is attaching the hidden door hinges. This is an essential part of the process that will ensure your hidden door operates smoothly and securely. In this section, we will walk you through the necessary steps to measure and mark the hinge placement on the door and frame, drill pilot holes for the hinges, and finally attach the hinges to the door and frame.
Measure and Mark the Hinge Placement on the Door and Frame
To begin, measure and mark the hinge placement on both the door and the frame. Start by determining where you want the hinges to be positioned on the door. Use a measuring tape to ensure accurate measurements. Once you have determined the placement, mark it using a pencil or a marker. Repeat this process for the frame as well, making sure the hinge placement aligns with the marks on the door.
Drill Pilot Holes for the Hinges
Next, it’s time to drill pilot holes for the hinges. Using a drill and an appropriate drill bit, carefully drill holes at the marked hinge placements on both the door and the frame. The size of the drill bit should match the diameter of the screws that will be used to attach the hinges. Make sure to drill the pilot holes straight and perpendicular to the door and frame to ensure a secure fit.
Attach the Hinges to the Door and Frame
Now that you have the pilot holes drilled, it’s time to attach the hinges to the door and frame. Place the hinge against the pilot holes on the door, aligning it with the marks you made earlier. Insert the screws through the hinge holes and into the pilot holes, ensuring a tight fit. Use a screwdriver or a drill with a screwdriver bit to tighten the screws securely. Repeat this process for each hinge on the door. Once the hinges are attached to the door, repeat the same steps for the frame. Ensure that the hinges are aligned properly and the door swings smoothly.
Note: Make sure to refer to any manufacturer instructions or guidelines for specific details on attaching the hidden door hinges, as different types of hidden doors may require variations in the installation process.
Congratulations! You have successfully attached the hidden door hinges. This step brings you one step closer to completing your hidden door installation. In the next section, we will explore how to install the door handle and any finishing touches necessary to complete your hidden door project.
Mounting The Hidden Door
When it comes to installing a hidden door, the most crucial step is mounting the door. This step involves placing the door onto the hinges, adjusting the hinges for proper alignment, and securely attaching the door to the frame. Each of these steps is essential to ensure that your hidden door functions properly and seamlessly integrates into your surroundings. In this section, we will guide you through the process of mounting your hidden door, using HTML syntax to make it easy for you to follow along.
Place the door onto the hinges
To begin, make sure you have prepared the door and frame for installation. Once you have ensured that the hinges are properly positioned on the door frame, it’s time to place the door onto the hinges. Carefully align the hinges with the hinge mortises on the door and gently slide the door into place. Ensure that the door sits flush against the frame and rests evenly on the hinges.
Adjust the hinges for proper alignment
Once the door is in place, it’s essential to adjust the hinges for proper alignment. This step ensures that the door swings smoothly and evenly without any friction or obstructions. Begin by loosening the hinge screws slightly, allowing for slight movement. Using a level, check the door to see if it is plumb and level. If adjustments are needed, gradually tighten or loosen the hinge screws until the desired alignment is achieved.
Securely attach the door to the frame
Finally, to complete the process of mounting the hidden door, you must securely attach the door to the frame. Using a screwdriver or drill, tighten the hinge screws firmly, making sure they are securely fastened to the frame. Ensure that each screw is tightened evenly to prevent any misalignment or wobbling. This step guarantees the stability and longevity of your hidden door, providing a secure and seamless installation.
Finishing Touches And Testing
Once you have successfully installed the hidden door, it is time for the final steps – the finishing touches and testing. This stage is crucial to ensure that the hidden door seamlessly integrates into your space and operates smoothly. In this section, we will cover installing trim or casing, applying paint or stain, and testing the hidden door for both functionality and security. By following these steps, you can add the perfect finishing touches to your hidden door installation project.
Install any necessary trim or casing
If you want your hidden door to blend in seamlessly with its surroundings, installing trim or casing is essential. This step creates a polished look and ensures that the hidden door doesn’t stand out in the room. Firstly, measure the dimensions of the doorway and purchase the appropriate trim or casing material. Then, cut the trim or casing to size using a miter saw or a similar cutting tool. Next, attach the trim or casing to the doorway using finish nails or a brad nailer. Make sure to secure it firmly to prevent any future movement or damage. Once the trim or casing is secured, you can proceed to the next step of applying paint or stain.
Apply paint or stain to match the surrounding decor
To achieve a cohesive look, it is crucial to paint or stain the hidden door to match the surrounding decor. This step ensures that the hidden door becomes an inconspicuous part of the room rather than a standout feature. Before you start painting or staining, make sure to prepare the surface by sanding it smooth and filling any imperfections with wood filler. If you opt for paint, choose a color that matches or complements the existing color scheme. Alternatively, if you prefer the natural wood look, consider staining the door with a color that matches the surrounding woodwork. Apply multiple coats, allowing each coat to dry completely, and ensure even coverage. Once the paint or stain dries, the hidden door will seamlessly blend into your space.
Test the hidden door for smooth operation and security
After completing the finishing touches, it is crucial to test the hidden door for smooth operation and optimal security. Testing ensures that the hidden door functions properly and provides the desired level of security. Begin by opening and closing the door multiple times, checking for any sticking points or misalignment. Pay attention to the hinges, latches, and any mechanical components to ensure they operate smoothly. If necessary, make slight adjustments to improve the door’s functionality. Additionally, test the secret mechanism or lock to verify that it securely locks and unlocks without any issues. This step ensures that the hidden door not only looks great but also provides the intended functionality and offers peace of mind.
Tips For Concealing The Hidden Door
When it comes to installing a hidden door in your home, one of the most important aspects to consider is how to conceal it effectively. A hidden door should seamlessly blend into the room, creating an illusion that it is simply a part of the wall or furniture. In this article, we will explore some tips that will help you effectively camouflage your hidden door, ensuring it remains concealed from prying eyes.
Use camouflage techniques to disguise the door
To effectively hide your hidden door, consider using camouflage techniques that will help it blend seamlessly into the surrounding environment. One way to achieve this is by matching the door’s color and texture to the adjacent wall or furniture. For example, if your wall has a textured finish, replicate the texture on the door to make it appear as an extension of the wall. Additionally, you can utilize paint or wallpaper to mimic the surrounding patterns and colors, further camouflaging the door. By carefully selecting the materials and finishes, you can ensure your hidden door remains undetectable to anyone who is unaware of its presence.
Incorporate a bookshelf or wall decor to blend the door
An excellent way to conceal a hidden door is by incorporating it into a bookshelf or wall decor. By installing the door within a bookshelf, you can create an ingenious disguise that will fool even the most observant eyes. Arrange books on the shelf strategically to create an illusion of a functional book collection and allow the door to seamlessly blend in. Similarly, you can use wall decor such as paintings or framed artwork to help disguise the door. Placing the door behind a large canvas painting, for instance, can effectively hide it from sight. By utilizing these methods, you not only conceal the door but also add an aesthetic appeal to your living space.
Ensure the hidden door seamlessly integrates into the room
For a hidden door to remain truly concealed, it is essential to ensure it seamlessly integrates into the room. This means considering factors such as lighting, flooring, and architectural details. If the room has recessed lighting, incorporate similar lighting fixtures around the hidden door to maintain a consistent look. Similarly, if the flooring consists of hardwood or tile, make sure the door’s threshold matches seamlessly with the existing flooring material. Additionally, consider the architectural details of the room, such as molding or trimwork, and replicate these details on the door to create a cohesive look. By carefully attending to these integration aspects, you can achieve a hidden door that remains practically invisible to the unsuspecting eye.
In conclusion, concealing a hidden door requires careful consideration of its camouflage, integration, and disguise techniques. By utilizing camouflage techniques, incorporating the door into existing furniture or decor, and ensuring seamless integration, you can create a hidden door that remains entirely undetected. Whether you choose to hide your door behind a bookshelf or blend it into the wall, these tips will help you achieve a concealed entrance that adds a touch of intrigue and mystery to your home.
Maintenance And Troubleshooting
Maintaining and troubleshooting your hidden door is crucial to ensure its long-term functionality and security. By regularly inspecting and lubricating the hinges, checking for any signs of wear or damage, and troubleshooting any issues that arise, you can keep your hidden door in optimal condition. Follow these simple steps to keep your hidden door functioning smoothly:
Regularly inspect and lubricate the hinges
Inspecting and lubricating the hinges is an essential part of maintaining a hidden door. Over time, dust, debris, and everyday use can cause the hinges to become stiff or squeaky. To prevent this, regularly clean the hinges and apply a suitable lubricant that will reduce friction and allow smooth operation. You can use a specialized door lubricant or even WD-40 to keep the hinges well-lubricated.
Check for any signs of wear or damage
It’s important to inspect your hidden door for any signs of wear or damage, as these issues can compromise its security and functionality. Look for cracks, dents, or loose components that may need repair. Additionally, check the weather stripping around the door to ensure it is intact and properly sealed. Addressing any wear or damage promptly will prevent further issues and ensure the longevity of your hidden door.
Troubleshoot any issues with the hidden door
If you encounter any problems with your hidden door, it’s essential to troubleshoot the issues promptly. Some common issues include the door not closing properly, difficulty in operating the locking mechanism, or misalignment of the door frame. Begin by carefully examining the door’s components to identify the source of the problem. You may need to adjust the hinges, tighten loose screws, or realign the door frame to resolve the issue. If the problem persists, it’s best to consult a professional for assistance.
Frequently Asked Questions For How To Install A Hidden Door
How Hard Is It To Install A Hidden Door?
Installing a hidden door is not overly difficult. It requires careful planning and precise measurements. With the right tools and materials, the installation process can be completed successfully. Following a step-by-step guide and seeking professional assistance when needed can make the installation easier.
How Much Does It Cost To Install A Hidden Door?
The cost of installing a hidden door can vary depending on factors like size, materials used, and complexity. On average, you can expect to pay between $1,000 and $5,000 for installation.
How Do You Make A Hidden Door?
To make a hidden door, first, choose a suitable location and measure the door size. Then, determine the type of hidden door, such as a bookcase or mirror, and gather the necessary materials. Cut and assemble the door carefully, ensuring it blends in with the surrounding wall.
Install hinges and a magnetic latch for easy opening and closing. Finally, test the door to ensure it functions properly and remains hidden.
How Do You Install A Murphy Door?
To install a Murphy door, follow these steps: 1) Measure and mark the location where you want the door installed. 2) Attach the track hardware to the wall and floor. 3) Hang the door slab onto the track. 4) Adjust the door for proper alignment and functionality.
5) Secure the door and enjoy your new hidden door.
How Can I Install A Hidden Door?
Installing a hidden door involves finding the right location, measuring accurately, and following step-by-step instructions.
What Tools Do I Need To Install A Hidden Door?
To install a hidden door, you’ll typically need a drill, screws, a level, a saw, a measuring tape, and hinges.
Conclusion
Installing a hidden door can be a fun and exciting project that adds a touch of mystery and elegance to your home. By following the step-by-step guide provided in this blog post, you can successfully install a hidden door that seamlessly blends into your existing interior design.
Remember to choose the right door and hardware, measure carefully, and take your time to ensure a perfect fit. With a hidden door, you can add a unique element to your home that will impress your guests and provide a sense of wonder for years to come.
So go ahead, embark on this DIY adventure and enjoy the hidden delights that lie behind your secret door.