To install a door closer, first, measure and mark the appropriate position on the door frame and the door itself. Then, attach the closer body to the frame and connect the arm to both the closer body and the door.
Finally, adjust the closing speed and make any necessary tweaks for optimal functioning. Installing a door closer requires measuring, attaching, and adjusting components for proper functionality.
Factors To Consider When Selecting A Door Closer
Installing a door closer is an essential step in ensuring the safety and functionality of your door. However, with so many options available in the market, selecting the right door closer can be a daunting task. To make the process easier, consider these factors when choosing a door closer:
Door Weight and Size
One of the primary considerations when selecting a door closer is the weight and size of the door. The door closer should be able to handle the weight and size of the door to ensure smooth operation. It is important to check the manufacturer’s specifications for each door closer to determine its maximum weight and size capacity. Installing a door closer that is not suitable for the door can lead to problems such as door misalignment or difficulty in opening and closing the door properly.
Type of Door (Wood, Metal, Glass)

The type of door also plays a crucial role in selecting the right door closer. Different materials require different types of door closers for optimal performance. For example, wood doors may require a different type of closer than metal or glass doors. It is important to consider the material of the door when choosing a door closer to ensure compatibility and longevity.
Fire Rating Requirements
Fire safety is a critical consideration when choosing a door closer, especially in commercial buildings or places where fire safety regulations are stringent. Certain doors may require door closers with fire rating certifications to ensure they comply with fire safety standards. It is important to consult local fire safety codes and regulations to determine the specific fire rating requirements for your doors. Look for door closers that have been tested and certified to meet the appropriate fire ratings.
ADA Compliance
Another important factor to consider is ADA (Americans with Disabilities Act) compliance. ADA regulations ensure that buildings are accessible to individuals with disabilities. When selecting a door closer, make sure it complies with ADA requirements, such as providing sufficient clearance for wheelchair users to pass through the door. ADA-compliant door closers typically have adjustable closing speeds and opening forces, allowing for easy access for everyone.
Aesthetics
While the primary focus when selecting a door closer should be functionality and safety, aesthetics also play a role, especially in residential or design-conscious environments. Door closers are available in a variety of finishes and styles to match the overall design of the door and the surrounding area. Consider selecting a door closer that complements the aesthetics of the door and enhances the overall visual appeal.
Considering these factors when selecting a door closer will ensure that you choose the right one for your specific needs. Whether it’s for a commercial building, a residential property, or any other type of space, selecting the appropriate door closer is crucial for both safety and convenience.
Types Of Door Closers
When it comes to door closers, there are several types to choose from, each designed for specific applications and preferences. Let’s take a closer look at the different types of door closers available:
Surface-mounted door closers
Surface-mounted door closers are the most common type of door closers used in commercial and residential buildings. These closers are installed on the surface of the door and frame, making them easy to install and maintain. They are typically visible when the door is closed, but can be adjusted to fit the aesthetic of the space. Surface-mounted door closers are versatile and can be used on a wide range of doors, including wood, metal, and glass.
Concealed door closers
Concealed door closers are designed to be hidden from view, making them a popular choice for applications where aesthetics are important. These closers are installed inside the door or frame, providing a clean and seamless look. Concealed door closers require precise installation and adjustment, but once properly set up, they provide smooth and controlled door closing action.
Floor-spring door closers
Floor-spring door closers are floor-mounted devices that control the closing action of heavy doors, such as glass doors or double-acting doors. These closers are installed in the floor and are hidden from view, allowing for a clean and unobtrusive look. Floor-spring door closers are suitable for high-traffic areas and can handle heavy doors with ease.
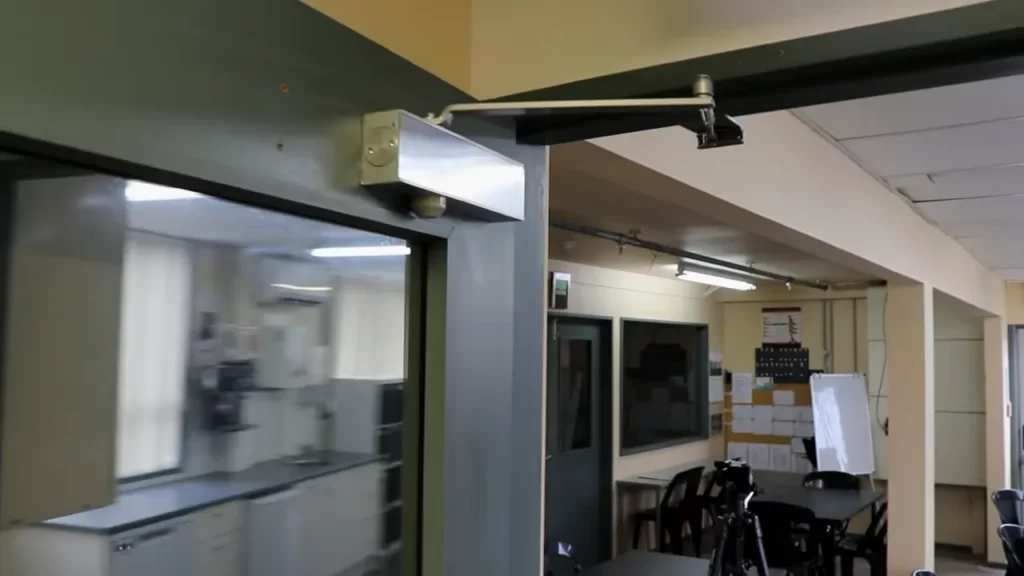
Overhead door closers
Overhead door closers, also known as surface-applied door closers, are installed on the door frame above the door. These closers are typically used on exterior doors and are visible when the door is closed. Overhead door closers are durable and reliable, making them a popular choice for commercial applications. They provide adjustable closing force and speed to ensure smooth and controlled door operation.
Transom door closers
Transom door closers are designed for doors with transoms or sidelights. These closers are installed above the door and provide controlled closing action while preserving the architectural integrity of the transom. Transom door closers are compact and discreet, making them a preferred choice for applications where aesthetics are important.
Now that you have a better understanding of the various types of door closers available, you can choose the one that best fits your needs and the requirements of your space. Whether you opt for a surface-mounted door closer, a concealed door closer, a floor-spring door closer, an overhead door closer, or a transom door closer, each type has its own advantages and will provide reliable and controlled closing action for your doors.
Tools And Equipment Needed
When it comes to installing a door closer, having the right tools and equipment is essential. These tools will not only make the installation process easier but also ensure that the door closer functions properly. Here are the tools you’ll need:
Screwdriver
A screwdriver is a must-have when installing a door closer. You’ll use it to remove the screws from the old closer and attach the new one to the door. Make sure you have a screwdriver with the appropriate size and type of head to fit the screws you’ll be working with.
Drill
In some cases, you may need a drill to create new holes for the door closer. This is especially true if you’re installing a surface-mounted closer or if the existing holes don’t line up with the new closer. Having a drill with the right drill bits will make the process quicker and more efficient.
Measuring tape
Accuracy is key when installing a door closer. A measuring tape will allow you to measure the correct distance for the closer placement on both the door and the frame. This will ensure that the door closes smoothly and securely.
Pencil
A pencil is a handy tool for marking the spots where you’ll be drilling or attaching the new door closer. By marking these spots, you’ll have a visual guide to follow and minimize the risk of errors during installation.
Level
To ensure that the door closer is installed straight and level, a level tool is necessary. It will help you determine if the door and the closer are aligned properly, preventing any issues with the door’s functionality. These tools are vital for a successful door closer installation. Gather them before you start the process to save time and make the installation go smoothly. By having the right tools on hand, you’ll be one step closer to improving the functionality and security of your door.
Inspecting And Preparing The Door
Inspecting and preparing the door before installing a door closer is crucial to ensure proper functionality and longevity of the closer. Follow these simple steps to prepare your door:
1. Check door condition
Start by checking the overall condition of your door. Look for any damages, such as cracks, dents, or warping, that may affect the installation or operation of the door closer. Ensure that the door is properly aligned and securely fastened to the frame. If you notice any major issues, it’s recommended to address them before proceeding with the installation.
2. Clean and prep door surface
Clean the surface of the door where the door closer will be mounted. Remove any dirt, dust, or debris using a damp cloth. If there is existing paint or finish on the door, it’s advisable to lightly sand the area to ensure proper adhesion of the closer. Wipe away any sanding residue with a clean cloth.
3. Measure and mark the door for closer placement
Measure the door to determine the optimal placement for the door closer. Generally, the closer is installed on the hinge side of the door, about two-thirds of the way up from the bottom of the door. This placement allows for smooth operation and sufficient closing force. Using a pencil or marker, make a small mark on the door at the desired location for the closer. Take into consideration any obstructions, such as handles or locks, that may interfere with the installation or operation of the closer. Double-check the accuracy of your measurements before proceeding.
4. Ensuring each H3 heading adheres to HTML syntax
In HTML, the H3 heading syntax is as follows: “`
Heading Text
“` Make sure to include this syntax for each H3 heading in your blog post to ensure proper formatting and organization of your content. By following these steps to inspect and prepare your door, you are setting a solid foundation for the installation of your door closer. A well-prepared door will ensure smooth operation and optimal performance of the closer in the long run. So, take the time to properly assess the condition of your door, clean the surface, and accurately mark the placement of the closer.
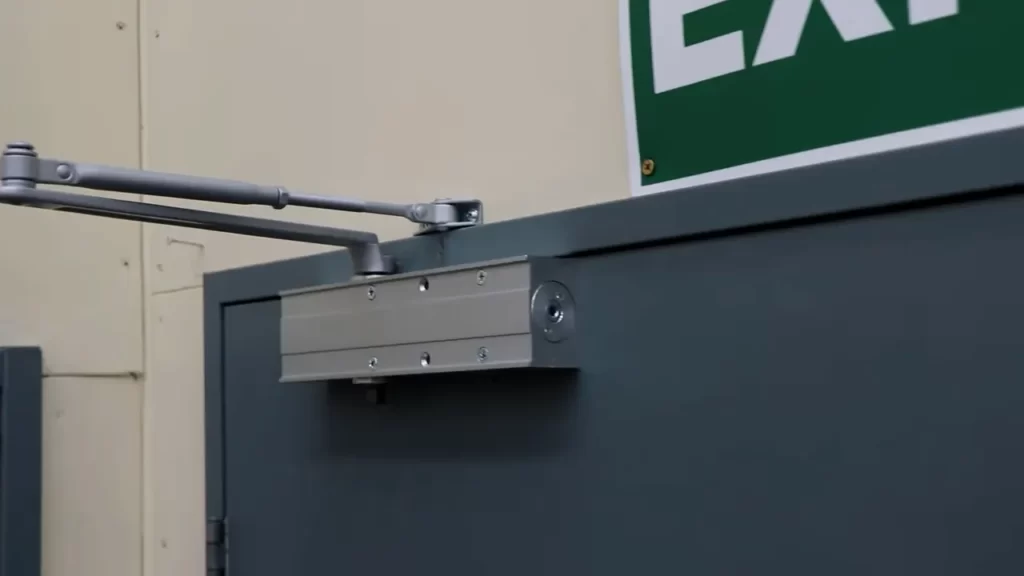
Mounting The Door Closer Body
Mounting the door closer body is an essential step in installing a door closer. This process involves identifying the appropriate location on the door frame and attaching the closer body securely using screws and a drill.
Identify the appropriate location on the door frame
To begin, you need to identify the ideal spot on the door frame for mounting the door closer body. Start by determining the closer’s position so that it aligns with the door’s swing. Make sure to leave enough clearance for the door to open and close smoothly without any obstruction. Additionally, consider the type and weight of the door to determine the appropriate closer size and strength.
Once you have determined the right location, mark the spot on the door frame with a pencil or marker. This is crucial to ensure accurate installation and proper functionality of the door closer.
Attach the closer body using screws and a drill
Now that you have identified the suitable location, it’s time to attach the door closer body. First, gather the necessary tools, including screws and a drill. It is recommended to use the screws provided with the door closer for optimum compatibility and stability.
Position the door closer body against the marked spot on the door frame, ensuring that it aligns with the door’s swing and the markings you made earlier. Hold the closer body firmly in place while inserting the screws into the pre-drilled holes on the closer and the door frame.
Using a drill, tighten the screws until the door closer body is securely fastened to the door frame. This step is critical as it ensures the door closer remains stable and properly functions when opening and closing the door.
It is crucial to pay close attention to the manufacturer’s instructions and specifications while installing the door closer. This will help ensure correct installation and optimal performance.
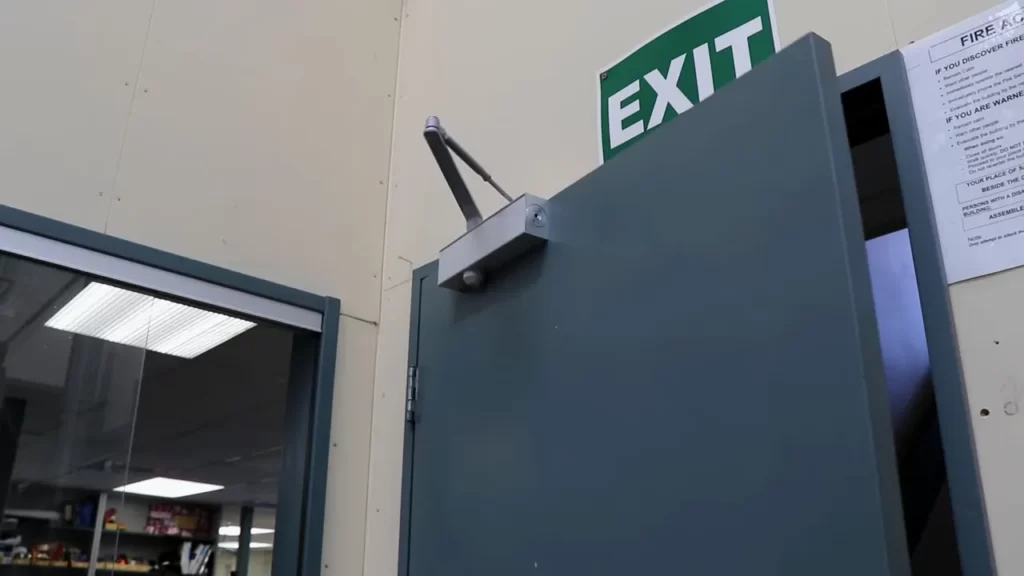
Installing The Arm And Arm Bracket
Once you’ve successfully mounted the door closer body and prepared the door for installation, it’s time to move on to the next step: installing the arm and arm bracket. This crucial part of the installation process ensures that the door closer functions correctly and effectively. In this section, we’ll guide you through the process, step by step.
Attach the arm bracket to the door
To start, you’ll need to attach the arm bracket to the door. This bracket serves as the connection point between the door and the door closer arm. Here’s how you do it: 1. First, determine the ideal location for the arm bracket on the door. This is typically on the top surface of the door, near the hinge side. 2. Align the arm bracket with the chosen location and mark the screw holes with a pencil or marker. Make sure the bracket is level to ensure proper installation. 3. Using a drill, carefully create pilot holes at the marked screw hole locations. These holes will allow you to screw the arm bracket securely into the door. 4. Place the arm bracket back in position and insert the screws through the bracket holes into the pilot holes. Use a screwdriver or drill to tighten the screws, ensuring the bracket is firmly attached to the door. Be careful not to overtighten and strip the screw holes. Once you’ve successfully attached the arm bracket to the door, you’re ready to proceed to the next step.
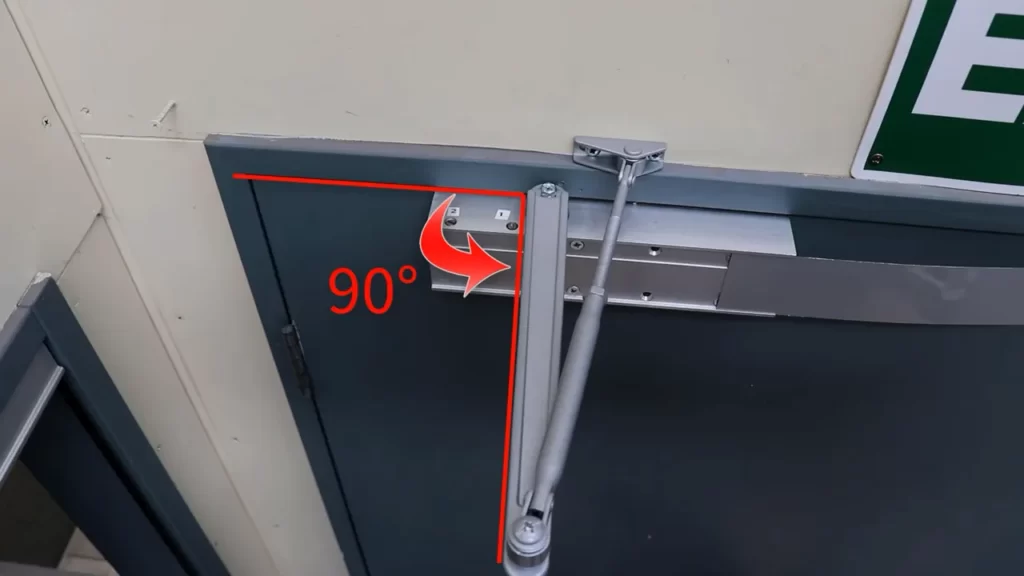
Connect the arm to the arm bracket and closer body
With the arm bracket securely installed, it’s time to connect the arm to both the arm bracket and the door closer body. This connection allows the door to open and close smoothly and in a controlled manner. Follow these steps to complete the process: 1. Position the door closer arm so that it aligns with both the arm bracket and the closer body. Make sure the arm is at a right angle to the door when in the closed position. 2. Insert the arm spindle into the arm bracket, aligning the holes on both parts. 3. Secure the arm and arm bracket connection by inserting a pin or screw through the aligned holes. This will ensure that the arm remains attached and functions properly. 4. Next, connect the other end of the door closer arm to the closer body, following the manufacturer’s instructions. This typically involves inserting the arm spindle into the corresponding hole on the closer body and securing it with a pin or screw. 5. Once the arm is securely attached to both the arm bracket and the closer body, test the door by opening and closing it. The door should move smoothly and close gradually without slamming shut. By following these simple steps, you can successfully install the arm and arm bracket of a door closer. This not only enhances the functionality of the door closer but also improves the overall security and safety of your door.
Adjusting The Closing Speed And Latching Action
Locate the Adjustment Valves on the Closer Body
Before you can adjust the closing speed and latching action of your door closer, you need to locate the adjustment valves on the closer body. These valves are usually located on the top or side of the closer, depending on the model. Refer to the manufacturer’s instructions to ensure you find the right valves for adjustment.
Adjust the Closing Speed and Latching Action to Desired Settings
Now that you’ve located the adjustment valves, it’s time to adjust the closing speed and latching action to your desired settings. This process requires a bit of trial and error to achieve the perfect balance between an efficient closing speed and a secure latching action.
Here’s how you can adjust the closing speed and latching action:
- Step 1: Start with a neutral or midpoint setting on the adjustment valves. This ensures a starting point from where you can fine-tune the speed and action. It’s important to note that each adjustment valve controls a different aspect, so make sure you understand which valve controls which setting.
- Step 2: Begin with the closing speed adjustment valve. This valve controls the speed at which the door closes. Turn the valve clockwise to increase the closing speed and counterclockwise to decrease it. Make small adjustments and test the door after each adjustment to find the optimal speed.
- Step 3: Once you’re satisfied with the closing speed, move on to the latching action adjustment valve. This valve determines how forcefully the door latches into the frame. Similar to the closing speed valve, turning it clockwise increases the force, while turning it counterclockwise decreases it. Again, make gradual adjustments and test the door to ensure it latches securely without slamming.
Remember to make small adjustments and test the door after each adjustment to achieve the desired closing speed and latching action. Finding the right balance ensures that your door closes smoothly and securely. Once you’ve made the adjustments, tighten the adjustment valves to secure the settings in place. Finally, take a step back and admire your perfectly installed and adjusted door closer!
Testing The Door Closer
Once you have successfully installed the door closer, it is crucial to test its functionality to ensure smooth operation and proper closing speed. Testing the door closer will allow you to verify that it is installed correctly and functioning as intended. Follow the steps below to effectively test your door closer.
Open and close the door to test the functionality
The first step in testing the door closer is to open and close the door multiple times. This will help you determine if the door closer is working properly. As you open the door, observe whether the door closer is smoothly controlling the opening motion. Similarly, as you release the door, pay attention to how the door closer smoothly closes it without any jerking or slamming.
To get accurate results, test the door closer in different scenarios, such as opening the door partially and releasing it, or opening the door at different angles. This will help you confirm that the door closer is functioning consistently in all situations.
Ensure smooth operation and proper closing speed
During the testing process, pay close attention to the smoothness of operation and the closing speed of the door closer. The door should move smoothly throughout the entire opening and closing cycle. If you notice any jerking or difficulty in the movement, it may indicate an issue with the installation or adjustment of the door closer.
The closing speed of the door should also be within the desired range. A door closer that closes too slowly can pose a security risk, while one that closes too quickly may cause the door to slam shut forcefully, potentially damaging the door or causing injury.
To ensure the proper closing speed, you may need to make adjustments using the speed control valve or adjusting screw provided by the manufacturer. Refer to the instruction manual or contact the manufacturer for guidance on adjusting the closing speed of your specific door closer model.
By thoroughly testing the functionality, smooth operation, and proper closing speed of your newly installed door closer, you can ensure that it functions optimally and provides the desired level of security and convenience. Regular testing and maintenance of the door closer will help prolong its lifespan and keep your door operating smoothly for years to come.
Troubleshooting Common Issues
Door not closing properly
If your door is not closing properly, there could be a few reasons for this issue. First, check the positioning of the door closer. Make sure it is installed at the correct height and angle. This can greatly affect the functionality of the closer. If the closer is not positioned correctly, the door may not fully close or may slam shut.
Another common issue is the strength of the door closer. If the closer is set too weak, it may not have enough power to fully close the door. On the other hand, if it is set too strong, it may cause the door to slam shut forcefully. Adjusting the strength of the closer can help ensure the door closes properly.
If adjusting the positioning and strength of the door closer does not solve the issue, there may be an underlying problem with the door itself. Check for any obstructions or damages that may be preventing the door from closing properly. It may be necessary to repair or replace the door if the issue persists.
Door closing too quickly or slowly
If your door is closing too quickly or slowly, it is likely a problem with the speed adjustment of the door closer. Most door closers have a speed adjustment mechanism that controls the closing speed of the door. If the adjustment is set too high, the door may close too quickly. If it is set too low, the door may close too slowly.
To adjust the speed, locate the speed adjustment screw on the door closer. Turning it clockwise will slow down the closing speed, while turning it counterclockwise will speed it up. Make small adjustments and test the door after each adjustment to achieve the desired speed.
Arm and bracket alignment issues
If you notice that the arm and bracket of the door closer are misaligned, it can cause the door to not close properly. This misalignment can result from improper installation or normal wear and tear over time. To fix this issue, follow these steps:
- Loosen the screws on the bracket that holds the arm in place.
- Manually move the arm into the correct position, aligning it with the door closer body.
- Tighten the screws on the bracket to secure the arm in place.
- Test the door to ensure it closes properly without any obstructions or resistance.
It is important to regularly check the alignment of the arm and bracket to prevent any future issues with the door closer. If the misalignment persists or worsens, it may be necessary to replace the door closer or consult a professional for further assistance.
Regular Maintenance
Regular maintenance is crucial for ensuring the proper functioning and longevity of your door closer. By taking the time to clean, lubricate, and inspect your door closer on a regular basis, you can prevent issues and avoid costly repairs down the line.
Cleaning and Lubricating the Door Closer
In order to maintain optimal performance, it’s important to clean and lubricate your door closer regularly. This helps remove dirt, debris, and any accumulated grime that may affect its operation. Here’s a simple step-by-step guide to cleaning and lubricating your door closer:
- Begin by removing any visible dirt or dust from the surface of the door closer using a soft cloth or brush.
- Next, inspect the door closer for any signs of corrosion or rust. If you notice any, gently scrub the affected areas with a mild detergent and water solution.
- Once the door closer is clean, it’s time to lubricate the moving parts. Use a high-quality silicone-based lubricant and apply it to the hinges, pivot points, and other moving components of the door closer.
- Be cautious not to over-lubricate, as this can attract more dirt and debris, leading to potential issues.
By regularly cleaning and lubricating your door closer, you can ensure that it operates smoothly and silently.
Inspecting for any Signs of Wear or Damage
In addition to cleaning and lubricating your door closer, it’s essential to inspect it for any signs of wear or damage. Regular inspections can help you identify potential issues early on and take the necessary steps to prevent further damage. Here’s what you should look out for:
- Check the mounting screws to ensure they are tight and secure.
- Inspect the closer arm for any signs of cracks or loose connections.
- Examine the hydraulic cylinder for leaks or visible damage.
- Test the door closer’s closing force by opening the door partially and releasing it. Make sure it closes smoothly and without resistance.
- Listen for any unusual sounds while operating the door closer, as this may indicate internal issues.
If you notice any abnormalities during the inspection, it’s important to address them promptly. Depending on the severity of the issue, you may need to tighten screws, replace damaged parts, or consult a professional for further assistance.
Regular maintenance of your door closer is essential to keep it functioning optimally and extend its lifespan. Cleaning and lubricating the door closer, as well as inspecting for wear and damage, should be included as part of your overall maintenance routine. By following these simple steps, you can ensure that your door closer operates smoothly and provides reliable performance for years to come.
Troubleshooting Routine Problems
Installing a door closer can greatly improve the functionality and security of your door. However, like any mechanical device, door closers can sometimes encounter problems. In this section, we will explore common issues that you may come across during the installation process, and the troubleshooting steps you can take to resolve them. Keep in mind that if you are unsure about any of the steps or encounter more complex issues, it is recommended to consult a professional for assistance.
Identifying and fixing common issues
When it comes to troubleshooting routine problems with a door closer, it is important to identify the specific issue first. By observing and analyzing the behavior of the door closer, you can determine the appropriate steps for fixing the problem. Here are some common issues you may encounter:
| Problem | Solution |
|---|---|
| The door closes too slowly | Adjust the closing speed setting using the adjustment valve located on the door closer. Turn the valve clockwise to increase the speed or counterclockwise to decrease it. |
| The door slams shut | Adjust the latching speed setting using the adjustment valve. Turn the valve clockwise to slow down the latching speed or counterclockwise to speed it up. |
| The door doesn’t close fully | Check for any obstructions that may be preventing the door from closing completely. Clear any debris or objects that are blocking the door’s path. Also, examine the doorframe and hinges for misalignment, and make necessary adjustments. |
| The door closer leaks oil | Inspect the oil seals for signs of damage or wear. If the seals are worn out, replace them with new ones. Additionally, check the oil level and refill if necessary. |
Replacing worn-out parts if necessary
If you have identified that a specific part of the door closer is causing the problem, it may need to be replaced. Over time, certain components such as the arm, spring, or seal can wear out and affect the performance of the door closer. To replace a worn-out part:
- Consult the manufacturer’s instructions for the specific door closer model to ensure you have the correct replacement part.
- Remove the faulty part by following the instructions provided.
- Install the new part in its place, making sure it is securely attached and aligned correctly.
- Test the door closer to ensure that the problem has been resolved.
By following these troubleshooting steps and being proactive about maintenance, you can ensure that your door closer operates smoothly and efficiently. Remember to perform routine checks and address any issues promptly to prolong the lifespan of your door closer and maintain optimal functionality.
Frequently Asked Questions Of How To Install Door Closer
Are Door Closers Easy To Install?
Yes, door closers are easy to install.
How Do You Install A Door Closer On A Storm Door?
To install a door closer on a storm door, follow these steps: 1. Begin by attaching the bracket of the closer to the door frame. 2. Attach the arm of the closer to the storm door. 3. Adjust the tension on the closer to ensure the door closes smoothly.
4. Test the door to ensure it closes properly. 5. Make any necessary adjustments until the door closes securely.
What Is The Common Problem Of Door Closer?
A common problem of door closers is that they may not close properly or at the desired speed. They might also make squeaking or grinding noises when opening or closing. Additionally, door closers can become misaligned or leak oil, affecting their performance.
Regular maintenance can help prevent these issues.
Should I Install Door Closer Top Or Bottom?
Install the door closer at the top of the door for optimal performance. Placing it at the bottom may not provide the desired control and function.
How Do You Install A Door Closer?
To install a door closer, first, ensure you have the necessary tools and follow the manufacturer’s instructions for your specific model.
What Tools Do You Need To Install A Door Closer?
To install a door closer, you will need a drill, screws, a screwdriver, a tape measure, and a pencil.
Conclusion
Installing a door closer is a simple but crucial step in ensuring the safety and functionality of your doors. By following the step-by-step instructions outlined in this guide, you can easily install a door closer without any hassle. Remember to choose the right door closer based on your specific needs, and always prioritize safety while working with tools and equipment.
With the door closer properly installed, you can enjoy improved security and convenience in your home or workplace. Happy door closing!