o install new door hinges, first, remove the old hinges from the door and frame using a screwdriver. Then, align the new hinges with the existing holes and secure them in place with screws.
When it comes to installing new door hinges, the process is relatively straightforward. However, it is important to follow the correct steps to ensure a proper fit and functionality. We will provide a concise guide on how to install new door hinges, making it easy for you to complete this task successfully.
By following our step-by-step instructions, you will be able to replace your door hinges effectively without any hassle. So, let’s dive in and learn the process of installing new door hinges in a few simple steps.
Signs That Indicate The Need For New Door Hinges:
If you’ve noticed issues with your doors such as squeaking, misalignment, or difficulty in closing them, it might be time to consider replacing the door hinges. In this article, we will discuss the different signs that indicate the need for new door hinges and provide you with a step-by-step guide on how to install them.
Door squeaking or making unusual noises
One of the most common signs that your door hinges need to be replaced is when they start squeaking or making unusual noises. This could be due to the accumulation of dirt, rust, or wear and tear on the hinges themselves. If ignored, the squeaking may worsen and eventually lead to the hinges becoming completely dysfunctional.
Door not closing properly
If you’re having trouble closing your door, it could be a clear indication that the hinges need attention. Over time, hinges can become loose, causing the door to sag or not align correctly with the frame. This misalignment often results in the door not closing properly or leaving gaps around the edges, affecting both the aesthetic and functional aspects of your door.
Door sagging or misaligned
A sagging door is a tell-tale sign that your door hinges are not functioning as they should. When hinges wear out or become damaged, they can no longer support the weight of the door properly, causing it to sag or become misaligned. This not only affects the appearance of your door but also makes it difficult to open and close smoothly.
Excessive wear or damage to the hinges
If you inspect your door hinges and notice excessive wear or visible damage such as cracks, breaks, or missing parts, it’s time to replace them. Hinges that are worn out or damaged can compromise the overall stability and security of your door, as they may not be able to provide the necessary support. Replacing them promptly ensures the longevity and smooth operation of your doors.
By paying attention to these signs and taking timely action, you can prevent further damage to your doors and maintain their functionality. In the next section, we will guide you on how to install new door hinges to resolve these issues effectively.
Benefits Of Replacing Door Hinges:
Improved functionality and smooth operation of the door
One of the primary benefits of replacing door hinges is the improved functionality and smooth operation of the door. Over time, hinges can become worn out or rusty, making it difficult to open and close the door smoothly. By installing new door hinges, you can restore the door’s functionality, allowing it to glide effortlessly without any creaking or sticking. This ensures a seamless experience every time you open or close the door. Whether it’s a front door, a bedroom door, or a cabinet door, replacing the hinges can make a noticeable difference in how smoothly it operates.
Enhanced security and safety
Another crucial advantage of replacing door hinges is enhanced security and safety. Hinges that are old or compromised can pose a security risk as they may not provide adequate protection against forced entry. By installing new hinges, you can ensure a secure barrier that reinforces the door’s strength and stability. This helps to deter potential intruders and provides peace of mind knowing that your property is well-protected. Additionally, new hinges often come with advanced security features such as non-removable pins or tamper-resistant screws, further safeguarding your home or office.
Preventing further damage to the door or frame
When door hinges deteriorate, they can cause damage to the door or frame. Loose hinges can lead to misalignment, resulting in scratches, dents, or even cracks on the door and frame. This not only affects the appearance of your door but can also impact its durability. By replacing the hinges in a timely manner, you can prevent further damage and preserve the structural integrity of the door. New hinges will help ensure proper alignment, preventing any unnecessary strain or stress on the door or frame, thus extending their lifespan.
Upgrading the overall aesthetics of the door
In addition to improved functionality and security, replacing door hinges can also upgrade the overall aesthetics of the door. Hinges that are rusty, dirty, or mismatched can significantly impact the visual appeal of your door, disrupting its overall aesthetic. By installing new hinges, you can give your door a fresh look, enhancing its appearance and complementing its style. Whether you opt for sleek and modern hinges or traditional and ornate ones, choosing the right hinges can add a touch of elegance and sophistication to any door, instantly revitalizing its appearance.
Gather The Necessary Tools And Materials:
Before you can begin installing new door hinges, it’s important to gather all the necessary tools and materials. With the right equipment on hand, the installation process will be smooth and efficient. Here are the essential items you’ll need:
Screwdriver (Phillips or flathead)
The first tool you’ll need is a reliable screwdriver. Depending on the type of screws used for your door hinges, you’ll want either a Phillips or flathead screwdriver. Make sure you have a screwdriver that fits snugly into the screw heads to avoid any slipping or stripping of the screws during installation.
New door hinges
Of course, you’ll need new door hinges for the installation. Choose hinges that are suitable for the size and weight of your door. It’s recommended to invest in high-quality hinges to ensure longevity and durability. Consider the finish of the hinges as well, to match the overall aesthetic of your door and the surrounding décor.
Screws
Along with the new door hinges, you’ll need screws to secure them in place. Check the packaging of your hinges to determine the appropriate size and type of screws to use. It’s important to use screws that are long enough to penetrate through the door and into the door frame, providing a secure and stable connection.
Drill (if necessary)
In some cases, a drill may be necessary for installing door hinges. If you’re replacing old hinges with new ones that have different screw hole placements, you may need to drill new holes for the screws. Ensure you have a drill with the appropriate drill bit size for the specific screws you’ll be using. This will ensure accurate and clean holes.
Measuring tape
Precision is key when installing door hinges, and a measuring tape is an essential tool for accurate measurements. Measure the dimensions of both the door and the door frame to ensure the hinges are aligned and positioned correctly. This will help prevent any issues with the door’s functionality or appearance.
Pencil
A pencil may seem like a simple tool, but it’s crucial for marking the exact locations for the hinges and screw holes. Use a pencil to outline the hinge locations and mark where the screws will go. This will serve as a guide during the installation process, ensuring proper alignment.
Chisel (if needed for mortised hinges)
If you’re installing mortised hinges, you may need a chisel to create recesses in the door and door frame. This allows the hinges to sit flush with the surfaces, providing a neat and seamless appearance. Make sure the chisel is sharp and precise for clean and accurate cuts.
Once you have all the necessary tools and materials assembled, you’ll be ready to tackle the installation of new door hinges. With attention to detail and a steady hand, you’ll be well on your way to improving the function and style of your doors.
Prepare The Door And Frame For Hinge Installation:
Before installing new door hinges, it is crucial to properly prepare the door and frame to ensure a secure and smooth fit. This step is essential for ensuring that your hinges function properly and that your door hangs correctly. Taking the time to prepare the door and frame will result in a professional-looking installation that will stand the test of time.
Remove any paint or debris from the hinge grooves

To start, you need to clear away any paint or debris that may be present in the hinge grooves. This step is crucial for ensuring a tight fit and smooth operation of the hinges. You can use a chisel or a small screwdriver to carefully scrape away any excess paint, dirt, or debris that may have accumulated in the grooves. Be sure to remove any loose particles and clean the area thoroughly before proceeding to the next step.
Fill in any holes or gaps with wood filler (if required)
Next, inspect the door and frame for any holes or gaps that may affect the installation of the new hinges. If you come across any, you will need to fill them in with wood filler. Wood filler is a versatile material that can be easily shaped and sanded. Simply apply a small amount of wood filler into the hole or gap using a putty knife and smooth it out until it is level with the surrounding surface. Allow the wood filler to dry completely before moving on to the next step.
Sand down rough or uneven surfaces for a smooth fit
Once the wood filler has dried, it’s time to ensure that the door and frame have a smooth surface for the new hinges. Using sandpaper or a sanding block, carefully sand down any rough or uneven surfaces. This step will ensure that the hinges sit flush against the door and frame, creating a seamless and secure installation. Take care to sand evenly and avoid removing too much material, as this can affect the integrity of the door. By following these steps, you will be well on your way to installing new door hinges successfully. Remember to take your time and pay attention to detail. A proper preparation process will result in a secure and long-lasting installation.
Positioning The New Hinge On The Door:
When it comes to installing new door hinges, one crucial step is positioning the hinge properly on the door. This ensures that the door functions smoothly and securely. In this section, we will discuss how to align the hinge leaves with the marked locations on the door and ensure the hinge is flush with the door surface.
Align the hinge leaves with the marked locations on the door
To begin, you’ll need to refer to your door manufacturer’s instructions for any specific guidelines. Once you have identified the location for your new hinge, make sure to mark it accurately on the door surface using a pencil or a marking tool. This will help you align the hinge leaves correctly.
Next, take your new hinge and align the screw holes on the hinge leaves with the marked locations on the door. Ensure that the hinge is positioned vertically, with the knuckles facing outward. This will help maintain the stability and functionality of the door.
Ensure the hinge is flush with the door surface
Once you have aligned the hinge leaves with the marked locations, it’s crucial to ensure that the hinge is flush with the door surface. A flush hinge ensures that the door swings smoothly without any obstructions. To achieve this, carefully hold the hinge against the door and check if it sits flat against the surface.
If you notice any gaps or unevenness, you may need to make adjustments. Use a chisel or a plane to carefully remove any excess material around the hinge mortise, allowing the hinge to sit flush against the door. Take your time during this step to ensure accuracy, as a properly aligned and flush hinge contributes to the overall stability and longevity of the door.
Once the hinge is flush, you can proceed to secure it to the door using the provided screws. Remember to tighten the screws firmly but not excessively, as overtightening can lead to damage.
In conclusion, positioning the new hinge correctly on the door is a crucial step in the installation process. Make sure to align the hinge leaves with the marked locations on the door and ensure the hinge is flush with the door surface. By following these steps, your door will operate smoothly and securely, providing you with peace of mind.
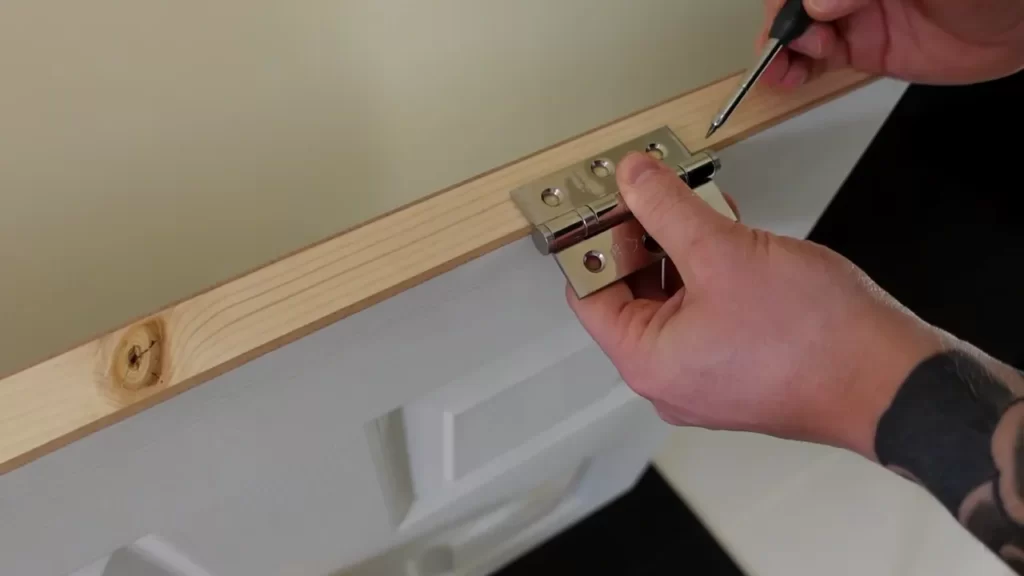
Securing The Hinge To The Door:
Insert screws through the hinge holes into the door
Once you have properly aligned the hinge with the door frame, it’s time to secure it in place. The first step in securing the hinge is to insert screws through the hinge holes into the door.
To do this, you will need a screwdriver or a drill with a screwdriver bit. Make sure you have the appropriate size of screws for your hinges. Align the hinge holes with the pre-drilled holes on the door, and carefully insert the screws into these holes.
Take extra care to position the screws straight and avoid applying too much pressure. Slowly twist the screwdriver or drill to tighten the screws, but be careful to avoid over-tightening.
Tighten screws firmly, but avoid over-tightening

Once the screws are inserted into the hinge holes and the door, it’s time to tighten them. Use a screwdriver or a drill to tighten the screws firmly, but avoid over-tightening.
Over-tightening the screws can lead to damage, such as stripping the screw holes or warping the door. It’s important to find the right balance between a secure fit and excessive force.
Take your time as you tighten each screw, making sure the hinge is securely attached to the door without any wobbling or loose parts. Keep an eye on the alignment as you tighten the screws, ensuring that the hinge remains properly positioned.
Remember that the goal is to create a stable and sturdy hinge connection that will withstand regular use and ensure the door operates smoothly.
By following these instructions and properly securing the hinge to the door, you can ensure a strong and reliable installation that will stand the test of time. Now that you have completed this step, you are one step closer to completing your door installation project.
Mounting The Hinge On The Frame:
Mounting the hinge on the frame is an essential step when installing new door hinges. This process ensures that the door swings smoothly and securely. Proper alignment and secure attachment are crucial to prevent any issues with the door’s functionality. In this section, we will discuss how to align the hinge with the corresponding marks on the frame, use a chisel to create or adjust the mortise (if applicable), and secure the hinge to the frame with screws. First, it’s important to align the hinge with the corresponding marks on the frame. This ensures that the door will be properly positioned and won’t rub against the frame when opening or closing. To do this, follow these steps: 1. Place the hinge on the frame at the desired height and position. Make sure it lines up with the marks or guides you have made for the hinge placement. 2. Use a pencil or marker to mark the positions of the screw holes on the frame. This will serve as a guide when attaching the hinge later on. Next, if the door frame has a mortise – a recessed area to accommodate the hinge – you may need to adjust it using a chisel. Follow these steps: 1. Start by positioning the hinge in the mortise. Ensure that the hinge fits snugly and aligns with the frame. 2. If the mortise is too shallow, use a chisel to carefully deepen it. Make small adjustments at a time, testing the fit of the hinge as you go. 3. If the mortise is too deep, you can use thin wooden shims or small wedges to fill in the gaps. This will help stabilize the hinge and ensure a tight fit. Finally, secure the hinge to the frame with screws. This step is crucial for the stability and functionality of the door. Here’s what you need to do: 1. Place the hinge in its final position on the frame, aligning the screw holes with the marks you made earlier. 2. Insert the screws into the holes and use a screwdriver or drill to tighten them. Start with the center screw, then work your way outwards, ensuring that each screw is secure. 3. Make sure not to overtighten the screws, as this can strip the holes or damage the hinge. Tighten them until they are snug but not overly tight. By following these steps, you can successfully mount the hinge on the frame and ensure that your door operates smoothly. Taking the time to align the hinge, adjust the mortise if needed, and securely attach the hinge with screws will contribute to a well-functioning and durable door.
Checking The Door Alignment:
When installing new door hinges, it’s crucial to ensure that the door is properly aligned within the frame. Checking the door alignment will help you determine if any adjustments need to be made to the hinge position, ensuring that your door fits securely and functions smoothly. Follow the steps below to effectively check the alignment of your door.
Close the door and observe if it fits properly within the frame
Begin by closing the door and carefully observing how it fits within the frame. Pay attention to any gaps between the door and the frame, as well as any signs of misalignment or rubbing. Ideally, the door should fit snugly within the frame without any gaps or interference.
Make any necessary adjustments to the hinge position
If you notice any issues with the door alignment, it may be necessary to make adjustments to the hinge position. Start by examining each hinge individually to identify any areas that require adjustment. Use a screwdriver to loosen the screws on the hinge and gently move the hinge up or down, left or right, as needed to align the door within the frame.
After making the necessary adjustments, re-tighten the screws to secure the hinges in place. Close the door again and observe if the alignment has improved. If further adjustments are required, repeat the process until the door fits properly within the frame without any gaps or interference.
Checking the door alignment is a crucial step in the installation of new door hinges. By ensuring that the door fits properly within the frame, you can enhance both the functionality and appearance of your door. Take the time to carefully inspect the alignment and make any necessary adjustments, and you’ll enjoy a smoother and more secure door.
Testing The Door Operation:
When it comes to installing new door hinges, testing the door operation is a crucial step to ensure that everything is functioning properly. This step allows you to verify the smooth movement of the door and its proper alignment. By testing the door, you can identify any issues or abnormalities that may need to be addressed.
Open and close the door to ensure smooth movement and proper alignment
To begin testing the door operation, open and close the door multiple times. Pay attention to how it moves and ensure that it opens and closes smoothly without any sticking or resistance. A properly installed door hinge should allow the door to move effortlessly, with no friction or jamming. If you notice any difficulty in opening or closing the door, it may indicate an alignment problem that needs to be addressed.
Listen for any squeaks or abnormalities
In addition to visually inspecting the door movement, it is important to listen for any squeaks or abnormal sounds while opening and closing the door. A well-installed door hinge should operate quietly and smoothly, without any unnecessary noise. If you notice any squeaks or unusual sounds, it may indicate a problem with the hinge or the alignment of the door. This can be resolved by adjusting the hinges or ensuring that the door is properly aligned.
Testing the door operation is an essential step in the installation process of new door hinges. By open and closing the door to ensure its smooth movement and proper alignment, you can identify any issues that may need to be addressed. Additionally, listening for any squeaks or abnormalities will help you detect any problems with the hinge or door alignment. By conducting these tests, you can ensure that your new door hinges are installed correctly and functioning optimally, providing you with a well-operating door.
Finalizing The Installation:
Tighten any loose screws

Once you have successfully installed your new door hinges, it’s crucial to ensure that all screws are tightly secured. Over time, screws can become loose due to constant use or natural expansion and contraction of the door and frame. Loose screws can lead to misalignment, squeaking, or even complete failure of the hinge mechanism. To avoid these issues, take a moment to inspect all screws and use a screwdriver to tighten any that are loose. This simple step will provide additional stability to your door hinges, ensuring they can effectively perform their intended function.
Apply lubrication to ensure smooth hinge operation
To enhance the longevity and performance of your newly installed door hinges, it is essential to apply lubrication. Proper lubrication allows for smooth and frictionless hinge operation, reducing the chances of wear and tear over time. Before lubricating, wipe away any existing grease or dirt from the hinge surface using a damp cloth. Once clean, apply a high-quality lubricant, such as a silicone-based spray or white lithium grease, to the hinge pin and surrounding areas. Be sure to apply the lubricant sparingly and avoid excess buildup, as it can attract dirt and debris, leading to potential hinge issues.
Clean any excess debris or dust from the door and hinges
In the final step of the door hinge installation process, it is important to clean any excess debris or dust from both the door and hinges. Over time, debris and dust can accumulate in the hinge mechanism, hinder smooth operation, and potentially cause damage. Start by using a soft brush or cloth to sweep away any loose particles from both the door and hinge surfaces. Next, dampen a cloth with warm water and mild soap, then gently wipe down the hinges, ensuring to reach the crevices and edges. After cleaning, dry the hinges thoroughly with a clean cloth to prevent any moisture-related issues that could arise. This step ensures that your door hinges are free from obstructions and allows for optimal functionality. In conclusion, finalizing the installation of new door hinges involves tightening any loose screws, applying lubrication for smooth hinge operation, and cleaning excess debris or dust. These simple yet effective steps will not only improve the performance of your door hinges but also contribute to their longevity. By taking the time to complete these final tasks, you can ensure that your door functions properly, providing security, ease of use, and aesthetic appeal to your space.
Frequently Asked Questions For How To Install New Door Hinges
Is It Easy To Replace Door Hinges?
Yes, replacing door hinges is relatively easy. It requires basic tools and can be done in a few simple steps. Just remove the old hinges, attach the new ones, and make sure they are properly aligned. With proper guidance, anyone can replace door hinges effortlessly.
What Is The Easiest Way To Install A Door Hinge?
To easily install a door hinge, follow these steps: 1. Gather the necessary tools: screwdriver, screws, and the hinge itself. 2. Determine the ideal placement for the hinge on both the door and frame. 3. Align the hinge and mark the screw holes.
4. Pre-drill the holes and attach the hinge with screws. 5. Repeat the process for the remaining hinges. Done!
Do You Put The Hinge On The Door Or The Frame First?
Put the hinge on the frame first before attaching it to the door.
Does It Matter Which Way Door Hinges Are Installed?
Yes, it does matter which way door hinges are installed. Proper installation ensures smooth operation, prevents damage to the door or frame, and enhances security. It also affects the appearance and functionality of the door. Correctly installed hinges ensure that the door opens and closes properly without any issues.
How Do I Choose The Right Door Hinges?
To choose the right door hinges, consider the weight of the door, door frame material, and desired finish.
What Tools Do I Need To Install Door Hinges?
You will need a screwdriver, chisel, hammer, drill, and a pencil for marking the hinge positions.
Conclusion
To conclude, installing new door hinges is a simple DIY task that can improve the functionality and appearance of your doors. By following the steps outlined in this blog post, you can easily replace old or damaged hinges in no time.
Remember to gather the necessary tools, remove the old hinges carefully, and align the new ones accurately. With a little patience and attention to detail, you can have your doors operating smoothly and securely. Happy hinge installation!