To install a door knob on a new door, simply follow these steps: first, measure and mark the correct placement of the door knob, then drill the necessary holes for the knob and latch. That’s it!
Welcome to our guide on how to install a door knob on a new door. Whether you’re replacing an old door knob or installing one on a brand new door, this process is relatively straightforward and requires just a few basic tools.
We will walk you through the step-by-step instructions to ensure a successful installation. So let’s get started and have your door looking great with a shiny new knob in no time!
Factors To Consider When Choosing A Door Knob

Factors to Consider When Choosing a Door Knob When it comes to choosing a door knob for your new door, there are several important factors to consider. Not only is the door knob an essential part of your home’s security, but it also serves as a design element that can enhance the overall aesthetic of your space. In this section, we will discuss three key factors that you should take into account when selecting a door knob: design and style, material and durability, and security features.
Design and Style
The design and style of your door knob can significantly impact the overall look and feel of your door. It is important to choose a knob that complements the design scheme of your home. Consider the following design elements when making your selection: – Shape and Size: Door knobs come in various shapes and sizes, including round, oval, and square. Select a shape that matches the overall aesthetic of the room. – Finish: The finish of the door knob can make a statement and tie into the existing hardware in your home. Popular finishes include polished brass, brushed nickel, and oil-rubbed bronze. – Style: Choose a door knob that aligns with the style of your home. Options range from traditional and vintage to modern and minimalist.
Material and Durability
The material and durability of the door knob are important considerations for both longevity and functionality. Ensure that you select a knob that can withstand frequent use and offers the desired level of durability. Here are a few popular materials for door knobs: – Brass: Brass door knobs are not only durable but also versatile in terms of style. They can be polished to a high shine or left with an antique finish. – Stainless Steel: Stainless steel door knobs are known for their strength and resistance to corrosion, making them a popular choice for exterior doors. – Glass: Glass door knobs can add an elegant and vintage touch to your door. However, they may be more prone to breakage and require care when handling.
Security Features
In addition to aesthetics and durability, it is essential to consider the security features of your door knob. After all, the primary purpose of a door knob is to keep your home safe and secure. Here are a few security features to look for: – Locking Mechanism: Choose a door knob with a reliable locking mechanism that offers sufficient security. – Keyed Entry: If you want additional security, opt for a door knob with a keyed entry option. – Grade: Look for door knobs that are graded by the ANSI (American National Standards Institute) for security. Higher grades indicate better overall quality and security. In conclusion, when choosing a door knob for your new door, consider the design and style, material and durability, and security features. By keeping these factors in mind, you can select a door knob that not only enhances the aesthetics of your home but also provides the security you need.
Checking The Alignment Of The Door
Before installing a door knob on a new door, it is crucial to ensure that the door is properly aligned. Proper alignment ensures that the door operates smoothly, closes securely, and the door knob functions correctly. This step-by-step guide will walk you through the process of checking the alignment of the door.
Measuring and Marking the Location for the Door Knob
The first step in checking the alignment of the door is to measure and mark the location for the door knob. Start by placing the door on a flat surface, making sure it is secure and won’t move or wobble. Use a tape measure to find the center point of the door’s width. Next, measure the height where the door knob will be installed. This is typically around 36 inches from the floor, but it can vary depending on personal preference and local building codes. Use a pencil to mark the exact location on the door.
Verifying the Correct Door Knob Height
Once you’ve marked the location for the door knob, it is important to verify the correct height. This ensures that the door knob will be at a comfortable height for everyday use. Measure the height from the floor to the center of the marked spot and compare it to the standard height of 36 inches. If the measurement matches, you can proceed to the next step. However, if the measurement is off, adjust the marked spot accordingly to achieve the proper height. Remember, it’s important to verify the correct height to ensure user convenience and comply with regulations. By checking the alignment of the door and verifying the correct door knob height, you are taking the necessary steps to ensure a smooth installation process. These simple yet crucial steps lay the foundation for a properly functioning door knob that enhances the functionality and aesthetics of your new door.
Gathering The Required Tools And Materials
Before you begin installing a door knob on a new door, it’s important to gather all the necessary tools and materials. Having everything ready beforehand will save you time and ensure a smooth installation process. Here are the essential items you’ll need:
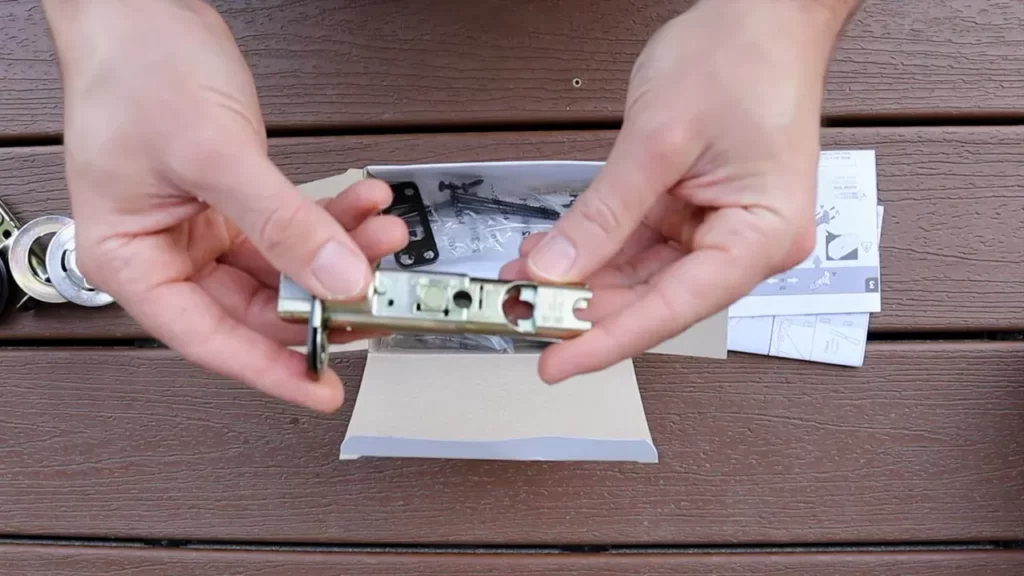
Door Knob Kit
The first item you’ll need is a door knob kit. This kit typically includes a latch assembly, strike plate, screws, and of course, the two knobs that will be installed on both sides of the door. You can find a variety of door knob kits at your local hardware store or online.
Screwdriver
A screwdriver is a must-have tool for installing a door knob. It’s used to fasten the screws that hold the knob and the strike plate in place. Make sure you have a screwdriver with the appropriate size and type of head to fit the screws included in your door knob kit.
Drill and Drill Bits
Depending on the type of door knob you’re installing, you may need a drill and drill bits. Some door knobs require holes to be drilled through the door to accommodate the latch assembly and the screws. Check the instructions provided with your door knob kit to determine if drilling is necessary and what size drill bit to use.
Wood Chisel
In case you need to mortise the door for the latch plate, a wood chisel will be required. A chisel will help you carve out a recess in the edge of the door to fit the latch plate properly. This will ensure that the door knob functions correctly and securely.
Tape Measure
A tape measure is essential for accurately measuring the placement of the door knob and the strike plate. It will help you determine the correct height and distance from the edge of the door, ensuring that the knob is installed in the proper position.
By gathering these required tools and materials before you begin, you’ll be well-prepared for the door knob installation process. Having everything on hand will save you from potential delays and frustrations during the installation. With the right tools, you’ll be ready to move on to the next step of installing the door knob on your new door.
Removing The Existing Door Hardware (If Applicable)
Taking Out the Old Door Knob and Latch Assembly
Before installing a new door knob on your new door, you’ll need to remove the existing door hardware. This step is only applicable if you have an old door knob and latch assembly that needs to be replaced. Here’s a simple guide to help you through the process:
- Start by taking a close look at your old door knob and latch assembly. Identify the different components, including the knob, the latch plate, and any screws or bolt plates holding them in place.
- Locate the screws or bolts that hold the latch plate in place on the edge of the door. Use a screwdriver or a wrench to remove them. Once the screws or bolts are removed, carefully pull the latch plate out of the door.
- Next, focus on the door knob itself. Look for any visible screws or bolts that hold it in place. Use the appropriate tool to loosen and remove these screws or bolts.
- Once the screws or bolts are removed, you should be able to easily separate the two sides of the door knob. Gently pull each side away from the door, being careful not to damage the surrounding area.
- Finally, remove any remaining screws or bolts that attach the latch assembly to the door. With these removed, you can now completely detach the old door knob and latch assembly from the door.
By following these steps, you’ll successfully remove the old door knob and latch assembly, making way for the installation of a new one.
Filling and Patching Any Holes or Gaps
After removing the old door hardware, it’s common to find holes or gaps left behind. These may have been caused by the previous installation or the removal process itself. Don’t worry, though – with a few simple steps, you can easily fill and patch these unsightly imperfections:
- Inspect the holes and gaps closely to determine their size and depth. This will help you choose the appropriate filler material.
- Decide on the type of filler material you’ll use. Wood filler is ideal for wooden doors, while a general-purpose filler works well for other types of doors.
- Clean the holes and gaps, removing any debris or loose particles that might prevent the filler from adhering properly.
- Take a small amount of filler material and press it into the holes and gaps, using a putty knife or your fingers. Ensure that the filler is evenly applied and fills the entire space.
- Allow the filler to dry completely according to the manufacturer’s instructions. This may take a few hours or overnight.
- Once the filler is dry, use sandpaper to smooth any rough edges or excess filler. Sand gently in a circular motion until the surface is even and flush with the surrounding area.
- Wipe away any dust or debris left by the sanding. You can use a clean, damp cloth for this.
- If necessary, apply a coat of paint or finish that matches the color of your door. This will help blend the repaired areas seamlessly with the rest of the door’s surface.
With these steps, you can effectively fill and patch any holes or gaps left behind after removing the old door hardware. Once the filler is dry and the surface is smooth, your door will be ready for the installation of a new door knob.
Attaching The New Door Knob Assembly
Once you have successfully prepared the mortise for the door knob assembly, it’s time to move on to the next step: attaching the new door knob assembly. This crucial step will ensure that your door knob functions properly and securely. In this section, we will guide you through the process of inserting the latch assembly into the prepared mortise and aligning and securing the door knob assembly.
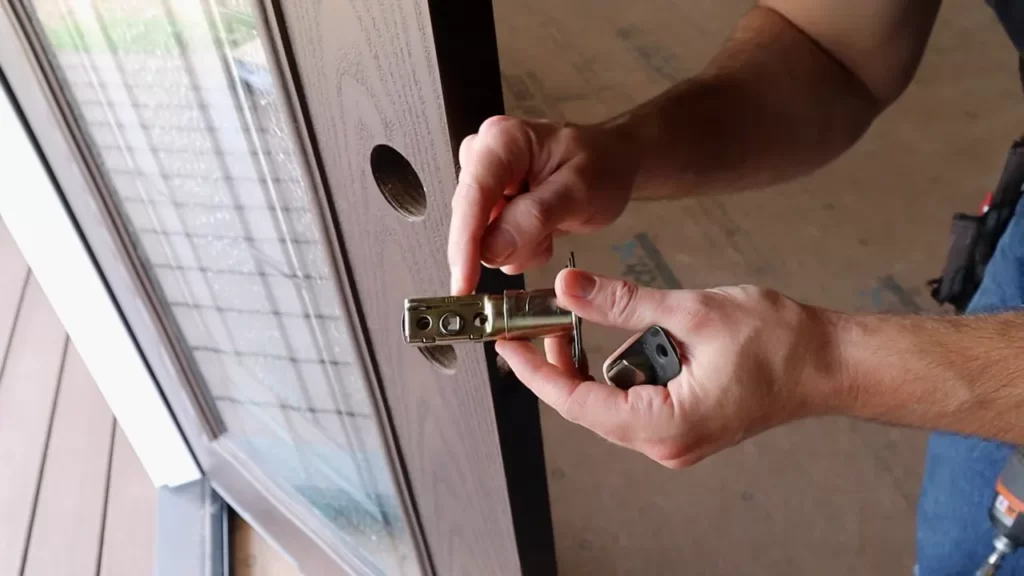
Inserting the Latch Assembly into the Prepared Mortise
The first step in attaching the new door knob assembly is inserting the latch assembly into the prepared mortise. Follow these steps to ensure a secure fit:
- Take the latch assembly and insert it into the mortise, making sure that the rounded edge faces the direction the door closes.
- Hold the latch assembly in place and mark the spots where the screws will go.
- Remove the latch assembly and pre-drill holes for the screws, using a drill bit that matches the size of the screws provided.
- Reinsert the latch assembly and secure it in place by driving the screws into the pre-drilled holes.
It is important to ensure that the latch assembly is securely fastened, as a loose latch can cause the door knob to malfunction or become difficult to operate.
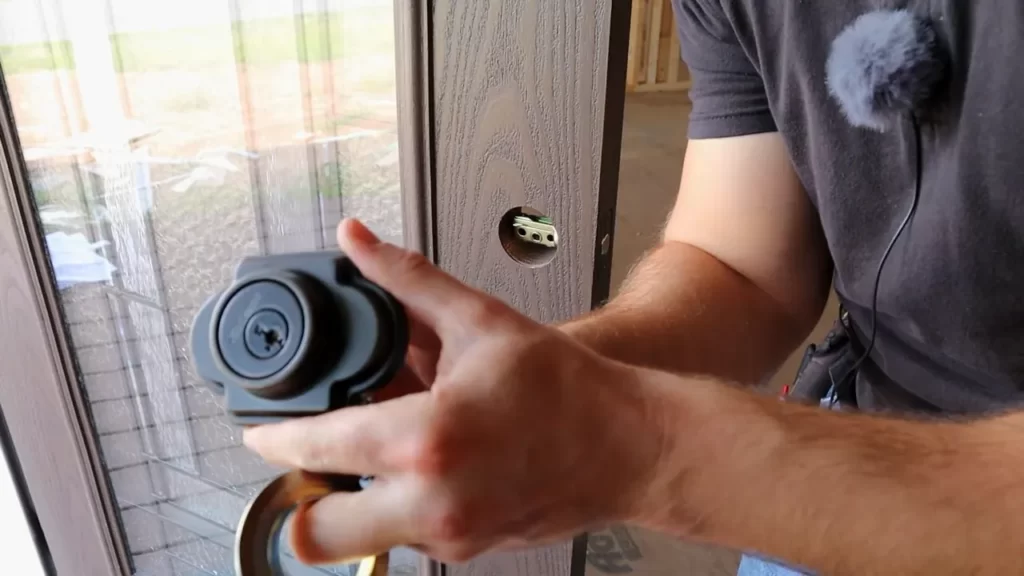
Aligning and Securing the Door Knob Assembly
Once the latch assembly is securely in place, it’s time to align and secure the door knob assembly. Follow these steps to achieve a proper alignment and secure installation:
- Take the door knob assembly and insert the spindle into the latch assembly.
- Hold the door knob assembly against the door and align it so that it sits flush against the surface.
- While holding the door knob assembly in place, insert the screws into the holes on the door knob plate.
- Using a screwdriver, tighten the screws until the door knob assembly is securely fastened to the door.
Ensure that the door knob turns smoothly and operates properly before considering the installation complete. If there is any resistance or difficulty in turning the door knob, double-check the alignment and tighten the screws if necessary.
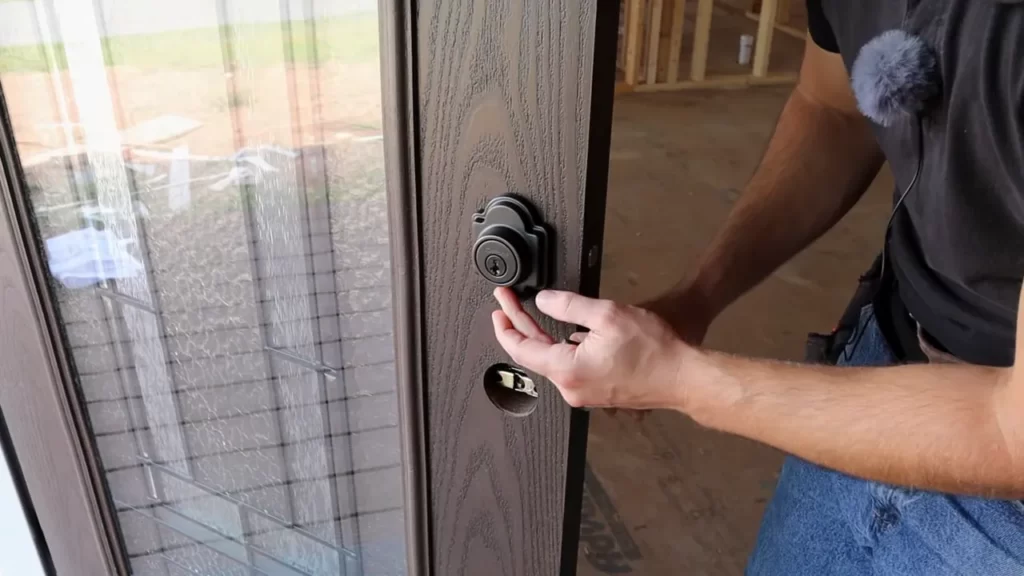
By following these steps, you can successfully attach a new door knob assembly to your new door. This final touch will not only enhance the functionality of your door but also add a polished look to your home.
Testing And Adjusting The Door Knob
Testing and Adjusting the Door Knob
As you complete the installation of a door knob on a new door, it is crucial to thoroughly test and adjust it to ensure proper functionality. This step is essential for achieving a smooth operation and maximizing the lifespan of your door knob. By following the steps outlined below, you can confidently check the functionality of the door knob and make necessary adjustments for optimal performance.
Checking the Functionality of the Door Knob
Once the door knob is installed on the new door, it’s important to test its functionality before considering any adjustments. Here are some key steps to follow:
- Check the turning action of the knob: Give the door knob a try by turning it both clockwise and counterclockwise. Ensure it moves smoothly in both directions without any resistance or friction.
- Test the latch mechanism: Close the door and attempt to lock it by pressing or turning the door knob locking mechanism. Verify that it secures the door firmly in place and doesn’t wobble or come loose.
- Try opening the door from both sides: Standing on the inside, try opening the door by turning the knob. Then, stand on the outside and repeat the process. This ensures that the knob operates properly from both sides and doesn’t get stuck or jammed.
- Check the alignment of the strike plate: Close the door and observe the alignment of the latch with the strike plate. The latch should comfortably fit into the strike plate, without requiring excessive force to close the door.
Making Necessary Adjustments for Smooth Operation
If any issues arise during the testing phase, adjustments may be necessary to ensure a smooth operation of the door knob. Here’s what you can do:
- Tighten loose screws: If you notice any loose screws during the testing, tighten them using a screwdriver. Loose screws can result in instability and improper functionality of the door knob.
- Adjust the strike plate: If the latch doesn’t align properly with the strike plate, you may need to adjust the position of the strike plate. Loosen the screws holding the strike plate in place and reposition it to align correctly with the latch. Once aligned, tighten the screws.
- Lubricate moving parts: If the door knob is sticky or difficult to turn, it may need lubrication. Apply a small amount of lubricant to the moving parts of the door knob, such as the spindle or latch, to ensure smooth operation.
- Test again: After making any adjustments, repeat the testing process outlined earlier to ensure that the adjustments have resolved any issues. Continue adjusting and testing until the door knob operates smoothly and securely.
By following these steps, you can ensure that your newly installed door knob is fully functional and operates smoothly on your new door. Remember, regular maintenance and periodic checks can help prolong the life of your door knob and keep it working efficiently for years to come.
Frequently Asked Questions On How To Install A Door Knob On A New Door
How Do You Install A Door Handle On A New Door?
To install a door handle on a new door, follow these steps: 1. Place the handle on the desired spot and mark the screw holes. 2. Drill pilot holes at the marked spots. 3. Secure the handle with screws. 4.
Test the handle to ensure it functions properly. 5. Adjust if necessary.
Is It Hard To Install A New Door Knob?
Installing a new door knob isn’t difficult. Just follow the instructions and use basic tools. It’s a simple and straightforward process.
How Do You Install A Vintage Doorknob On A Modern Door?
To install a vintage doorknob on a modern door, follow these steps: Remove the existing doorknob and latch. Place the vintage knob on either side of the door, aligning it with the spindle holes. Insert the spindle and tighten the screws.
Test the knob’s functionality before finishing the installation.
How Do You Screw In A New Door Knob?
To screw in a new door knob, follow these steps: 1. First, remove the old knob and latch plate. 2. Next, align the new latch plate on the door edge and screw it in. 3. Insert the latch mechanism into the door and secure it with screws.
4. Align the new knob on the outside, place the spindle through the latch, and screw it in. 5. Finally, test the knob to ensure it functions properly.
How Do You Install A Door Knob On A New Door?
To install a door knob on a new door, first, measure the height and thickness of the door. Then, mark the desired location for the knob and drill a hole. Finally, insert the knob assembly and tighten the screws.
What Tools Do I Need To Install A Door Knob On A New Door?
To install a door knob on a new door, you will need a tape measure, pencil, drill, hole saw or spade bit, screwdriver, and screws that come with the doorknob assembly.
Conclusion
Installing a door knob on a new door is a simple task that can make a big difference in the overall look and functionality of your space. By following these step-by-step instructions, you can easily tackle this DIY project without any hassle.
Remember to choose the right tools and materials, measure carefully, and take your time to ensure a secure and aesthetically pleasing result. With a little patience and effort, you’ll have a beautiful and functional door knob that enhances the overall appearance of your door.