nstalling a steel door frame requires measuring the existing doorway dimensions, cutting the frame to fit, securing it in place with screws or nails, and attaching the door. Once the installation is complete, check for proper alignment and ensure the frame is level and plumb.
The installation of a steel door frame is a relatively straightforward process that can provide added security and durability to your home or business. In this guide, we will walk you through the steps involved in installing a steel door frame, from measuring the doorway to attaching the door.
By following these steps carefully, you can ensure a proper and secure installation that will last for years to come.
Choosing The Right Tools And Materials
Selecting the Appropriate Steel Door Frame for Your Project
Installing a steel door frame provides excellent security and durability to any building, whether it’s a residential or commercial property. However, before diving into the installation process, it’s crucial to select the right steel door frame for your project. This ensures a perfect fit and seamless integration with your existing structure. When choosing a steel door frame, consider factors such as the desired size, style, and finish. A well-selected door frame enhances the overall aesthetics and functionality of your door. Take the time to explore different options and consult with professionals if needed.
Gathering the Necessary Tools for Installation
The success of your steel door frame installation largely depends on having the appropriate tools at your disposal. Here’s a list of tools you’ll need:
| 1. Tape measure | 2. Level | 3. Screwdriver |
| 4. Drill | 5. Hammer | 6. Chisel |
| 7. Hacksaw | 8. Screwdriver bit set | 9. Pliers |
Ensure that each tool is in good condition before starting the installation process. Double-check that you have all the necessary tools readily available, as running back and forth can be time-consuming and disruptive.
Ensuring You Have the Correct Measurements and Specifications
Before proceeding with the installation, it’s crucial to have the correct measurements and specifications for your steel door frame. Take accurate measurements of the door opening, including the height, width, and depth. This information will help you select a door frame that fits perfectly. Pay attention to specifications such as the door frame’s fire rating, soundproofing capabilities, and weather resistance, depending on your specific requirements.
Remember, having the correct measurements and specifications not only ensures the door frame will fit properly, but it also guarantees that it will meet your desired functionality and safety standards. Precise measurements and specifications are the foundation for a successful steel door frame installation.
By choosing the right tools and materials and ensuring you have accurate measurements and specifications, you’ll be well-prepared for a smooth steel door frame installation. Taking the time to gather the necessary tools, carefully select a door frame, and measure accurately will result in a secure and aesthetically pleasing door that enhances the overall value of your property. Stay tuned for our next blog post, where we’ll guide you through the step-by-step installation process.
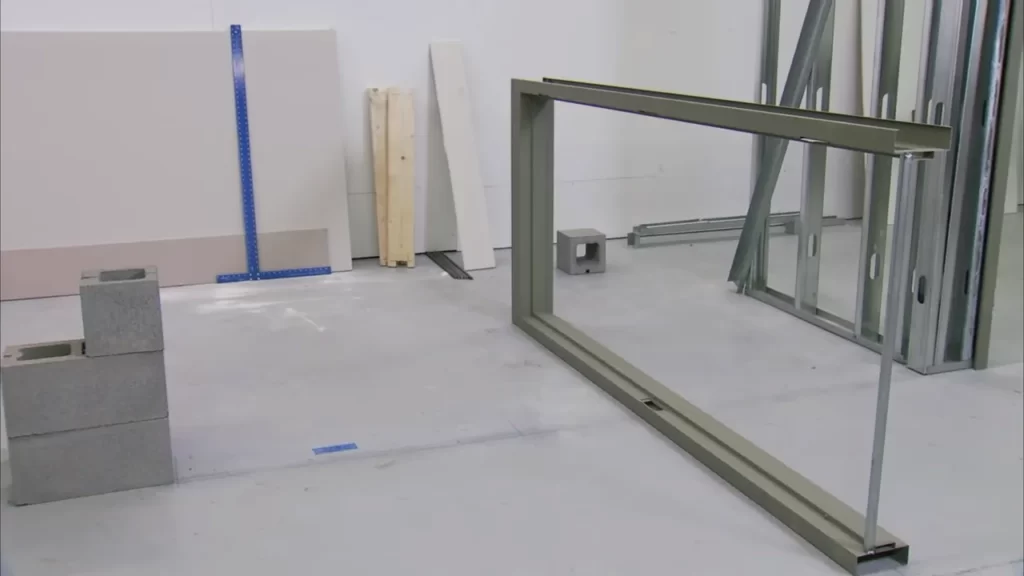
Preparing The Doorway For Installation
Before you can begin the installation of your steel door frame, it is crucial to properly prepare the doorway. This preparation involves removing the existing door and frame, clearing the area of any debris or obstructions, leveling the floor, and ensuring a smooth surface for installation. In this section, we will guide you through each step to ensure a seamless installation process.
Removing the existing door and frame
The first step in preparing the doorway is to remove the existing door and frame. This may seem like a simple task, but it is important to follow the correct procedures to avoid any damage to the surrounding area. Here are the steps you can follow:
- Begin by unscrewing the hinges that hold the door in place. Use a screwdriver or a drill to remove the screws.
- Once the hinges are unscrewed, carefully lift the door out of the doorway and set it aside.
- Next, you will need to remove the frame. Start by removing any screws or nails that secure the frame to the doorway.
- Use a pry bar or a hammer to gently pry the frame away from the wall. Be cautious not to damage the surrounding wall or flooring.
- Once the frame is removed, inspect the doorway for any remaining nails, screws, or debris. Remove them using pliers or a pry bar.
Clearing the area of any debris or obstructions
Now that the existing door and frame are removed, it is essential to clear the area of any debris or obstructions. This step ensures a clean and smooth surface for the installation of the steel door frame. Here’s what you should do:
- Start by sweeping or vacuuming the floor to remove any loose dirt, dust, or debris.
- Inspect the walls and the surrounding area for any remaining nails, screws, or other objects that may hinder the installation process.
- Use a putty knife or a scraper to remove any adhesive residue or old caulking that may be present.
- Wipe down the walls and the floor with a damp cloth to remove any remaining dust or dirt.
Leveling the floor and ensuring a smooth surface for
installation
Leveling the floor and ensuring a smooth surface is vital for the proper installation of your steel door frame. An uneven floor can cause the frame to be imbalanced and may result in issues with the door’s functionality. Follow these steps to level the floor:
- Start by inspecting the floor for any unevenness or dips. You can use a level tool to determine if the floor is level or not.
- If you identify any uneven areas, you will need to fill them using a self-leveling compound. Prepare the compound according to the manufacturer’s instructions.
- Pour the self-leveling compound over the uneven areas and use a trowel to spread it evenly. Ensure that the compound fills the low spots and creates a level surface.
- Allow the compound to dry completely before proceeding with the installation.
- Once the floor is level, ensure it is clean and free from any debris before proceeding with the installation.
By following these steps to prepare the doorway, you are setting the foundation for a successful installation of your steel door frame. Taking the time to carefully remove the existing door and frame, clearing the area, and leveling the floor will ensure a seamless and secure installation process.
Installing The Steel Door Frame
When it comes to installing a steel door frame, proper technique is essential to ensure a secure and durable installation. In this guide, we will walk you through the process step-by-step, from positioning the frame in the doorway, to securing it with screws or fasteners, and finally checking for proper alignment and adjustment.
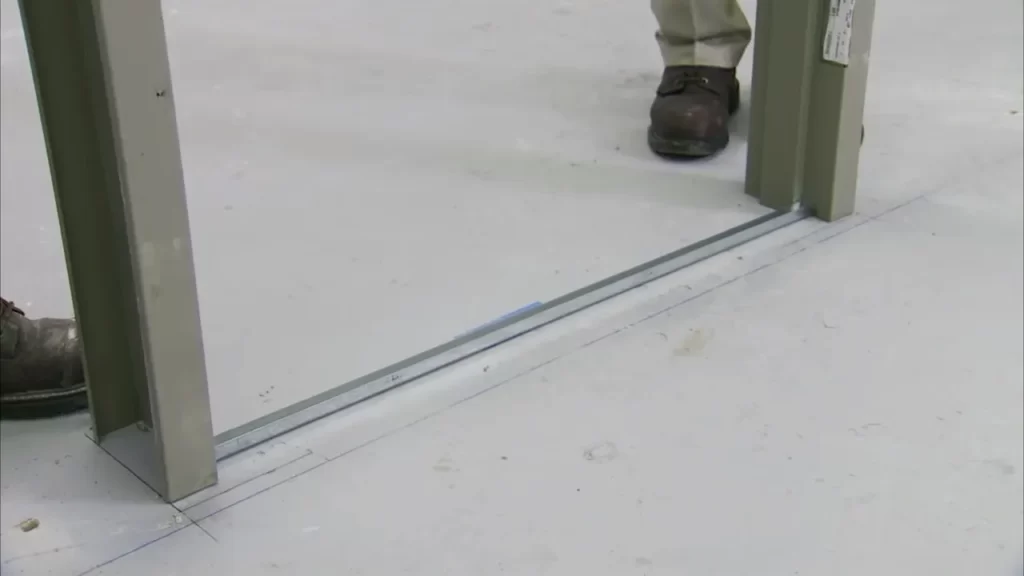
Positioning the frame in the doorway
The first step in installing a steel door frame is to position it correctly in the doorway. Start by placing the frame into the rough opening, ensuring that it fits snugly and aligns properly with the surrounding walls. Use shims (thin rectangular pieces of wood or plastic) to level and secure the frame in position.
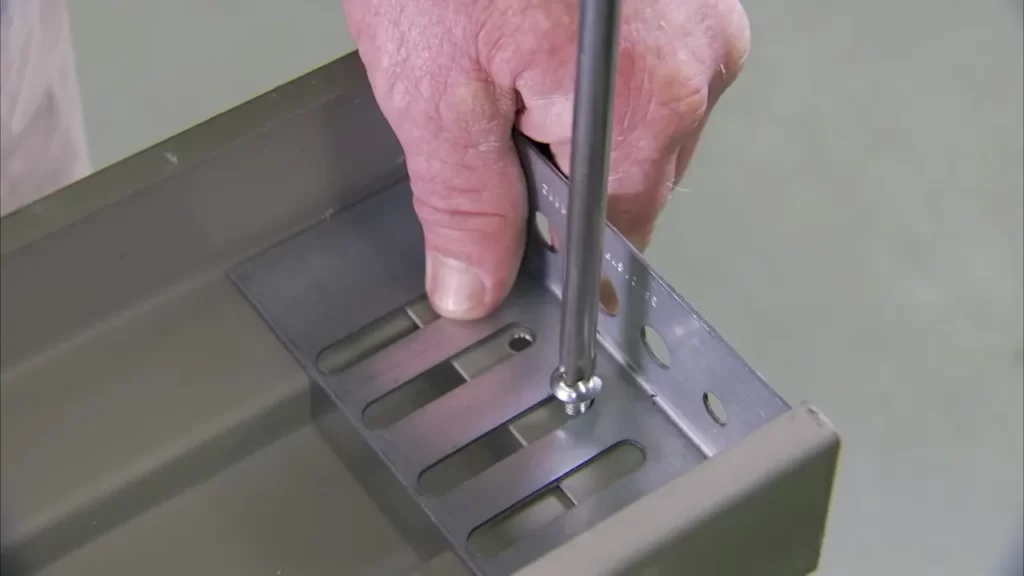
Securing the frame with screws or fasteners
With the frame in place, it’s time to secure it using screws or fasteners. Start by drilling pilot holes into the frame, making sure to align them with the pre-drilled holes in the frame itself. This will prevent the frame from splitting when the screws are inserted. Once the pilot holes are drilled, insert screws or fasteners through the holes and into the frame, ensuring a tight and secure fit.
Checking for proper alignment and adjustment
Once the frame is secured, it’s important to check for proper alignment and make any necessary adjustments. Use a level to ensure that the frame is plumb (vertically straight) and level (horizontally straight). If adjustments are needed, use shims to achieve the desired alignment. Additionally, ensure that the door swings freely within the frame without any binding or sticking.
By following these steps, you can successfully install a steel door frame that is secure, durable, and properly aligned. Remember to take your time and double-check your work at each stage of the installation process for the best results.
Fine-Tuning The Frame If Needed
Introductory paragraph: When installing a steel door frame, it is important to ensure that it fits perfectly in the opening. However, sometimes minor adjustments may be needed to fine-tune the frame for an ideal fit. In this section, we will discuss how to make these adjustments and address any gaps or unevenness. By following these steps, you will ensure that your steel door frame is installed correctly and provides a secure and attractive entrance to your space.
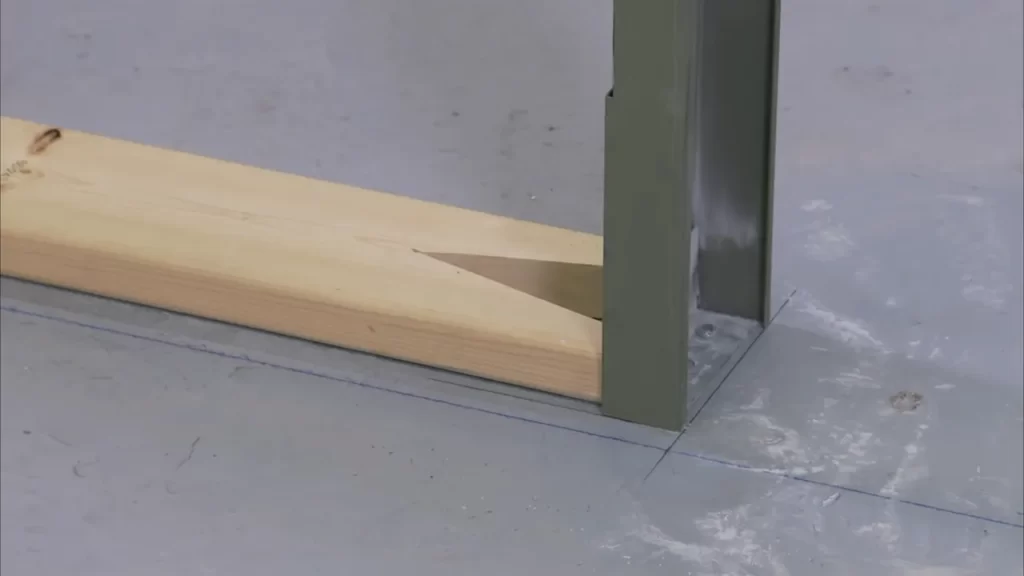
Making minor adjustments for a perfect fit
1. Assess the fit: Before making any adjustments, carefully assess the fit of the steel door frame in the opening. Check for any uneven gaps or areas where the frame is not sitting flush against the surrounding wall. This initial assessment will guide you in identifying the areas that require adjustment. 2. Use shims: Shims are small, tapered wedges that can be used to adjust the position of the frame. Insert the shims in the gaps between the frame and the wall to level it and make it plumb. Start by inserting the shims at the top and bottom of the frame, ensuring it is level horizontally and vertically. Placing shims in multiple locations along the frame may be necessary for larger gaps or unevenness. 3. Secure the frame: Once the frame is level and plumb, secure it in place using screws or nails. Make sure to use the appropriate fasteners for the material of the surrounding wall. Drive the fasteners through the frame and shims into the wall studs to ensure a secure installation.
Ensuring the frame is plumb and level
1. Check for plumb: To ensure the frame is plumb, use a level tool. Place the level vertically against the frame on both sides and check if the bubble is centered. If the bubble is off-center, adjust the shims accordingly until the frame is perfectly plumb. 2. Verify the levelness: Along with being plumb, it is essential to check the levelness of the frame. Use the level tool horizontally on the top and bottom sections of the frame. Adjust the shims until the bubble is centered, indicating a level frame.
Addressing any gaps or unevenness
1. Fill gaps with foam: If there are small gaps between the frame and the surrounding wall, use expanding foam to fill them. Apply the foam carefully, ensuring not to overfill, as it expands as it dries. Once the foam is dry, trim off any excess using a knife or saw. 2. Patch uneven areas: If there are areas where the wall is uneven or damaged, patch them with appropriate materials like joint compound or spackle. Apply the patching material using a putty knife and smooth it out to create a seamless surface. Sand the patched areas once dry for a smooth finish. By following these steps and making the necessary adjustments, you can fine-tune the steel door frame for a perfect fit. This attention to detail will ensure that the installation is secure, visually appealing, and provides a functional door for your space.
Sealing And Insulating The Door Frame
Applying weatherstripping to prevent drafts and energy loss
One crucial step in sealing and insulating your steel door frame is applying weatherstripping. Weatherstripping acts as a barrier against drafts, preventing air from entering and escaping your home. By creating an airtight seal, weatherstripping helps to maintain a comfortable indoor temperature and reduce energy loss, resulting in lower utility bills.
Start by thoroughly cleaning the door frame surface and removing any existing weatherstripping. Measure the length of each side of the frame and cut the weatherstripping material accordingly, ensuring a snug fit. Apply adhesive to the back of the weatherstripping and press firmly onto the door frame, making sure it covers the gaps between the frame and the door.
Remember to choose weatherstripping material that is durable and weather-resistant to ensure long-lasting effectiveness. Common options include adhesive-backed foam tape, V-strip weatherstripping, and door sweeps. Regularly inspect and replace worn out weatherstripping to maintain optimal insulation.
Insulating the frame for improved soundproofing and thermal efficiency
In addition to weatherstripping, insulating the steel door frame can provide further benefits such as improved soundproofing and thermal efficiency. Insulation helps to reduce noise transmission from the outside, creating a quieter and more peaceful environment inside your home.
There are several insulation options to consider, including foam insulation strips and expanding foam insulation. Foam insulation strips can be cut to size and adhered to the door frame, filling the gaps and providing an additional barrier against air infiltration. Expanding foam insulation, on the other hand, expands to fill cavities and hard-to-reach areas, offering superior thermal insulation.
When installing insulation, ensure that it does not impede the movement of the door or interfere with any locking mechanisms. Properly insulating your steel door frame can contribute to energy savings, as it prevents the transfer of heat or cold air, reducing the workload on your heating or cooling system.
Sealing any gaps or cracks to enhance security and weather resistance
To enhance security and weather resistance, it’s vital to seal any gaps or cracks in your steel door frame. These gaps can compromise the structural integrity of the frame and provide an entry point for unwanted pests and moisture. By sealing these gaps, you can protect your home from potential threats while maintaining a comfortable and secure living environment.
Start by inspecting the door frame for any visible cracks or gaps. Use an appropriate sealant, such as silicone or caulk, to fill in these openings. Apply the sealant in a continuous and even line along the length of the gap, ensuring complete coverage. Smooth out the sealant using a caulking tool or your finger to create a neat finish.
It’s important to note that sealing gaps and cracks not only improves security but also enhances the frame’s resistance to harsh weather conditions, such as wind-driven rain or snow. Regularly inspect and reseal any areas that show signs of wear or damage to maintain the integrity of your steel door frame.
Mounting The Door In The Frame
Mounting the door in the frame is a crucial step in the installation process of a steel door frame. It involves measuring and trimming the door to fit if necessary, hanging the door on hinges, and installing the door hardware such as locks and handles. In this section, we will go through each step in detail to ensure a smooth and successful installation.
Measuring and trimming the door to fit if necessary
Before mounting the door in the frame, it is essential to measure and trim it to ensure a proper fit. Start by measuring the height and width of the door opening in the frame. Use a measuring tape to get accurate measurements, taking into account any trim or molding. If the door is slightly too large for the opening, you can trim it down to size. This can be done using a circular saw or a hand saw. Measure the excess portion of the door that needs to be trimmed and mark it with a pencil. Secure the door properly and make sure to follow safety precautions when using a saw. Trim the excess portion carefully, keeping in mind the measurements you took earlier.
Hanging the door on hinges
Once the door is properly measured and trimmed, it’s time to hang it on hinges. Start by attaching the hinges to the door frame. Position the hinge plates according to the manufacturer’s instructions, making sure they are level and evenly spaced. Mark the screw holes with a pencil and then pre-drill the holes using a drill machine. Next, align the door with the hinges on the frame, ensuring that it is plumb and level. Insert the hinge pins into the hinge plates and test the swing of the door to ensure smooth movement. Secure the hinges firmly to the frame using screws, making sure they are tight but not over-tightened.
Installing the door hardware (locks, handles, etc.)
With the door properly mounted on hinges, it’s time to install the door hardware. This includes locks, handles, and any other accessories you may have chosen. Start by following the manufacturer’s instructions for installing the specific hardware you have chosen. This may involve drilling holes for locksets or handles and attaching them securely to the door. Make sure to use the provided screws or hardware to ensure proper installation. Test the functionality of the hardware by opening and closing the door, and ensure that everything operates smoothly. If additional adjustments are necessary, refer to the manufacturer’s instructions for troubleshooting. In conclusion, the process of mounting the door in the steel frame involves careful measurement, trimming if necessary, hanging the door on hinges, and installing the door hardware. By following these steps, you can ensure a secure and functional steel door installation.
Testing And Finishing
Now that you have successfully installed the steel door frame, it’s time to move on to the final steps: testing and finishing. This crucial phase will ensure that your door functions properly and looks impeccable. In this section, we will guide you through checking the functionality of the installed door, adjusting the hardware as needed, and applying any desired finishes or touch-ups.
Checking the functionality of the installed door

Before considering the installation complete, it’s essential to make sure that the door operates smoothly and securely. To do this, follow these steps:
- Open and close the door several times to check for any sticking or misalignment. Make sure it moves effortlessly along the hinges and closes tightly.
- Inspect the door’s locks, latches, and handles. Ensure that they engage and disengage easily without any resistance.
- Check the overall stability of the door frame. Gently push it from different angles to test its rigidity. A properly installed steel door frame should feel strong and sturdy.
Adjusting the hardware as needed
Even with careful installation, there might be some minor adjustments required to achieve optimal functionality. Follow these steps to address any issues:
- Check the alignment of the strike plate on the door jamb. If the door doesn’t latch properly, you may need to loosen the screws and adjust the position of the strike plate to align it with the latch.
- If the door swings open or closed too quickly, you can adjust the speed by tightening or loosening the hydraulic door closer.
- Inspect the hinges to ensure they are securely fastened and functioning smoothly. If you notice any squeaking or resistance, lubricate them with a suitable lubricant.
- Test all hardware components, such as the doorknob or lever, for proper operation. Tighten any loose screws and ensure everything is securely attached.
Applying any desired finishes or touch-ups
Now that the functionality of your steel door frame is flawless, it’s time to give it the finishing touches. Follow these steps to achieve a polished appearance:
- Start by cleaning the door frame using a mild cleaning solution and a soft cloth. Remove any dirt, dust, or fingerprints that may have accumulated during the installation process.
- If necessary, touch up any scratches or dings on the door frame with matching paint or touch-up markers.
- If you wish to add finishes such as paint or varnish, ensure that you choose options suitable for steel surfaces. Apply them evenly using a paintbrush or roller, following the manufacturer’s instructions.
- Allow the finishes to dry completely before handling or closing the door. This ensures a professional and long-lasting result.
By following these steps to test and finish your steel door frame installation, you will not only ensure its functionality but also enhance its aesthetic appeal. Take the time to pay attention to detail and enjoy the satisfaction of a job well done.
Frequently Asked Questions On How To Install Steel Door Frame
How Do You Install A Metal Door Frame?
To install a metal door frame, follow these steps: 1. Measure and mark the desired location for the frame. 2. Secure the frame in place using screws or anchors. 3. Level the frame to ensure it is straight. 4. Attach the door hinges and strike plate.
5. Test the door for smooth operation and make any necessary adjustments.
How Much Does It Cost To Install A Steel Frame Door?
The cost of installing a steel frame door varies depending on factors such as size, style, and location. On average, you can expect to pay around $500 to $1,500 for both the door and installation.
How Do You Install A Metal Door Frame On A Concrete Wall?
To install a metal door frame on a concrete wall, follow these steps: 1. Measure and mark the desired location for the frame. 2. Use a hammer drill to make holes for the anchors. 3. Insert the anchors into the holes and tighten them securely.
4. Attach the frame to the anchors using screws or bolts. 5. Ensure the frame is level and plumb.
How Do You Install A Steel Door In A Block?
To install a steel door in a block, follow these steps: 1. Measure the door opening and choose the suitable door size. 2. Prepare the block opening by removing any old door and cleaning the area. 3. Attach the door frame securely to the block using screws or anchors.
4. Hang the door onto the frame and adjust for proper fit. 5. Install the necessary hardware like hinges, handle, and lock.
How Much Does It Cost To Install A Steel Door Frame?
The cost of installing a steel door frame can vary depending on factors such as the size, location, and complexity of the installation. It is best to consult with a professional installer for an accurate estimate.
What Tools Are Needed To Install A Steel Door Frame?
To install a steel door frame, you will typically need a hammer, drill, screwdriver, level, measuring tape, shims, and screws. Make sure to have these tools on hand before starting the installation process.
Conclusion
To sum up, installing a steel door frame may seem like a daunting task, but with the right guidance and tools, it can be accomplished seamlessly. By following the steps outlined in this guide, you can ensure a sturdy and secure installation that will enhance both the aesthetics and safety of your space.
Remember to prioritize safety precautions and seek professional help if needed. With practice and patience, you’ll soon master the art of installing steel door frames. Happy DIY-ing!