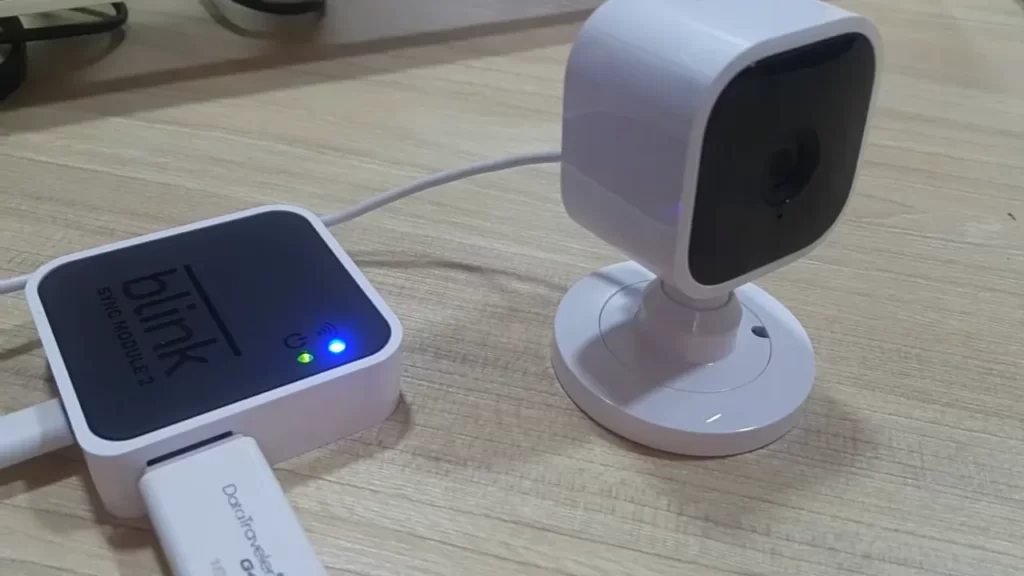
To install Blink Sync Module 2, plug it into the power outlet and wait for the light to turn blue, indicating it is ready to pair with your Blink camera system. Then, open the Blink app, tap on the “+” icon to add a new device, select “Sync Module,” and follow the on-screen instructions to complete the installation process.
Introducing the Blink Sync Module 2, the essential component for connecting your Blink cameras to your home Wi-Fi network. Setting up the Sync Module 2 is quick and straightforward. In this guide, we will take you through the step-by-step process of installing the Blink Sync Module 2 to ensure seamless integration with your Blink camera system.
By following these easy instructions, you’ll have your Sync Module 2 ready to go in no time. So let’s get started!
Choosing The Appropriate Location

When it comes to installing your Blink Sync Module 2, choosing the appropriate location is crucial for optimal functionality. The Sync Module 2 acts as the central hub for your Blink security system, connecting all your Blink devices and allowing you to monitor and control them with ease. In this section, we will discuss the factors to consider when selecting the ideal placement for your Sync Module 2, as well as finding a suitable power outlet and correctly mounting the module.
Factors to Consider
Before you begin the installation process, there are a few important factors to consider when choosing the best location for your Blink Sync Module 2. These factors will ensure seamless communication between the module and your Blink devices, resulting in a reliable and efficient security system.
- WiFi Signal Strength: The Sync Module 2 relies on a stable WiFi connection to communicate with your Blink cameras and other devices. Therefore, it is crucial to place the module within range of your WiFi router, ensuring a strong and uninterrupted signal. Consider the size of your home or office and any potential obstacles that may interfere with the signal, such as thick walls or appliances.
- Physical Accessibility: While it is important to ensure a strong WiFi signal, it is equally important to place the Sync Module 2 in a location that is easily accessible for maintenance and troubleshooting. Avoid mounting the module in hard-to-reach areas or behind furniture that may make it difficult to access when needed.
- Avoiding Interference: Electronic devices and appliances can interfere with WiFi signals, leading to a weaker connection or even signal dropouts. When choosing the location for your Sync Module 2, try to keep it away from other electronic devices, such as microwave ovens, cordless phones, or baby monitors.
- Environmental Considerations: While Blink devices are designed for both indoor and outdoor use, it is still important to consider environmental factors when selecting the location for your Sync Module 2. Extreme temperatures, direct sunlight, and excessive humidity can affect the performance and lifespan of the module. Therefore, choose a location that is well-ventilated and protected from these elements.
Finding a Suitable Power Outlet
Once you have determined the perfect location for your Sync Module 2, the next step is to find a suitable power outlet. The module requires a consistent power source to function properly, so it is crucial to choose an outlet that is easily accessible and ideally located near the selected placement for the module. Consider the following tips when picking the appropriate power outlet:
- Proximity: Ideally, the chosen power outlet should be in close proximity to the location of your Sync Module 2. This will minimize the need for long power cables that can clutter your space and create tripping hazards.
- Avoiding Power Strips and Extension Cords: While it may be tempting to use a power strip or an extension cord to connect your Sync Module 2, it is best to avoid them if possible. Directly plugging the module into a dedicated power outlet will provide a more stable power supply and reduce any risk of power interruptions.
- Safety Considerations: Ensure that the power outlet is in good condition and meets electrical safety standards. Avoid outlets that are worn out, loose, or show signs of damage. Prioritize your safety and consult a professional electrician if needed.
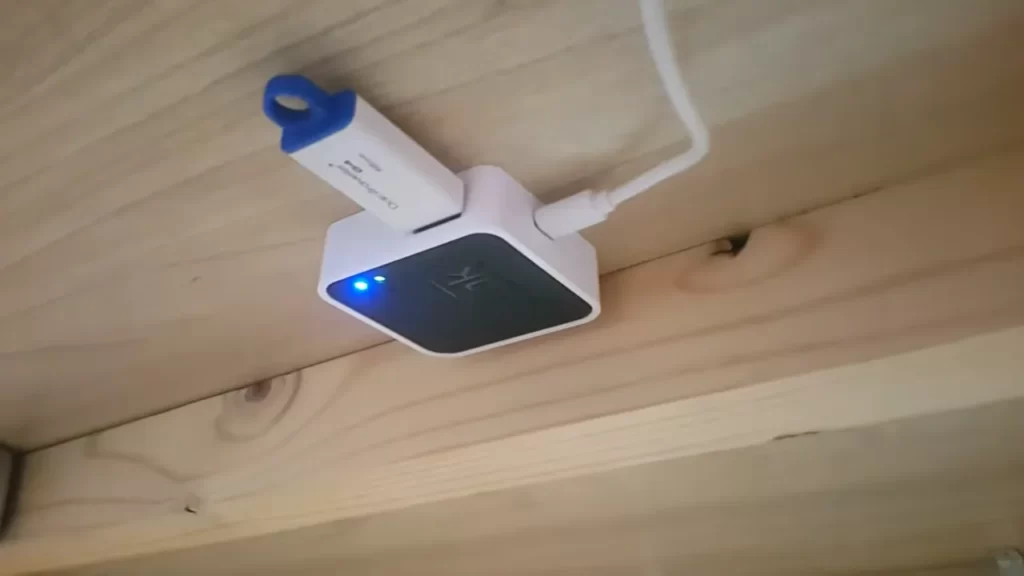
Mounting the Sync Module 2

Now that you have selected the perfect location and found a suitable power outlet for your Sync Module 2, it is time to mount the module securely. Follow these steps to ensure a successful and reliable installation:
- Gather the Mounting Accessories: Start by gathering the necessary mounting accessories, which usually include screws, anchors, and a mounting bracket provided with your Sync Module 2.
- Select a Mounting Surface: Depending on your preference, you can choose to mount the module on a wall or place it on a flat surface such as a table or shelf. If mounting on a wall, ensure that it is sturdy and can support the weight of the module.
- Attach the Mounting Bracket: If you have opted for wall mounting, attach the mounting bracket to the desired location using the provided screws and anchors. Make sure the bracket is level and securely attached.
- Place the Sync Module 2: Slide the Sync Module 2 into the mounting bracket, ensuring a snug fit. Take a moment to double-check its alignment and stability.
- Connect Power and Ethernet Cables: Finally, connect the power cable from the Sync Module 2 to the previously chosen power outlet. If your network requires a wired connection, you can also connect an Ethernet cable to the module at this stage.
Once you have completed these steps, you have successfully installed and mounted your Blink Sync Module 2. With the appropriate location, a suitable power outlet, and secure mounting, your Blink security system is ready for use.
Setting Up The Sync Module 2
When it comes to home security, having a reliable surveillance system is crucial. Blink offers a range of innovative cameras and devices that make it easy to monitor your home from anywhere. One such device is the Blink Sync Module 2, which acts as the central hub for your Blink cameras. In this guide, we will walk you through the process of setting up the Sync Module 2, step by step.
Gathering the Required Equipment
Before you begin setting up your Sync Module 2, make sure you have all the necessary equipment at hand. Here’s a list of what you’ll need:
| Equipment | Description |
| Blink Sync Module 2 | The central hub for your Blink cameras |
| Power adapter | To provide power to the Sync Module 2 |
| Blink app | Available for download on your smartphone or tablet |
| Wi-Fi network | A stable internet connection to connect the Sync Module 2 |
Connecting the Sync Module 2 to Power
Once you have gathered all the required equipment, it’s time to connect the Sync Module 2 to power. Follow these steps:
- Locate a suitable power outlet near where you plan to install the Sync Module 2.
- Connect the power adapter to the Sync Module 2 and plug it into the power outlet.
- Make sure the power adapter is securely connected to both the Sync Module 2 and the power outlet. Verify that the LED light on the Sync Module 2 is solid blue, indicating it has power.
Connecting the Sync Module 2 to Wi-Fi

With the Sync Module 2 powered on, the next step is to connect it to your Wi-Fi network. Follow these instructions:
- Open the Blink app on your smartphone or tablet.
- Select the option to add a new Sync Module.
- Follow the on-screen instructions to connect your smartphone or tablet to the Sync Module 2 using Bluetooth.
- Once connected, the app will prompt you to select your Wi-Fi network and enter your network password.
- After entering the network details, wait for the Sync Module 2 to establish a connection to your Wi-Fi network. The LED light on the Sync Module 2 will turn solid green when it is successfully connected.
And there you have it! You have successfully set up your Blink Sync Module 2. With this central hub in place, you can now connect and monitor your Blink cameras with ease. Enjoy the peace of mind that comes with a fully functional home security system.
Syncing The Sync Module 2 With Blink Devices
Syncing your Blink devices with the Sync Module 2 is an essential step to ensure smooth and seamless monitoring of your home or office. In this article, we will guide you through the process of syncing your Blink devices with the Sync Module 2, enabling you to enjoy the benefits of a fully connected security system.
Enabling Blink Device Discovery Mode
The first step to syncing your Blink devices with the Sync Module 2 is to enable the Blink device discovery mode. This mode allows the Sync Module 2 to detect and connect with your Blink devices effortlessly. To enable device discovery mode, follow these simple steps:
- Open the Blink app on your smartphone or tablet.
- Navigate to the “Settings” menu.
- Select the “Sync Module 2” option.
- Tap on “Enable Device Discovery Mode”.
By following these steps, you will activate the Blink device discovery mode, allowing the Sync Module 2 to search for and connect with your Blink devices.
Adding Blink Devices to the Sync Module 2
After enabling the Blink device discovery mode, it’s time to add your Blink devices to the Sync Module 2. This process will establish a secure connection between the devices, enabling them to communicate effectively. To add Blink devices to the Sync Module 2, simply follow these steps:
- Ensure that your Blink devices are within range of the Sync Module 2.
- Open the Blink app on your smartphone or tablet.
- Navigate to the “Settings” menu.
- Select the “Sync Module 2” option.
- Tap on “Add Device”.
- Follow the on-screen instructions to pair your Blink devices with the Sync Module 2.
Once the pairing process is complete, your Blink devices will be successfully added to the Sync Module 2, and you can now enjoy the benefits of a fully synced security system.
Configuring Device Settings
Now that your Blink devices are synced with the Sync Module 2, it’s time to configure the device settings according to your preferences. The Blink app offers a range of customizable settings that allow you to tailor the monitoring experience to suit your specific needs. To configure the device settings, follow these steps:
- Open the Blink app on your smartphone or tablet.
- Navigate to the “Settings” menu.
- Select the specific Blink device you want to configure.
- Explore the available settings options, such as motion detection sensitivity, clip length, and more.
- Adjust the settings according to your preferences.
- Tap on “Save” to apply the changes.
By configuring the device settings, you can optimize the performance of your Blink devices and ensure that they cater to your unique surveillance needs.
With these simple steps, you can easily sync your Blink devices with the Sync Module 2, enabling a fully integrated and intuitive security system. Enjoy the peace of mind that comes with knowing your home or office is protected, regardless of where you are.
Troubleshooting And Tips
When it comes to installing the Blink Sync Module 2, it’s important to ensure a smooth and hassle-free experience. In this section, we will address common issues that you may come across during the installation process, provide tips for a seamless installation, and answer some frequently asked questions to help you get your Blink Sync Module 2 up and running in no time.
Common Issues
If you encounter any issues while installing the Blink Sync Module 2, don’t worry. Here are some of the common issues that users have reported along with possible solutions:
- Blink Sync Module 2 not connecting to Wi-Fi: If you’re having trouble connecting the Sync Module to your Wi-Fi network, ensure that your Wi-Fi password is correct and that the Sync Module is within range of your router. Additionally, check if your router has any restrictions or settings that might prevent the Sync Module from connecting.
- Poor video quality: If you’re experiencing poor video quality, it could be due to a weak Wi-Fi signal. Try moving the Sync Module closer to your router or consider upgrading your Wi-Fi network to improve the signal strength.
- Sync Module not detecting cameras: If the Sync Module is not detecting your Blink cameras, make sure that the cameras are within range and that they are properly synced with the module. You can try re-syncing the cameras by following the instructions in the Blink app.
Tips for a Seamless Installation Process
To ensure a smooth and hassle-free installation process, follow these tips:
- Choose an optimal location: Select a location for your Blink Sync Module 2 that is within range of your Wi-Fi network and close to your Blink cameras. This will help ensure a strong and stable connection.
- Check your internet connection: Before starting the installation, make sure that you have a stable internet connection. A slow or unreliable internet connection can cause issues during the installation process.
- Follow the installation guide: Carefully read and follow the installation guide provided with your Blink Sync Module 2. It will outline the step-by-step process to set up and sync your module with your cameras.
- Keep firmware up to date: Regularly check for firmware updates for your Blink Sync Module 2 and cameras. Firmware updates often include bug fixes and new features that can help improve the performance and reliability of your system.
Frequently Asked Questions (FAQs)
Here are some frequently asked questions about the installation of the Blink Sync Module 2:
| Q: Can I install the Blink Sync Module 2 outdoors? | A: No, the Blink Sync Module 2 is designed for indoor use only. It is not weatherproof and should not be exposed to extreme temperatures or moisture. |
| Q: How many Blink cameras can I connect to one Sync Module? | A: The Blink Sync Module 2 has the capacity to connect up to 10 Blink cameras, allowing you to monitor multiple areas of your home or property. |
| Q: Can I use the Blink Sync Module 2 with older generation Blink cameras? | A: Yes, the Blink Sync Module 2 is backward compatible with older generation Blink cameras, so you can easily upgrade your system without having to replace all your cameras. |
Hopefully, these troubleshooting tips and frequently asked questions have provided you with the information you need to successfully install your Blink Sync Module 2. Follow the guidelines, be patient, and soon you’ll be able to enjoy the benefits of a reliable and efficient home security system.
Frequently Asked Questions For How To Install Blink Sync Module 2
Q: How To Connect Blink Sync Module 2 To The Internet?
A: Simply plug in the Blink Sync Module 2 into a power outlet and follow the instructions on the Blink app to connect it to your home’s Wi-Fi network.
Q: Can I Use Blink Sync Module 2 With Multiple Cameras?
A: Yes, Blink Sync Module 2 can support multiple cameras, allowing you to monitor different areas of your home simultaneously.
Q: What Is The Range Of Blink Sync Module 2?
A: The Blink Sync Module 2 has an impressive range of up to 100 feet, ensuring strong connectivity between the module and your Blink cameras.
Q: How Long Does The Blink Sync Module 2 Last On Battery?
A: Unlike the previous version, the Blink Sync Module 2 needs to be connected to a power outlet at all times, eliminating the need for battery replacement.
Q: Can I Access My Blink Cameras Remotely With The Sync Module 2?
A: Absolutely! Once your Blink Sync Module 2 is connected to the internet, you can conveniently access your cameras and receive motion alerts from anywhere using the Blink app.
Conclusion
To sum it up, installing the Blink Sync Module 2 is a straightforward process that enhances the functionality of your Blink security system. By following the step-by-step instructions outlined in this guide, you can seamlessly connect your Blink cameras and enjoy the benefits of remote viewing and advanced features.
Don’t hesitate to take advantage of this user-friendly module to ensure your home is well-protected.