o install hinges on a door slab, align them with the hinge cutouts and screw them into place. Installing hinges on a door slab is a straightforward process that requires careful alignment and screwing them into position.
Hinges play a crucial role in facilitating the smooth swinging of a door, ensuring its proper alignment and functionality. Whether you are replacing old hinges or installing new ones, following the correct procedure is essential for a secure and reliable installation.
This task can be accomplished by anyone with basic DIY skills and the right tools, resulting in a well-hung door that opens and closes effortlessly. We will provide a step-by-step guide on how to install hinges on a door slab, enabling you to complete this project successfully.
Getting Started With Door Hinges Installation
Understanding the Importance of Proper Door Hinge Installation
Proper door hinge installation is crucial for ensuring the stability, security, and functionality of your door slab. Hinges not only help support the weight of the door but also allow it to swing open and closed smoothly. By installing the hinges correctly, you can prevent issues such as sagging, misalignment, and binding, which can lead to further problems down the line. Understanding the importance of proper door hinge installation is the first step towards successfully completing this DIY project.
Gathering the Necessary Tools and Materials for the Job
Before you begin installing hinges on your door slab, it is essential to gather all the necessary tools and materials. Having everything ready and easily accessible will save you time and prevent unnecessary interruptions during the installation process. Here is a list of tools and materials you’ll need:
| Tools | Materials |
|---|---|
| Screwdriver (preferably a cordless one)ChiselHammerTape measurePencilHinge template or jig | Door slabHingesScrews (preferably provided with the hinges)Wood filler or puttyDuct tape or masking tape |
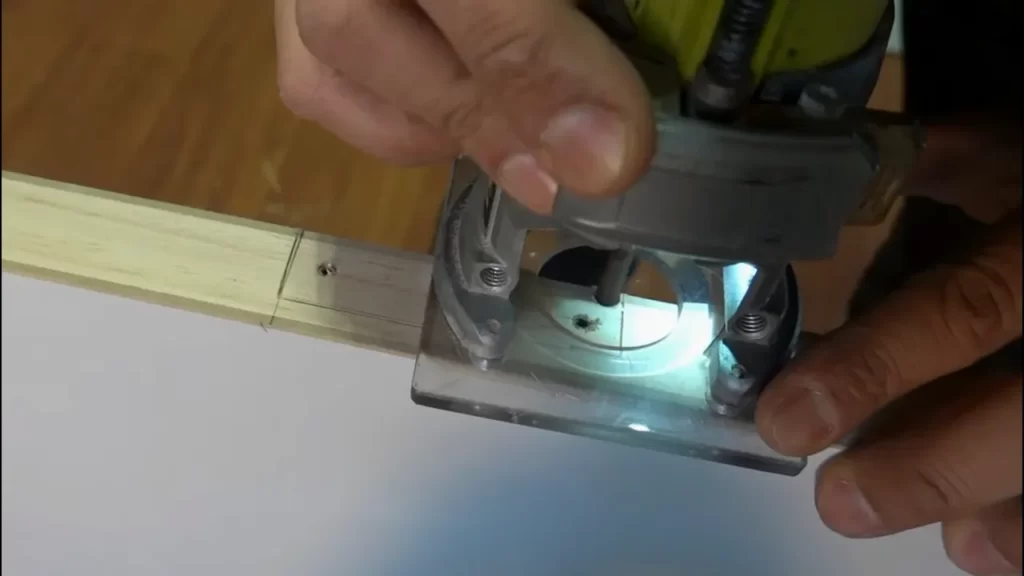
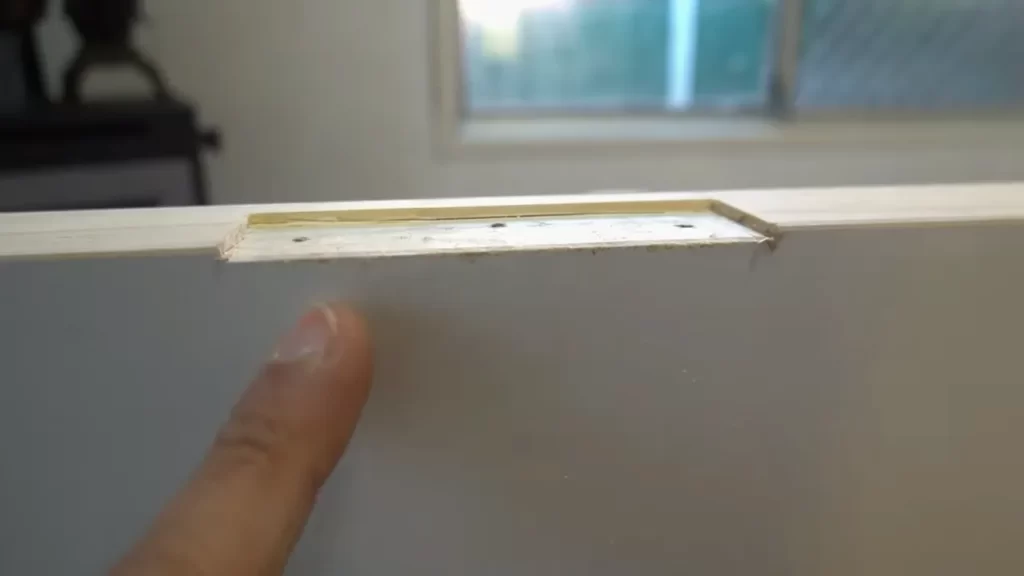
Preparing the Door Slab for Hinge Installation
Before you can install the hinges on the door slab, proper preparation is vital to ensure a secure and accurate fit. Follow these steps to prepare the door slab:
- Measure and mark the desired locations for the hinges on both the door edge and the door jamb. Ensure the marks are level and aligned properly.
- Place the hinge template or jig on the door edge where the hinge will be installed. Align it with the marks made in the previous step.
- Secure the template in place using duct tape or masking tape, ensuring it doesn’t move during the chiseling process.
- Using a chisel, follow the template’s instructions to cut a recess for the hinge. Be careful to avoid chiseling too deep, as it may weaken the structure of the door.
- Repeat the chiseling process for each hinge location.
- Once the recesses are complete, test-fit each hinge to ensure they sit flush with the door slab.
- If any adjustments are needed, use the chisel to make slight modifications to the hinge recesses until the hinges fit snugly.
- Once the hinges fit properly, secure them to the door slab using the provided screws. Make sure to align the hinge leaves with the door edge and screw them in securely.
- Finally, inspect the installed hinges to ensure they operate smoothly and the door slab remains stable.
By following these steps and taking your time to prepare the door slab correctly, you can ensure a successful door hinge installation. Remember, attention to detail and accuracy are key to achieving reliable and long-lasting results.
Step 1: Marking The Hinge Areas On The Door Slab
Installing hinges on a door slab is an important step in the process of hanging a door. The proper installation of hinges ensures that the door opens and closes smoothly and securely. In this step-by-step guide, we will walk you through the process of marking the hinge areas on the door slab. By following these instructions, you’ll be ready to move on to the next steps of installing your door in no time.
Measuring and marking the correct hinge positions on the door slab
The first step in the process is to measure and mark the correct hinge positions on the door slab. This ensures that the hinges will be properly aligned and spaced for optimal functionality. Here’s how to do it:
- Start by placing the door slab on a stable, flat surface, such as a workbench or sawhorses.
- Use a tape measure to determine the height at which you want the hinges to be installed. Typically, this is around 7 to 8 inches from the top and bottom of the door slab. Make a small mark at these heights on the side of the door slab.
- Next, measure the width of the door slab and divide it by the number of hinges you plan to install. This will give you the approximate spacing between each hinge.
For example, if the door slab is 32 inches wide and you plan to install three hinges, divide 32 by 3 to get 10.67 inches. This means that each hinge should be placed approximately 10.67 inches apart from each other.
Ensuring proper alignment and spacing of the hinge areas
Once you have marked the hinge positions, it’s important to ensure that they are properly aligned and spaced. This will help to prevent any issues with the door hanging unevenly or not closing properly. Here are some tips to help you ensure the proper alignment and spacing:
- Use a level to ensure that the marks you made for the hinge positions are straight and level.
- Check that the marks for the hinge positions are evenly spaced from the top and bottom of the door slab.
- Double-check the spacing between each hinge position using your tape measure. Adjust the marks if needed to achieve the desired spacing.
By taking the time to measure, mark, and ensure proper alignment and spacing of the hinge areas, you are setting yourself up for a successful door installation. This attention to detail will pay off in the long run with a door that operates smoothly and looks professional.
Step 2: Creating Pilot Holes For The Hinge Screws
Once you have properly marked the areas where your hinges will be attached to the door slab, the next step is to create pilot holes for the hinge screws. This is an important step that ensures the screws will go in smoothly and securely, preventing any potential damage to the door or hinges. In this section, we will walk you through the process of selecting the appropriate drill bit size for the pilot holes and carefully drilling them into the marked hinge areas.
Selecting the appropriate drill bit size for the pilot holes
When it comes to selecting the right drill bit size for your pilot holes, you need to consider the diameter of the screws you will be using and the type of material your door slab is made of. It is recommended to use a drill bit that is slightly smaller in diameter compared to the screws. This will allow the screws to have a tighter grip and avoid any potential splitting of the wood. Refer to the table below for a general guideline:
| Hinge Screw Diameter | Drill Bit Size |
|---|---|
| 1/2 inch | 1/8 inch |
| 5/8 inch | 3/16 inch |
| 3/4 inch | 1/4 inch |
Remember, these sizes are just guidelines and may vary depending on the specific screws and materials you are working with. It’s always a good idea to test the drill bit size on a scrap piece of wood before proceeding with the actual pilot holes.
Carefully drilling the pilot holes into the marked hinge areas
Now that you have selected the appropriate drill bit size, it’s time to carefully drill the pilot holes into the marked hinge areas on the door slab. Here’s a step-by-step guide to help you:
- Attach the selected drill bit to your power drill and ensure it is securely fastened.
- Position the drill bit at a 90-degree angle to the door slab, aligning it with one of the marked hinge areas.
- Apply gentle pressure and start drilling slowly. Make sure to keep the drill level and avoid applying excessive force to prevent any damage to the door slab.
- Continue drilling until the desired depth is reached. The depth should be enough to accommodate the length of the screws without protruding out of the other side of the door slab.
- Repeat the process for the remaining marked hinge areas, ensuring the pilot holes are evenly spaced and aligned.
Once all the pilot holes are drilled, you can proceed to the next step of attaching the hinges to the door slab. Creating pilot holes may seem like a small step, but it greatly contributes to the overall stability and functionality of the door. So take your time and ensure each pilot hole is created with precision and care!
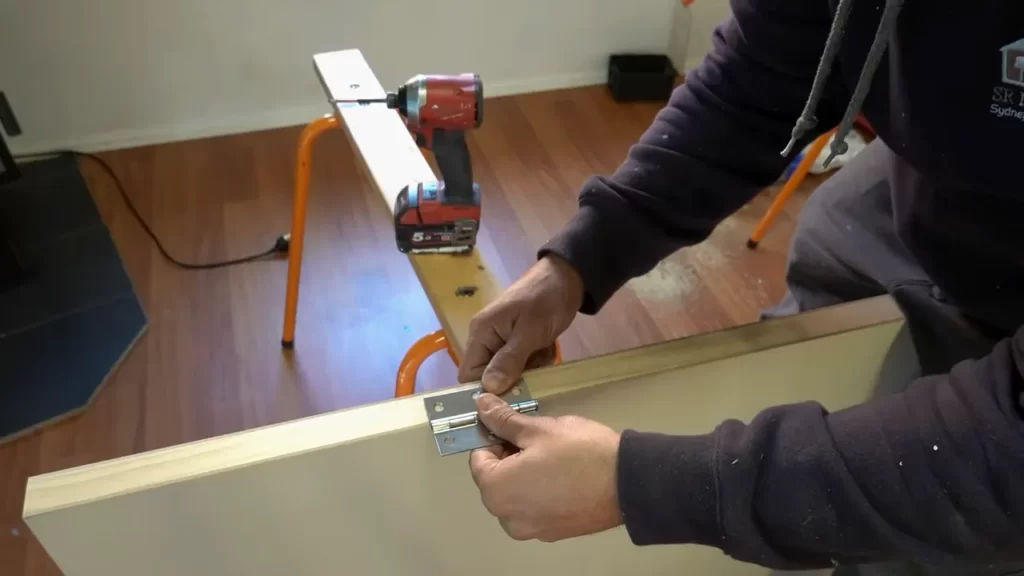
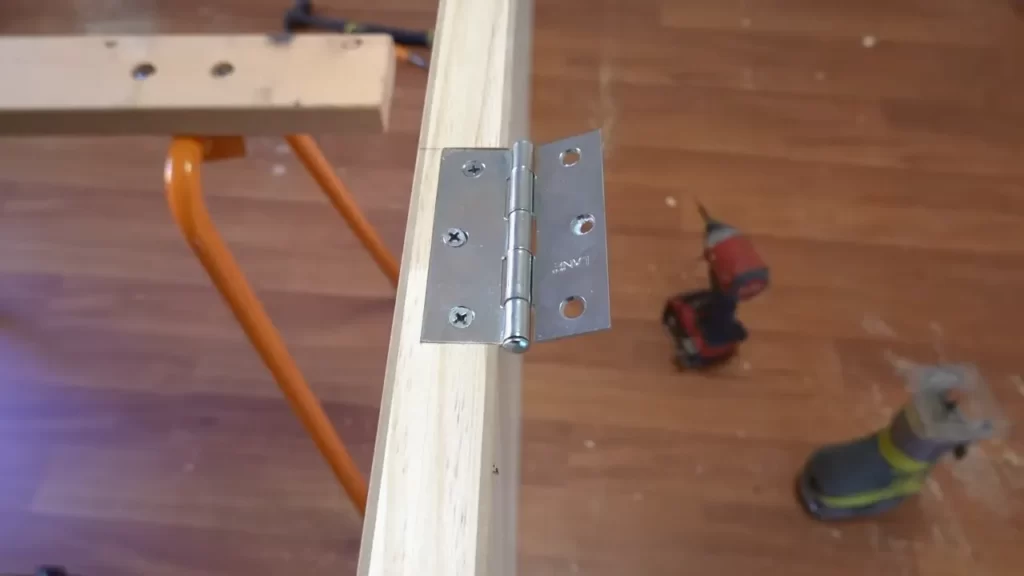
Step 3: Attaching The Hinges To The Door Slab
After properly drilling the pilot holes on the door slab in the previous step, it’s now time to securely attach the hinges to the door. This step is crucial as it ensures the stability and functionality of the door. Follow the instructions below to align the hinges with the pilot holes and secure them into place using screws and a screwdriver.
Aligning the hinges with the pilot holes on the door slab
To begin, carefully position the hinge over the pilot hole on the door slab. It’s important to ensure that the hinge properly aligns with the hole for a secure fit. Take note that each hinge should be placed in the same manner, keeping them parallel to each other. Keeping the hinge aligned is essential for preventing any issues with the door’s movement or alignment in the future.
Securing the hinges in place using screws and a screwdriver
Once the hinges are properly aligned, it’s time to secure them in place. Grab your screwdriver and the appropriate screws for the chosen hinges. Fasten the screws tightly using the screwdriver, ensuring that they are snug and hold the hinge firmly against the door slab.
For optimal results, remember to screw in the screws firmly but be careful not to overtighten them, as it may cause damage to the door or the hinge. It’s recommended to tighten the screws alternately, ensuring even pressure distribution. This will help keep the hinges securely in place and maintain the structural integrity of the door.
Repeat this process for each hinge, ensuring that they are all aligned and securely attached to the door slab. Take your time during this step to ensure that the hinges are firmly in place, as it will contribute to the door’s overall functionality and durability in the long run.
Step 4: Verifying The Hinge Alignment And Smooth Operation
Once you have successfully installed the hinges on your door slab, it’s important to ensure that the alignment is correct and that the door opens and closes smoothly. This step is crucial to guarantee the proper functioning and longevity of your door. In this section, we will discuss how to check the alignment of the door slab and hinges, as well as how to test the smooth operation of the door.
Checking the Alignment of the Door Slab and Hinges
To verify the alignment of the door slab and hinges, it’s essential to pay attention to detail. A misaligned door can lead to issues such as difficulty in opening and closing, drafts, and even damage to the door and frame over time. Follow these steps to ensure proper alignment:
- Start by visually inspecting the door slab and hinges. Look for any gaps or uneven spaces between the door and the frame.
- Next, firmly close the door and check if it sits flush with the frame. Assess all sides of the door to ensure an even fit.
- If you notice any misalignment, use a level to determine which part of the door or hinge needs adjustment. You can place the level vertically and horizontally along the door to identify any significant deviations.
- Once you have identified the problem area, make the necessary adjustments. This may involve loosening and retightening the screws on the hinges, shimming the hinges or door frame, or even sanding the door edges to achieve a better fit.
Testing the Smooth Opening and Closing of the Door
After confirming that the door slab and hinges are properly aligned, it’s time to test the smooth operation of the door. Follow these steps to ensure a seamless opening and closing experience:
- To test the smoothness, slowly open and close the door several times while paying attention to any resistance or rubbing.
- Listen for any unusual sounds, such as squeaking or scraping, which might indicate misaligned hinges or an improper fit.
- If you encounter any issues, address them promptly by adjusting the hinges, applying lubrication, or repeating the alignment verification process.
- Ensure that the door opens and closes smoothly without any sticking points or excessive force required.
By properly verifying the hinge alignment and smooth operation of the door, you will ensure that your newly installed hinges function optimally. Taking the time to check and adjust as needed will not only improve the overall door performance but also extend its lifespan. With these simple steps, you can have confidence in the reliability and functionality of your door for years to come.
Troubleshooting Common Issues With Door Hinge Installation
Installing hinges on a door slab may seem like a straightforward task, but it can sometimes come with its fair share of challenges. Fortunately, common issues that arise during the installation process can be easily addressed with a few troubleshooting steps. In this section, we will look at three common issues that may occur during door hinge installation and discuss effective solutions for each. Read on to learn how to address hinge misalignment, fix loose hinge screws, and resolve squeaky hinges.
Addressing hinge misalignment and adjusting the door slab
If you encounter hinge misalignment during the installation process, it is important to address it promptly to ensure proper functioning of the door. Misalignment can occur due to various reasons, such as incorrect hinge placement or unevenness in the frame. To address this issue, follow these steps:
- Inspect the positioning of the hinges on the door slab and compare it to the corresponding positions on the frame. Ensure that they align correctly.
- If misalignment is detected, remove the screws from the affected hinge(s) using a screwdriver.
- Reposition the hinge(s) to align them with the corresponding positions on the frame.
- Securely fasten the hinge(s) back in place by inserting the screws and tightening them using a screwdriver.
- Double-check the alignment and ensure that the door opens and closes smoothly without any obstructions or friction.
Fixing loose hinge screws and ensuring proper fastening
Loose hinge screws can cause the door to sag, resulting in difficulty with opening and closing. To fix this issue and ensure proper fastening, follow these steps:
- Inspect each hinge screw and identify any that may be loose or partially unscrewed.
- Using a screwdriver, tighten each loose screw by turning it clockwise.
- If a screw seems stripped or unable to tighten properly, remove it and replace it with a slightly larger and longer screw for a better grip.
- Ensure that all screws are securely fastened, but be cautious not to overtighten them, as it can cause damage to the hinge or the door slab.
Resolving squeaky hinges and applying lubrication for smooth operation
Squeaky hinges can be an annoying problem that can be easily resolved with a little lubrication. Here’s how:
- Identify the squeaky hinge by opening and closing the door while listening for any unusual sounds.
- Use a lubricant such as silicone spray or graphite powder to lubricate the hinge pin and the contact points between the hinge leaves.
- Apply a small amount of lubricant to the pin, then open and close the door a few times to allow the lubricant to penetrate and distribute evenly.
- Wipe away any excess lubricant with a clean cloth to prevent it from attracting dirt and dust.
- Test the door to ensure that it opens and closes smoothly without any squeaks or resistance.
By addressing hinge misalignment, fixing loose hinge screws, and resolving squeaky hinges, you can ensure that your door slab installation is successful and that your door operates smoothly. These troubleshooting steps will help you overcome common issues that may arise during the installation process, allowing you to enjoy a properly installed and functional door.
Issue 1: Hinge Misalignment And Adjusting The Door Slab
Misalignment of hinges can cause a variety of problems with your door slab, such as difficulty opening and closing, uneven gaps, and potential damage to the hinges themselves. To ensure smooth operation and proper alignment of your door, it’s important to identify signs of hinge misalignment and make the necessary adjustments. In this section, we’ll discuss how to identify the signs of hinge misalignment and how to adjust the position of the hinge areas on the door slab.
Identifying signs of hinge misalignment
When your hinges are misaligned, you may notice some tell-tale signs that indicate the problem. These signs include:
- Difficulty opening or closing the door
- Uneven gaps between the door and the frame
- Squeaking or creaking noises when the door is in use
- Visible stress or damage to the hinges
By carefully inspecting your door and hinges, you can easily identify these signs of misalignment and take the necessary steps to correct the issue.
Adjusting the position of the hinge areas on the door slab
Once you’ve identified the signs of hinge misalignment, it’s time to adjust the position of the hinge areas on the door slab. Follow these steps to ensure a proper adjustment:
- 1. Remove the door slab: Use a screwdriver to remove the screws securing the hinges to the door slab. Carefully lift the door off the hinges and set it aside in a safe location.
- 2. Inspect the hinge areas: Examine the hinge areas on the door slab and the frame to determine if any repairs or adjustments are needed. Look for any signs of damage or wear that may have contributed to the misalignment.
- 3. Make necessary repairs: If you notice any visible damage or worn components, now is the time to repair or replace them. This can include tightening loose screws, filling in holes, or replacing damaged hinge plates.
- 4. Adjust the position: With the door slab removed, you can easily adjust the position of the hinge areas. Use a level to ensure the door slab is plumb and adjust the placement of the hinges accordingly. You can use shims or cardboard wedges to help align the door slab properly.
- 5. Secure the hinges: Once you have adjusted the position of the hinges, reattach them to the door slab using the screws you removed earlier. Make sure the screws are tightened securely but not overly tight to avoid damaging the hinge or door slab.
- 6. Reinstall the door slab: Carefully place the door slab back onto the hinges and test its operation. Open and close the door to ensure it is aligned correctly and operates smoothly.
By following these steps, you can effectively address hinge misalignment and ensure that your door slab functions properly. Taking the time to identify and adjust any misaligned hinges will save you from future headaches and potential damage to your door slab.
Issue 2: Fixing Loose Hinge Screws And Proper Fastening
One of the common problems homeowners face with doors is loose hinge screws. This issue can lead to various problems, including a misaligned door, difficulty in opening and closing, and even potential security risks. Therefore, it is crucial to address this issue promptly and ensure proper fastening of the hinges.
Detecting loose hinge screws and potential risks
To identify if your door has loose hinge screws, carefully observe any visible gaps between the hinges and the door frame. You may also notice a sagging effect or witness the door rattling when it’s opened or closed. These signs indicate that the screws have become loose over time, compromising the stability and functionality of the door.
Ignoring loose hinge screws can lead to several potential risks. First and foremost, it compromises the overall security of your home, as a loose door can be easily forced open by intruders. Additionally, loose hinges can cause damage to the door frame, resulting in expensive repairs down the line. It’s best to address this issue as soon as possible to prevent any further complications.
Tightening the loose screws and ensuring secure fastening
Fixing loose hinge screws requires a few simple steps and basic tools. Here’s a step-by-step guide on how to tighten the screws and ensure secure fastening:
- Start by closing the door and positioning yourself on the hinge side.
- Inspect each hinge and identify the loose screws.
- Using a suitable screwdriver, tighten the loose screws by turning them clockwise. Be sure not to overtighten, as it can strip the screw holes.
- If the screws do not hold firmly, remove them one by one and apply a small amount of wood glue or toothpicks coated in wood glue to fill the stripped holes.
- Reinsert the screws and tighten them again. The wood glue will provide additional grip and hold the screws firmly in place.
- Repeat this process for each loose hinge screw on the door.
After tightening all the screws, test the door by opening and closing it to ensure it moves smoothly and securely. If you notice any further issues, you may need to seek professional help or consider replacing the hinges altogether.
Remember, regular maintenance of your door hinges is essential to prevent loose screws and maintain the overall stability of your doors. Take the time to inspect and tighten the screws periodically to avoid potential risks and ensure the longevity of your door.
Issue 3: Resolving Squeaky Hinges And Applying Lubrication
Identifying Squeaky Hinges and the Causes Behind the Noise
Squeaky hinges can be both an annoying and concerning issue for homeowners. Not only do they disrupt the peaceful atmosphere of your home, but they can also indicate underlying problems with the hinges themselves. By identifying the root causes of squeaky hinges, you can take the necessary steps to resolve the issue and ensure smooth operation of your door slab.
One common cause of squeaky hinges is the lack of proper lubrication. Over time, the constant friction between the hinge components can lead to wear and tear, resulting in the annoying squeaking sound every time you open or close the door. Additionally, rust and debris build-up can also contribute to hinge noise.
Applying Lubrication to Eliminate the Squeaking Sound
To eliminate the squeaking sound and restore smooth operation to your door slab, applying lubrication to the hinges is crucial. Here’s a step-by-step guide on how to do it:
- Start by opening the door to access the hinges. It’s important to note that some door slabs may have multiple hinges, so be sure to locate each one.
- Inspect the hinges for any signs of rust or debris. If present, use a soft brush or cloth to carefully remove them.
- Choose an appropriate lubricant for your hinges. Popular options include silicone-based lubricants, WD-40, or even household items like petroleum jelly.
- Apply a small amount of lubricant to each hinge, making sure to reach all moving parts. Use a brush or cloth to spread the lubricant evenly.
- After lubricating the hinges, slowly open and close the door multiple times to allow the lubricant to penetrate the hinge components thoroughly.
- Wipe off any excess lubricant to avoid attracting dirt and dust, which can lead to future hinge problems.
- Finally, test the door slab to ensure the squeaking sound has been eliminated. If necessary, you can repeat the lubrication process or seek professional assistance for further inspection.
By following these steps and applying lubrication to your squeaky hinges, you can enjoy a quiet and smoothly functioning door slab once again. Regular maintenance and occasional lubrication can help prevent future squeaking and prolong the lifespan of your hinges.
Enhancing Security And Longevity Of Door Hinges
When it comes to the safety and functionality of your doors, the hinges play a crucial role. Proper installation and maintenance of door hinges can not only enhance the security of your home or office but also improve the longevity of the hinges themselves. In this guide, we will explore three essential aspects that contribute to maximizing the security and durability of your door hinges.
Installing Security Pins for Additional Protection against Forced Entry
One effective way to enhance the security of your door hinges is by installing security pins. These pins act as an additional obstacle against forced entry, making it more difficult for intruders to tamper with your doors. To install security pins, follow these simple steps:
- Use a drill press to create holes in the hinge plates at a suitable distance from the hinge pins.
- Insert security pins into the drilled holes until they are flush with the surface of the hinge plates.
- Ensure the security pins are properly aligned with the hinge pins for optimal effectiveness.
Maintaining and Lubricating Door Hinges for Optimal Performance
Regular maintenance and lubrication are vital to ensure that your door hinges function smoothly and efficiently. Follow these steps to maintain and lubricate your door hinges:
- Inspect the hinges regularly for any signs of wear, rust, or corrosion.
- Clean the hinges using a mild detergent and a soft cloth to remove dirt and debris.
- Apply a high-quality lubricant, such as silicone-based oil or graphite powder, to the hinges, paying attention to the pivot points.
- Open and close the door several times to distribute the lubricant evenly and ensure smooth operation.
Selecting the right hinges for your doors is essential for both security and longevity. Consider these factors when choosing durable and corrosion-resistant hinge options:
| Factor | Consideration |
|---|---|
| Material | Opt for high-quality metal hinges, such as stainless steel or brass, which are resistant to rust and corrosion. |
| Size and Weight | Ensure that the hinges are suitable for the size and weight of your door slab, as this will prevent any strain or misalignment. |
| Finish | Choose a finish that complements the aesthetic of your door while providing an additional layer of protection against the elements. |
By following these guidelines for installing security pins, maintaining and lubricating your door hinges, and selecting durable and corrosion-resistant options, you can strengthen the security and longevity of your door hinges. Take the necessary steps to fortify your doors and safeguard your property today!
Security Pin Installation For Added Protection
When it comes to securing your door, installing hinges with security pins can provide an extra layer of protection against tampering and forced entry. Security pins are designed to prevent the removal of the hinge pins, making it extremely difficult for intruders to gain unauthorized access. In this section, we will explore the benefits of security pins for door hinges and guide you through the steps of installing them.
Understanding the benefits of security pins for door hinges
Security pins offer several advantages when it comes to enhancing the security of your door. Here are the key benefits:
- Deter tampering: Security pins act as a deterrent for burglars and intruders. The added difficulty in removing the hinge pins makes it less likely for them to attempt to tamper with the door.
- Prevent forced entry: With security pins in place, it becomes significantly harder for anyone to force open the door by removing the hinges. This adds an extra level of protection for your home or business.
- Increased peace of mind: Knowing that your door hinges are equipped with security pins can give you greater peace of mind, especially when it comes to the safety of your loved ones or valuable possessions.
Installing security pins to prevent hinge tampering and forced entry
Now that we’ve explored the benefits, let’s dive into the process of installing security pins on your door hinges. Follow these simple steps:
- Gather the required tools: Before you begin, make sure you have the necessary tools on hand. These typically include a drill, drill bits, a hammer, a chisel, and security pin sets.
- Remove the hinge pins: Carefully lift the door off its hinges and place it in a secure location. Use a flathead screwdriver or a hinge pin removal tool to remove the existing hinge pins from the hinges.
- Prepare the hinge knuckles: Using a chisel, create a small notch on the edge of each hinge knuckle. This will provide a space for the security pin to sit flush with the surface.
- Drill pilot holes: Next, use a drill bit with a slightly smaller diameter than the security pins to drill pilot holes into the hinge knuckles. Be careful not to drill too deep, as you want the security pins to fit snugly.
- Insert the security pins: Take the security pins and insert them into the pilot holes you just drilled. Use a hammer to gently tap them in until they are flush with the surface of the hinge knuckles.
- Reattach the door: Once you’ve installed the security pins on all the hinges, carefully reattach the door to its frame. Make sure the pins align with the hinge knuckles and slide them back into place.
By following these steps, you can effectively install security pins on your door hinges, providing added protection against tampering and forced entry. Remember to always prioritize the security of your home or business and take necessary measures to safeguard against potential threats.
Proper Maintenance And Lubrication For Door
Hinges
Importance of Regular Maintenance for Door Hinges
Regular maintenance for door hinges is crucial to ensuring their proper functioning and longevity. Over time, door hinges can become worn or damaged, causing doors to squeak, stick, or not close properly. By incorporating regular maintenance into your routine, you can prevent these issues and prolong the lifespan of your door hinges.
One of the main reasons why regular maintenance is important for door hinges is the prevention of rust and corrosion. Moisture and exposure to the elements can cause hinges to rust, leading to a decrease in their effectiveness and potentially causing damage to the door itself. By inspecting and maintaining your hinges regularly, you can identify and address any signs of rust or corrosion before they become major problems.
Lubrication Techniques to Ensure Smooth Operation and Longevity
Lubricating your door hinges is an essential part of proper maintenance. By keeping the hinges well lubricated, you can ensure smooth operation and reduce wear and tear. Here are some effective lubrication techniques:
- Choose the right lubricant: When it comes to lubricating door hinges, it is important to select the appropriate lubricant. Avoid using petroleum-based products, as they can attract dirt and grime, causing the hinges to become sticky and less effective over time. Instead, opt for a silicone or graphite-based lubricant, which will provide long-lasting lubrication without attracting debris.
- Clean the hinges: Before applying any lubricant, it is important to clean the hinges thoroughly. Use a soft cloth or brush to remove any dust or debris from the hinge surfaces and ensure they are clean and dry before proceeding.
- Apply the lubricant: Once the hinges are clean, apply a small amount of lubricant to each hinge. Use a cotton swab or a clean cloth to spread the lubricant evenly on the hinge pin and the moving parts of the hinge. Avoid over-lubrication, as excess lubricant can attract dirt and cause the hinge to become stiff or sticky.
- Operate the door: After applying the lubricant, open and close the door several times to allow the lubricant to distribute evenly along the hinge surfaces. This will ensure that all parts are properly lubricated and moving smoothly.
- Wipe off any excess lubricant: Finally, use a clean cloth to wipe off any excess lubricant from the hinge surfaces. This will help prevent the accumulation of dirt and debris.
By following these lubrication techniques and incorporating regular maintenance into your door hinge care routine, you can ensure smooth operation, prevent unnecessary wear and tear, and prolong the lifespan of your door hinges.
Choosing Durable And Corrosion-Resistant Hinge Options
When installing hinges on a door slab, it is crucial to choose durable and corrosion-resistant options. Hinges play a vital role in the functionality and longevity of the door, so selecting the right materials and finishes is a key consideration. In this section, we will explore different hinge materials and finishes and provide guidance on selecting hinges that will resist rust and corrosion.
Exploring different hinge materials and finishes
Before diving into the world of hinge materials and finishes, it’s important to understand the characteristics and benefits of each. Here are some popular options to consider:
| Hinge Material | Advantages |
|---|---|
| Stainless Steel | Highly durableResistant to rust and corrosionSleek and modern appearance |
| Brass | Classic and elegant lookGood resistance to corrosionAvailable in various finishes |
| Zinc | Affordable optionDecent resistance to corrosionCan be coated for added protection |
| Iron | Strong and durableMight require regular maintenance to prevent rustCan be painted or coated for enhanced protection |
When it comes to finishes, there are several options to suit your aesthetic preferences, ranging from polished and satin to antique and oil-rubbed. Each finish serves a purpose, so choose the one that complements your door and surrounding decor.
Selecting the right hinges to resist rust and corrosion
Resisting rust and corrosion should be a priority when selecting hinges for your door slab. To avoid future maintenance and replacement costs, consider the following factors:
- Material: Stainless steel and brass hinges are the top choices for superior resistance to rust and corrosion. Their inherent properties make them less susceptible to environmental factors.
- Finish: Opt for finishes such as powder coating or PVD (Physical Vapor Deposition) coating, as they offer enhanced protection against rust and corrosion.
- Environment: Take into account the environment the hinges will be exposed to. For coastal areas with high humidity and salt content, stainless steel or brass hinges with a corrosion-resistant finish are highly recommended.
- Maintenance: Regular maintenance is key to prolonging the lifespan of hinges. Keep hinges clean and lubricated using appropriate products, as this can prevent the buildup of dirt and debris that may lead to corrosion.
By carefully considering these factors, you can select hinges that will resist rust and corrosion, providing you with a durable and long-lasting door slab installation.
Frequently Asked Questions For How To Install Hinges On A Door Slab
Do Slab Doors Have Hinge Cutouts?
Yes, slab doors typically do not have pre-cut hinge openings. The absence of these cuts allows homeowners to customize the placement of hinges based on their specific needs and preferences.
Do Door Slabs Have Hinges?
Yes, door slabs usually have hinges. Hinges are the metal components that allow a door to swing open and closed on its frame.
How Do You Measure A Slab Door For Hinges?
To measure a slab door for hinges, follow these steps: First, measure the height of the door from top to bottom. Then, measure the width of the door from side to side. Next, determine the thickness of the door. Finally, use these measurements to choose the appropriate size and placement for your hinges.
Is There A Right Way To Install Door Hinges?
Yes, there is a right way to install door hinges. Follow these guidelines for proper installation: 1) Start by marking the hinge positions accurately on the door and frame. 2) Use a chisel to create recesses for the hinges. 3) Align the hinges with the recesses and secure them tightly with screws.
4) Test the door to ensure smooth operation. 5) Make any necessary adjustments for a perfect fit.
How Do I Measure For Door Hinges?
To measure for door hinges, open the door and measure the width and height of the hinge plate.
What Tools Do I Need To Install Hinges On A Door Slab?
You will need a screwdriver, a chisel, a pencil, and a hammer to install hinges on a door slab.
Conclusion
To sum up, installing hinges on a door slab is a simple yet essential task that can greatly improve the functionality and appeal of your door. By carefully following the steps outlined in this blog post, you can ensure a smooth and successful installation process.
Remember to choose the right hinges for your door type, pre-drill the holes, and secure the hinges properly. With these tips, you can confidently tackle this DIY project and enjoy a perfectly working door in no time.