o install garage door cables, start by securing the door in the open position and attaching the bottom brackets. Then, loop the cable around the pulley and secure it to the top bracket.
Finally, adjust the tension and test the door to ensure it operates smoothly and safely. Welcome to our guide on installing garage door cables. Whether you’re replacing old cables or installing new ones, it’s important to know the proper steps to ensure a smooth and safe operation of your garage door.
We will walk you through the process of installing garage door cables. By following these steps, you’ll be able to confidently complete the task and enjoy the convenience of a fully functional garage door. So, let’s get started!
Understanding The Basics Of Garage Door Cables
When it comes to your garage door, there are many components that work together to ensure smooth and safe operation. One such crucial component is the garage door cables. Understanding the basics of garage door cables is essential for any homeowner or DIY enthusiast looking to install or maintain their garage door.
What are garage door cables?
Garage door cables are an integral part of the garage door mechanism. These cables, typically made of sturdy steel, are responsible for supporting the weight of your garage door as it opens and closes. They connect the garage door springs to the bottom brackets, providing stability and balance.
The importance of garage door cables
The importance of garage door cables cannot be overstated. These cables play a vital role in ensuring that your garage door operates safely and effectively. Without properly functioning garage door cables, your garage door could become unstable, potentially causing damage to the door itself or posing a safety hazard to you and your family.
Here are some key reasons why garage door cables are important:
- Weight distribution: Garage door cables distribute the weight of the door evenly, preventing excessive strain on other components and ensuring smooth operation.
- Balance and alignment: Garage door cables help keep the door balanced and aligned properly, reducing the risk of it becoming crooked or off-track.
- Safety: Functioning cables prevent the door from falling unexpectedly, reducing the risk of injuries or property damage.
Different types of garage door cables
| Types of Garage Door Cables | Description |
|---|---|
| Torsion cables | These cables are used in garage doors with torsion spring systems. They are typically thicker and stronger, designed to withstand the higher tension created by torsion springs. |
| Extension cables | Extension cables are used in garage doors with extension spring systems. These cables run through the extension springs and are responsible for lifting and lowering the door. |
Understanding the different types of garage door cables is crucial for selecting the right type for your garage door. If you’re unsure about which cables to choose, consult the manufacturer’s instructions or seek professional assistance.
Overall, knowing the basics of garage door cables is essential for homeowners who wish to install or maintain their garage door. By understanding what garage door cables are, their importance, and the different types available, you can ensure the proper functioning and safety of your garage door.
Gathering The Necessary Tools And Materials
Installing garage door cables is an essential part of proper garage door maintenance. Over time, cables can become worn or damaged, leading to a variety of issues such as the door being difficult to operate or even completely stuck. To ensure a smooth and successful installation process, it is crucial to gather all the necessary tools and materials before getting started. In this section, we will discuss the tools and materials needed for installing garage door cables.
Tools needed for installing garage door cables
Before diving into the installation process, it is vital to have the right tools on hand. Here is a list of the tools you will need:
| Tool | Description |
|---|---|
| Wrench set | A set of wrenches in different sizes will be required for loosening and tightening various bolts and nuts. |
| Screwdriver set | Both Phillips and flathead screwdrivers will be needed to remove screws and fasten new components. |
| Pliers | A pair of pliers will come in handy for gripping and manipulating parts during the installation process. |
| Cable cutters | These specialized cutters are designed to cleanly and safely cut through garage door cables. |
| Socket set | A socket set will be required for loosening and tightening nuts and bolts throughout the installation. |
| Tape measure | Having a tape measure will ensure accurate measurements are taken for proper cable length. |
By having these essential tools at your disposal, you will be well-prepared to tackle the process of installing garage door cables.
Materials needed for installing garage door cables

In addition to the necessary tools, you will also require specific materials to complete the installation. Below is a list of materials you will need:
- Garage door cables – Ensure you have the correct type and length of cables for your specific garage door model.
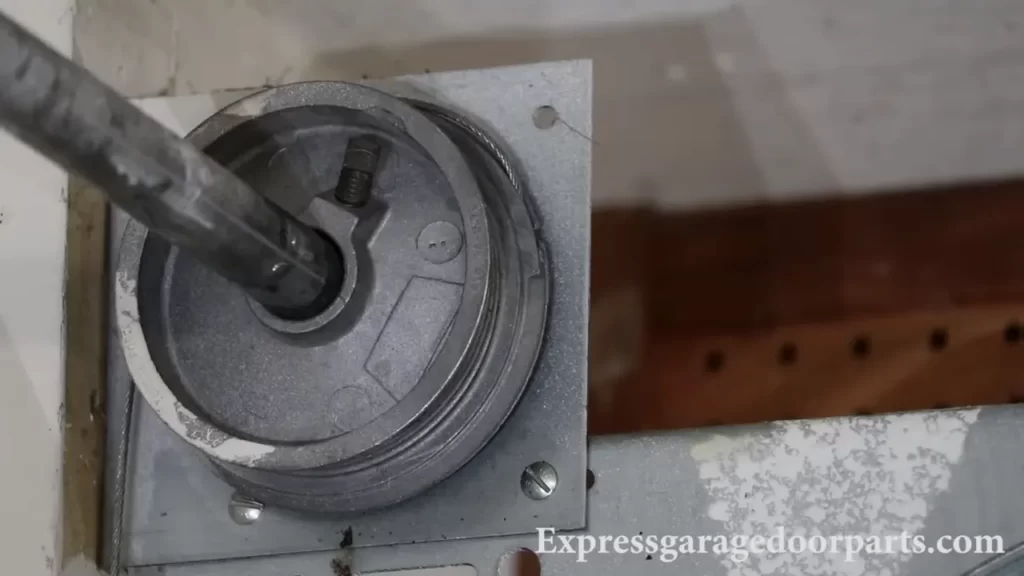
- Cable drum – This component helps to wind and unwind the garage door cables during operation.
- Pulleys – The pulleys are responsible for guiding the cables and ensuring smooth movement of the door.
- Cable brackets – These brackets secure the garage door cables in place.
- Nuts and bolts – These fasteners are used to secure various components together.
By gathering all the necessary tools and materials beforehand, you will be ready to embark on the installation process smoothly. Having everything readily available will save you time and frustration, ensuring a successful garage door cable replacement.
Step-By-Step Guide To Installing Garage Door Cables
Installing garage door cables is an essential part of maintaining and repairing your garage door. These cables play a crucial role in supporting the weight of the door and ensuring its smooth operation. If you’re experiencing issues with your garage door cables, it’s important to address them promptly to avoid further damage or potential accidents. In this step-by-step guide, we’ll walk you through the process of installing garage door cables, from preparing the workspace to adjusting the tension of the cables. Let’s get started!
Preparing the Workspace
Before you begin installing garage door cables, it’s crucial to ensure that your workspace is safe and organized. Here are the steps to prepare your workspace:
- Clear the area around the garage door, removing any objects that may obstruct your work or pose a safety hazard.
- Pull the emergency release cord to disengage the garage door opener, allowing you to manually operate the door.
- Place a sturdy ladder under the garage door to provide easy access to the overhead components.
Measuring and Cutting the Cables
Accurate measurements are essential when it comes to installing garage door cables. Here’s how you can measure and cut the cables:
- Measure the length of the existing cables. They should be long enough to run from the bottom bracket to the door drum.
- Use wire cutters to cut the cables to the appropriate length.
- Remember to account for extra slack in the cables to ensure proper tension.
Attaching the Cables to the Door Drum
The door drum holds the cables in place and facilitates the movement of the garage door. Follow these steps to attach the cables to the door drum:
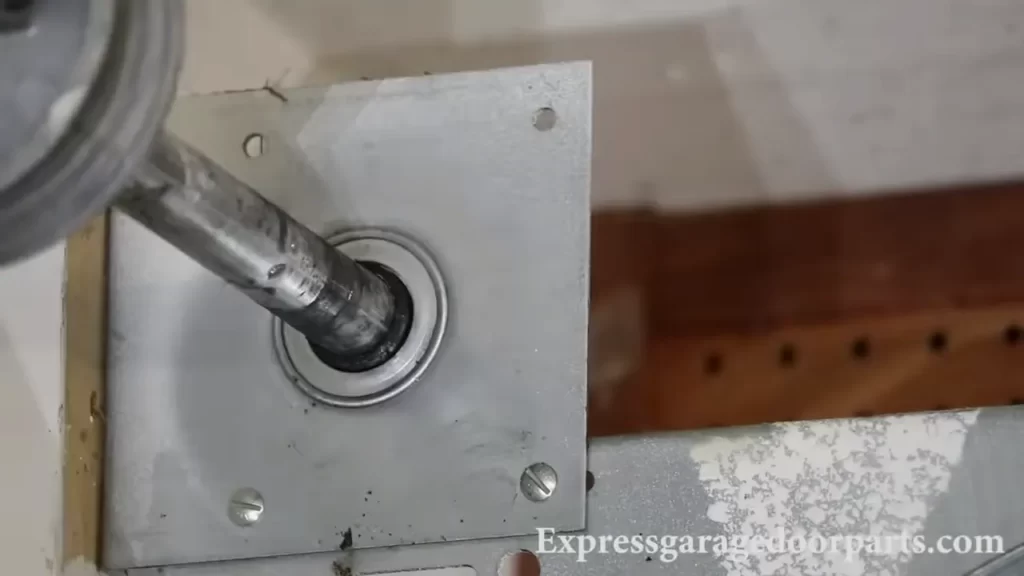
- Locate the door drum on both sides of the garage door, near the top.
- Insert the end of each cable into the designated slot on the door drum.
- Wind the cables around the drum in a neat and orderly manner, making sure they are properly secured.
Securing the Cables to the Bottom Bracket
The bottom bracket serves as an anchor point for the garage door cables. Here’s how you can secure the cables to the bottom bracket:
- Position yourself near the bottom bracket, which is located at the bottom of the garage door.
- Tightly fasten each cable to the corresponding slot on the bottom bracket.
- Ensure that the cables are properly aligned and securely attached.
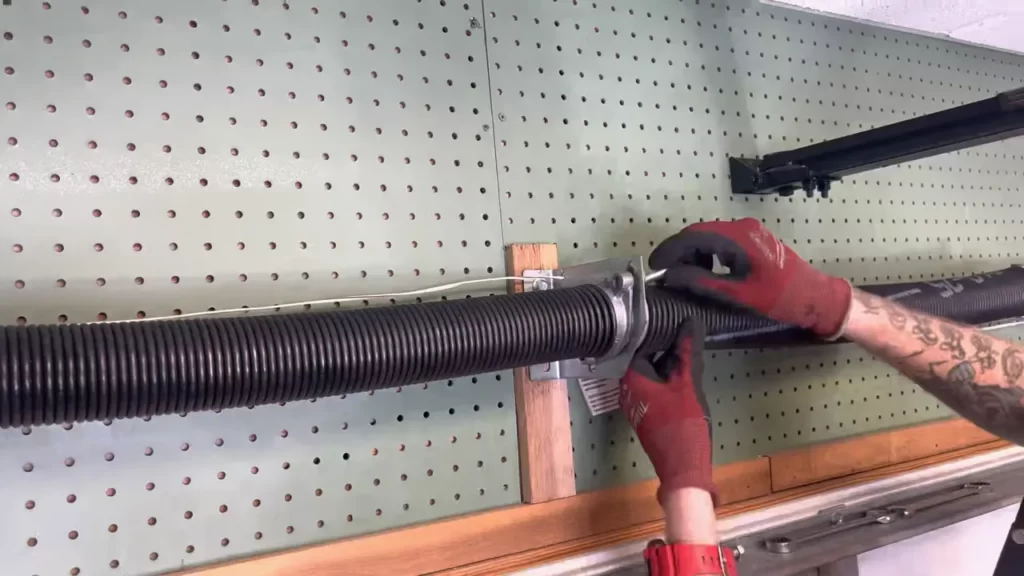
Adjusting the Tension of the Cables
Proper tension in the garage door cables is vital for smooth operation and optimal safety. Follow these steps to adjust the tension of the cables:
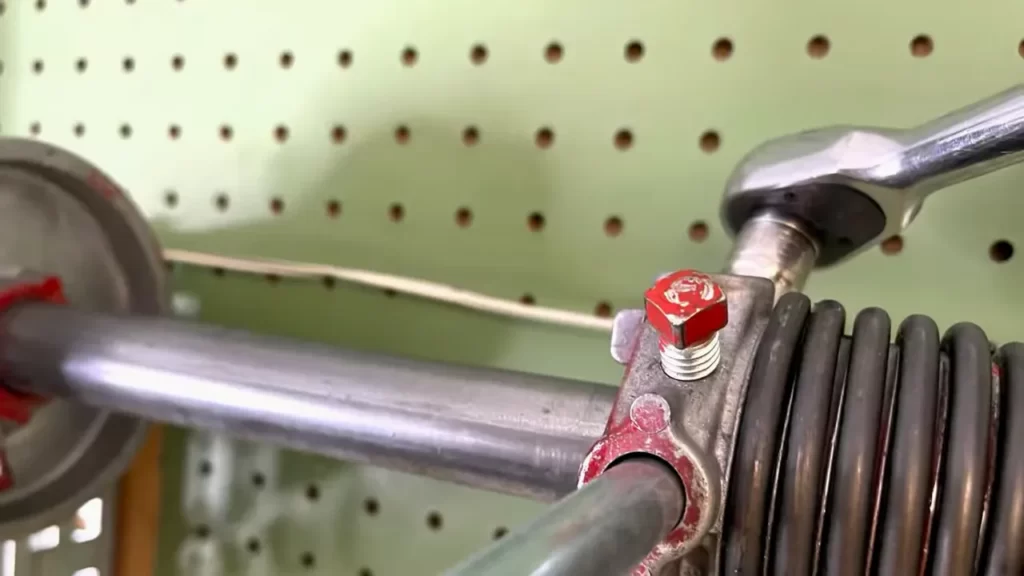
- Using an adjustable wrench, loosen the set screws on the bottom bracket.
- Gradually tighten the cable tension by turning the adjustment nuts in a clockwise direction.
- As you tighten the cables, observe the movement of the garage door and ensure it remains balanced and doesn’t sag.
By following this step-by-step guide, you can successfully install garage door cables and maintain the proper functionality of your garage door. However, it’s important to note that if you’re unsure or uncomfortable performing these tasks yourself, it’s best to hire a professional garage door technician to ensure the job is done safely and correctly.
Tips And Precautions For A Smooth Installation Process
Installing garage door cables can be a bit challenging, but with the right tips and precautions, you can ensure a smooth and successful installation process. In this section, we will discuss some important safety precautions to follow, common mistakes to avoid, and troubleshooting tips for cable installation.
Safety precautions to follow
When it comes to installing garage door cables, safety should always be the top priority. Follow these safety precautions to minimize the risk of accidents and injuries:
- Wear protective gear, including safety glasses and gloves, to protect yourself from any potential hazards.
- Ensure that the power to the garage door opener is disconnected before starting the installation process.
- Use sturdy and stable ladders or step stools when working at heights.
- Never attempt to install cables alone. It’s always recommended to have a helper to assist you during the process.
- Read and follow the manufacturer’s instructions carefully to ensure proper installation and avoid any mistakes.
Common mistakes to avoid
Avoiding common mistakes during the installation process can save you time, money, and frustration. Here are some mistakes to steer clear of:
- Incorrect cable measurements: Take precise measurements before purchasing cables to ensure they are the right length for your garage door.
- Improper cable installation: Follow the manufacturer’s instructions closely to ensure the cables are installed correctly. Improper installation can lead to garage door malfunctions or accidents.
- Skipping regular maintenance: Neglecting regular maintenance can shorten the lifespan of your cables and increase the risk of failure. Make sure to lubricate the cables regularly and inspect them for any signs of wear and tear.
- Over-tightening the cables: Over-tightening the cables can put unnecessary strain on the garage door system and lead to premature wear. Follow the recommended tension specifications provided by the manufacturer.
Troubleshooting tips for cable installation
If you encounter any issues during the cable installation process, here are some troubleshooting tips to help you overcome them:
- If the cables are not running smoothly through the pulleys, check for any obstructions or debris that may be hindering their movement. Clear out any obstructions and lubricate the pulleys if necessary.
- If the cables are slipping out of the pulleys, make sure they are properly seated and adjusted to the correct tension. Retighten any loose nuts or bolts that may be causing the problem.
- If you notice frayed or damaged cables, replace them immediately. Frayed or damaged cables are a safety hazard and should not be used.
- If the garage door is not opening or closing smoothly after the cable installation, double-check the cable tension and make adjustments as needed. An improperly tensioned cable can affect the door’s operation.
By following these tips and precautions, you can successfully install garage door cables and ensure smooth and efficient operation of your garage door system. Remember to prioritize safety, avoid common mistakes, and troubleshoot any issues that may arise during the installation process.
Maintaining And Repairing Garage Door Cables
Regular maintenance for optimal performance
Regular maintenance is crucial for ensuring that your garage door cables function smoothly and efficiently. By following a few simple steps, you can keep your cables in good condition and extend their lifespan. 1. Inspect the cables: Start by visually examining the cables for any signs of fraying, rust, or damage. Check for loose or worn-out strands, as well as any dents or kinks in the cable. If you notice any issues, it’s important to address them promptly. 2. Lubricate the cables: Apply a high-quality lubricant to the cables to prevent them from becoming stiff or resistant to movement. This will keep them operating smoothly and minimize the risk of wear and tear. Be sure to use a lubricant that is specifically designed for garage door cables. 3. Tighten loose connections: Check the connections between the cables and the door’s pulleys or springs. If you notice any loose connections, use a wrench to tighten them securely. Loose connections can cause the cables to become misaligned and lead to unnecessary strain. 4. Test the balance of the door: An imbalanced garage door can put additional stress on the cables, leading to premature wear. To test the balance, close the door and observe its movement. If one side appears to be heavier than the other or the door doesn’t close smoothly, it may need to be balanced by a professional.
Signs of cable wear and tear
Identifying signs of wear and tear on your garage door cables is crucial for preventing accidents and ensuring the door’s optimal performance. By being alert to these signs, you can address any issues promptly and avoid costly repairs down the line. Here are some common indicators that your garage door cables may need attention: 1. Frayed or worn-out cables: Inspect the cables regularly for any fraying or signs of wear. Frayed cables can snap under tension, leading to a dangerous situation. If you notice any significant fraying or damage, it’s essential to replace the cables as soon as possible. 2. Uneven movement: If your garage door starts to move unevenly or jerks while opening or closing, it could be a sign of cable issues. Uneven movement indicates that the cables may be misaligned or experiencing excessive tension. Promptly addressing this issue can prevent further damage. 3. Noisy operation: Excessive noise during the door’s operation can be an indication of cable wear. Squeaking, grinding, or unusual sounds could mean that the cables are not moving smoothly or are rubbing against other components. Lubricating the cables may help eliminate these noises, but it’s important to address the underlying cause if the noise persists.
How to fix common cable issues
Fixing common cable issues may require some basic tools and the assistance of a second person for safety. However, if you’re not confident in your ability to undertake these repairs yourself, it’s always best to consult a professional garage door technician. Here’s a step-by-step guide for fixing common cable issues: 1. Gather the necessary tools: Before starting any repairs, make sure you have the right tools on hand. These typically include safety gloves, adjustable wrenches, cable cutters, and replacement cables. 2. Disconnect the garage door opener: To ensure your safety, disconnect the power supply to the garage door opener. This will prevent the accidental activation of the door while you’re working on the cables. 3. Loosen the tension on the cables: Use an adjustable wrench to loosen the tension on the cables. This will make it easier to remove and replace them. 4. Remove the damaged cable: Carefully detach the damaged cable from the door’s pulley system and remove it completely. 5. Install the new cable: Attach one end of the new cable to the bottom roller bracket and thread it through the pulleys or cable drums. Make sure the cable is properly aligned and secure. 6. Restore tension on the cables: Use the adjustable wrench to tighten the cable, restoring the appropriate tension. Be careful not to over-tighten, as this can cause unnecessary strain. 7. Test the door’s operation: Reconnect the power supply to the garage door opener and test the door’s movement. Ensure that it opens and closes smoothly without any issues. Remember, if you encounter any difficulties or are unsure about the repair process, it’s always best to consult a professional technician to avoid any safety risks or further damage to your garage door.
Frequently Asked Questions On How To Install Garage Door Cables
How Do You Put The Cable Back On A Garage Door Opener?
First, make sure the garage door is closed. Next, locate the cable end and insert it into the opener trolley. Then, loop the cable around the necessary pulleys, following the path outlined in the instructions. Finally, adjust the tension and test the door’s operation.
How Long Are The Cables To A 7 Ft Garage Door?
The cables for a 7 ft garage door are typically around 12 ft long.
How Do You Adjust Garage Door Springs And Cables?
To adjust garage door springs and cables, follow these steps: 1. Ensure the power is off. 2. Use a ladder or step stool to reach the springs and cables. 3. Use the appropriate tools to adjust the tension on the springs.
4. Test the door’s balance and adjust as needed. 5. Examine the cables for any signs of wear or damage and replace if necessary.
Can Garage Door Cables Be Replaced?
Yes, garage door cables can be replaced.
How Do I Know If My Garage Door Cables Need Replacing?
If your garage door doesn’t close evenly or makes strange noises, it’s time to inspect the cables for signs of wear or fraying.
Can I Install Garage Door Cables By Myself?
While it’s possible, it’s highly recommended to hire a professional technician who has the necessary skills and equipment for a safe and accurate installation.
Conclusion
Installing garage door cables can be a complex task, but with the right knowledge and tools, it becomes manageable. By following the step-by-step guide provided in this blog post, you can ensure the proper installation of these essential components. Remember to prioritize safety and consult professional help if needed.
With attention to detail and precision, your garage door will be functioning smoothly in no time. Happy DIY-ing!