To install a hydraulic door closer, first, position the closer body on the door frame and mark the mounting holes. Then, drill pilot holes, attach the closer body with screws, and align the arm with the door bracket.
Finally, adjust the closing speed and latch action according to your preferences. Installing a hydraulic door closer is a straightforward process that requires careful positioning, drilling, and adjusting for optimal performance. By following these steps, you can ensure a secure and efficient door closing mechanism in your space.
Choosing The Right Hydraulic Door Closer
When it comes to installing a hydraulic door closer, one of the most crucial steps is choosing the right one for your specific needs. A hydraulic door closer plays a significant role in ensuring that doors close smoothly and securely, providing convenience and safety for users.
Factors to Consider When Selecting a Hydraulic Door Closer
Choosing the right hydraulic door closer may seem like a daunting task, considering the wide range of options available in the market. However, by considering a few key factors, you can make an informed decision that suits your requirements perfectly.
1. Door Size and Weight
The first factor to consider when selecting a hydraulic door closer is the size and weight of the door. Each hydraulic door closer is designed to accommodate a specific range of door sizes and weights. It is crucial to choose a closer that can handle the weight and width of your door, ensuring optimal functionality and longevity.
2. Level of Traffic
The second factor to consider is the level of traffic your door experiences. Doors in high-traffic areas require a heavy-duty hydraulic door closer that can withstand frequent use and constant opening and closing. On the other hand, doors in low-traffic areas can operate efficiently with a lighter-duty closer.
3. Required Closing Force
The third factor to take into account is the required closing force. Different doors may have specific requirements in terms of how much force is needed to close them securely. It is essential to choose a hydraulic door closer that provides the appropriate closing force to ensure the door shuts properly.
In addition to these factors, you should also consider other aspects such as the architectural aesthetics, fire-rated requirements, and ADA compliance of the hydraulic door closer. By carefully evaluating all these elements, you can select a door closer that not only meets your functional needs but also enhances the overall appearance and safety of your space.
Step 1: Assessing Door Requirements
Before you start installing a hydraulic door closer, it is crucial to assess the specific requirements of your door. By understanding the weight and size of the door and determining the level of traffic or usage, you can ensure the door closer you choose will function optimally. This step is essential to guaranteeing the smooth operation and longevity of the hydraulic door closer.
Understanding the Weight and Size of the Door
The weight and size of the door play a significant role in determining the appropriate hydraulic door closer for installation. It is important to know the exact measurements and weight capacity of your door before making your selection. Here’s how you can assess the weight and size:
- Measure the height, width, and depth of the door using a measuring tape.
- Weigh the door using a reliable scale or consult the manufacturer’s specifications.
Once you have obtained these measurements, you can refer to the door closer’s specifications to ensure it is suitable for your door’s weight and size. Choosing a door closer that matches these requirements will ensure optimal performance and prevent any strain on the door and the closer itself.
Determining the Level of Traffic or Usage
The level of traffic or usage is another crucial factor to consider when installing a hydraulic door closer. Doors that experience heavy usage, such as those in commercial buildings or high-traffic areas, require door closers with higher durability and strength. Conversely, doors with lighter usage, such as those in residential buildings, may not need door closers with the same level of robustness.
To determine the level of traffic or usage, consider the following:
- Identify whether the door is located in a commercial or residential setting.
- Take into account the number of people who regularly use the door.
- Consider the frequency at which the door is opened and closed.
By evaluating these factors, you can accurately gauge the level of traffic or usage and choose a hydraulic door closer that can handle the demands. This ensures the door closer operates smoothly and efficiently for an extended period without experiencing premature wear or failure.
Step 2: Selecting The Appropriate Type Of Closer
In order to install a hydraulic door closer properly, it is crucial to choose the most suitable type of closer for your specific needs. There are two main types to consider: surface-mounted closers and concealed closers. In this step, we will compare these two types, exploring their benefits and drawbacks to help you make an informed decision.
Comparing Surface-Mounted and Concealed Closers
When it comes to hydraulic door closers, two popular options are surface-mounted closers and concealed closers. Understanding the key differences between these types will aid in choosing the right one for your installation.
Exploring the Benefits and Drawbacks of Each Type
Both surface-mounted closers and concealed closers offer their own unique set of advantages and disadvantages. Take a closer look at what each type has to offer:
Surface-Mounted Closers
Surface-mounted closers are installed on the surface of the door or frame, making them visible to anyone passing by. These closers are relatively easier to install and require fewer modifications to the existing door or frame. Additionally, they are more cost-effective and can be easily adjusted if necessary. However, their exposed placement may not be suitable for aesthetics-focused environments.
Concealed Closers
Concealed closers, as the name suggests, are hidden within the door or frame, providing a sleek and unobtrusive appearance. One of the primary benefits of concealed closers is their capability to maintain the overall aesthetic of the door and frame. They are particularly well-suited for commercial or upscale residential settings. However, these closers are more complex to install and may require greater modifications to the door or frame, resulting in higher installation costs.
In conclusion, when choosing between surface-mounted closers and concealed closers, it is important to consider factors such as visibility, installation complexity, cost, and overall aesthetics. Assessing these factors will allow you to make an informed decision that meets both functional and visual requirements for your specific installation.
Tools And Equipment Needed For Installation
Installing a hydraulic door closer is an essential step in ensuring the smooth operation and controlled closing of doors. To successfully complete this installation, you will need specific tools and equipment. In this section, we will outline the essential tools for installing a hydraulic door closer as well as any additional accessories that may be required.
Essential tools for installing a hydraulic door closer
When it comes to installing a hydraulic door closer, having the right tools is crucial for a successful installation. Here are the essential tools you will need:
- Power drill: A power drill is necessary for creating holes in the door and the door frame to accommodate the mounting brackets and screws.
- Screwdriver: A screwdriver is required to tighten the screws and secure the mounting brackets in place.
- Adjustable wrench: An adjustable wrench is used to adjust the tension and closing speed of the hydraulic door closer.
- Tape measure: A tape measure is essential for accurately measuring and marking the positions for the mounting brackets on the door and the door frame.
- Pencil or marker: You will need a pencil or marker to mark the positions for the mounting brackets on the door and the door frame.
- Level: A level is necessary to ensure that the door closer is installed properly and that the door will close smoothly and evenly.
Additional accessories that may be required
In addition to the essential tools mentioned above, you may also need the following accessories depending on your specific installation requirements:
- Mounting brackets: Some hydraulic door closer kits may not include mounting brackets, so you may need to purchase them separately.
- Screws and anchors: If the existing screws or anchors are damaged or not suitable for your door closer, you may need to purchase new ones.
- Door reinforcement plate: If the existing door frame is weak or damaged, a door reinforcement plate may be necessary to provide additional support.
- Instruction manual: The hydraulic door closer kit should come with an instruction manual that provides detailed information on the installation process. Make sure to read and follow the instructions carefully.
By having these tools and accessories prepared for the installation process, you will be well-equipped to install your hydraulic door closer successfully. It is crucial to follow the manufacturer’s instructions carefully and take the necessary safety precautions throughout the installation process.
Step 3: Gathering The Necessary Tools
Before you begin the installation process, it is crucial to ensure that you have all the necessary tools readily available. Having everything you need at hand will help streamline the process and avoid any unnecessary delays. Here is a list of tools you will need:
- Screwdriver: A screwdriver is an essential tool for loosening and tightening screws. Make sure you have both a Phillips and a flathead screwdriver on hand, as different types of screws may be used in the installation.
- Measuring tape: Accurate measurements are key to a proper installation. A measuring tape will enable you to measure and mark the appropriate spots on the door and frame.
- Pencil: A pencil is useful for marking the points where you will install the door closer. This ensures precision and helps you align the components properly.
- Drill: Depending on the type of door closer you are installing, you may need a drill to create pilot holes for the screws. It is essential to use a drill bit that matches the size of the screws provided with the door closer.
- Hammer: A hammer may be required to gently tap the door closer into place or make minor adjustments during the installation process.
- Safety goggles: Safety should always be a priority when working with tools. Wearing safety goggles will protect your eyes from any flying debris or accidental injuries.
Make sure to gather all the tools mentioned above before you begin the installation. Having everything nearby will save you time and effort, allowing you to complete the installation smoothly and efficiently. It’s always better to be prepared!
Step 4: Checking For Included Parts
Once you have gathered all the necessary tools and prepared the door for installation, it’s time to move on to Step 4: Checking for Included Parts. This step is crucial to ensure that you have everything you need to properly install the hydraulic door closer. By carefully examining the contents of the door closer package and verifying the presence of all required components, you can prevent any delays or difficulties in the installation process.
Examining the contents of the door closer package
Before diving into the installation, take a moment to inspect the contents of the door closer package. The manufacturer typically includes a set of components, and it’s essential to ensure that nothing is missing or damaged. A thorough examination will give you a clear idea of what to expect during the installation process and allow you to address any potential issues beforehand.
Here is a breakdown of the key parts you should find in the package:
| Components |
|---|
| Hydraulic door closer unit |
| Mounting brackets and screws |
| Arm assembly (with attachments) |
| Installation instructions |
Verifying the presence of all required components
Once you have visually inspected the package contents, it’s time to verify the presence of all the required components. Carefully go through the provided list above and cross-reference it with what you can see in front of you. Check each item off the list as you find it to ensure you have everything you need for a successful installation.
Missing or damaged parts can significantly impact the effectiveness and longevity of the hydraulic door closer. If you find any component missing or damaged, it’s important to contact the manufacturer or supplier as soon as possible to request a replacement.
By taking this extra step to meticulously check for included parts, you can address any potential issues beforehand, saving time and reducing frustration during the installation process. It’s always better to be prepared and have all the necessary components on hand before proceeding with the installation of the hydraulic door closer.
Installation Process For A Hydraulic Door Closer
Installing a hydraulic door closer is a recommended step to ensure the smooth and controlled closing of your doors. With this easy-to-follow step-by-step process, you’ll have your hydraulic door closer installed in no time, adding convenience and safety to your space. Let’s dive into the installation process:
Step-by-step instructions for installing a hydraulic door closer:
- Begin by gathering the necessary tools and equipment. You will need a hydraulic door closer kit, a power drill, a tape measure, a screwdriver, and screws.
- Measure and mark the desired placement for your hydraulic door closer. It should be installed on the top corner of the door, opposite to the hinge side. Make sure to align it vertically for optimal performance.
- Next, prepare the door and the door jamb for installation. Clean any debris or dust from the areas where the hydraulic door closer and bracket will be mounted using a cloth or a brush.
- Attach the bracket to the door using the provided screws. Ensure that it is tightly secured to the door and positioned according to your marks.
- Now, it’s time to install the hydraulic door closer. Hold it against the bracket and attach it using the provided screws. Make sure the closer is aligned to ensure smooth operation.
- Once you have securely installed the hydraulic door closer, adjust the tension or closing speed according to your preference. Most hydraulic door closers have adjustment screws to control the closing speed and latch speed. Use a screwdriver to make the necessary adjustments.
You have now successfully installed your hydraulic door closer! Test its functionality by opening the door and observing how it closes. Ensure that it fully closes and latches securely without slamming or excessive force.
By following these steps, you can enjoy the benefits of a hydraulic door closer, including improved door control, reduced energy loss, and added safety. Whether it’s for your home, office, or any other space, installing a hydraulic door closer is a valuable investment.
Step 5: Preparing The Door And Frame
Once you have gathered all the necessary tools and materials and followed the previous steps, it’s time to prepare the door and frame for the installation of the hydraulic door closer. This step is crucial to ensure the smooth functioning of the door and proper operation of the closer. The following subheadings will guide you through the process:
Assessing the condition of the door and frame
Before proceeding with the installation, it’s important to assess the condition of the door and frame. Check for any visible damages, such as cracks, warping, or rotting. Addressing these issues beforehand will ensure the longevity and durability of the hydraulic door closer. If you notice any significant damage or if the door or frame is in poor condition, it may be necessary to repair or replace them before continuing with the installation.
Ensuring proper alignment and clearance
To ensure the smooth operation of the door and the effective functioning of the hydraulic door closer, it’s crucial to ensure proper alignment and clearance. Make sure that the door is properly aligned within the frame and that there is sufficient clearance between the door and any surrounding structures or objects. This will prevent any potential obstructions that might hinder the door’s movement or interfere with the operation of the door closer.
If necessary, use a level to ensure that the door is plumb vertically and level horizontally. Adjust the hinges or door frame as needed to achieve proper alignment. Additionally, measure the clearance on all sides of the door to ensure that there is enough space for the door to swing freely without any obstructions.
Pro tip: If you find that the door is not properly aligned or there is not enough clearance, consider seeking professional assistance for the necessary adjustments. Improper alignment and insufficient clearance may affect the functionality of the hydraulic door closer and could lead to premature wear and tear.In conclusion, assessing the condition of the door and frame and ensuring proper alignment and clearance are crucial steps in preparing for the installation of a hydraulic door closer. By following these steps, you will create a solid foundation for the door closer to operate smoothly and effectively.
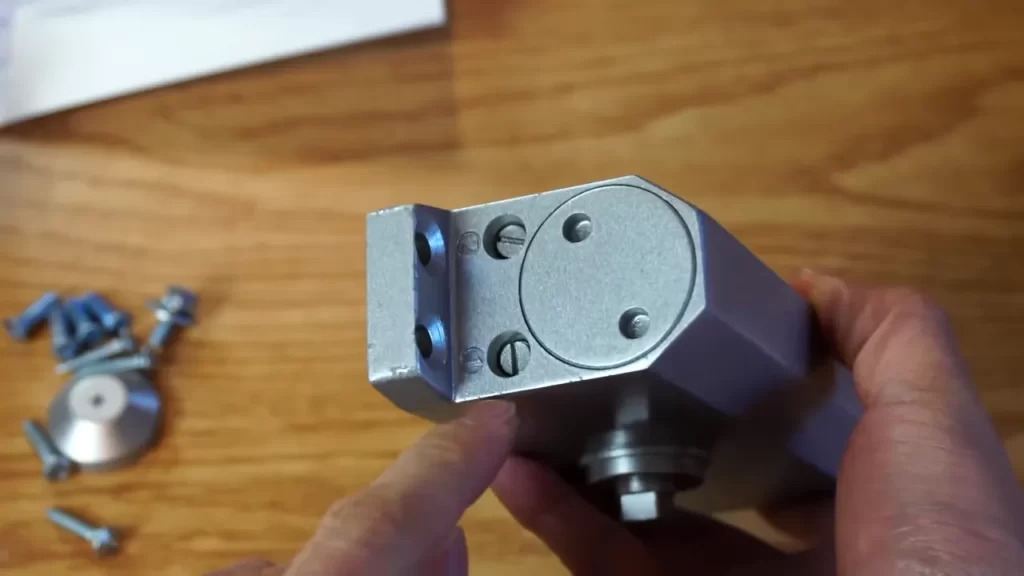
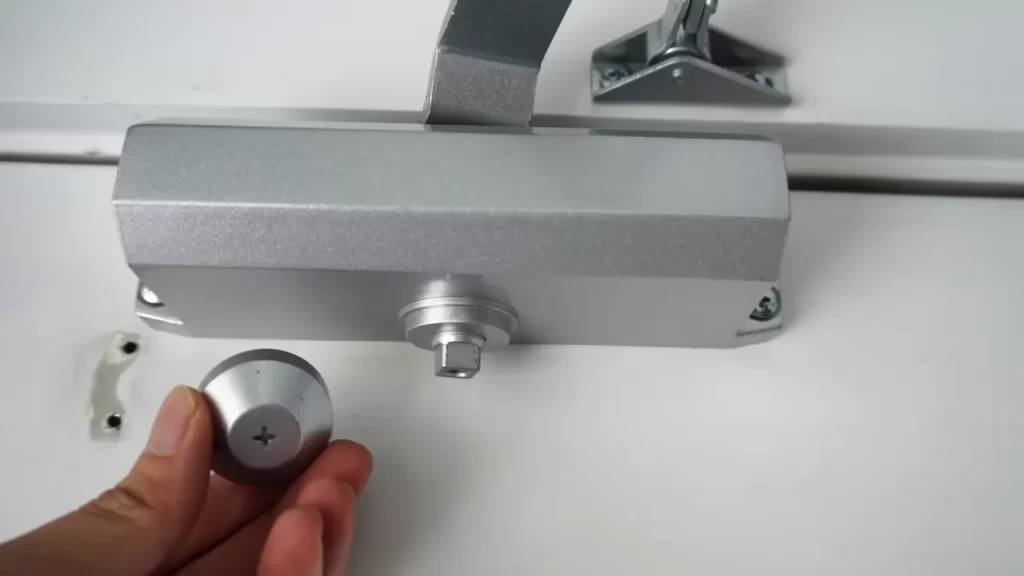
Step 6: Mounting The Door Closer
Now that you have prepared the door and attached the arm to the door frame, it’s time to mount the hydraulic door closer. This step ensures that the door closer is securely attached to provide optimal functionality and safety. Follow these steps to properly mount the door closer:
Positioning the door closer correctly
Before mounting the door closer, it is crucial to position it correctly to ensure optimal performance. Here’s how to do it:
- Place the door closer on the inside of the door, ensuring that it is centered vertically.
- Make sure there is enough clearance between the door closer and the top of the door, allowing it to function without any obstructions.
- Check that the door closer is not obstructing the door handle or any other hardware on the door.
Proper positioning of the door closer is essential for its smooth operation and to avoid any interference with the door’s functionality.
Aligning and attaching the mounting bracket
Once the door closer is positioned correctly, you’ll need to align and attach the mounting bracket. Follow these steps:
- Hold the mounting bracket against the door frame, aligning it with the holes previously drilled in Step 4.
- Insert screws through the holes in the mounting bracket and screw them into the pre-drilled holes, ensuring a secure attachment.
- Tighten the screws firmly but avoid over tightening, as it may damage the door frame or the door closer.
Aligning and attaching the mounting bracket securely is crucial for the stability and functionality of the hydraulic door closer. This step ensures that the door closer stays in place, even with frequent opening and closing of the door.
Congratulations! You have successfully mounted the hydraulic door closer on your door. The next step is to adjust the door closer to achieve the desired closing speed and force, which we’ll cover in the next section.
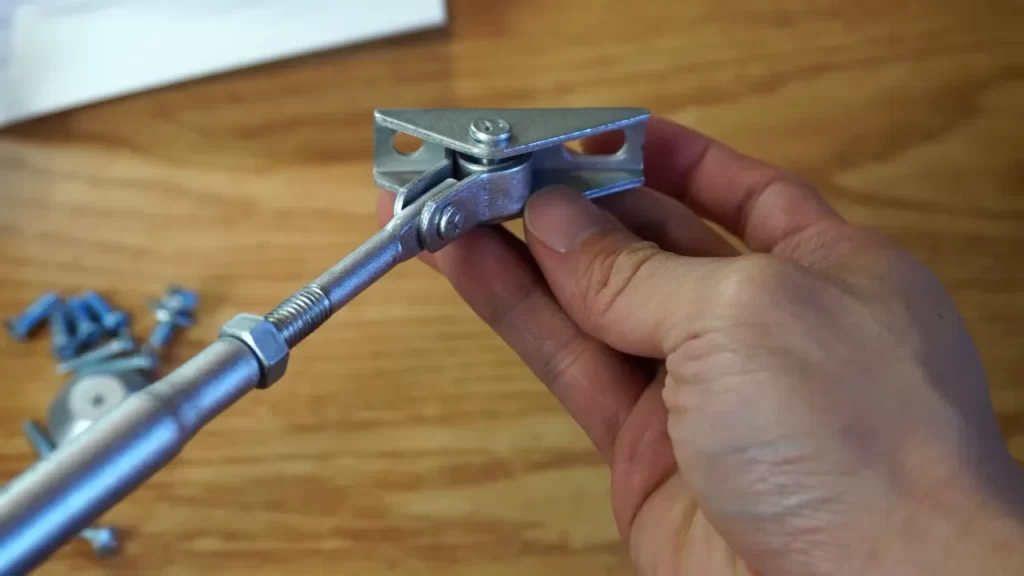
Step 7: Connecting The Arm And Door
After successfully mounting the hydraulic door closer to the frame (covered in Step 6), it’s time to move on to the next crucial step – connecting the arm to the door and closer body. This step ensures the door closes smoothly and securely every time. In this section, we will guide you through two essential aspects: securing the arm to the door and closer body, and adjusting the arm for proper operation.
Securing the arm to the door and closer body
Securing the arm to both the door and the closer body is essential for the hydraulic door closer to function optimally. Follow these steps to ensure a secure connection:
- Attach the arm bracket to the top corner of the door using the provided screws. Ensure the bracket is positioned securely and aligns with the closer body.
- Attach the connecting arm to the arm bracket, making sure it fits snugly.
- Next, position the closer body parallel to the floor, ensuring it is securely attached to the frame. Use the appropriate screws or bolts provided, and tighten them firmly.
- Connect the loose end of the connecting arm to the closer body by aligning the holes or slots in the arm with the corresponding ones on the closer body. Insert the connecting pin or bolt, securing the arm.
Remember, a proper and secure connection between the arm, door, and closer body is crucial for the door closer to function effectively.
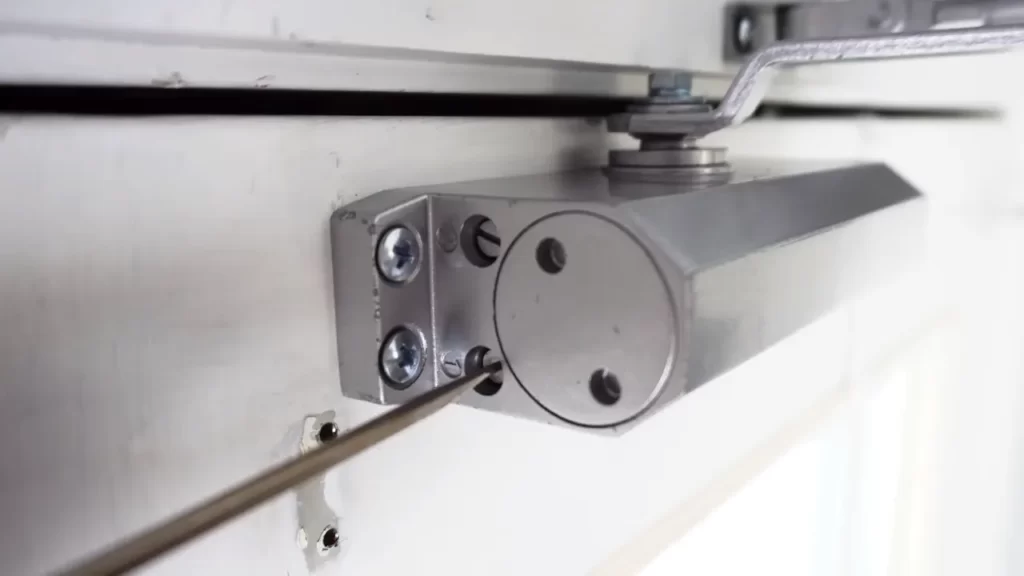
Adjusting the arm for proper operation
To ensure the hydraulic door closer operates as intended, you need to adjust the arm correctly. Follow these steps to make the necessary adjustments:
- Check if the door closes completely and latches properly on its own. If not, adjust the closer tension by turning the adjustment screw clockwise (+) to increase tension or counterclockwise (-) to decrease tension.
- Examine the speed at which the door closes. If it closes too fast, use the speed adjustment screw to slow it down. Turning the screw clockwise will slow the closing speed, while turning it counterclockwise will increase the speed.
- As you adjust the door closer, keep testing the door’s operation by opening it fully and allowing it to close on its own. Make incremental adjustments until you achieve the desired results of smooth and controlled closing.
- Finally, ensure the arm is well-aligned with the closer body, allowing the door to close smoothly without any resistance or sticking. Adjust the arm’s position if needed, ensuring it moves freely without any obstructions.
By following these steps, you will secure the arm to the door and closer body, and make the necessary adjustments for proper operation. Remember to test the door several times after installation to ensure everything is functioning as expected.
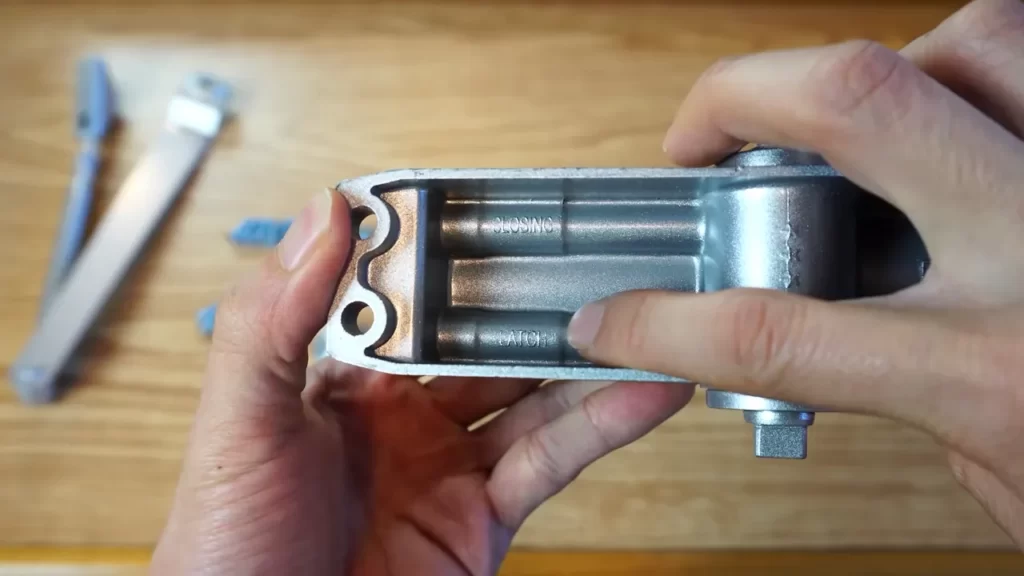
Step 8: Adjusting The Closing And Latching Speeds
Understanding the settings for closing and latching speeds
Adjusting the closing and latching speeds of a hydraulic door closer is essential to ensure the door functions as desired. By controlling the speed at which the door closes and latches, you can optimize the movement for ideal functionality and safety. This step-by-step guide will help you understand the settings for closing and latching speeds and make the necessary adjustments.
Making adjustments to achieve the desired door movement
When it comes to adjusting the closing and latching speeds, you need to follow these steps:
- Start by identifying the two valves that control the closing and latching speeds. These valves are usually located on the hydraulic door closer body.
- Using an adjustable wrench, turn the closing speed valve clockwise to decrease the closing speed or counterclockwise to increase it. Make small adjustments and test the door movement after each adjustment.
- Similarly, adjust the latching speed valve in the same way. Turning it clockwise will decrease the latching speed, while turning it counterclockwise will increase it.
- Continue making small adjustments to both valves until you achieve the desired door movement. Remember to test the door after each adjustment to ensure it closes and latches properly.
It’s important to note that the closing and latching speeds may vary depending on the weight and size of the door. For heavier doors, you may need to set the closing and latching speeds to slower settings to prevent the door from slamming shut. On the other hand, lighter doors may require faster settings to ensure proper closing and latching.
By following these steps and understanding the settings for closing and latching speeds, you can easily adjust the hydraulic door closer to achieve the desired functionality. Take the time to make small adjustments and test the door movement until you find the perfect balance of speed and control. Your efforts will result in a well-functioning door that closes smoothly and latches securely.
Testing And Troubleshooting
Ensuring the proper functioning of the hydraulic door closer is essential for maintaining a safe and efficient entrance. By performing regular tests and troubleshooting any issues that may arise, you can guarantee that your hydraulic door closer operates smoothly and effectively. In this section, we will walk you through the steps to ensure the correct functionality of your hydraulic door closer, as well as how to troubleshoot common issues and find their solutions.
Ensuring the proper functioning of the hydraulic door closer
Before proceeding with any testing or troubleshooting, it’s crucial to ensure that your hydraulic door closer is correctly installed. Make sure all the necessary hardware, such as screws and brackets, are securely tightened. Additionally, verify that the door closer is aligned correctly with the door frame, with no obstructions or interference.
Once the installation is confirmed, you can proceed to test the proper functioning of the hydraulic door closer. Here are the steps to follow:
- Open the door to a wide angle and release it gently. Observe how the door closes and ensure that it does so smoothly and gradually, without any sudden movements. This ensures that the hydraulic door closer is providing an adequate amount of closing force.
- Close the door manually and check if it latches securely. If the latch does not engage properly, adjust the closing speed and latch speed screws according to the manufacturer’s guidelines to achieve a precise closing action.
- Test the hold open feature, if applicable. Adjust the hold open screw to allow the door to stay open at the desired angle. Check if the door remains in the hold open position without any sagging or resistance.
- Inspect the door closer for any leaks or visible damage. Leakage or damaged seals can affect the performance of the hydraulic door closer and should be addressed promptly. If you notice any issues, consider replacing the seals or contacting a professional.
By following these steps, you will ensure that your hydraulic door closer is functioning optimally, providing a smooth and controlled door closing experience.
Troubleshooting common issues and their solutions
Even with proper installation and testing, issues may arise with your hydraulic door closer. Here are some common problems you may encounter along with their solutions:
| Issue | Solution |
|---|---|
| The door slams shut or closes too slowly | Adjust the closing speed screw to regulate the closing speed according to your preference. Clockwise rotation will slow down the closing speed, while counterclockwise rotation will increase it. |
| The door does not latch properly | Check if the latch speed screw is adjusted correctly. Increase the speed if the door fails to latch, or decrease it if the latch action is too forceful. |
| The door closer makes unusual noises | Inspect the closer for loose screws or hardware. Tighten any loose components. If the noise persists, consider lubricating the hinges and moving parts to reduce friction. |
| The door closer leaks oil | Replace the damaged seals or contact a professional for assistance. Oil leakage can lead to decreased performance and potential safety hazards. |
| The hold open feature does not work properly | Adjust the hold open screw to allow the door to stay open at the desired angle. If the hold open feature still does not function correctly, check if any obstructions or damaged components are affecting its operation. |
By troubleshooting these common issues and implementing the suggested solutions, you can resolve most problems with your hydraulic door closer and maintain its optimal functioning.
Step 9: Testing The Door Closer
Step 9: Testing the Door Closer
After successfully installing the hydraulic door closer, it’s essential to perform a comprehensive door closer test to ensure its proper functionality and safety. This step is crucial as it ensures that the door closer operates smoothly and with the correct closing force. Let’s dive into the specifics of this important testing process.
Performing a comprehensive door closer test
Performing a comprehensive door closer test is the key to guaranteeing the efficiency of your newly installed hydraulic door closer. Follow the steps below to perform a thorough test and make any necessary adjustments:
- Open the door to a 90-degree angle and release it. Observe the door as it closes. It should close smoothly and consistently without any jarring or jerking movements. If you notice any irregularities, make a note of them for further inspection.
- Next, stand back and observe the closing speed. The door should close at a controlled pace, neither too fast nor too slow. If the door closes too quickly, it might pose a safety hazard. Conversely, if it closes too slowly, it might not provide the necessary security.
- Test the door closer’s latching mechanism. Ensure that the door securely latches into place when fully closed. This is crucial for maintaining the security and integrity of the door. If the latching mechanism is not functioning correctly, make the necessary adjustments to ensure proper latching.
- Check for any unusual sounds during the closing process. The door closer should operate silently without any squeaks or creaking noises. If you detect any unusual sounds, it’s essential to address them promptly.
Checking for smooth operation and correct closing force
In addition to the above steps, it’s crucial to check for smooth operation and correct closing force. Follow the steps provided below:
- Check if the door closer operates smoothly throughout its entire range of motion. It should not exhibit any sticking or resistance during the opening or closing process.
- Inspect the door closer’s closing force. It should provide sufficient pressure to close the door firmly but not too forcefully. Use an appropriate force gauge if necessary to measure the closing force. Adjustments may be required to achieve the optimal closing force.
- Ensure that the door closer consistently maintains its performance over time. Regularly test the door closer to make sure it continues to operate smoothly and provides the correct closing force.
By following these steps and performing a comprehensive door closer test, you can ensure the efficient and safe operation of your newly installed hydraulic door closer. Remember, regular maintenance and periodic testing are crucial for keeping your door closer in optimal condition.
Step 10: Troubleshooting Common Problems
Even with careful installation, it’s not uncommon to encounter some issues with your hydraulic door closer. Identifying and addressing these problems promptly can help ensure optimal performance and extend the lifespan of your door closer. This step will guide you through troubleshooting common installation issues and provide helpful tips for dealing with a malfunctioning door closer.
Identifying and addressing common installation issues
While installing a hydraulic door closer, it’s possible to encounter a few common issues that may affect its operation. By knowing how to identify and address these issues, you can quickly resolve them and restore the proper functioning of your door closer. Here are some common installation issues to watch out for:
1. Door closing too slowly or not closing fully
If your door closes too slowly or doesn’t close all the way, the problem may lie with the adjustment settings on your door closer. To address this issue, follow these steps:
- Check the closing speed adjustment valve. Turn it clockwise to increase the closing speed or counterclockwise to decrease the speed. Make small adjustments until you achieve the desired closing speed.
- Inspect the latch speed adjustment valve. Turning it clockwise increases the latch speed, while turning it counterclockwise decreases it. Make minor adjustments until the door closes fully.
If adjusting the valves doesn’t resolve the issue, it may be necessary to consult the manufacturer’s instructions or seek professional assistance.
2. Door slamming shut too forcefully
If your door slams shut with excessive force, it may present a safety hazard and potentially damage the door or door frame. To address this issue, follow these steps:
- Inspect the closing force adjustment valve. Turning it counterclockwise will decrease the force, while turning it clockwise will increase it. Make small adjustments until the door closes smoothly without excessive force.
- If the issue persists, check the arm bracket and mounting position. Ensure that there are no obstructions or misalignments that could cause the excessive force. Adjust or reposition the arm bracket if necessary.
Proper adjustment of the closing force and arm bracket should help alleviate the problem. If not, consider contacting the manufacturer or seeking professional assistance.
Troubleshooting tips for a malfunctioning door closer
Even with careful installation and regular maintenance, door closers can occasionally malfunction. If you notice any issues with the door closer’s operation, you can try the following troubleshooting tips:
1. Lubricate the door closer
A lack of lubrication can cause friction and hinder the door closer’s smooth operation. Applying a lubricant to the moving parts can help resolve this issue. Refer to the manufacturer’s instructions for the recommended lubricant and proper application method.
2. Check for door misalignment
Verify that the door is properly aligned with the frame. Misalignment can place unnecessary strain on the door closer, leading to malfunctions. Adjust the hinges and other components as needed to ensure proper alignment.
3. Inspect for loose screws or bolts
A door closer with loose screws or bolts may not function properly. Check all connection points and tighten any loose hardware. Be careful not to overtighten, as this could cause damage to the door closer or the door itself.
By addressing these troubleshooting tips, you can often resolve common door closer issues without the need for professional assistance.
Remember, troubleshooting problems promptly and properly maintaining your hydraulic door closer will help ensure its smooth operation and longevity.
Maintenance And Care Tips For Hydraulic Door Closers
Proper maintenance and care of your hydraulic door closer are essential to ensure its longevity and optimal performance. By following a few simple steps, you can keep your hydraulic door closer in excellent condition, avoiding unnecessary repairs or replacements. In this section, we will discuss some valuable tips on how to maintain and care for your hydraulic door closer.
Keeping your hydraulic door closer in optimal condition
Regular inspection and lubrication are crucial for maintaining your hydraulic door closer. It is important to visually inspect the closer periodically to check for any signs of wear and tear, such as loose screws or damaged components. Tighten or replace any loose or missing screws promptly to prevent further damage.
Lubricating your hydraulic door closer on a regular basis will ensure smooth operation and prevent friction-related issues. Use a high-quality lubricant recommended by the manufacturer and apply it to the necessary points as instructed. This will help extend the life of your hydraulic door closer and minimize any unnecessary strain on the components.
In addition to regular inspection and lubrication, maintaining the appropriate speed setting on your hydraulic door closer is crucial. Over time, these settings may become misaligned or altered due to external factors. Therefore, it is important to periodically check and adjust the speed setting to ensure that the door closes and latches properly.
Ensuring proper adjustments for optimal performance
Proper adjustment is essential for ensuring the optimal performance of your hydraulic door closer. If you notice that the door closes too slowly or too quickly, it may indicate that the speed adjustment needs to be modified. Follow the manufacturer’s instructions to make the necessary adjustments to ensure the door closes smoothly and securely.
Another important aspect of proper adjustment is ensuring the proper closing and latching sequence. This determines how the door closes and latches to create a secure seal. In some cases, the closing and latching sequence may need to be adjusted to achieve the desired result. Consult the manufacturer’s instructions for guidance on adjusting the closing and latching sequence.
Regular cleaning and inspection
Regular cleaning and inspection are essential for maintaining the overall condition of your hydraulic door closer. Dust, dirt, and debris can accumulate over time, affecting the performance of the closer. Clean the closer using a soft cloth or brush to remove any buildup.
During the cleaning process, it is also important to inspect the closer for any signs of damage or excessive wear. Look for any leaks, cracks, or damage to the housing or components. If you notice any issues, contact a professional for further assistance or replacement.
By following these maintenance and care tips, you can ensure that your hydraulic door closer remains in optimal condition, providing reliable and efficient operation for years to come.
Step 11: Regular Maintenance Practices
Regular maintenance is essential to keep your hydraulic door closer working smoothly and efficiently. By following these simple practices, you can extend the lifespan of your door closer and avoid any unexpected issues.
Cleaning and lubricating the door closer
Keeping your hydraulic door closer clean and properly lubricated is crucial for its optimal functioning. Here’s how you can maintain cleanliness and lubrication: 1. Clean the door closer regularly by wiping off dirt, dust, and debris that may accumulate on its surface. Use a damp cloth or mild soap solution to clean any stubborn stains. 2. Ensure that the door closer’s moving parts are free from dirt or grime. Use a brush or canned air to remove any debris from the hinge mechanism and control valve. 3. Once the door closer is clean, apply a high-quality lubricant to the moving parts. This will help reduce friction and allow the door closer to operate smoothly. Use a lubricant specifically designed for door closers, as other lubricants may damage the internal components. 4. Pay attention to areas that naturally experience more friction, such as the pivot points and the arm of the door closer. Apply lubricant to these areas regularly to ensure optimal performance.
Inspecting for wear and damage
Regular inspection is essential to identify any signs of wear or damage that may affect the functionality of the hydraulic door closer. Follow these steps to inspect your door closer: 1. Check the mounting screws and brackets. Ensure they are secure and tightened properly. Loose screws can cause misalignment and affect the door closer’s performance. 2. Examine the arm and piston assembly for any signs of wear or damage. Look for cracks, chips, or corrosion. If you notice any issues, it’s best to replace the damaged parts as soon as possible. 3. Inspect the control valve and its seals for any leaks or signs of wear. A leaking control valve can lead to inconsistent door closing and compromise the door closer’s effectiveness. 4. Test the closing and latching speed of the door closer. Ensure that the door closes smoothly without slamming or bouncing back open. Adjust the valve if necessary to achieve the desired speed. By regularly cleaning, lubricating, and inspecting your hydraulic door closer, you can ensure its longevity and reliable performance. Following these maintenance practices will not only save you costly repairs but also provide peace of mind knowing that your door closer is functioning at its best.
Step 12: Addressing Specific Door Closer Issues
After successfully installing the hydraulic door closer, you might encounter some specific issues that require attention. In this step, we will address two common problems that you may face with your door closer: fixing leaks and adjusting hydraulic fluid levels, as well as replacing worn-out or damaged components.
Fixing leaks and adjusting hydraulic fluid levels
If you notice any leaks or suspect that the hydraulic fluid levels in your door closer are incorrect, it is important to address these issues promptly. Leaks can negatively impact the functionality of your door closer and compromise its effectiveness.
To fix leaks and adjust hydraulic fluid levels, follow these steps:
- Inspect the door closer for any visible signs of leaks, such as oil stains or dripping fluid.
- If you identify a leak, locate the source of the problem. It could be a damaged seal, loose fitting, or faulty valve.
- Once you have identified the source of the leak, tighten any loose fittings or replace damaged seals.
- If the issue persists, consult the manufacturer’s instructions or contact a professional for further assistance.
- To adjust the hydraulic fluid levels, refer to the manufacturer’s instructions for your specific door closer model. Typically, this involves adding or removing fluid using a screwdriver or Allen wrench.
- Remember to test the door closer after making any adjustments to ensure proper functionality.
Replacing worn-out or damaged components
Over time, components of the hydraulic door closer may wear out or become damaged. It is essential to replace these parts to maintain the effectiveness and longevity of your door closer.
To replace worn-out or damaged components, follow these steps:
- Identify the specific component that needs replacement, such as a spring, cylinder, or arm.
- Refer to the manufacturer’s instructions or consult a professional to determine the correct replacement part for your door closer model.
- Using the appropriate tools, carefully remove the old component from the door closer.
- Install the new component, following the manufacturer’s instructions or seeking professional assistance if needed.
- Test the door closer after replacing the component to ensure smooth operation.
By addressing leaks, adjusting hydraulic fluid levels, and replacing worn-out components, you can keep your hydraulic door closer working optimally and extend its lifespan. Regular maintenance and timely troubleshooting will ensure that your door closer functions smoothly, providing convenience, safety, and peace of mind.
Frequently Asked Questions For How To Install Hydraulic Door Closer
What Is The Proper Way To Install A Door Closer?
To properly install a door closer, follow these steps: 1. Begin by measuring the height and width of the door. 2. Determine the type of door closer needed based on weight and usage. 3. Position the closer at the top of the door, aligning it with the jamb bracket.
4. Secure the closer with screws, ensuring it is level and centered. 5. Adjust the tension and speed controls as necessary for smooth door operation.
Which Is Better Pneumatic Or Hydraulic Door Closer?
Pneumatic and hydraulic door closers both have their benefits. Pneumatic closers are easier to install and adjust, while hydraulic closers offer better control and durability. Ultimately, the choice depends on your specific needs and preferences.
How Do You Adjust The Tension On A Hydraulic Door Closer?
To adjust the tension on a hydraulic door closer: 1. Locate the tension adjustment screw on the closer body. 2. Use a screwdriver to turn the screw clockwise to increase tension, or counterclockwise to decrease tension. 3. Test the door to ensure the desired closing speed is achieved.
4. Repeat the process if needed.
How Do You Install A Spring Loaded Door Closer?
To install a spring-loaded door closer, follow these steps: 1. Position the closer on the top of the door and mark the screw holes. 2. Drill pilot holes at the marked spots. 3. Attach the closer using screws and a screwdriver.
4. Adjust the tension and speed of the closer as needed. 5. Test the door to ensure it closes smoothly.
How Do You Install A Hydraulic Door Closer?
To install a hydraulic door closer, first identify the correct location on the door and frame. Then, use the provided template to mark the holes. Next, drill the holes and attach the closer with screws. Finally, adjust the speed and closing force according to your preference.
What Tools Do I Need To Install A Hydraulic Door Closer?
To install a hydraulic door closer, you will need a drill, screwdriver, measuring tape, pencil, level, and the necessary screws and anchors. Additionally, having someone to assist you during the installation process can be helpful.
Conclusion
To sum up, installing a hydraulic door closer may seem like a daunting task, but with the right tools and step-by-step guidance, it can be easily accomplished. By following the instructions outlined in this blog post, you’ll be able to ensure the safety and convenience of your doors.
Remember, regular maintenance and adjustment are essential to guarantee optimal performance. So, go ahead and give it a try – your doors will thank you!