To install a mortise lockset, start by marking the desired height and location on the door. Then, chisel out a recess to accommodate the lock body and plate.
Fit the lockset into the recess and secure it with screws.
Essential Tools And Materials For The Installation
Installing a mortise lockset is an important step in securing your home or office. To ensure a successful installation, it is crucial to have the right tools and materials on hand. This will not only make the process smoother but also save you time and effort. In this section, we will discuss the essential tools and materials you will need to install a mortise lockset.
List of tools needed

Before you begin the installation, you need to gather the necessary tools. Having these at your disposal will allow you to work efficiently and complete the installation without any interruptions. Here are the tools you will need:
- Power drill
- Screwdriver
- Chisel
- Hammer
- Tape measure
These tools are essential for drilling holes, screwing in screws, chiseling, and measuring dimensions accurately. Make sure you have them readily available before you start the installation process.
Types of mortise lockset
Not all mortise locksets are the same. They come in various types, each designed for specific applications and security levels. Here are the common types of mortise locksets:
- Main entrance lockset: This type of lockset is the most secure and is typically used for the front doors of homes and offices.
- Privacy lockset: Perfect for bathroom and bedroom doors, privacy locksets provide a locking mechanism that can be easily unlocked from the inside.
- Passage lockset: Commonly used in hallways and closets, passage locksets do not have a locking mechanism and are operated by a simple twist or push.
Understanding the different types of mortise locksets will help you choose the right one based on your specific requirements.
Required materials
In addition to the tools, there are some materials you will need to properly install a mortise lockset. These include:
| Lockset | The main component of the installation, the lockset itself is responsible for securing the door. |
| Strike plate | This metal plate is attached to the door frame and helps the lockset latch properly. |
| Screws | To secure the lockset and strike plate in place, you will need screws of the appropriate size and length. |
Having these materials readily available will ensure a seamless installation process and a secure lockset.
Now that you know what tools and materials you need, you are ready to begin the installation process. Make sure to have everything prepared and follow the manufacturer’s instructions for a successful installation.
Choosing The Right Door And Location
Choosing the right door and location for your mortise lockset installation is crucial to ensure the security and functionality of your door. In this section, we will discuss how to evaluate the door condition and determine the ideal location for the lockset.
Evaluating the door condition
Before installing a mortise lockset, it’s important to evaluate the condition of your door. A sturdy and solid door is essential to provide a secure foundation for the lockset. Here are some factors to consider:
- Examine the material: Is your door made of wood, metal, or another material? Each material may require different installation techniques.
- Check for damages: Look for cracks, warping, or any other damage that may affect the integrity of the door. If you find any significant damages, it’s important to repair or replace the door before installing the lockset.
- Measure the thickness: Determine the thickness of your door. Mortise locksets are designed for doors of specific thicknesses, so make sure the lockset you choose matches your door’s dimensions.
Determining the ideal location for the lockset
Identifying the right location for your mortise lockset is essential to ensure its proper functioning and convenience. Here are some factors to consider:
- Consider the hand of the door: Determine if your door is left-handed or right-handed. This will help you position the lockset correctly.
- Analyze the height: The ideal height for a lockset is typically around 36 to 48 inches from the bottom of the door. This allows for easy access and operation.
- Take into account other hardware: Consider the placement of other hardware, such as door knobs, deadbolts, and hinges. Ensure that the mortise lockset is installed in a location that does not interfere with these components.
By carefully evaluating the door condition and determining the ideal location for your mortise lockset, you can ensure a secure and functional installation. It’s always a good idea to consult the manufacturer’s guidelines for specific instructions related to your lockset and door type.
Measuring And Marking The Door
Before you can install a mortise lockset, it’s important to properly measure and mark the door. This ensures that the lockset will fit correctly and function properly. In this section, we will cover two important steps: determining the door’s thickness and marking the required measurements for the lockset installation.
Determining the door’s thickness

The first step in measuring the door is to determine its thickness. This is crucial because it will help you choose the right lockset that fits perfectly.
- Start by measuring the door’s thickness with a tape measure. Place the tape measure at the edge of the door and extend it all the way to the other edge.
- Once you have the measurement, note it down. Most standard doors have a thickness of either 1 3/8 inches or 1 3/4 inches.
By accurately measuring the door’s thickness, you can ensure that the mortise lockset you choose will fit securely without any issues.
Marking the required measurements for the lockset
After determining the door’s thickness, it’s time to mark the necessary measurements for the lockset installation. This will ensure that the lockset is positioned correctly and functions smoothly.
- First, measure the backset, which is the distance from the edge of the door to the center of the lockset. Standard backsets are normally either 2 3/8 inches or 2 3/4 inches. Measure and mark this distance on the door edge.
- Next, determine the height at which the lockset should be installed. This depends on personal preference, but a common height is around 36 inches from the bottom of the door. Measure and mark this height on both sides of the door, ensuring they are level.
- Finally, mark the locations for the strike plate (the metal plate attached to the door frame that the lock latch engages with). Position the strike plate on the door frame where the latch will extend when the door is closed. Mark the screw holes for the strike plate on the door frame, ensuring they align with the latch.
By marking these measurements accurately, you can proceed with confidence knowing that your mortise lockset will be installed correctly and securely.
Now that you have measured and marked the door, you are ready to move on to the next step: preparing the door for installation. This will involve creating the necessary mortise (or pocket) in the edge of the door to accommodate the lockset mechanism. Stay tuned for the next section where we will guide you through this process.
Removing The Old Lockset
When it comes to installing a new mortise lockset, the first step is removing the existing lockset. This may seem like a daunting task, but with the right tools and a little bit of know-how, you can do it yourself. In this guide, we will walk you through the process step by step, ensuring that you can easily remove the old lockset and prepare for the installation of your new one.
Removing the existing lockset
The first thing you need to do is remove the screws that hold the lockset in place. These screws are usually located on the interior side of the door, where the latch is. Using a screwdriver, carefully unscrew the screws and keep them in a safe place, as you will need them later.
Once the screws are removed, you can begin to detach the lockset from the door. This can usually be done by pulling the lockset away from the door and wiggling it until it comes loose. If the lockset is stubborn and doesn’t easily detach, you may need to use a flathead screwdriver to gently pry it away from the door.
Cleaning the mortise pocket
After removing the old lockset, it’s important to clean the mortise pocket before installing the new one. The mortise pocket is the recessed area on the edge of the door where the lockset sits. Over time, dirt and debris can accumulate in this area, which can interfere with the proper installation of the new lockset.
To clean the mortise pocket, start by removing any loose dirt or debris with a small brush or vacuum cleaner. Once the loose debris is removed, use a damp cloth to wipe down the inside of the pocket, ensuring that it is clean and free of any remaining dirt or dust.
It’s also a good idea to check the mortise pocket for any signs of damage or wear. If you notice any cracks or other issues, it may be necessary to repair or replace the pocket before proceeding with the installation of the new lockset. This will help ensure that the new lockset fits securely and functions properly.
With the old lockset removed and the mortise pocket cleaned, you are now ready to move on to the next step in the installation process. Stay tuned for our next guide, where we will walk you through the steps of installing the new mortise lockset.
Preparing The Mortise Pocket
Chiseling the Mortise Pocket
When it comes to installing a mortise lockset, one of the first steps you’ll need to take is preparing the mortise pocket. This pocket is where the lockset will be inserted, so it needs to be the right size and shape for a proper fit. Chiseling the mortise pocket is an important part of the installation process and requires some careful attention to detail.
To start, you’ll need a chisel that matches the width of the lockset plate. Using a marking gauge, trace the outline of the plate onto the door, ensuring it is aligned properly. Once you have the outline, use a utility knife to score the edges, creating a shallow groove that will prevent any splintering while chiseling.
Next, position the chisel at one edge of the outlined area and tap it gently with a hammer to create a small notch. This will serve as a starting point for your chiseling. Slowly and carefully, work your way around the outline, gradually deepening the groove with each pass of the chisel and hammer. Take your time to ensure the edges are straight and clean, as this will determine the final fit of the lockset.
Once you have chiseled to the appropriate depth, use a sharp wood chisel to remove the excess wood from the mortise pocket. This will create a clean and precise recess for the lockset to sit in. Make sure to check the depth and width of the pocket as you go, using the lockset for reference. You want the lockset to fit snugly into the pocket without being too tight or loose.
Ensuring a Proper Fit for the Lockset
In order to ensure a proper fit for the lockset, there are a few additional steps you need to take. First, check the depth of the mortise pocket using a measuring tape or ruler. The depth should be equal to or slightly greater than the depth of the lockset plate. If it’s too shallow, you may need to chisel a bit more to create the necessary depth.
Next, check the width of the mortise pocket. It should match the width of the lockset plate, leaving just enough room for the plate to fit snugly. If the pocket is too narrow, you may need to widen it slightly with a chisel or file.
Before installing the lockset, make sure the door is properly aligned and the latch hole is drilled. The latch should smoothly slide into the mortise pocket without any resistance. If necessary, adjust the mortise pocket or the latch hole accordingly.
In conclusion, preparing the mortise pocket is a crucial step in installing a mortise lockset. By carefully chiseling the pocket and ensuring a proper fit, you’ll be on your way to a secure and functioning lockset for your door. Take your time, follow these steps, and you’ll have your mortise lockset installed in no time.
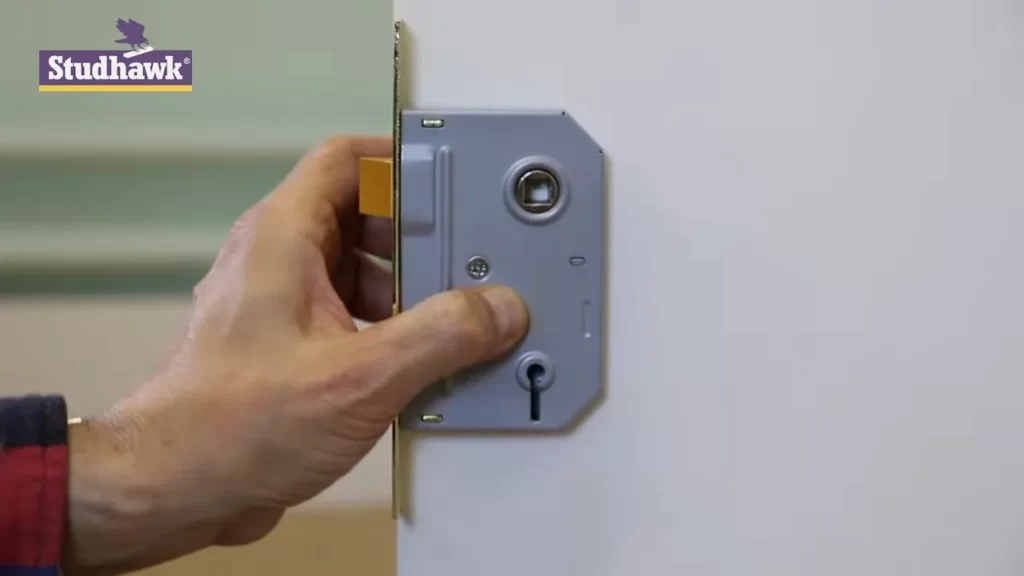
Installing The Lockset Components
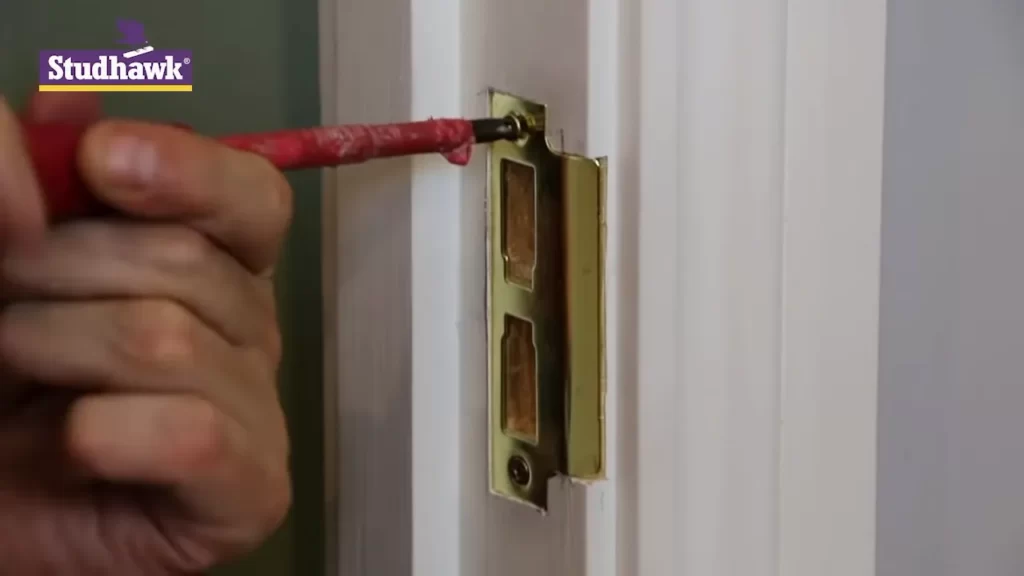
Installing the Lockset Components When it comes to home security, installing a reliable lockset is of utmost importance. A mortise lockset is a popular choice as it provides enhanced security and durability. In this guide, we will walk you through the process of installing the lockset components, including inserting the lock body, attaching the lock faceplate, and installing the strike plate. Inserting the lock body The first step in installing a mortise lockset is inserting the lock body into the prepared mortise pocket on the edge of the door. The lock body consists of the latch mechanism and the locking mechanism, ensuring your door can be securely locked and unlocked. To insert the lock body, follow these steps: 1. Measure and mark the location of the mortise pocket on the edge of the door. Ensure the lock body will be centered and aligned with the door handle. 2. Using a chisel, carefully carve out the mortise pocket according to the marked dimensions. Make sure the pocket is deep enough to accommodate the lock body. 3. Once the mortise pocket is prepared, insert the lock body into the pocket, ensuring the latch mechanism is aligned with the door frame. 4. Secure the lock body in place by tightening the screws provided with the lockset. Make sure it is firmly attached to the door. Attaching the lock faceplate The lock faceplate is the visible plate that covers the lock body and provides a finished appearance to the door. It also serves as a mechanism to hold the lockset components together. To attach the lock faceplate, follow these steps: 1. Position the lock faceplate over the lock body. Ensure the holes on the faceplate align with the screws on the lock body. 2. Insert the screws through the holes in the faceplate and into the corresponding holes on the lock body. 3. Using a screwdriver, tighten the screws until the faceplate is securely attached to the lock body. Be careful not to overtighten, as this may cause damage to the faceplate or lockset components. Installing the strike plate The strike plate is installed on the door frame and acts as the counterpart to the lock latch. When the door is closed, the latch engages with the strike plate, keeping the door securely shut. To install the strike plate, follow these steps: 1. Hold the strike plate against the door frame, aligning it with the latch mechanism on the door. 2. Using a pencil or marker, mark the locations of the screw holes on the door frame. 3. Remove the strike plate and drill pilot holes at the marked locations. 4. Position the strike plate over the pilot holes and insert the screws into the holes. 5. Tighten the screws using a screwdriver until the strike plate is securely attached to the door frame. By following these steps, you can successfully install the lockset components, including the lock body, lock faceplate, and strike plate. These steps will ensure that your door is properly secured, providing peace of mind and enhanced home security.
Assembling The Lockset Hardware
Attaching the Knobs and Spindles
Attaching the knobs and spindles is an essential step when installing a mortise lockset. This step ensures that the door handles are securely in place and can function properly. To do this, you will need the following tools:
- Lockset kit
- Screwdriver
Follow these steps to attach the knobs and spindles:
- Begin by determining the correct position for the door knobs on each side of the door.
- Insert the spindle through the latch mechanism, making sure it is centered. The spindle is a long metal rod that connects the knobs on both sides of the door.
- On one side of the door, place the knob over the spindle, aligning the holes in the knob with the holes in the spindle.
- Secure the knob in place by inserting and tightening the screws provided in the lockset kit. Ensure the knob is securely attached, but be careful not to overtighten the screws, as this can cause damage.
- Repeat the process on the other side of the door, ensuring that both knobs are aligned and securely fastened.
Connecting the Latch Mechanism
Connecting the latch mechanism is another crucial step in assembling the lockset hardware. This mechanism ensures proper locking and unlocking of the door. To connect the latch mechanism, follow these steps:
- Place the latch mechanism into the pre-cut mortise pocket on the edge of the door.
- Ensure that the latch bolt extends fully and smoothly when the door is closed. If necessary, adjust the position of the latch to ensure proper alignment.
- Secure the latch mechanism in place using the screws provided in the lockset kit. Use a screwdriver to tighten the screws, ensuring they are snug but not overly tightened.
- Test the latch mechanism by closing and opening the door multiple times, ensuring that it operates smoothly and securely.
By following these steps to assemble the lockset hardware, you can ensure that your mortise lockset is properly installed and functioning effectively. Take your time during the assembly process to ensure that each step is done correctly, resulting in a secure and reliable lockset for your door.
Adjusting And Testing The Lockset

Once you have successfully installed the mortise lockset, it is important to check its alignment and operation. By following these steps, you can ensure that your lockset is functioning smoothly and securely.
Checking the alignment and operation of the lockset
Start by checking the alignment of the lockset. Close the door and observe how the latch bolt aligns with the strike plate. If the latch bolt does not smoothly slide into the strike plate hole, it may be misaligned. Adjust the strike plate as needed to ensure proper alignment.
Next, test the operation of the lockset by turning the door knob or lever. Ensure that the latch bolt retracts and extends smoothly with each turn. If you notice any stiffness or resistance, the lockset may require adjustment.
Making necessary adjustments for a smooth functioning
If you find that the latch bolt does not fully retract or extend, you may need to adjust the depth of the lockset in the door. To do this, remove the lockset from the door and locate the adjustment screws on the side or back of the lockset.
Here’s how to adjust the depth of the lockset:
- Loosen the screws that hold the lockset in place.
- Slide the lockset slightly forward or backward in the door to achieve the desired depth.
- Tighten the screws back up to secure the lockset in its adjusted position.
After making the necessary adjustments, test the lockset again to ensure that the latch bolt functions smoothly and securely.
Ensuring each H3 heading adheres to HTML syntax
Within HTML syntax, H3 headings are defined using the <h3> opening and closing tags. For example, the heading “Checking the alignment and operation of the lockset” would be written as <h3>Checking the alignment and operation of the lockset</h3>.
By using proper HTML syntax for the subheadings, search engines can easily understand the structure and hierarchy of your content, ultimately improving its SEO value.
Securing The Lockset With Screws
When it comes to installing a mortise lockset, one of the most critical steps is securing the lockset with screws. This step ensures the stability and security of the lockset, preventing it from coming loose or being easily tampered with.
Tightening all screws for stability
In order to ensure the lockset remains firmly in place, it is essential to tighten all the screws properly. Start by positioning the lockset on the door, aligning it with the pre-drilled holes. Insert the screws into the holes and use a screwdriver or a drill fitted with the appropriate bit to tighten them securely.
It is important to note that over-tightening the screws can cause damage to the lockset or the door. To avoid this, tighten the screws until they are snug but be careful not to apply excessive force.
Testing the lockset’s security
Once the lockset is securely fastened, it’s crucial to test its security. To do this, close the door and engage the lock. Attempt to turn the doorknob or handle firmly to check if the lockset holds up and remains secure.
Additionally, you can test the security further by attempting to push or pull the door to see if there is any movement or give in the lockset. If the lockset remains stable and the door holds firm, it indicates that the lockset has been properly installed and secured.
Overall, securing the lockset with screws is a vital step for ensuring the safety and stability of your doors. By tightening all the screws properly and testing the lockset’s security, you can have peace of mind knowing that your lockset will serve its purpose effectively.
Maintaining And Lubricating The Lockset
Maintaining and lubricating your lockset is essential for its smooth operation and longevity. Over time, dirt and debris can accumulate within the lock, causing it to become stiff and difficult to operate. Regular maintenance and lubrication can help prevent this and ensure that your lockset continues to function properly. In this section, we will explore some tips and techniques for keeping your lockset in excellent condition.
Periodic Maintenance for Smooth Operation
To keep your lockset working smoothly, it is important to perform periodic maintenance. This involves inspecting the lockset for any signs of wear or damage and taking appropriate action to fix them. Here are some steps to follow:
- Check for loose screws or fasteners: Inspect the lockset and tighten any loose screws or fasteners using a screwdriver or wrench. Loose components can affect the performance of the lockset, so it is important to ensure everything is securely tightened.
- Clean the lockset: Regularly clean the lockset to remove any dirt, dust, or debris that may have accumulated. Use a soft cloth or brush to gently wipe away dirt from the exterior and interior components of the lock.
- Inspect the keyway: Examine the keyway for any signs of damage or blockage. If you notice any debris or foreign objects, use a compressed air canister or a thin, flexible wire to remove them carefully.
- Test the lockset: After performing the above steps, test the lockset by inserting and turning the key to ensure smooth operation. If you encounter any difficulties or if the lockset feels stiff, consider lubricating the components.
Lubricating the Lockset Components
Proper lubrication is crucial for maintaining the smooth operation of a lockset. It helps reduce friction between the moving parts, preventing them from wearing out prematurely. Here are some guidelines for effectively lubricating your lockset:
- Choose the right lubricant: Use a high-quality lubricant specifically designed for locksets. Avoid using oil-based lubricants or WD-40, as they can attract dirt and debris, which may lead to more frequent cleanings.
- Apply the lubricant: Apply a small amount of lubricant to the keyway, latch, and other moving parts of the lockset. Ensure that the lubricant reaches all the necessary areas while being careful not to over-apply.
- Rotate the key: Insert and turn the key several times to distribute the lubricant evenly throughout the lockset. This will help ensure that all the components are adequately coated.
- Wipe away the excess: After lubricating the lockset, use a clean cloth to wipe away any excess lubricant. This will help prevent the accumulation of dirt and debris.
By following these maintenance and lubrication practices, you can keep your mortise lockset in optimal condition, ensuring smooth operation and enhanced security for your premises. Remember to perform these tasks periodically to extend the lifespan of your lockset and avoid potential issues in the future.
Troubleshooting Common Installation Issues
Installing a mortise lockset can be a straightforward process if done correctly. However, like any other home improvement project, it is not uncommon to encounter a few bumps along the way. In this section, we will address some common installation issues that may arise during the process and provide troubleshooting solutions to help you overcome them.
Addressing door alignment problems
One common issue that many homeowners face when installing a mortise lockset is door misalignment. This can occur when the lockset is not properly aligned with the strike plate, causing difficulty in opening and closing the door smoothly.
To address door alignment problems, follow these steps:
- First, ensure that the door is properly aligned in the frame. Check for any visible gaps between the door and the frame, as well as any rubbing or sticking.
- If the door is misaligned, you may need to adjust the hinges. Tighten or loosen the screws on the hinge plates to align the door properly.
- Next, check the strike plate to ensure it is properly aligned with the lockset. If it is not aligned, you may need to adjust the strike plate by loosening the screws and shifting it slightly until it aligns with the lockset.
- Once the door and strike plate are properly aligned, test the lockset to ensure that it operates smoothly without any sticking or resistance.
By addressing door alignment problems promptly, you can ensure that your mortise lockset functions correctly and provides optimal security for your home.
Fixing loose knobs or spindle connections
Another common issue that may arise during the installation of a mortise lockset is loose knobs or spindle connections. This can result in wobbly or shaky handles, compromising the overall functionality and security of the lockset.
If you encounter loose knobs or spindle connections, follow these steps to fix the issue:
- First, remove the loose knob by locating the setscrew on the side of the knob. Use a screwdriver or Allen wrench to loosen the setscrew and remove the knob.
- Inspect the spindle on the backside of the loose knob. If the spindle is worn or damaged, replace it with a new one.
- If the spindle is in good condition, clean the spindle and the inside of the knob to remove any debris or dirt that may be causing the loose connection.
- Apply a small amount of adhesive or thread-locking compound to the spindle before reattaching the knob. This will help create a more secure connection.
- Tighten the setscrew on the side of the knob to secure it in place.
- Repeat the process for any other loose knobs in the lockset.
By fixing loose knobs or spindle connections, you can ensure that your mortise lockset operates smoothly and provides the security you desire.
Enhancing Security With Mortise Locksets
Mortise locksets offer an unparalleled level of security for your home or business. These locks are designed to withstand forced entry and provide an added layer of protection for your property.
Additional Features and Options for Increased Security
One of the advantages of using mortise locksets is the wide range of additional features and options available to enhance security. These features can provide added peace of mind knowing that your property is well-protected:
- Double Cylinder: This option requires a key to be used on both the inside and outside of the door, making it more difficult for intruders to gain access.
- Key Control: With key control technology, you have the ability to restrict the duplication of keys, ensuring that only authorized individuals can have access to your property.
- Deadlocking: Deadlocking features add an extra layer of security by preventing the lock from being forced open.
- Built-in Alarm: Some mortise locksets are equipped with built-in alarms that can quickly alert you and others nearby in the event of a break-in.
Choosing the Right Lockset for Specific Needs
When it comes to selecting a mortise lockset, it is essential to choose the one that is right for your specific needs. Consider the following factors:
- Security Level: Assess the level of security you require for your property. Homes may have different needs compared to businesses or high-security areas such as offices and storage facilities.
- Material and Finish: Mortise locksets are available in a variety of materials and finishes. Consider the aesthetics of your property and choose a lockset that complements its overall design.
- Brand Reputation: Research different brands and their reputation for producing high-quality, durable locksets. Choose a trusted and reliable brand for long-term security.
- Professional Installation: Proper installation of a mortise lockset is crucial for its effectiveness. Ensure that you hire a professional locksmith with experience in installing mortise locksets.
By taking these factors into account and selecting the appropriate mortise lockset, you can greatly enhance the security of your property. Whether it is your home or business, investing in a reliable and robust lockset is a wise decision to protect yourself, your loved ones, and your valuable possessions.
Frequently Asked Questions Of How To Install Mortise Lockset
How Do I Install A Mortise Lock?
To install a mortise lock, follow these steps: 1. Begin by marking the location for the lock on the door. 2. Use a chisel to create a recess for the lock body. 3. Install the lock body by inserting it into the recess and securing it with screws.
4. Attach the lock faceplate to the door edge using the provided screws. 5. Test the lock to ensure it is functioning correctly.
What Is The Difference Between A Mortise And A Lockset?
A mortise is a type of lock that is installed within the door, while a lockset consists of both the lock and the accompanying hardware.
Does A Mortise Lock Have Two Bolts?
A mortise lock typically has two bolts.
How Secure Are Mortise Locks?
Mortise locks are highly secure due to their strong construction and complex mechanisms. They offer superior resistance against forced entry and are considered more secure than other types of locks. Their design ensures that the lock remains firmly in place, making it difficult for intruders to bypass.
Q: How Do You Install A Mortise Lockset?
A: To install a mortise lockset, start by making sure the door is prepped correctly, then attach the lock body to the door and secure it with screws.
Q: What Tools Do I Need To Install A Mortise Lockset?
A: You will need a measuring tape, chisel, drill, screwdriver, and a mortise lockset installation kit.
Conclusion
Installing a mortise lockset may seem daunting at first, but following the step-by-step process outlined in this blog post makes it a breeze. From preparing the door to attaching the lockset and strike plate, we covered every important detail. By ensuring proper alignment and smooth operation, you can enhance the security and functionality of your door.
With these instructions, you’ll be able to confidently install a mortise lockset like a pro. Happy DIY-ing!