To install a patio screen door, measure the opening and purchase a door that fits. Then, attach the door frame to the opening using screws and a screwdriver.
Adjust the door’s height and leveling using the provided tools.
Materials Needed For Installing A Patio Screen Door
When it comes to installing a patio screen door, having the right materials is essential. With the proper tools and supplies, you can ensure a smooth and efficient installation process. This section will provide you with a comprehensive checklist of the tools and materials you will need for installing a patio screen door.
Tools and Materials Checklist
Before you get started with the installation process, make sure you have the following tools and materials ready:
| Tools | Materials |
|---|---|
|
|
With these tools and materials at your disposal, you’ll be well-prepared to install your patio screen door. Remember to prioritize safety by wearing protective gloves and safety glasses when handling the tools and materials.
Moving forward, the next step is to choose the right screen door for your patio.
Preparing For Installation
Before installing a patio screen door, it is essential to properly prepare the area and gather the necessary tools and materials. This step-by-step guide will walk you through the process of preparing for a successful installation.
Measuring the Door Frame
To ensure a perfect fit for your patio screen door, it is crucial to accurately measure the door frame. Follow these simple steps to obtain precise measurements:
- Use a tape measure to measure the width of the door frame from inside edge to inside edge. Record this measurement.
- Next, measure the height of the door frame from the top inside edge to the bottom inside edge. Note down this measurement as well.
- Take these measurements into consideration when selecting a patio screen door to ensure it will fit snugly in your door frame.
Removing the Existing Door (if applicable)
If you have an existing door that needs replacement, follow these steps to remove it:
- Start by carefully unscrewing the hinges that hold the door to the door frame. Use a screwdriver or power drill for this task.
- Gently lift the door off the hinges, making sure to have assistance if the door is heavy.
- Once the door is removed, check the door frame for any remaining screws or nails, and remove them as well.
- Thoroughly clean the door frame to ensure a smooth and debris-free surface for the new patio screen door installation.
Cleaning the Door Frame
Before proceeding with the installation, it is essential to clean the door frame meticulously. Follow these steps to ensure a clean and suitable surface for the patio screen door:
- Remove any dirt, dust, or debris from the door frame using a brush or a vacuum cleaner.
- Wipe down the door frame using a damp cloth or sponge, removing any stubborn stains or grime.
- Allow the door frame to dry completely before proceeding with the installation.
By measuring the door frame accurately, removing any existing door, and cleaning the door frame thoroughly, you are now well-prepared for the installation of your new patio screen door. The next step is to follow the installation instructions provided by the manufacturer to ensure a proper and secure fit.
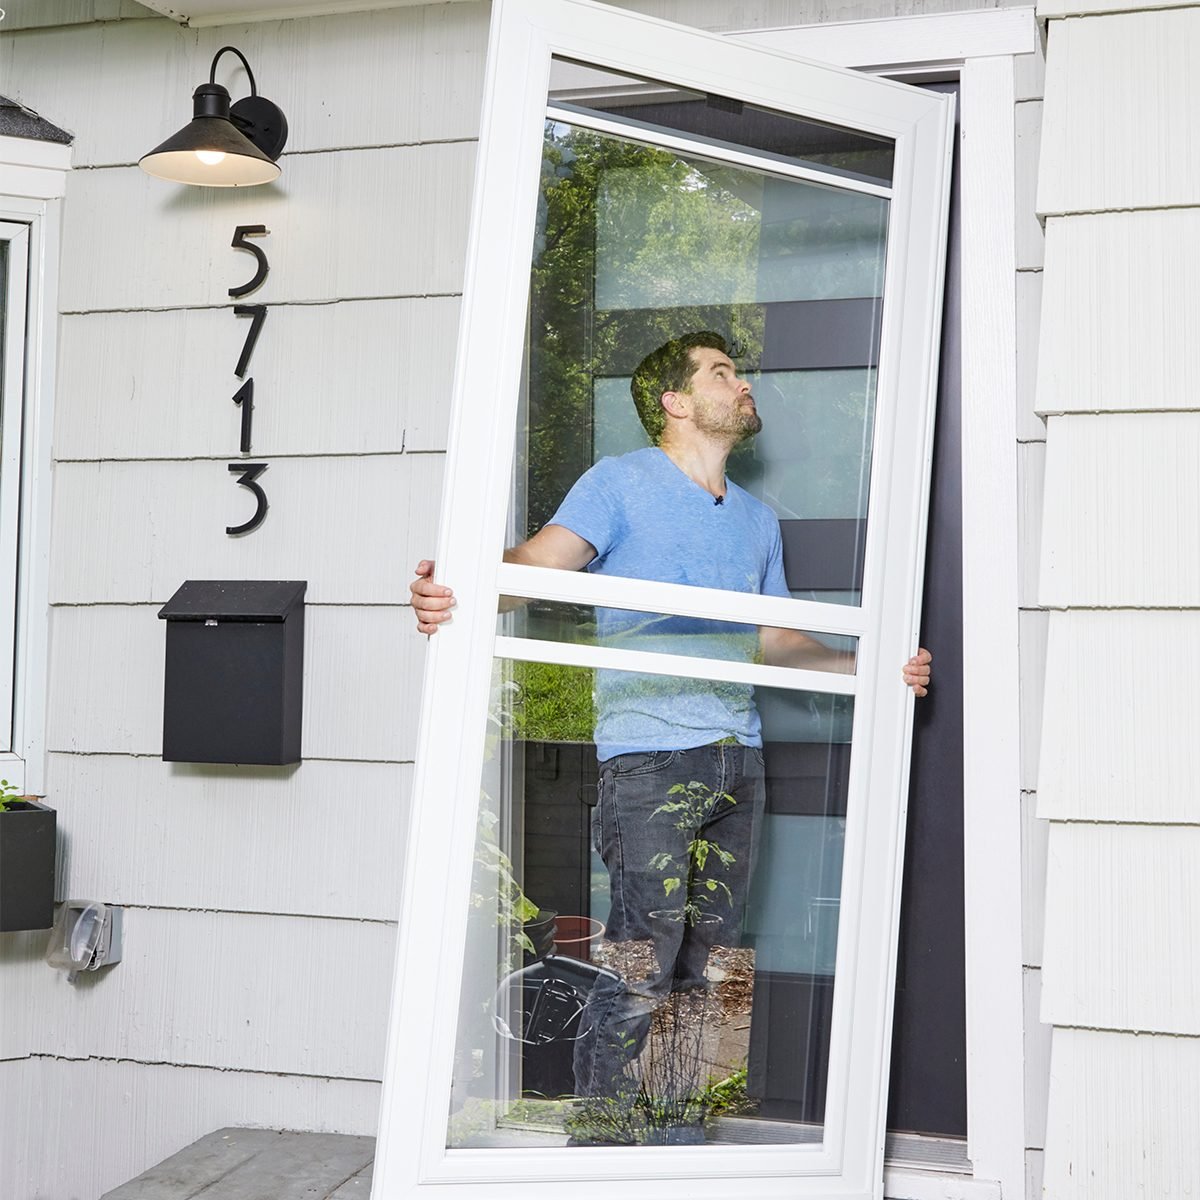
Installing The Patio Screen Door
Once you have selected the perfect patio screen door for your outdoor space, it’s time to start the installation process. With a few simple steps, you can have a functional and aesthetically pleasing screen door that allows you to enjoy the fresh air while keeping pesky insects out. Let’s take a look at how to install a patio screen door, from attaching the frame and tracks to securing the screen door in place.
Attaching the frame and tracks
The first step in installing a patio screen door is to attach the frame and tracks. Before you begin, ensure that you have all the necessary tools, including a drill, screws, and a level. Start by positioning the frame in the desired location and use a level to ensure it is straight. Once the frame is level, secure it in place by drilling screws into the designated mounting holes. Make sure to follow the manufacturer’s instructions for proper spacing and alignment of the tracks.
Inserting the rollers and adjusting them
After the frame and tracks are securely in place, it’s time to insert the rollers and adjust them for smooth operation. Each patio screen door will have two rollers, one on each side. Start by locating the roller housing and gently sliding the rollers into place. Once inserted, adjust the rollers using the provided adjustment screws to ensure they are aligned properly and glide smoothly along the tracks. Test the movement of the screen door by sliding it back and forth to ensure it opens and closes effortlessly.
Mounting the screen material
With the frame, tracks, and rollers in place, it’s time to mount the screen material. Begin by unrolling the screen material and align it with the frame. Use a staple gun or screen spline to secure the screen to the frame. Start at one corner and work your way around, pulling the screen taut as you go. Be sure to trim any excess screen material once it is securely attached to the frame. This step will not only ensure a snug fit but also prevent any unwanted insects from entering your outdoor space.
Securing the screen door in place
Finally, secure the screen door in place to complete the installation process. Depending on the model of your patio screen door, you may need to use screws or clips to hold it in place. Follow the manufacturer’s instructions to determine the appropriate method for securing the screen door. Once secured, give the screen door a final test to ensure it opens and closes smoothly and securely. Now, you can enjoy the benefits of a patio screen door, allowing you to enjoy the fresh air while keeping bugs out.
Installing a patio screen door doesn’t have to be a complicated process. By following these steps and taking the time to properly install the frame, tracks, rollers, screen material, and secure the door in place, you can enjoy the benefits of a functional and attractive screen door on your patio. Say goodbye to pesky insects and hello to a refreshing outdoor oasis!
Adjusting And Testing The Patio Screen Door
Once you have successfully installed your patio screen door, it is important to adjust and test it to ensure smooth sliding motion and proper alignment. By performing these checks, you can guarantee the functionality and durability of your patio screen door for a long time to come.
Ensuring Smooth Sliding Motion
One of the crucial aspects of a patio screen door is its ability to slide smoothly along the track. To ensure a smooth sliding motion, follow these steps:
- Inspect the track and remove any debris or dirt that may cause obstructions. Use a soft brush or vacuum to clean the track thoroughly.
- Apply a lubricating spray specifically designed for use on patio screen door tracks. Spray a small amount on the track and wipe off any excess.
- Check the rollers on the bottom of the door for any signs of wear or damage. Replace any worn-out or damaged rollers to maintain smooth sliding motion.
Checking for Proper Alignment
Proper alignment of the patio screen door is essential to ensure it functions correctly and fits securely in the door frame. Follow these steps to check for proper alignment:
- Close the patio screen door and stand on the inside, facing the door.
- Check if there are any visible gaps between the door and the frame. If necessary, adjust the top and bottom rollers to eliminate these gaps.
- Open and close the door multiple times to test the alignment. Make further adjustments, if needed, until the door fits snugly in the frame without any gaps.
Testing the Door for Functionality
After adjusting the patio screen door for smooth sliding motion and proper alignment, it is important to test its functionality. Perform the following tests:
| Test | Steps |
|---|---|
| 1. Sliding Test | Open and close the door several times to ensure it slides smoothly and without any resistance. Pay attention to any unusual noises or sticking points and address them accordingly. |
| 2. Latch Test | Ensure that the latch mechanism locks and unlocks smoothly without any difficulties. Test the latch from both the inside and outside of the door. |
| 3. Screen Test | Inspect the screen to ensure there are no tears, holes, or damage. Open and close the door with the screen in place to ensure it functions properly without any snags or obstructions. |
By following these steps to adjust and test your patio screen door, you can enjoy a smooth and hassle-free experience, effortlessly opening and closing your screen door for years to come.
Additional Tips For Maintaining Your Patio Screen Door
Now that you have successfully installed your patio screen door, it’s important to know how to properly maintain it to ensure its longevity. By following these additional tips, you can keep your door looking and functioning great for years to come.
Cleaning and maintaining the tracks
To keep your patio screen door gliding smoothly, regular cleaning and maintenance of the tracks is essential. Over time, dirt, dust, and debris can accumulate in the tracks, causing the door to stick or become difficult to open and close. Here’s how you can clean and maintain the tracks to avoid such issues:
- Start by removing the screen door from the tracks. This will allow you better access to clean the tracks thoroughly.
- Using a soft brush or old toothbrush, carefully remove any loose dirt or debris from the tracks. Be sure to clean both the upper and lower tracks.
- Next, wipe the tracks with a damp cloth or sponge and a mild detergent. This will help remove any remaining dirt or grime.
- Once you have cleaned the tracks, dry them thoroughly to prevent moisture buildup.
- Finally, apply a silicone-based lubricant to the tracks to ensure smooth gliding motion of the screen door. Avoid using oil-based lubricants as they can attract more dirt and debris.
Repairing small damages
Even with proper maintenance, your patio screen door may still encounter small damages over time. These can include tears in the screen or damage to the door frame. Fortunately, many of these minor issues can be easily repaired. Here are some steps you can follow to repair small damages:
- Inspect the screen for any tears or holes. If you find any, use a screen repair kit or patch to fix the damage. Simply cut a piece of the patch material slightly larger than the tear, apply adhesive around the edges, and press it firmly onto the damaged area.
- If your screen door frame has become loose or damaged, use a screwdriver or drill to tighten any loose screws or replace them if necessary.
- In the case of more severe damage, such as a bent or dented frame, consider contacting a professional for repair or replacement.
Protecting the screen from pets and children
If you have pets or young children, it’s important to take extra measures to protect the screen from potential damage. Here are some tips to ensure the screen remains intact:
- Train your pets to avoid scratching or pushing against the screen door. Using deterrent sprays or providing alternative scratching posts can help redirect their behavior.
- Teach your children the importance of being gentle with the screen door. Encourage them not to push or lean on the screen and educate them about its fragility.
- Consider installing a pet grille or a childproof barrier to create a physical barrier between the screen and your pets or children.
By following these additional maintenance tips, you can keep your patio screen door clean, functional, and protected from potential damage. Regular cleaning, timely repairs, and taking preventive measures will ensure that your patio screen door remains a reliable and durable part of your outdoor living space.
Credit: www.familyhandyman.com
Frequently Asked Questions For How To Install Patio Screen Door
How Do You Install A Screen On A Patio Door?
To install a screen on a patio door, measure the door frame and purchase a screen kit that fits. Attach the screen to the frame using the included hardware, following the kit’s instructions. Make sure the screen fits securely and opens and closes smoothly.
Enjoy a bug-free patio experience!
How Do You Put A Sliding Screen Door Back On The Track?
To put a sliding screen door back on the track, 1. Lift the door and tilt it slightly towards you. 2. Align the bottom wheels with the track and slide them in. 3. Tilt the top of the door towards the track.
4. Place the top wheels on the upper track and slide the door in. 5. Test the door to ensure it slides smoothly.
Can You Install A Screen Door Yourself?
Yes, you can install a screen door yourself. It’s a simple DIY project that doesn’t require professional help. Follow the manufacturer’s instructions, gather the necessary tools, and take your time to ensure proper installation. Enjoy the benefits of a screen door without the need for hiring someone.
What Is The Easiest Screen Door To Install?
The easiest screen door to install is a retractable screen door. It is user-friendly, hassle-free, and can be easily installed within a few simple steps. Simply follow the instructions provided, and you’ll have a convenient and functional screen door in no time.
How Do I Measure For A Patio Screen Door?
To measure for a patio screen door, measure the width and height of the opening, ensuring accuracy.
What Tools Do I Need To Install A Patio Screen Door?
You will need a screwdriver, measuring tape, hacksaw, drill, level, and a helper.
Conclusion
Installing a patio screen door can enhance the functionality and beauty of your outdoor space. By following the step-by-step guide in this blog post, you can easily install a patio screen door on your own. Remember to gather all the necessary tools and materials, measure accurately, and follow the instructions carefully.
With a little patience and effort, you’ll be enjoying the fresh air while keeping bugs out in no time. So go ahead, give it a try and transform your patio into a more welcoming and comfortable space.