To install a Schlage Keypad Deadbolt, simply follow the manufacturer’s instructions. Looking to enhance your home security?
Installing a Schlage Keypad Deadbolt is an effective solution that provides convenient access control for your front door. With its easy-to-use keypad, you can say goodbye to fumbling for your keys. Not only does it offer keyless entry, but it also boasts advanced security features to protect your home from intruders.
In this guide, we will walk you through the step-by-step process of installing a Schlage Keypad Deadbolt, ensuring a hassle-free installation. Whether you’re a seasoned DIY enthusiast or a novice, you’ll find this installation process straightforward and user-friendly. So, let’s get started and improve the security of your home.
Enhanced Security And Convenience
When it comes to securing your home, convenience and peace of mind are of utmost importance. The Schlage Keypad Deadbolt is a cutting-edge solution that combines advanced security features with effortless access. With keyless entry technology and secure access codes, you can enhance your home’s security while enjoying the convenience of easy entry without keys.
Keyless Entry Technology
With the Schlage Keypad Deadbolt, you no longer have to fumble for your keys or worry about losing them. This innovative lock system allows you to enter your home using a unique access code. Simply program your desired code into the keypad, and you’re all set. Whether you’re coming home from a long day at work or a late-night outing, accessing your home is as easy as entering a code.
Secure Access Codes
Security is paramount when it comes to protecting your home and loved ones. The Schlage Keypad Deadbolt provides an added layer of security with its secure access codes. You can create multiple codes for different family members or trusted individuals, granting them personalized access to your home. This eliminates the need for spare keys and ensures that only authorized individuals can enter your premises.
Each access code can be easily programmed and changed, giving you complete control over who has access to your home and when. Should the need arise, you can revoke access to certain individuals without having to change the lock or rekey your entire home. This flexibility provides you with added peace of mind and convenience.
Furthermore, the Schlage Keypad Deadbolt features a built-in alarm system that detects potential threats such as tampering or forced entry. This alerts you and your neighbors to an attempted breach, further enhancing the security of your home.
In conclusion, the Schlage Keypad Deadbolt offers enhanced security and convenience for your home. With its keyless entry technology and secure access codes, you can enjoy the advantages of easy access and personalized security. Upgrade your home’s security with this advanced lock system and experience the peace of mind that comes with knowing you are in control of who enters your home.
Easy Installation Process For Beginners
Installing a Schlage Keypad Deadbolt is a straightforward process that even beginners can tackle with ease. By following a few simple steps and gathering the necessary tools, you’ll have your keypad deadbolt installed and functioning in no time. In this guide, we’ll break down the installation process into three easy-to-follow steps: gathering the required tools, removing the existing deadbolt, and preparing the door for installation.
Gathering the Required Tools
Before you begin the installation process, it’s crucial to gather all the necessary tools and materials. Having everything you need at hand will make the installation smoother and more efficient. Here’s a list of tools you’ll need:
| Tools | Materials |
|---|---|
| Screwdriver | Schlage keypad deadbolt |
| Hammer | Old deadbolt removal tool (if applicable) |
| Tape measure | |
| Pencil | |
| Drill and appropriate drill bits | |
| Chisel |
Removing the Existing Deadbolt
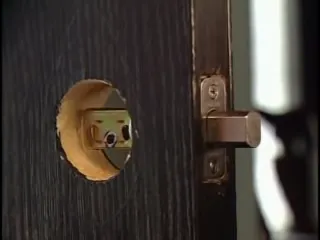
- Begin by removing the existing deadbolt from your door. Use a screwdriver to unscrew the screws securing the deadbolt to the door.
- If your old deadbolt is stubborn and won’t easily come off, use a hammer to gently tap it and loosen it from its position.
- Once the deadbolt is removed, you’ll be left with a hole or indent on your door. Take a moment to clean the area and remove any debris or excess dirt.
Preparing the Door for Installation
- Measure the height of the existing hole on your door to ensure your new Schlage keypad deadbolt will fit perfectly. Use a tape measure to take accurate measurements.
- Mark the center of the hole on your door with a pencil. This will help you align the new deadbolt properly.
- Using a drill and appropriate drill bit, create a new hole at the marked center point. Be sure to follow the manufacturer’s instructions for drill bit size and depth.
- Next, use a chisel to create a recessed area on the edge of the door where the deadbolt latch will fit. This will ensure a secure and flush fit.
With the tools gathered, the existing deadbolt removed, and the door properly prepared, you’re now ready to install your Schlage keypad deadbolt. Be sure to consult the manufacturer’s instructions for the specific installation steps and enjoy the added security and convenience this keypad deadbolt will bring to your home.
Step-By-Step Guide To Installing A Schlage Keypad Deadbolt
Welcome to our step-by-step guide on installing a Schlage keypad deadbolt. If you’re looking for a convenient and secure way to upgrade your home’s security, the Schlage keypad deadbolt is a great choice. In this guide, we’ll walk you through each step of the installation process, ensuring that you can install your deadbolt correctly and efficiently.
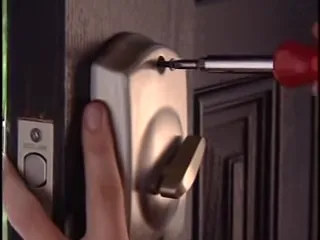
Attaching the Mounting Plate
The first step in installing your Schlage keypad deadbolt is attaching the mounting plate. The mounting plate is what connects the deadbolt to your door. To attach the mounting plate, follow these steps:
- Remove the existing deadbolt from your door, if applicable.
- Place the mounting plate on the inside of the door, aligning it with the holes where the previous deadbolt was installed.
- Secure the mounting plate to the door using the provided screws. Make sure the plate is flush against the door.
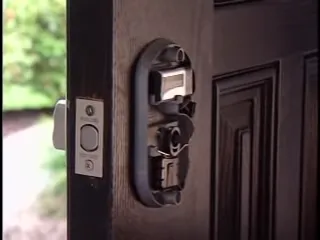
Installing the Keypad Assembly
Once the mounting plate is securely attached, you can proceed to install the keypad assembly. The keypad assembly is where you’ll enter your access codes to lock and unlock the deadbolt. To install the keypad assembly, follow these steps:
- Take the keypad assembly and align it with the mounting plate, making sure the wires are properly positioned.
- Insert the keypad assembly into the mounting plate and press it firmly to ensure it is properly seated.
- Secure the keypad assembly to the mounting plate using the provided screws.
Installing the Latch and Strike Plate
With the mounting plate and keypad assembly in place, it’s time to install the latch and strike plate. These components ensure that your deadbolt locks securely. Here’s how to install them:
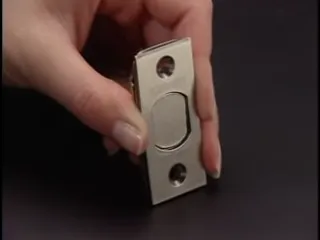
- Insert the latch into the edge of the door, ensuring that the curved side faces the strike plate.
- Secure the latch to the door using the provided screws.
- Position the strike plate on the door frame, aligning it with the latch.
- Secure the strike plate to the door frame using the provided screws.
Applying Power and Testing the Deadbolt
Now that the deadbolt is installed, it’s time to apply power and test it to ensure everything is functioning correctly. Follow these final steps:
- Insert the battery pack into the keypad assembly and connect the wires according to the instructions provided.
- Test the deadbolt by entering a code on the keypad and turning the thumbturn to lock and unlock the deadbolt.
- Make any necessary adjustments to the latch or strike plate to ensure smooth operation.
- Once satisfied with the deadbolt’s performance, close the door and test it again to ensure proper alignment.
Troubleshooting Common Installation Issues
Installing a Schlage keypad deadbolt can enhance both the security and convenience of your home. However, like any electronic device, there may be some installation issues that you encounter along the way. In this guide, we will address the most common installation issues and provide troubleshooting tips to help you overcome them.
Deadbolt Not Extending or Retracting Properly
If you find that your Schlage keypad deadbolt is not extending or retracting properly, there are a few possible causes and solutions to consider:
- Check the alignment: Ensure that the deadbolt is properly aligned with the strike plate on the door jamb. Misalignment can prevent smooth operation. You can adjust the strike plate as needed to improve alignment.
- Inspect the battery level: Low battery power can affect the performance of your keypad deadbolt. Make sure to replace the batteries with fresh ones if they are running low. Regularly checking and replacing the batteries can prevent issues with the deadbolt operation.
- Examine the latch: The deadbolt latch should move freely without any obstruction. Inspect the latch mechanism to ensure that it is clean and free from debris. If necessary, use a lubricant suitable for locks to ensure smooth movement.
- Reset the lock: If the above steps do not resolve the issue, a reset may be needed. Refer to the user manual for instructions on how to perform a factory reset. This can help resolve any software or programming issues that may be affecting the deadbolt operation.
Keypad Error Messages
If you encounter error messages on the keypad of your Schlage deadbolt, there are a few common reasons and troubleshooting steps to consider:
- Incorrect code entry: Double-check that you have entered the correct code on the keypad. Keep in mind that some models require a specific sequence of steps to enter and validate the code.
- Lockout mode: After several unsuccessful code entry attempts, the keypad may enter a lockout mode. This is a security feature to prevent unauthorized access. Wait for a few minutes and try again.
- Low battery warning: If the keypad displays a low battery warning, replace the batteries with fresh ones to ensure proper operation.
- Reset the lock: In some cases, a keypad error message may indicate a software issue. Performing a factory reset can help resolve such problems. Refer to the user manual for instructions on how to perform a reset.
By following these troubleshooting tips, you can overcome common installation issues you may encounter when installing a Schlage keypad deadbolt. Remember to refer to the user manual for specific instructions and contact customer support if you need further assistance. With a properly installed and functioning keypad deadbolt, you can enjoy improved security and peace of mind for your home.
Maintenance Tips To Ensure Long-Term
Functionality
Regular maintenance is essential to keep your Schlage keypad deadbolt functioning smoothly and to extend its lifespan. By incorporating these maintenance tips into your routine, you can ensure that your lock stays reliable and secure for the long term.
Regularly Clean and Lubricate the Lock
One of the easiest ways to maintain your Schlage keypad deadbolt is to regularly clean and lubricate the lock mechanism. Over time, dirt, dust, and debris can accumulate, hindering the lock’s performance. To prevent this buildup, follow these steps:
- Use a soft, dry cloth to remove any surface dirt or dust from the lock.
- Apply a small amount of graphite lubricant to the keyway.
- Turn the key several times to distribute the lubricant and ensure smooth operation.
- Wipe away any excess lubricant.
Regular cleaning and lubrication will help maintain the lock’s functionality and prevent any potential issues.
Check Batteries and Replace as Needed
As the Schlage keypad deadbolt relies on batteries to power its electronic components, it is crucial to periodically check the battery life. Here’s how to do it:
- Press the Schlage button on the keypad.
- If the light on the keypad flashes green, the batteries are still good.
- If the light flashes red, it signifies low battery levels.
- Replace the batteries with new ones as soon as possible.
Regularly checking and replacing the batteries when needed will guarantee uninterrupted operation of your Schlage keypad deadbolt.
Perform Periodic Security Audits
In addition to regular maintenance, it’s important to perform periodic security audits to ensure the safety of your property. Follow these steps to conduct a security audit:
- Inspect the door frame, strike plate, and deadbolt to ensure they are securely fastened and not damaged.
- Check the screws on the lock’s plate and strike plate to confirm they are tight.
- Test the lock and keypad functionality to make sure they are working correctly.
- Consider upgrading to advanced security features, such as smart lock integration or alarm systems.
Performing periodic security audits will give you peace of mind knowing that your Schlage keypad deadbolt is providing optimal security for your home or business.
Frequently Asked Questions On How To Install Schlage Keypad Deadbolt
How Do I Install Schlage Keypad Lock?
To install a Schlage keypad lock, follow these steps: 1. Remove the existing lock. 2. Install the keypad lock using the provided mounting screws and template. 3. Connect the wires to the lock. 4. Insert the batteries. 5. Test the lock to ensure it functions properly.
How To Install Schlage Touchscreen Deadbolt With Alarm?
To install a Schlage touchscreen deadbolt with alarm, follow these steps: 1. Start by removing the existing deadbolt from your door. 2. Align the keypad assembly with the mounting plate and secure it in place. 3. Connect the wires from the keypad to the interior assembly and attach it to the door.
4. Insert the batteries and follow the manufacturer’s instructions to program your desired codes. 5. Finally, test the lock to ensure proper installation and functionality.
How Do You Remove A Schlage Keypad Lock From A Door?
To remove a Schlage keypad lock from a door, follow these steps: 1. Locate the mounting screws on the interior side of the door. 2. Unscrew the mounting screws using a screwdriver. 3. Disconnect the lock from the door by sliding it out of the mounting plate.
4. The lock is now removed and can be replaced or repaired as needed.
Does Schlage Keypad Deadbolt Lock Automatically?
Yes, Schlage keypad deadbolt locks do have an automatic locking feature. This means that once the door is closed, the lock will automatically engage, providing enhanced security and convenience.
How Do I Install A Schlage Keypad Deadbolt?
To install a Schlage Keypad Deadbolt, simply remove your old lock, align the new deadbolt, and secure it with screws provided.
What Tools Do I Need To Install A Schlage Keypad Deadbolt?
You will need a screwdriver, a measuring tape, and a drill (if your door doesn’t have pre-drilled holes).
Conclusion
Installing a Schlage Keypad Deadbolt is a straightforward process that can enhance the security and convenience of your home. By following the step-by-step instructions provided in this blog post, you can successfully complete the installation without any hassle. Remember to choose a suitable location for the deadbolt, mark the holes accurately, and secure it firmly.
With the Schlage Keypad Deadbolt installed, you can enjoy the peace of mind that comes with a reliable and efficient lock system. Secure your home easily and effectively today!