o install a steel door frame, first, measure and mark the desired location on the wall. Then, align the frame with the marks and secure it in place using screws and a level.
Now, fill any gaps with insulation and attach the door to the frame using hinges. Finally, test the door for smooth opening and closing. Alternatively, you can hire a professional to install the steel door frame for you, ensuring a precise and secure fit.
Installing a steel door frame can provide added security and durability to your home or business. It is a straightforward process that can be completed with a few basic tools and some careful measurements.
Determining The Correct Size And Type Of Steel Door Frame
Installing a steel door frame can enhance the security and durability of your entryway. However, before you get started, it is essential to determine the correct size and type of steel door frame for your specific needs. This will ensure a seamless installation process and a secure fit for your new door. In this section, we will cover the crucial steps involved in measuring the door opening, selecting the appropriate frame type, and considering the material and finish options.
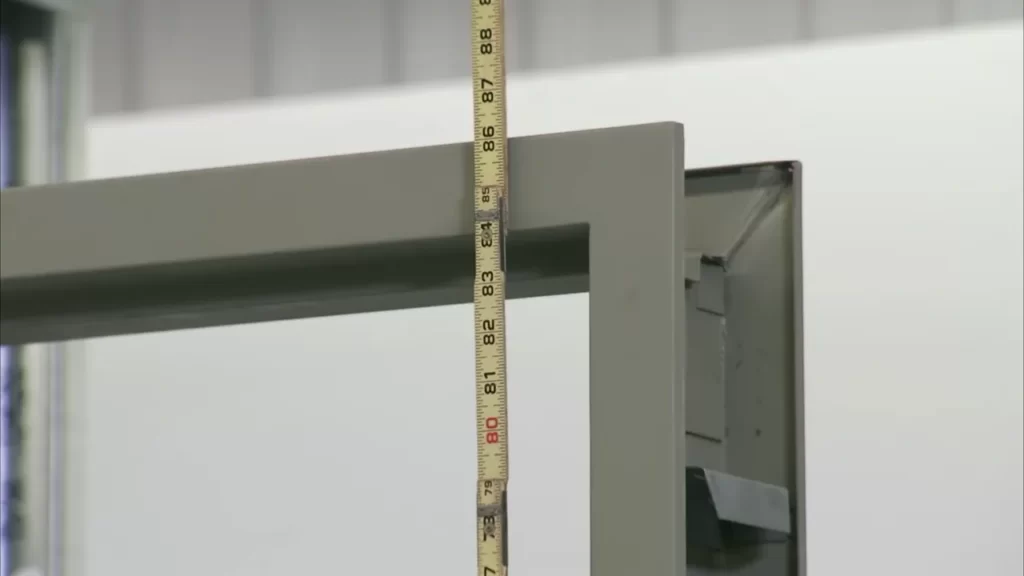
Measuring the Door Opening
Measuring the door opening accurately is the first step in finding the right size steel door frame. Follow these steps to ensure precise measurements:
- Start by measuring the width of the door opening. Use a tape measure and measure from one side of the opening to the other, taking note of the measurement in inches.
- Next, measure the height of the door opening. Place the tape measure at the top of the opening and measure down to the floor, noting the measurement in inches.
- It is also crucial to measure the thickness of the wall surrounding the opening. This measurement will help determine the correct jamb depth needed for your steel door frame installation.
By carefully measuring the width, height, and thickness of the door opening, you can ensure that the steel door frame fits perfectly and provides optimal security for your entryway.
Selecting the Appropriate Frame Type
Once you have determined the correct size of the steel door frame, it’s time to choose the appropriate frame type for your needs. Consider the following factors:
- Single or Double: Determine whether you need a single or double steel door frame, depending on the width of the door opening and your personal preference.
- Masonry or Drywall: Assess whether your wall is built with masonry or drywall, as this will influence the type of frame you select.
- Kick Plates and Thresholds: Decide whether you require kickplates and thresholds for added strength and protection.
Choosing the appropriate frame type based on these factors will ensure that your steel door frame installation is compatible with your entryway’s unique specifications.
Considering the Material and Finish Options
In addition to the proper sizing and frame type, considering the material and finish options is crucial for enhancing the aesthetics and durability of your steel door frame. Some popular material and finish options include:
| Material | Finish Options |
|---|---|
| Galvanized Steel | Primed, Powder Coated, Stainless Steel Finish |
| Stainless Steel | Brushed, Polished, Satin Finish |
Selecting the material and finish options that align with your preferences and the overall aesthetic of your home will ensure a visually appealing and long-lasting steel door frame installation.
By accurately measuring the door opening, selecting the appropriate frame type, and considering the material and finish options, you can confidently install a steel door frame that fits perfectly and enhances the security and beauty of your entryway.
Removing The Existing Door Frame
Before installing a steel door frame, it is crucial to properly remove the existing door frame. This process involves a few steps to ensure a clean and smooth installation. In this section, we will discuss removing the door trim and casing, taking out the door frame components, and clearing the area for a clean surface.
Removing the Door Trim and Casing
The first step in removing the existing door frame is to remove the door trim and casing. This is the decorative molding that surrounds the door and covers the gap between the frame and the wall. Follow these steps for a successful removal:
- Start by inserting a putty knife between the trim and the wall. Gently pry the trim away from the wall to expose the nails or screws holding it in place.
- Using a hammer or a screwdriver, carefully remove the nails or unscrew the screws. Be cautious not to damage the surrounding walls or the trim itself.
- Once the fasteners are removed, gently pull the trim away from the wall, taking care not to break it. Set the trim aside for later use, if desired.
Taking Out the Door Frame Components
After removing the trim and casing, the next step is to take out the door frame components. This includes the door itself, hinges, and any additional hardware. Follow these steps to properly remove the door frame components:
- Open the door and secure it in place using wedges or a helper to hold it for you.
- Remove the screws or nails that secure the door hinges to the frame using a screwdriver or hammer.
- Once the hinges are detached, carefully lift the door off the hinges and set it aside.
- Inspect the frame for any additional hardware, such as latch plates or strike plates, and remove them accordingly.
Clearing the Area and Ensuring a Clean Surface
After removing the door frame components, it is essential to clear the area and ensure a clean surface for the new steel door frame installation. Here are the steps to follow:
- Remove any remaining nails, screws, or debris from the door frame and surrounding area.
- Inspect the wall for any damage or issues that may need to be addressed before installing the new frame.
- Use a sanding block or sandpaper to smooth the surface of the wall, ensuring there are no protrusions or rough spots.
- Wipe down the area with a damp cloth or sponge to remove any dust or particles.
By following these steps, you will successfully remove the existing door frame and prepare the area for installing the new steel door frame.
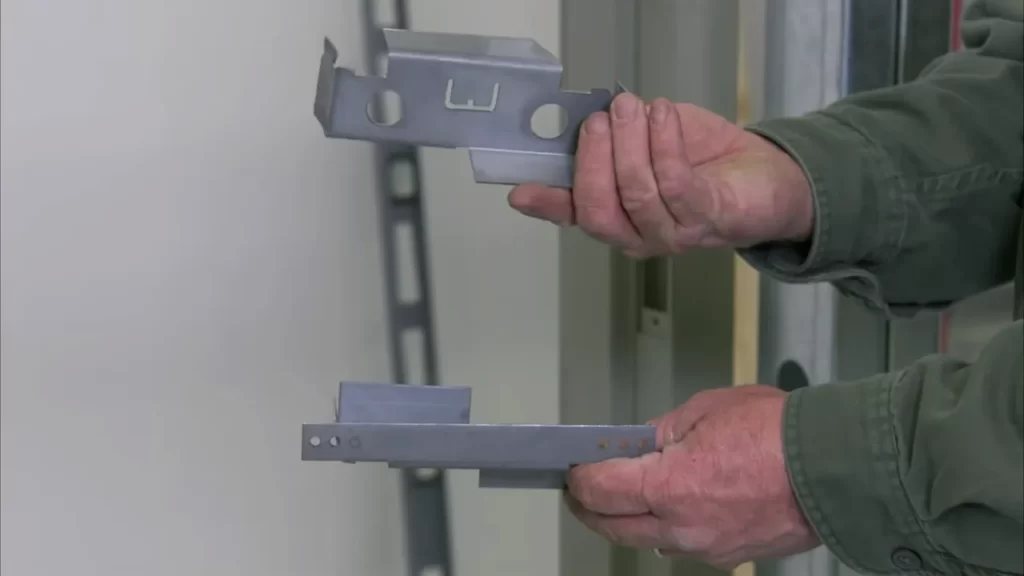
Assembling The Frame Components
In order to successfully install a steel door frame, it is essential to properly assemble the frame components. This step-by-step guide will walk you through the process, ensuring that you have a solid foundation for your door.
Attaching the Jamb Legs to the Header
The first step in assembling the frame components is to attach the jamb legs to the header. The jamb legs are the vertical pieces of the frame that will support the door. Follow these steps:
- Place the header on a flat surface with the pre-drilled holes facing up.
- Align one of the jamb legs with the header, making sure that it is flush with the top edge.
- Using the provided screws, secure the jamb leg to the header by inserting the screws into the pre-drilled holes and tightening them with a screwdriver or power drill.
- Repeat the process with the other jamb leg, ensuring that it is flush with the opposite edge of the header.
Installing the Hinge Side Jamb Leg
Once the jamb legs are attached to the header, you can proceed with installing the hinge side jamb leg. This is the side of the frame where the hinges will be positioned. Follow these steps:
- Position the hinge side jamb leg against the jamb leg already attached to the header.
- Ensure that the jamb leg is plumb and square by using a level or square.
- Secure the hinge side jamb leg to the header and the existing jamb leg using screws.
Inserting the Strike Side Jamb Leg
The final step in assembling the frame components is to insert the strike side jamb leg. This is the side of the frame where the door strike plate will be installed. Follow these steps:
- Position the strike side jamb leg against the jamb leg already attached to the header and the hinge side jamb leg.
- Ensure that the jamb leg is plumb and square by using a level or square.
- Secure the strike side jamb leg to the header and the existing jamb legs using screws.
Once the frame components are properly assembled, you are ready to move on to the next step in installing your steel door frame. Stay tuned for our next blog post, where we will cover the process of installing the door into the frame.
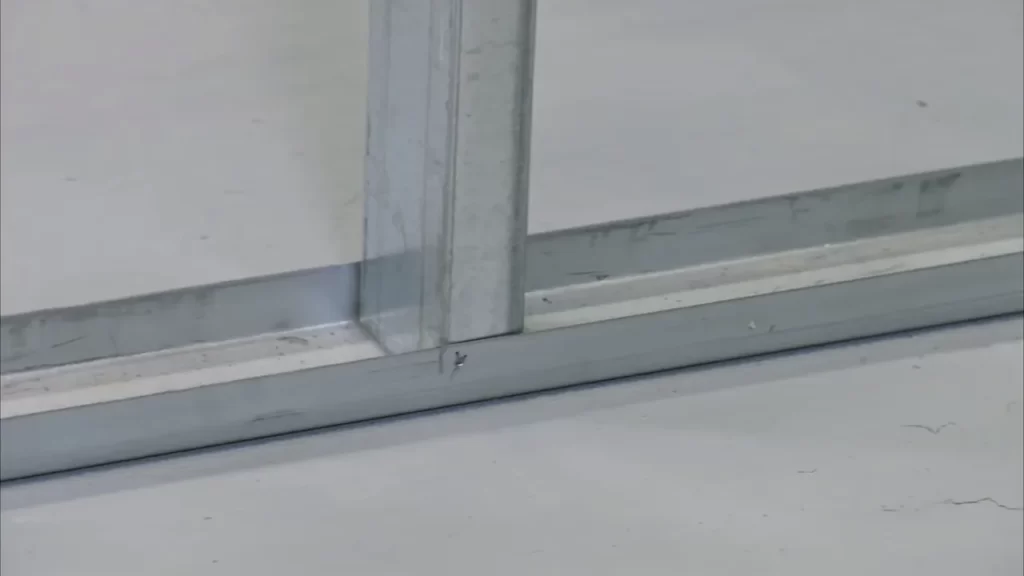
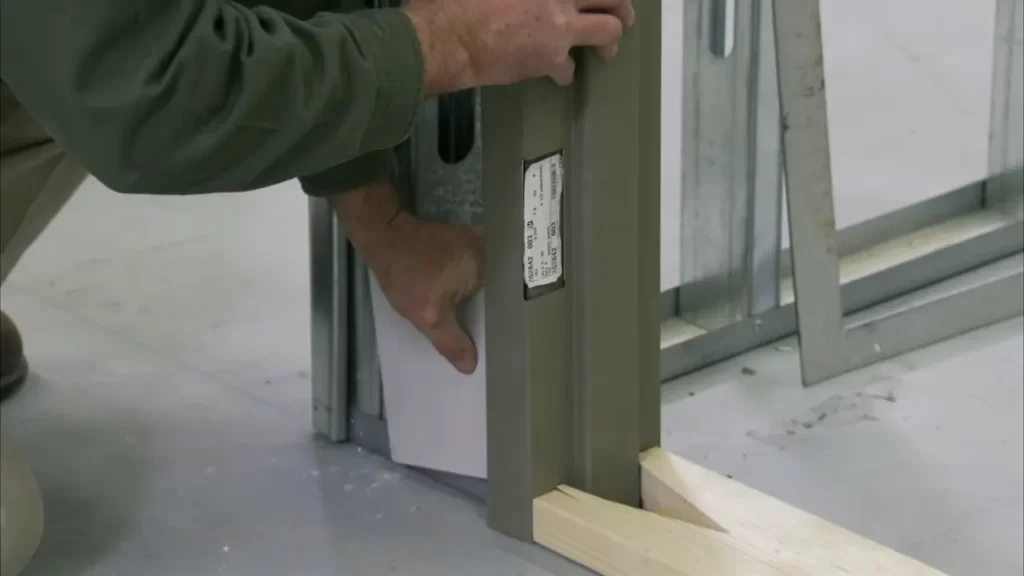
Securing The Frame To The Door Opening
Once you have positioned the steel door frame in the opening and ensured that it is leveled and aligned, the next step is to secure it to the wall. This is a critical step in the installation process, as it ensures the stability and durability of the door frame. In this section, we will outline the steps you need to follow to anchor the frame securely.
Positioning the Frame in the Opening
Before securing the frame to the door opening, it is essential to position it correctly. This ensures that the door will open and close smoothly without any obstructions. To position the frame:
- Place the frame in the opening, ensuring that the top of the frame is level with the header of the doorway.
- Check that the frame is centered within the opening, leaving an equal space between the frame and the surrounding walls.
Leveling and Aligning the Frame
Once the frame is positioned correctly, the next step is to level and align it. This is crucial for the proper functioning of the door and to avoid any gaps that may compromise security. To level and align the frame:
- Use a leveling tool to check the vertical sides of the frame. Adjust the frame as necessary until it is perfectly vertical.
- Check the horizontal top of the frame using a level. Make adjustments if needed to ensure that the top is perfectly level.
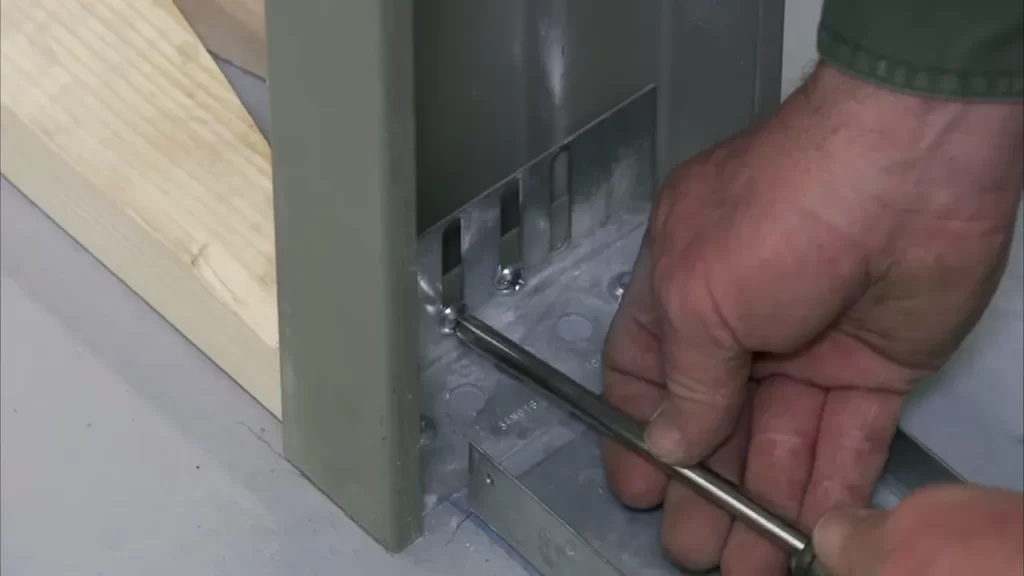
Anchoring the Frame to the Wall
With the frame positioned and leveled, it’s time to anchor it to the wall. This step provides the necessary support to keep the frame in place. To anchor the frame:
- Drill pilot holes into the frame and the wall.
- Insert screw anchors into the pilot holes to provide added stability.
- Using a drill, screw in the screws through the frame and into the screw anchors, ensuring a tight fit.
Checking the Frame’s Stability
After securing the frame, take a moment to ensure its stability. This will give you peace of mind knowing that the frame is firmly in place and the door will function smoothly. To check the frame’s stability:
- Push and pull on the frame to test its sturdiness. It should not move or feel loose.
- Inspect the frame for any visible gaps or misalignments. If you find any, make the necessary adjustments.
By following these steps to secure the steel door frame to the door opening, you can ensure a solid and stable installation. Taking the time to position, level, align, and anchor the frame correctly will result in a secure and reliable entrance to your space.
Adjusting And Fine-Tuning The Door Frame
Once the steel door frame has been properly installed, the next step is to adjust and fine-tune the frame to ensure it functions perfectly. This involves verifying the frame’s alignment, adjusting the hinges for proper opening and closing, and testing the door swing and functionality. In this section, we will go through each of these steps in detail to guide you through the process.
Verifying the Frame’s Alignment
The alignment of the door frame is crucial for the proper functioning of the door. To verify the frame’s alignment, follow these steps:
- Check the vertical alignment by placing a level along the side of the frame. Ensure it is perfectly plumb from top to bottom. If not, you may need to adjust the frame by inserting shims behind the frame at the appropriate locations.
- Next, check the horizontal alignment by placing a level on the top of the frame. Make sure it is level from one side to the other. If it is not level, adjust the frame by adding or removing shims.
- Lastly, check the frame’s squareness by measuring the diagonals from corner to corner. The measurements should be equal if the frame is square. If not, adjust the frame until the measurements match.
Adjusting the Hinges for Proper Opening and Closing
Properly adjusted hinges are essential for smooth and secure operation of the door. To adjust the hinges, follow these steps:
- Check if the hinge leaves are flush with the edge of the frame. If not, use a chisel to recess the hinges until they are flush.
- Ensure that the hinge pins are properly inserted and secure. Tighten any loose screws to ensure the hinges are securely attached to the frame.
- Open and close the door to check for any dragging or sticking. If the door is sticking, use a screwdriver to adjust the hinge screws. Loosen them slightly to allow for smoother movement, or tighten them to reduce any gaps or rattling.
Testing the Door Swing and Functionality
Once the frame alignment and hinge adjustments are completed, it’s time to test the door swing and functionality. Here’s what you need to do:
- Stand inside the door and swing it open and closed to check for smooth movement and proper clearance. Ensure that the door swings freely without any obstructions and does not scrape against the frame or floor.
- Test the door’s functionality by closing and latching it. Make sure it securely latches and that the lock mechanism functions properly. Check all handles and hardware for secure attachment.
- If any issues are detected during the testing phase, make the necessary adjustments as outlined in the previous steps until the door operates smoothly and securely.
By following these steps to adjust and fine-tune your steel door frame, you can ensure that your door operates seamlessly, providing security and functionality for years to come.
Insulating And Sealing The Door Frame
Applying Insulation Foam to Fill Gaps
When installing a steel door frame, one crucial step to ensure energy efficiency and a tight seal is to apply insulation foam to fill any gaps. Gaps around the frame can allow air and moisture to seep through, leading to energy loss and potential damage. By applying insulation foam, you can effectively seal these gaps, creating a barrier that prevents air and moisture infiltration.
Start by identifying any visible gaps between the frame and the wall. These gaps may be present on the top, sides, or bottom of the door frame. Using a can of expanding foam insulation, carefully apply the foam in these gaps. The foam will expand to fill the space and create a tight seal.
It’s important to note that the foam may expand significantly, so be cautious not to overfill the gaps. Once applied, allow the foam to dry and cure completely before moving on to the next step.
Sealing around the Frame with Weatherstripping
In addition to insulating foam, weatherstripping is another effective method to seal around the frame of a steel door. Weatherstripping is a flexible material that is designed to block drafts, air leakage, and moisture. It provides an extra layer of protection, enhancing the energy efficiency of the door frame.
To apply weatherstripping, start by measuring the length needed for each side of the frame. Cut the weatherstripping material accordingly, ensuring it fits snugly along the length. With adhesive backing, securely attach the weatherstripping to the frame, pressing firmly to create a tight bond.
For the top of the frame, use a door sweep or threshold to seal the gap between the door and the floor. This will prevent drafts and any outdoor elements from entering the interior space. Weatherstripping should also be applied to the bottom of the door to create a complete seal.
Ensuring a Tight Seal for Energy Efficiency
Creating a tight seal for energy efficiency is vital when installing a steel door frame. It not only helps regulate indoor temperature but also reduces energy costs. Insulating foam and weatherstripping play significant roles in achieving this.
Before completing the installation, take the time to inspect the door frame for any potential gaps or areas that may need further sealing. Pay attention to the areas around hinges, locks, and strike plates. Apply additional foam or weatherstripping as necessary to ensure a secure and energy-efficient seal.
By taking these measures to insulate and seal the door frame, you can optimize energy efficiency, minimize drafts, and enhance the overall performance of your steel door. Investing time in this step will provide long-term benefits, maintaining a comfortable and energy-efficient environment in your space.
Installing The Door And Hardware
Once you have successfully installed the steel door frame, it’s time to move on to the next crucial step: installing the door itself. This involves attaching the door to the frame securely and mounting the necessary hardware such as the door handle, lock, and latch. In this section, we will guide you through each step, ensuring a proper and functional installation.
Attaching the Door to the Frame
Attaching the door to the frame is a crucial step that requires careful precision. Follow the steps below to ensure a secure and accurate fit:
- Begin by placing the door in the frame, making sure it aligns properly. Use a level to ensure that the door is plumb and level.
- Once you have verified the alignment, secure the door to the frame using the provided screws or nails. Be sure to place them evenly along the edges and hinges to ensure stability.
- If necessary, use shims to fill any gaps between the door and the frame. This will help to prevent draughts and ensure a snug fit.
- Once the door is securely attached, test its movement by opening and closing it to ensure smooth operation. Make any adjustments if needed.
Mounting the Door Handle, Lock, and Latch
After the door is attached to the frame, the next step is to mount the hardware, including the door handle, lock, and latch. Follow these steps to ensure proper installation:
- Start by marking the desired position of the door handle and lock on the door. Use a tape measure to ensure accurate placement.
- Using a drill, create the necessary holes for the door handle and lock. Refer to the manufacturer’s instructions for guidance on hole sizes and placement.
- Once the holes are drilled, carefully attach the door handle and lock using the provided screws. Ensure they are tightened securely.
- Next, install the latch plate onto the door frame. Use a chisel to create a recess for the latch plate to sit flush with the frame.
- Attach the latch plate to the frame using screws, ensuring it aligns with the corresponding hole on the door.
Checking for Proper Functionality
With the door attached and hardware mounted, it’s important to check for proper functionality to ensure everything is in working order:
- Test the door by opening and closing it multiple times, ensuring it operates smoothly and without any resistance.
- Double-check the alignment of the latch and strike plate to ensure they engage properly when the door is closed and locked.
- Make sure the door handle and lock operate smoothly without sticking or jamming.
- Test the security of the lock by attempting to open the door from the outside. It should remain securely locked.
By following these steps and thoroughly checking for proper functionality, you can ensure a successful installation of your steel door frame, complete with a secure door and functional hardware.
Adding Trim And Finishing Elements
Once you have successfully installed the steel door frame, it’s time to add the finishing touches to enhance its aesthetic appeal and complete the project. Adding decorative door trim and casing, applying paint or finish, and considering additional elements are essential steps to achieve a polished and stylish look for your door frame.
Installing Decorative Door Trim and Casing
One way to elevate the appearance of your steel door frame is by installing decorative door trim and casing. These elements not only add a touch of sophistication but also help conceal any gaps or imperfections around the frame. Here’s how you can install decorative door trim and casing:
- Measure the length and width of the door frame, ensuring accuracy for a seamless fit.
- Choose a trim and casing design that complements the overall aesthetics of your space.
- Cut the trim and casing to the required dimensions using a saw or miter box, ensuring precise 45-degree angles for corners.
- Apply adhesive or use finishing nails to secure the trim and casing in place, ensuring it aligns perfectly with the edges of the door frame.
- Fill any gaps or nail holes with wood filler, sand it smooth, and paint or stain the trim and casing to your desired finish.
Applying Paint or Finish to the Frame
Adding a fresh coat of paint or finish to your steel door frame not only provides a protective layer but also enhances its overall appearance. Follow these steps to properly apply paint or finish:
- Clean the surface of the steel door frame to remove any dirt, dust, or grease.
- Apply a coat of primer specifically designed for metal surfaces to promote adhesion.
- Once the primer is dry, choose a paint or finish that is suitable for metal and matches your desired aesthetic.
- Apply the paint or finish evenly using a brush or roller, ensuring complete coverage.
- Allow the first coat to dry and apply additional coats if necessary, following the manufacturer’s instructions.
Enhancing the Aesthetics of the Door Frame
While adding trim, casing, and paint can significantly enhance the appearance of your steel door frame, there are additional elements you can consider to further elevate its aesthetics:
- Add decorative accents such as door handles, hinges, and kickplates that complement the style of your door frame.
- Install weatherstripping to improve energy efficiency and reduce drafts.
- Consider adding a doorstop to protect your walls and prevent the door from slamming.
- Explore options for architectural details, such as paneling or glass inserts, to add a unique touch to your door frame.
By paying attention to these details and carefully considering the trim, paint, and additional features, you can transform your steel door frame into a focal point that enhances the overall beauty of your space.
Maintenance And Care Tips
Proper maintenance and care of your steel door frame are essential for its longevity and functionality. Regular cleaning, inspection, and addressing any issues or wear can help ensure that your door frame remains in top condition. By following these maintenance and care tips, you can extend the lifespan of your steel door frame.
Regular Cleaning and Inspection
Regular cleaning and inspection of your steel door frame are crucial to prevent dirt, grime, and debris buildup and to identify any potential issues or damages. Here are some steps you can follow for effective cleaning and inspection:
- Start by removing any loose dirt or debris from the door frame using a soft brush or a vacuum cleaner with a brush attachment.
- Prepare a mixture of mild detergent or soap with warm water.
- Moisten a soft cloth or sponge in the soapy water and gently scrub the steel door frame, paying extra attention to the corners and edges.
- Rinse the door frame thoroughly with clean water to remove any soap residue.
- Dry the door frame with a clean, lint-free cloth to prevent moisture buildup.
- Inspect the door frame for any signs of rust, dents, or scratches. If you notice any damages, take appropriate measures to address them.
Addressing Any Issues or Wear
Timely addressing any issues or wear on your steel door frame is crucial to prevent further damage and maintain its structural integrity. Here are some tips for addressing common issues or wear:
- If you notice any rust spots on the steel door frame, carefully remove them using steel wool or a wire brush. Then, apply a coat of rust-resistant paint or primer to prevent future rusting.
- In case of dents or scratches, you can use an auto body filler or putty to fill the damaged areas. Once the filler is dry, sand it down to achieve a smooth surface. Finally, apply a matching paint color to blend it with the rest of the door frame.
- If the hinges or latches of the steel door frame become loose or malfunctioning, tighten the screws or replace them if necessary.
- Check the weatherstripping around the door frame for any signs of wear or damage. Replace the weatherstripping if needed to ensure proper insulation and energy efficiency.
Extending the Lifespan of the Steel Door Frame
To maximize the lifespan of your steel door frame, you can take additional measures to protect it from harsh weather conditions and everyday wear and tear:
- Apply a protective coat of clear sealant or paint specifically designed for steel surfaces. This will create a barrier against moisture, UV rays, and other external factors that can cause damage.
- Regularly lubricate the hinges and moving parts of the door frame to prevent friction and maintain smooth operation.
- Consider installing a door sweep or threshold to prevent dust, insects, and drafts from entering your home.
- Avoid using abrasive cleaners or harsh chemicals on the steel door frame, as they can cause damage to the surface.
By following these maintenance and care tips, you can ensure that your steel door frame remains in excellent condition, providing security and durability for years to come.
Common Installation Mistakes To Avoid
When it comes to installing a steel door frame, it’s important to get it right the first time. Improper installation can lead to a whole host of issues, from security concerns to functionality problems. To ensure a successful installation, it’s crucial to avoid some common mistakes that can occur during the process. In this article, we will discuss three common installation mistakes to avoid: improper measurement or sizing, insufficient anchoring and securing, and neglecting proper alignment and leveling.
Improper Measurement or Sizing
One of the most critical aspects of installing a steel door frame is ensuring accurate measurement and sizing. Any mistake in this area can result in a misfit, making it difficult to install the door correctly. To avoid this mistake, measure the opening carefully and accurately using a reliable tape measure or digital measuring tool. Take into consideration any irregularities in the opening, such as uneven walls or sloping floors. It’s essential to follow the manufacturer’s guidelines for sizing to ensure a perfect fit.
Insufficient Anchoring and Securing
Anchoring and securing the steel door frame properly is crucial for its stability and longevity. Neglecting this step can result in a weak installation that may cause the door frame to shift or become loose over time. To avoid this mistake, use the appropriate anchors and screws recommended by the manufacturer. Ensure that they are long enough to penetrate through the frame and into the surrounding structure securely. It’s also important to distribute the anchors evenly to provide equal support on all sides of the frame.
Neglecting Proper Alignment and Leveling
Proper alignment and leveling are essential for the steel door frame to function correctly. Neglecting this step can result in a door that doesn’t close properly or is difficult to open. To avoid this mistake, use a level to ensure that the frame is perfectly vertical and plumb. Make any necessary adjustments to ensure the frame is aligned correctly before proceeding with the installation. Taking the time to level the frame will ensure that the door operates smoothly and securely.
By avoiding these common installation mistakes, you can ensure a successful installation of your steel door frame. Remember to measure accurately, anchor and secure the frame properly, and pay attention to alignment and leveling. In doing so, you’ll have a sturdy and functional steel door frame that provides security and peace of mind.
Troubleshooting And Problem Solving
While installing a steel door frame can be a relatively straightforward process, it’s not uncommon to encounter a few hiccups along the way. This section will address some common problems that may arise during the installation process and provide practical solutions.
Addressing Uneven or Misaligned Door Frame
If you notice that your steel door frame is uneven or misaligned, it’s crucial to address the issue promptly. Leaving it unattended can result in difficulty opening and closing the door, as well as potential security risks.
One possible solution to fix an uneven or misaligned door frame is to use wooden shims. These shims can be inserted behind the frame at specific points to level it out and ensure a proper fit. It’s important to use a level to check the alignment at various points along the frame, making adjustments with the shims as needed.
In some cases, you may need to remove the frame and reinstall it to rectify the problem. This can be a more time-intensive process, but it can provide a more reliable solution if the misalignment is severe.
Resolving Issues with Tight or Loose Door Swings
If you experience problems with the door swing being too tight or too loose, adjustments may be necessary to ensure smooth operation.
For a tight door swing, one possible solution is to check and adjust the hinge screws. Tightening or loosening these screws can help alleviate the friction and allow for a better swinging motion. Additionally, you may want to inspect the door’s weatherstripping to ensure it isn’t causing any unnecessary resistance.
If the door swing is too loose, adjusting the hinge screws may also be beneficial. Loosening the screws slightly can help create a tighter fit and reduce excess movement. If needed, you can also consider installing hinge adjustment shims to provide additional stability.
Dealing with Weatherstripping or Insulation Problems
Weatherstripping and insulation play a crucial role in maintaining energy efficiency and keeping out unwanted elements. If you encounter issues with the weatherstripping or insulation during the steel door frame installation, addressing them promptly is essential.
Inspect the weatherstripping along the edges of the door frame to ensure it is properly aligned and provides a tight seal. If there are gaps or areas where the weatherstripping is damaged, it may need to be replaced. Using a weatherstripping adhesive or nails, secure the new weatherstripping in place.
Insulation problems can often be resolved by adding or adjusting insulation material. Check for any areas where insulation may be missing or not properly placed. These gaps can be filled with expanding foam insulation to improve energy efficiency and reduce drafts.
By addressing these common troubleshooting and problem solving scenarios, you can ensure a successful installation of your steel door frame, while also improving the functionality, security, and energy efficiency of your door.
Frequently Asked Questions On How To Install A Steel Door Frame
How Do You Install A Metal Door Frame?
To install a metal door frame, follow these steps: 1. Start by measuring the doorway to ensure proper fit. 2. Next, mark the frame’s placement on the wall and secure it with screws. 3. Attach the door hinges to the frame and hang the door.
4. Finally, check for proper alignment and make any necessary adjustments.
Can You Put A Steel Door On A Wood Frame?
Yes, you can install a steel door on a wood frame. It provides added security and durability. Make sure to properly align the door and frame for a secure fit and consult a professional for installation guidance.
How Much Does It Cost To Install A Steel Frame Door?
The cost of installing a steel frame door varies, but on average, it can range from $500 to $1,500, depending on the size, style, and complexity of the installation project. Factors like additional features, materials, and labor costs can also affect the overall price.
How To Install A Hollow Metal Door Frame In Existing Concrete Wall?
To install a hollow metal door frame in an existing concrete wall, follow these steps: 1. Measure and mark the desired location for the frame. 2. Use a masonry drill to create holes in the concrete wall for the frame anchors.
3. Insert frame anchors into the holes. 4. Align the frame with the anchors and secure it using screws or bolts. 5. Check the frame for level and adjust if needed.
How Do I Measure For A Steel Door Frame?
To measure for a steel door frame, first, measure the width of the existing door opening and then measure the height from the floor to the top of the opening.
What Tools Do I Need To Install A Steel Door Frame?
To install a steel door frame, you will need tools such as a tape measure, level, screwdriver, drill, chisel, and a hammer.
Conclusion
Installing a steel door frame may seem like a daunting task, but with the right tools and a step-by-step approach, you can easily achieve it. Remember to measure accurately and prepare the opening before starting the installation process. Follow the instructions provided by the manufacturer and take your time to ensure a sturdy and secure door frame.
With the right techniques and attention to detail, you’ll have a durable and reliable steel door frame that will enhance the security of your space for years to come. So, don’t hesitate, get started today and enjoy the benefits of a professionally installed steel door frame.