To install a garage door track, first, gather the necessary tools and materials. Then, follow the manufacturer’s instructions to assemble and secure the track to the ceiling and walls, ensuring proper alignment and clearance for the door.
Next, attach the rollers and brackets to the door, and slide the door into the track while making any necessary adjustments. Finally, test the door for smooth operation. The installation process may vary depending on the type of garage door track and manufacturer instructions.
Installing a garage door track is essential for ensuring the smooth and efficient functioning of your garage door. Whether you are replacing an existing track or installing a new one, it is crucial to follow the correct installation process. By carefully assembling and securing the track to the ceiling and walls, attaching the rollers and brackets to the door, and making necessary adjustments, you can ensure the door glides effortlessly along the track. In this guide, we will provide step-by-step instructions on how to install a garage door track, ensuring a safe and functional garage door system for your home.
Tools You Will Need
Before you begin the installation process for your garage door track, there are a few essential tools that you will need to have on hand. These tools will not only make the installation process easier but will also ensure that the end result is secure and functional.
Required tools for the installation process
1. Tape Measure: A tape measure is an indispensable tool for precise measurements. You’ll need it to measure the length and width of your garage door opening and track.
2. Level: A level is necessary to ensure that the garage door track is properly aligned. This will prevent any complications or malfunctions in the future.
3. Drill: A drill will be needed to secure the track to the wall. Make sure you have the appropriate drill bits for your wall material (such as wood or concrete).
4. Screwdriver: A screwdriver will be needed to tighten the screws and bolts that hold the track in place. Consider having both a Phillips and a flathead screwdriver available, as different types of screws may be used.
5. Wrench: A wrench is essential for tightening nuts, bolts, and other fasteners. Ensure you have an adjustable wrench that can accommodate different sizes.
6. Pliers: Pliers will come in handy for gripping and twisting wires, if required during the installation process.
7. Ladder: Depending on the height of your garage, you may need a ladder to safely reach the track installation area. Choose a sturdy ladder that is appropriate for the task.
8. Safety Equipment: Last but not least, make sure you have the necessary safety equipment, such as safety glasses and gloves. These will protect you from any potential hazards during the installation process.
By having these tools ready before you start, you’ll save time and ensure a smooth and successful installation of your garage door track.
Measuring For Track Installation
When it comes to installing a garage door track, one of the crucial steps is measuring the garage door opening and determining the correct length of the track needed. Getting these measurements right ensures a proper fit and smooth operation of the garage door. In this section, we will guide you through the process of measuring your garage door opening and determining the correct length of track required for a successful installation.
Measuring the garage door opening
The first step in installing a garage door track is to accurately measure the dimensions of your garage door opening. This will help you determine the right size of the track you need to install. Follow these step-by-step instructions to measure your garage door opening:
- Using a tape measure, measure the width of the garage door opening from one side to the other. Make sure to measure from the inside of the opening for accuracy.
- Record this measurement as the width of your garage door opening.
- Next, measure the height of the garage door opening from the top to the bottom. Again, measure from the inside of the opening for precise results.
- Take note of this measurement as the height of your garage door opening.
By measuring the width and height of your garage door opening, you have obtained the basic dimensions necessary for selecting the appropriate track length.
Determining the correct length of track needed
Once you have measured the width and height of your garage door opening, it’s time to determine the correct length of track required for installation. The track length is determined by adding the vertical distance from the top of the garage door opening to the ceiling, along with the horizontal distance from the edge of the opening to the wall.
To calculate the correct length of track, follow these steps:
- Measure the distance from the top of the garage door opening to the ceiling. This measurement determines the vertical portion of the track length.
- Measure the distance from the edge of the garage door opening to the nearest wall on both sides. Take the larger of the two measurements and multiply it by two. This gives you the horizontal portion of the track length.
- Add the vertical portion and the horizontal portion together. The result is the total length of track needed for installation.
By accurately measuring the garage door opening and calculating the correct length of track required, you can ensure a snug fit and optimal performance of your garage door. Taking the time to measure carefully will save you potential headaches down the line.
Preparing For Installation
How to Install Garage Door Track
Before you start installing your new garage door track, it’s important to prepare the area and gather all the necessary materials. Proper preparation will ensure a smooth installation process and help you avoid any unnecessary delays or frustration. In this guide, we will walk you through the steps required to prepare for the installation.
Clearing the area around the garage door
The first step in preparing for the installation is to clear the area around your garage door. Remove any obstacles or debris that may impede your work or pose a safety hazard. This includes removing vehicles, tools, and other items that are stored near the garage door. Clearing the area will provide you with the necessary space to work effectively and minimize any potential accidents.
Gathering all necessary materials
Once the area is clear, it’s time to gather all the necessary materials for the installation. Having everything you need at your disposal will save you time and ensure a smooth process. Here’s a list of the essential materials you’ll need:
- Garage door track kit
- Power drill
- Screws and bolts
- Level
- Measuring tape
- Wrench
- Hacksaw
- Safety goggles
Make sure each item on the list is readily available before starting the installation process. Checking off the materials beforehand will help you avoid any unexpected interruptions during the installation.
Note: It’s essential to follow the manufacturer’s instructions carefully when selecting materials, as different garage door track systems may require specific items.
Removing Old Track (If Applicable)
Before installing a new garage door track, it’s important to remove the old track (if one is already installed). This will ensure a smooth and hassle-free installation process. In this section, we will walk you through the steps to remove the old track, ensuring a clean slate for the new track installation.
Steps to remove the old track (if already installed)
- Step 1: Disconnect the garage door opener
- Step 2: Remove the screws
- Step 3: Detach the old track
- Step 4: Remove any remaining hardware
- Step 5: Clean the area
By following these steps, you can easily remove the old track (if applicable) and get one step closer to installing a brand new garage door track. Remember to handle the old track with caution and ensure your safety throughout the process. Now that the old track is removed, let’s move on to the next section to learn about installing the new garage door track!
Installing Vertical Track
When it comes to installing a garage door track, the vertical track plays a crucial role in ensuring smooth and efficient operation of your garage door. In this section, we will guide you on how to properly attach and align the vertical track to the wall, so you can enjoy a hassle-free garage door experience.
Attaching the vertical track to the wall
To begin with, let’s go through the steps involved in attaching the vertical track to the wall:
- First, measure and mark the desired height for the vertical track on both sides of the garage door opening. Ensure that the distance is consistent and level. This will help in providing smooth door movement.
- Next, position the vertical track against the wall at the marked height. Make sure that the track is plumb, using a level to ensure correctness.
- Using a drill, make pilot holes at the marked positions on the wall.
- Secure the vertical track to the wall using appropriate screws or bolts. Ensure that the track is securely fastened, as it will bear the weight and movements of the garage door.
- Repeat the above steps for the other side of the garage door opening, ensuring that the second vertical track is aligned with the first one.
Aligning the track properly
Proper alignment of the vertical track is essential for the smooth operation of your garage door. Follow these steps to achieve optimal alignment:
- Check and adjust the vertical track to ensure it is aligned with the center line of the garage door opening. This will prevent unnecessary friction and ensure balanced movement.
- Inspect the vertical track for any twists or bends that may obstruct the smooth functioning of the garage door. If any issues are found, carefully straighten or replace the track.
- Check the alignment of the track horizontally. It should be parallel to the garage door opening and at a consistent distance from the wall.
- Make sure that the rollers on the garage door fit into the vertical track properly. Adjust the track if needed to ensure a snug fit.
- Repeat the alignment process for the other vertical track, ensuring consistency in both tracks.
By following these steps, you can successfully install and align the vertical track for your garage door. Proper installation and alignment will not only enhance the performance of your garage door but also prolong its lifespan. So, take the time to install your garage door track correctly and enjoy the benefits for years to come.
Installing Horizontal Track
The horizontal track is an essential component of the garage door mechanism. Proper installation of this track is crucial for the smooth operation of the door. In this section, we will guide you through the process of securing the horizontal track to the ceiling and checking for proper alignment.
Securing the horizontal track to the ceiling
Before you begin securing the horizontal track to the ceiling, make sure you have gathered all the required materials such as a ladder, drill, screws, and the track mounting brackets.
- Place the ladder underneath the area where you will be installing the track. Ensure that the ladder is stable and positioned at a safe angle.
- Hold the horizontal track against the ceiling, aligning it with the vertical track on the side of the door. This ensures that the door will move properly along the tracks.
- Using a drill, make pilot holes into the ceiling at regular intervals along the track. These pilot holes will serve as guides for the screws.
- Secure the track mounting brackets to the ceiling by inserting screws into the pilot holes and tightening them. Make sure the brackets are securely fastened to provide proper support for the track.
- Repeat the process for the other side of the door, ensuring that the horizontal track is level and parallel to the ground.
Checking for proper alignment
After securing the horizontal track to the ceiling, it is crucial to check for proper alignment. Misaligned tracks can cause the door to become stuck or operate improperly.
- Close the garage door and observe its movement as you manually open and close it. Pay attention to any unusual sounds or resistance.
- If the door is not moving smoothly, adjust the track brackets by loosening the screws slightly. Gently tap the bracket with a hammer to shift its position, aligning it with the vertical track.
- Repeat this process for both sides of the door, ensuring that the track is aligned properly.
- Once you have made the necessary adjustments, test the door’s operation again to ensure it moves smoothly without any issues.
By following these steps, you will be able to install the horizontal track of your garage door and ensure it is securely attached to the ceiling with proper alignment. Remember to take your time during the installation process and double-check your work to guarantee a hassle-free operation of your garage door.
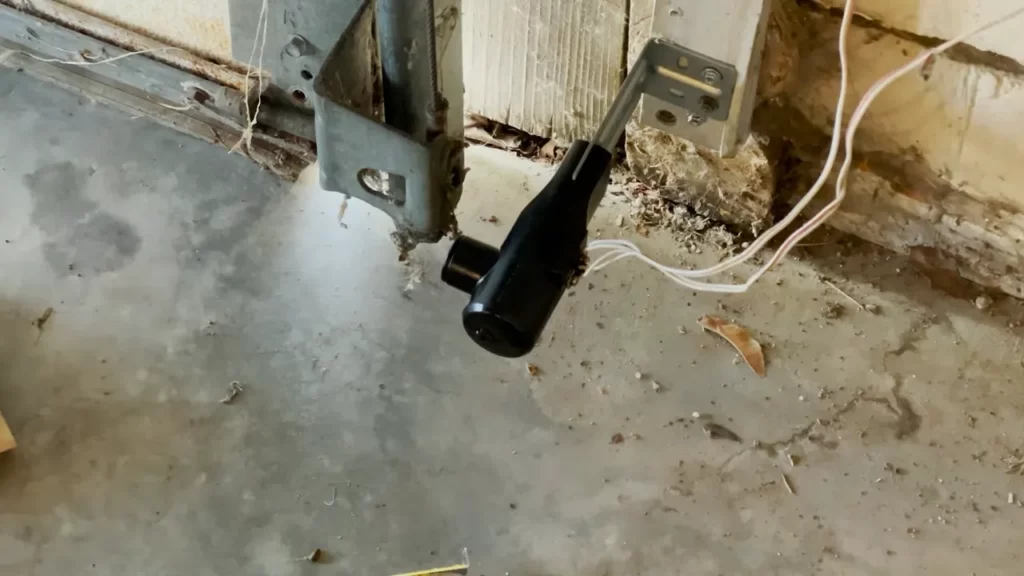
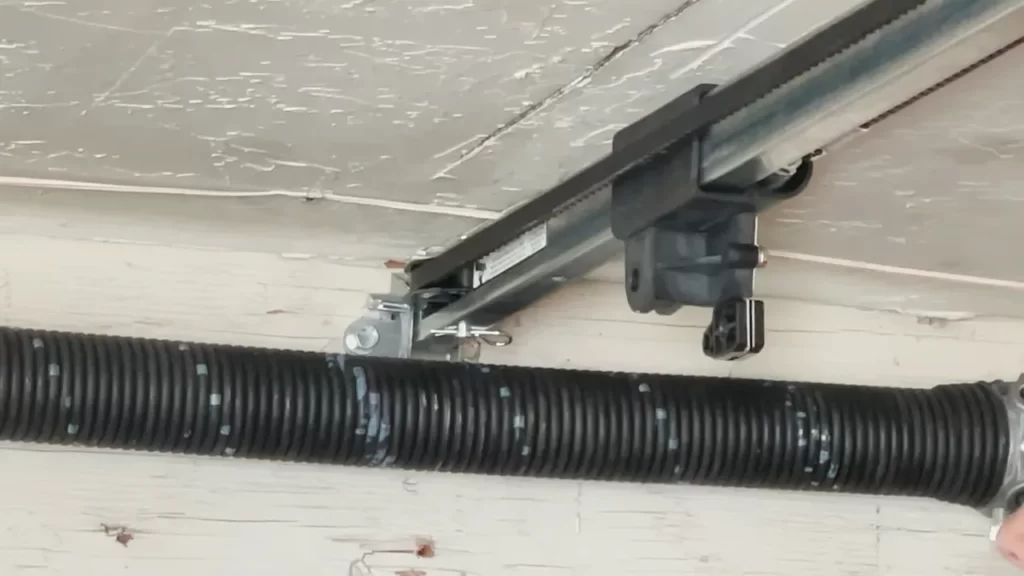
Installing The Rear Track And Connecting Sections
Once you have successfully installed the vertical track on the wall, it’s time to move on to the next step of installing the rear track and connecting the sections. This is a crucial part of the garage door installation process, as it ensures the smooth movement of the door along the track.
Mounting the rear track on the wall
To mount the rear track on the wall, you will need to follow these steps:
- Place the rear track against the wall, aligning it with the vertical track. Make sure the track is level and centered.
- Use a pencil to mark the positions of the mounting holes on the wall.
- Drill pilot holes at the marked positions, ensuring the size of the drill bit matches the size of the mounting screws.
- Hold the rear track against the wall, aligning the mounting holes with the pilot holes.
- Insert the mounting screws through the track and into the pilot holes.
- Tighten the mounting screws using a screwdriver or a drill. Ensure the track is securely mounted on the wall.
By following these steps, you can mount the rear track on the wall, providing the necessary support for the garage door.
Connecting the track sections together
Now that the rear track is securely mounted on the wall, it’s time to connect the track sections together. This allows for the seamless movement of the garage door along the track. Here’s how you can do it:
- Start by aligning the two sections of the track, ensuring they are level and properly aligned.
- Insert the provided bolts into the pre-drilled holes on the track sections.
- Tighten the bolts using a wrench, ensuring they are securely fastened.
- Continue connecting the rest of the track sections in the same manner until all sections are securely connected.
By connecting the track sections in this way, you ensure a smooth and uninterrupted movement of the garage door. It is important to double-check that all the sections are securely connected to avoid any potential mishaps.
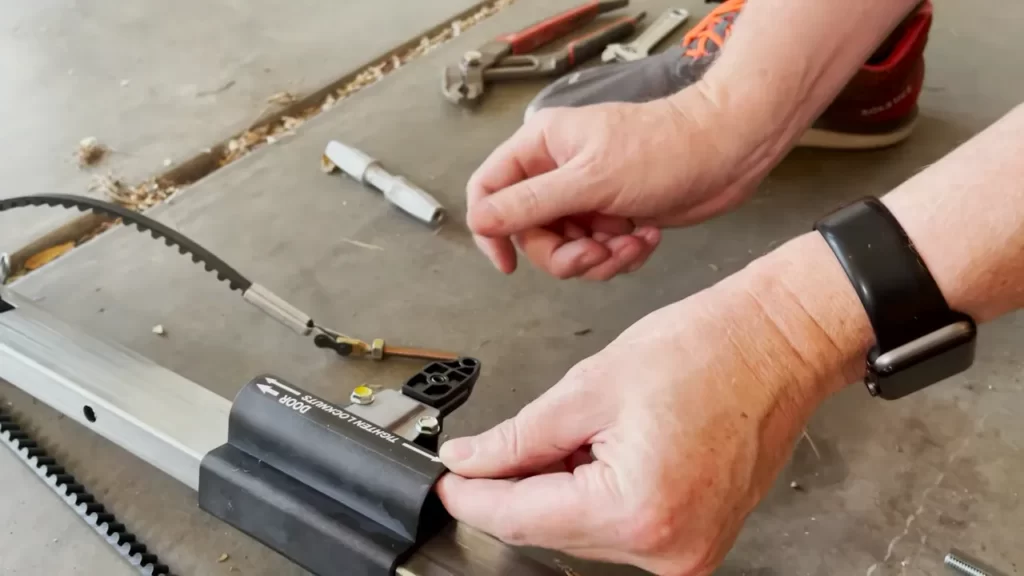
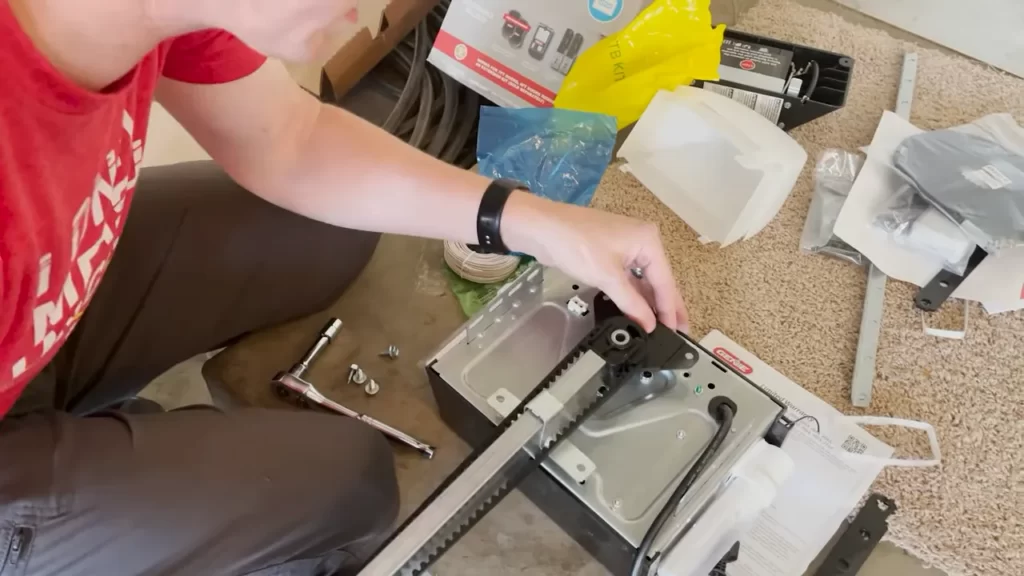
Installing Brackets And Fasteners
Once you have successfully assembled the garage door track sections, the next step in the installation process is to install the brackets and fasteners. Properly positioning the brackets and fastening the track securely are crucial for ensuring the smooth operation of your garage door. In this section, we will walk you through the necessary steps to complete this task with ease and precision.
Properly positioning the brackets
The first step in installing the brackets is to determine their placement along the garage door track. To ensure proper alignment, it is important to position the brackets at the same height on both sides of the door. This will ensure that the track remains level and the door operates smoothly.
A helpful tip is to mark the desired position of the brackets on the wall before attaching them. This will serve as a guide and make installation easier. Alternatively, you can use a level to ensure that the brackets are aligned both vertically and horizontally.
Fastening the track to the brackets securely
Once the brackets are properly positioned, it’s time to secure the track to them. Fastening the track securely is essential to prevent any wobbling or misalignment that could interfere with the door’s functionality. Follow these steps to ensure a secure attachment:
- Starting at one end of the garage door, place the end of the track into the bracket.
- Use a wrench or socket set to tighten the nuts on the brackets, securing the track in place.
- Check for any movement or play in the track once it is attached. If there is any, reposition the bracket and tighten the nuts further.
- Repeat this process for each section of the track, ensuring that each bracket is securely fastened.
By following these steps, you can be confident that the garage door track is properly installed and securely attached to the brackets. This will contribute to the smooth and efficient operation of your garage door, providing you with convenience and peace of mind.
Adjusting Track And Checking Alignment
Ensuring the track is level and aligned correctly is crucial for the smooth operation of a garage door. Misaligned or uneven tracks can cause the door to get stuck, become noisy, or even pose a safety hazard. In this section, we will cover how to check the alignment of the track and make necessary adjustments to ensure optimal performance.
Ensuring the track is level and aligned correctly
The first step in adjusting the garage door track is to check its alignment. Start by visually inspecting the track to see if it is properly aligned with the door and the floor. Look for any gaps, bends, or dents that may affect the door’s movement. It’s important to note that the track should be perpendicular to the floor and parallel to the door. Any deviations from this position will require adjustment.
If the track appears misaligned, you can use a level to confirm its position. Place the level along the length of the track, both vertically and horizontally, to check if it is level and straight. If the level indicates that the track is not aligned correctly, you will need to make the necessary adjustments.
Making necessary adjustments for smooth operation
Adjusting the garage door track can be done by loosening the mounting brackets that hold the track in place. Use a wrench or a socket set to loosen the bolts or screws securing the brackets to the wall or ceiling. Once the brackets are loose, you can carefully reposition the track to the correct alignment. Make sure to not overtighten the bolts or screws when securing the brackets after adjustment.
It’s essential to maintain an equal and consistent gap between the track and the door on both sides. Use a tape measure to ensure the distance is the same, measuring from the inside edge of the track to the nearest edge of the door. This step is vital as an uneven gap can cause the door to bind or operate less smoothly.
Additionally, inspect the rollers and check if they are properly aligned with the track. Misaligned rollers can cause the door to operate unevenly or become stuck. If needed, adjust the roller brackets to align them correctly with the track.
Finally, after making the necessary adjustments, test the door’s operation. Open and close the door several times to ensure it moves smoothly along the track without any obstructions or noise. If the door still encounters issues, you may need to consult a professional for further assistance.
By following these steps, you can adjust the garage door track and ensure its alignment for a smooth, safe, and efficient operation.
Installing Rollers
Installing Rollers on the Track
Now that you have successfully installed the garage door track, it’s time to move on to the next crucial step: installing the rollers. The rollers play a vital role in ensuring smooth and efficient movement of your garage door. In this section, we will guide you through the process of installing the rollers on the track.
To begin with, ensure that you have all the necessary tools handy, including a pair of pliers, a screwdriver, and the rollers themselves. Now, carefully place the rollers into the track, ensuring that they are aligned properly. It’s important to note that the rollers should fit snugly into the track and move freely without any obstructions.
Here’s a step-by-step guide to installing rollers on the track:
- Step 1: Start by placing the bottom roller into the track. Use your pliers to loosen the adjustment screw and adjust the roller’s height. Once you have achieved the desired height, tighten the adjustment screw to secure the roller in place.
- Step 2: Move on to the next roller, which is typically located above the bottom roller. Insert the roller into the track and adjust its height using the same process as in step 1. Repeat this step for all the remaining rollers.
- Step 3: Once you have installed all the rollers, give the track a gentle shake to ensure that the rollers are securely in place. If you notice any loose or misaligned rollers, adjust them using the pliers until they are properly aligned and secure.
By following these steps, you can ensure that the rollers are properly installed on the garage door track. It’s essential to pay close attention to detail to avoid any future issues with the garage door’s movement.
Testing the Movement of the Garage Door
After installing the rollers, it’s crucial to test the movement of your garage door to ensure everything is functioning correctly. Open and close the garage door multiple times to observe its smoothness and check for any unusual noises or resistance. If you notice any issues, such as sticking or uneven movement, inspect the rollers and track for debris or damage that may be causing the problem.
Maintaining a well-functioning garage door track and rollers is essential for the longevity and efficient performance of your garage door. Regularly inspect them for any signs of wear and tear, replace any damaged rollers promptly, and lubricate the track to minimize friction and ensure smooth movement. By following proper maintenance practices, you can extend the lifespan of your garage door and avoid any inconveniences or costly repairs.
Installing Door Stops And Bottom Seal
Attaching Door Stops to Prevent Overshooting
One of the important steps in installing a garage door track is attaching door stops. Door stops are essential to prevent the garage door from overshooting, ensuring that it opens and closes smoothly without causing any damage. To install door stops, follow these simple steps:
- Start by positioning the door stops at the desired locations on either side of the garage opening. Make sure they are aligned with the vertical tracks.
- Using a power drill, secure the door stops to the vertical tracks with the provided screws. Ensure they are firmly attached to provide proper support to the garage door.
- Once the door stops are securely in place, carefully close the garage door and check if it aligns with the stops. Adjust the position of the stops if necessary to ensure a perfect fit.
By attaching door stops correctly, you can prevent your garage door from overshooting, protecting it from potential damage and increasing its longevity.
Installing a Bottom Seal for Weatherproofing
Another crucial step in installing a garage door track is installing a bottom seal for weatherproofing. A bottom seal helps keep out moisture, dirt, and pests, ensuring a well-protected garage space. Follow these steps to install a bottom seal:
- Measure the width of your garage door opening and cut the bottom seal to the appropriate length. A utility knife or a pair of scissors can easily do the job.
- Clean the bottom edge of the garage door to remove any dirt or debris. This will ensure proper adhesion of the bottom seal.
- Apply a bead of sealant along the bottom edge of the garage door. This will act as an adhesive to hold the bottom seal in place. Make sure the sealant is evenly spread.
- Align the bottom seal with the edge of the garage door and press it firmly onto the sealant, ensuring it is centered and straight.
- Secure the bottom seal to the garage door by using nails or screws at regular intervals. This will ensure that it stays in place and provides effective weatherproofing.
Installing a bottom seal not only helps in keeping the elements out of your garage but also enhances energy efficiency, preventing drafts and reducing energy costs.
Lubricating Track And Moving Parts
Lubricating Track and Moving Parts
Proper lubrication of the garage door track and moving parts is crucial to ensure smooth and efficient operation of your garage door. Over time, the track and rollers can become dirty and worn, causing unnecessary friction and potentially leading to significant damage. By applying lubricant to the track and rollers regularly, you can extend the lifespan of your garage door and prevent costly repairs. In this section, we will explore the importance of lubrication and provide step-by-step instructions on how to lubricate the track and moving parts of your garage door.
Applying lubricant to the track and rollers
When it comes to lubricating the garage door track and rollers, it’s important to use the right lubricant and apply it correctly. Here are the steps to follow:
- Clean the track: Before applying any lubricant, ensure that the track is clean and free from debris. Use a cloth or brush to remove dirt, dust, and any other obstructions that might hinder the movement of the door.
- Choose the right lubricant: It is essential to select a lubricant specifically designed for garage door track and rollers. Avoid using WD-40 or other general-purpose lubricants, as they can attract dirt and cause buildup over time. Instead, opt for a silicone-based or lithium-based lubricant, which is less likely to accumulate grime.
- Apply the lubricant: Starting at the top of the track, apply a thin, even coat of lubricant along the entire length of the track. Be sure to lubricate both the inside and outside edges of the track to ensure complete coverage. Additionally, you should also apply lubricant to the rollers, hinges, and springs. Applying the lubricant directly to the rollers can be done by using a spray or applying a few drops of lubricant to each roller.
- Wipe off excess lubricant: After applying the lubricant, use a clean cloth to wipe off any excess. Excessive lubricant can drip onto the floor or stick to the track, attracting dirt and debris.
Maintaining smooth operation of the garage door
Lubricating the track and moving parts is just one aspect of maintaining smooth operation of your garage door. To ensure the optimal performance of your garage door, consider the following:
- Regular cleaning: In addition to lubricating, it is important to regularly clean the track and moving parts. Clean any accumulated dirt or debris that may cause friction or hinder smooth movement.
- Inspection: Periodically inspect the track, rollers, hinges, and springs for signs of wear or damage. If you notice any issues, such as bent tracks, worn rollers, or loose hinges, address them promptly to prevent further damage and ensure safe operation.
- Tighten loose hardware: Over time, the hardware securing the track and other components may become loose. Check and tighten any loose screws or bolts to keep the door secure and eliminate unnecessary rattling or movements.
By following these simple maintenance steps, you can extend the lifespan of your garage door and enjoy smooth, reliable operation for years to come.
Safety Considerations
When it comes to installing a garage door track, safety should be your top priority. It is essential to take the necessary precautions to avoid any accidents or injuries during the installation process. In this section, we will discuss some important safety measures that you should keep in mind.
Important safety precautions to keep in mind during installation
Installing a garage door track requires careful attention to detail and adherence to safety guidelines. Here are some key safety precautions you should follow:
- Use protective gear: Before starting the installation, make sure to wear the appropriate protective gear. This includes safety goggles, gloves, and a hard hat to protect yourself from any potential hazards.
- Disconnect the power: Before working on the garage door track, ensure that the power is disconnected to avoid any accidental electric shocks. This can be done by turning off the circuit breaker or unplugging the garage door opener.
- Secure the door: To prevent the door from accidentally falling during the installation, secure it in place using clamps or locking mechanisms. This will help create a stable and safe working environment.
- Work with a partner: Installing a garage door track can be a two-person job. Having a partner to assist you not only makes the installation process easier but also enhances safety. They can help support the track while you secure it in place.
- Follow the instructions: It is crucial to carefully read and understand the manufacturer’s instructions before starting the installation. This will ensure that you follow the correct steps and use the recommended tools and materials.
By adhering to these safety precautions, you can significantly minimize the risk of accidents or injuries during the installation process. Remember, prioritizing safety is essential for a successful and trouble-free garage door track installation.
Common Troubleshooting Tips
When it comes to installing a garage door track, it’s important to be prepared for any potential issues that may arise. In this section, we will discuss some common troubleshooting tips to help you overcome these challenges and ensure a successful installation.
Solutions for common issues encountered during installation
During the installation process, you may encounter a few common issues that can be easily resolved with the right solutions. Here are some tips to help you tackle these problems:
1. Misalignment of track
If you notice that the track is not properly aligned, it’s crucial to address this issue right away. Misalignment can cause the door to operate inefficiently or even become stuck. To rectify this problem, follow these steps:
- Use a level to check the alignment of the track.
- If the track is not level, loosen the screws holding it in place.
- Carefully adjust the track until it is aligned correctly.
- Tighten the screws to secure the track in its new position.
2. Insufficient lubrication
Lack of lubrication can lead to friction, causing the door to operate noisily or get stuck. To ensure smooth operation, make sure to lubricate the track properly by following these steps:
- Clean the track thoroughly to remove any debris or dirt.
- Apply a generous amount of lubricant to the entire length of the track.
- Use a clean cloth to spread the lubricant evenly.
- Operate the door a few times to distribute the lubricant along the track.
3. Loose or damaged hardware
If you notice any loose or damaged hardware during installation, it’s important to address it promptly to avoid further problems. Follow these steps to resolve this issue:
- Tighten any loose screws or bolts using the appropriate tools.
- If any hardware is damaged beyond repair, replace it with new ones.
- Ensure that all hardware is securely fastened to prevent any future issues.
By following these troubleshooting tips, you can overcome common installation issues and ensure that your garage door track is properly installed and functions smoothly.
Frequently Asked Questions Of How To Install Garage Door Track
How Do You Install A Horizontal Garage Door Track?
To install a horizontal garage door track, follow these steps: 1. Measure and mark where the track will be installed. 2. Attach the brackets to the wall and ensure they are level. 3. Attach the track to the brackets using screws or bolts.
4. Install the rollers on the track. 5. Test the door to ensure it operates smoothly.
Can I Install New Garage Door On Old Tracks?
Yes, it is possible to install a new garage door on old tracks. However, it is important to assess the condition of the tracks to ensure they are in good shape and compatible with the new door. Professional installation may be needed to ensure proper fit and functionality.
How Long Does It Take To Install Garage Door Track?
It typically takes a few hours to install a garage door track. The exact time may vary depending on the complexity of the installation and any additional repairs or adjustments required. A professional technician can complete the task efficiently and ensure proper functioning.
Can I Install My Own Garage Door?
Yes, you can install your own garage door if you have the necessary skills and tools. It is important to follow the manufacturer’s instructions, ensure the door is properly balanced, and prioritize your safety. If you’re unsure, it’s recommended to hire a professional for installation to avoid any potential risks or damage.
How Do I Install A Garage Door Track?
To install a garage door track, start by measuring and marking the placement, then attach the brackets securely and align the track with the markings. Finally, secure the track with screws.
What Tools Do I Need To Install A Garage Door Track?
To install a garage door track, you will need a tape measure, level, drill, screwdriver, wrench, and a ladder.
Conclusion
Installing a garage door track is a crucial task that you can easily accomplish by following the step-by-step guide provided in this blog post. By ensuring that you have the necessary tools and knowledge, you can complete the installation process smoothly.
Remember to prioritize safety and take your time to ensure a secure and efficient track installation. With these guidelines, you’ll be able to enjoy a functioning and reliable garage door track in no time.