nstall a cat door in an exterior door by following these steps: measure and mark the door, outline the door’s shape, cut the opening, insert the cat door, and secure it in place. Installing a cat door in your exterior door is a convenient way to give your feline friend easy access to the outdoors.
Whether you have a patio, a backyard, or simply want to provide your cat with the freedom to come and go as they please, a cat door can be a great solution. In this guide, we’ll take you through the step-by-step process of installing a cat door in an exterior door, ensuring that you and your furry friend can enjoy the benefits of a cat door in no time.
Choosing The Right Cat Door For Your Exterior Door
Installing a cat door in your exterior door is a great way to give your feline friend the freedom to come and go as they please. However, with so many options available, it’s important to choose the right cat door that meets both your cat’s needs and your security concerns. In this article, we will discuss the key factors to consider when selecting a cat door for your exterior door.
Consider the Size and Breed of Your Cat
The first step in choosing the right cat door is to consider the size and breed of your furry friend. Cats come in various sizes, so it’s important to select a cat door that is suitable for your cat’s dimensions. If you have a large cat, such as a Maine Coon or a Norwegian Forest cat, you’ll need to ensure that the cat door is wide and tall enough to accommodate their size. On the other hand, if you have a small or medium-sized cat, you may opt for a standard-sized cat door.
Measure the Exterior Door Thickness
Before purchasing a cat door, it’s crucial to measure the thickness of your exterior door. This measurement will help you find a cat door that fits securely without any gaps. Use a tape measure to determine the thickness of the door and choose a cat door that is compatible with this measurement. Some cat doors are designed to fit a range of door thicknesses, while others may require additional adaptors or extensions.
Assess the Security Features of the Cat Door
When it comes to installing a cat door in an exterior door, security is of utmost importance. You want to ensure that the cat door has built-in security features to prevent unwanted intruders from entering your home. Look for cat doors that have locking mechanisms, such as a slide-on panel or a magnetic collar key system. These features will allow you to control your cat’s access and provide added security when you’re not at home.
Determine the Location on the Exterior Door
The final consideration when choosing a cat door is determining the location on the exterior door. Take into account the traffic flow in your home and choose a spot that provides easy access for your cat. Avoid installing the cat door near any potential hazards or obstructions, such as stairs or electrical outlets. It’s also important to ensure that the chosen location does not compromise the integrity of the door or interfere with its functionality.
By keeping these factors in mind, you can select the perfect cat door that suits your cat’s needs while maintaining the security and convenience of your home.
Gathering The Necessary Tools
To install a cat door in an exterior door, you will need a few tools to ensure a smooth and efficient installation process. Gathering these necessary tools before you begin will save you time and frustration. Here are the tools you will need for this project:
Screwdriver
A screwdriver is an essential tool for installing a cat door. It allows you to loosen and tighten screws, ensuring a secure attachment of the cat door to the exterior door. Make sure to use a screwdriver that matches the type of screws provided with the cat door kit.
Jigsaw
A jigsaw is a versatile tool that allows you to cut precise openings in the exterior door for the cat door. This tool is crucial in ensuring that the cat door fits properly and functions as intended. Select a jigsaw with a fine-toothed woodcutting blade for this task.
Measuring Tape
Accurate measurements are crucial when installing a cat door. A measuring tape will help you determine the ideal placement for the cat door on the exterior door. Measure the height and width of your cat to ensure that the door is set at the right height, allowing your furry friend easy access.
Pencil
A pencil is a simple but essential tool for marking the cutting area on the exterior door. Use it to draw precise lines and outlines, ensuring that you make clean and accurate cuts for the cat door. A pencil mark can easily be erased, allowing you to make adjustments if needed. To summarize, the tools you will need for installing a cat door in an exterior door include a screwdriver for attaching screws, a jigsaw for cutting precise openings, a measuring tape for accurate measurements, and a pencil for marking cutting areas. Having these tools readily available will set you off on the right foot for a successful cat door installation. Remember, it’s important to take your time and follow the instructions provided with the cat door kit to ensure a safe and secure entryway for your feline friend.
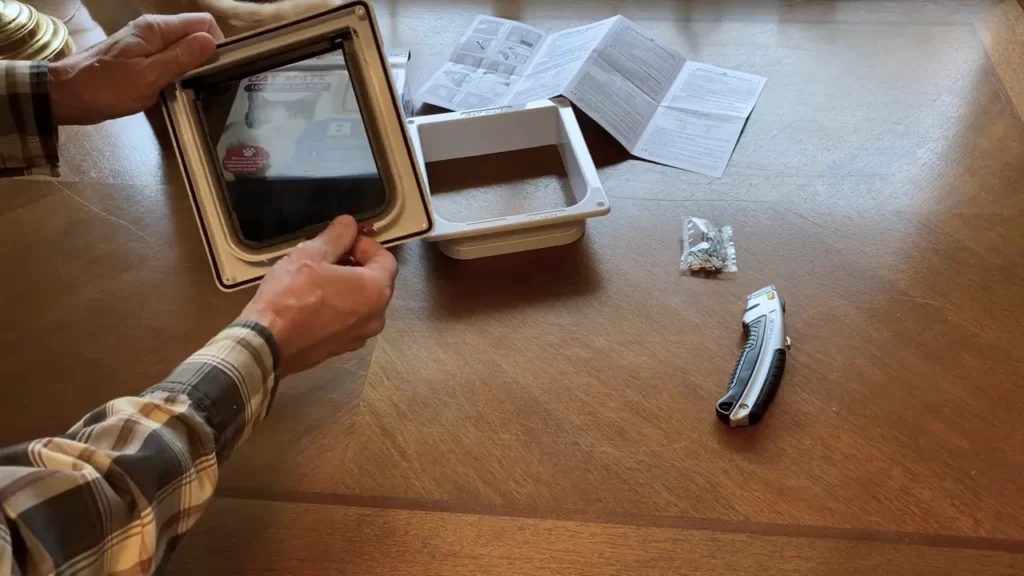
Gathering The Required Materials
Gathering the Required Materials:
Cat Door Kit
To install a cat door in an exterior door, you will first need to gather the necessary materials. One of the most important items is a cat door kit. This kit typically includes all the components needed for a successful installation, such as a door template, frame, and flap. Make sure to choose a kit that is suitable for your cat’s size and the thickness of your exterior door.
Exterior Door Reinforcement Plate (If Needed)
In some cases, an exterior door may require additional reinforcement to support the weight of the cat door. If your door is hollow or weak, it is recommended to use an exterior door reinforcement plate. This plate helps distribute the weight of the cat door and prevents damage to the door over time. Check the manufacturer’s instructions or consult a professional to determine if you need a reinforcement plate.
Screws and Anchors
Another crucial component for installing a cat door is the screws and anchors. These fasteners will secure the cat door frame to the exterior door. It is essential to use screws and anchors that are appropriate for the material of your door, whether it is wood, metal, or fiberglass. Choose screws and anchors that are strong and durable to ensure the cat door remains securely in place.
Sealant or Caulking
Lastly, you will need sealant or caulking to create a watertight and airtight seal around the cat door frame. This helps prevent drafts, water leaks, and unwanted pests from entering your home. Choose a high-quality sealant or caulking that is suitable for outdoor use and compatible with the material of your exterior door. Applying a generous amount around the edges of the cat door frame will provide added insulation and security.
Removing The Exterior Door
When it comes to installing a cat door in an exterior door, the first step is removing the existing door. This process may seem a bit daunting, but with the right tools and a little patience, you can easily accomplish this task.
Disconnecting the Door from the Hinges
The first thing you need to do is disconnect the door from the hinges. This will allow you to effectively remove the door and work on it more easily. To do this, follow these steps:
- Start by opening the door to a 90-degree angle to provide better access to the hinges.
- Use a screwdriver or a drill with the appropriate bit to remove the screws from the top and bottom hinges. Make sure to support the door properly to prevent it from falling.
- Once the screws are removed, carefully detach the door from the hinges and place it aside.
By following these simple steps, you’ll be able to disconnect the door from the hinges without any issues.
Laying the Door Flat on a Stable Surface
Now that the door is disconnected, the next step is to lay it flat on a stable surface. This will provide a proper work area and make it easier to remove the hardware. Follow these steps:
- Find a clean and sturdy area where you can place the door. A workbench or sawhorses can be ideal for this purpose.
- Ensure that the surface is stable and level to prevent any unnecessary movement or damage to the door. If needed, use shims or adjust the surface until it is secure.
- Gently lay the door flat on the stable surface, making sure it is centered and supported evenly on all sides.
Laying the door flat on a stable surface will make it easier for you to work on it and proceed with the installation of the cat door.
Removing the Hardware (Doorknob, Deadbolt, etc.)
With the door properly positioned on a stable surface, the next step is to remove the hardware. This includes the doorknob, deadbolt, and any other components that might be in the way. Follow these steps to effectively remove the hardware:
- Inspect the door for any screws or fasteners securing the hardware components. Depending on the type of door and hardware, these may be visible or hidden behind covers or plates.
- Using a screwdriver or appropriate tool, carefully remove the screws or fasteners that hold the hardware in place. Keep them organized and set them aside for reinstallation later.
- Once all the screws or fasteners are removed, gently detach the hardware from the door, ensuring not to damage the door or surrounding areas.
By following these steps, you will be able to remove the hardware without any complications and make way for the cat door installation.
Measuring And Marking The Cat Door Placement
Installing a cat door in an exterior door can provide your furry friend with the freedom to roam in and out as they please. Before you can start the installation process, you need to accurately measure and mark the placement of the cat door. This step is crucial to ensure that the cat door is at the right height and properly aligned with the door. In this section, we will guide you through the process of finding the ideal height for the cat door and marking the outline of the cat door template.
Finding the Ideal Height for the Cat Door
When it comes to determining the ideal height for your cat door, it’s important to consider the comfort and convenience of your furry companion. A cat door that is placed too high may require your cat to jump or stretch excessively, while a cat door that is too low may not provide enough clearance. To find the perfect height, consider the size of your cat and observe their natural movements.
| Small Cats | Medium Cats | Large Cats |
|---|---|---|
| 6-8 inches from the floor | 8-10 inches from the floor | 10-12 inches from the floor |
These height recommendations are general guidelines, so feel free to adjust them according to your cat’s specific needs. Once you’ve determined the ideal height, it’s time to mark the outline of the cat door template.
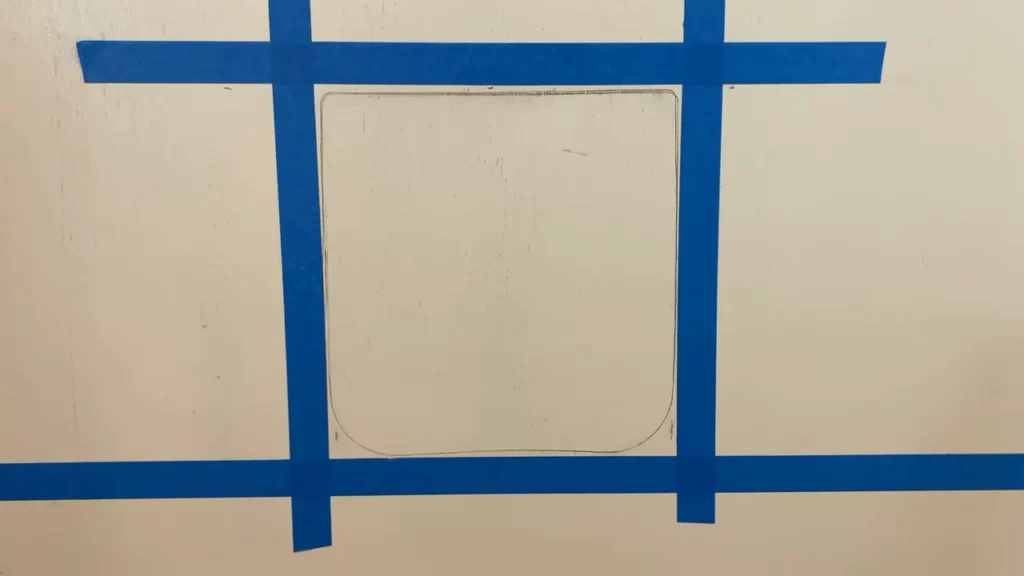
Marking the Outline of the Cat Door Template
Now that you have the ideal height for your cat door, it’s time to mark the outline of the cat door template on your exterior door. Follow these steps to ensure precise placement:
- Using a measuring tape, measure the width and height of the cat door template.
- Position the template at the desired height and align it with the edge of the door.
- Using a pencil, trace the outline of the template onto the door.
Make sure to double-check the alignment and measurements before proceeding. It’s also a good idea to mark the centerline of the cat door template for reference later on. Once you’re satisfied with the markings, you’re ready to move on to the next step of the installation process.
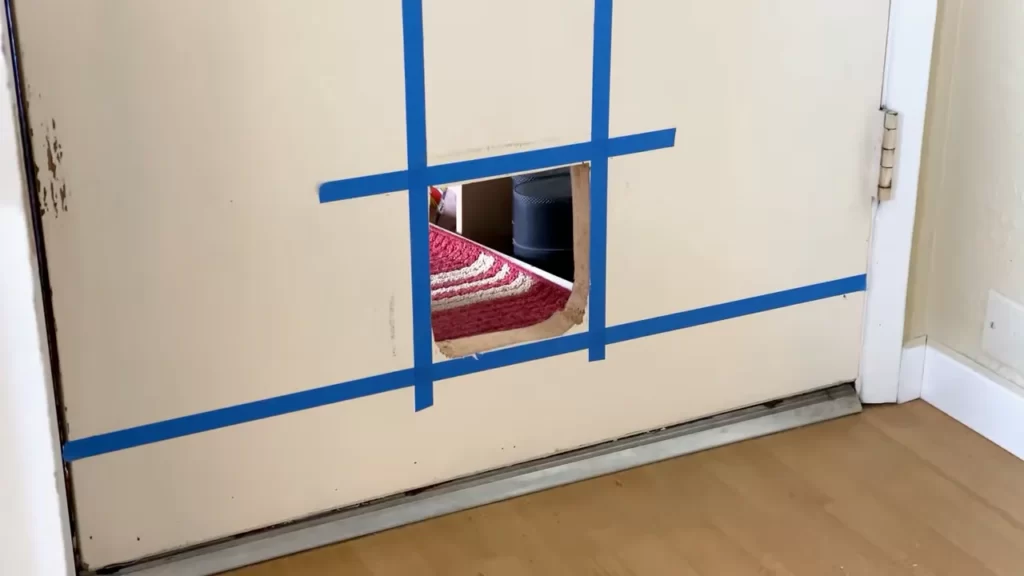
Cutting Out The Cat Door Opening
Drilling Starter Holes in the Corners
When it comes to installing a cat door in an exterior door, the first step is to cut out the cat door opening. This process can be done easily with some basic tools and a little bit of patience. To begin, you will need to mark the area where the cat door will be installed. Use a tape measure to measure the height and width of your cat door, and mark these measurements on the exterior door with a pencil. This will serve as a guide for cutting out the opening. Once you have marked the area, the next step is to drill starter holes in the corners. These starter holes will allow you to insert the jigsaw blade and begin cutting along the marked template. To drill the starter holes, you will need a drill and a drill bit that is slightly larger than the jigsaw blade you will be using. Place the drill bit in one of the corners of the marked template and drill a hole through the door. Repeat this process in the remaining three corners of the template.
Using a Jigsaw to Cut Along the Marked Template
With the starter holes drilled, it’s time to use a jigsaw to cut along the marked template. A jigsaw is a versatile power tool that is perfect for this type of job. It allows for precise and controlled cutting, making it an ideal tool for creating a clean and accurate cat door opening. To use the jigsaw, place the blade in one of the starter holes and turn the tool on. Slowly guide the jigsaw along the marked template, following the pencil lines that you have drawn on the door. Make sure to keep a steady hand and move at a consistent pace to ensure a smooth and even cut. Note: While using the jigsaw, it’s essential to wear safety goggles to protect your eyes from any flying debris. Additionally, make sure to keep your hands away from the blade at all times to avoid any accidents. Continue cutting along the marked template until you have completed the cat door opening. Take your time and double-check your work to ensure that the opening is the correct size and shape. Once you are satisfied with the cut, use sandpaper to smooth any rough edges and remove any splinters. Now that you have successfully cut out the cat door opening, you are one step closer to providing your furry friend with easy access to the outdoors. In the next section, we will discuss how to properly install the cat door into the opening you have created. Stay tuned!
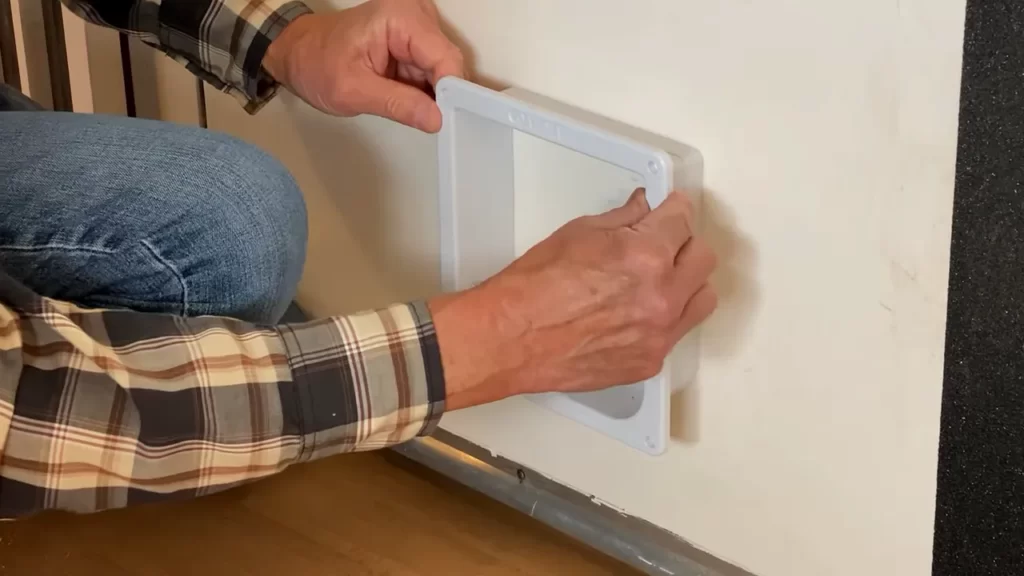
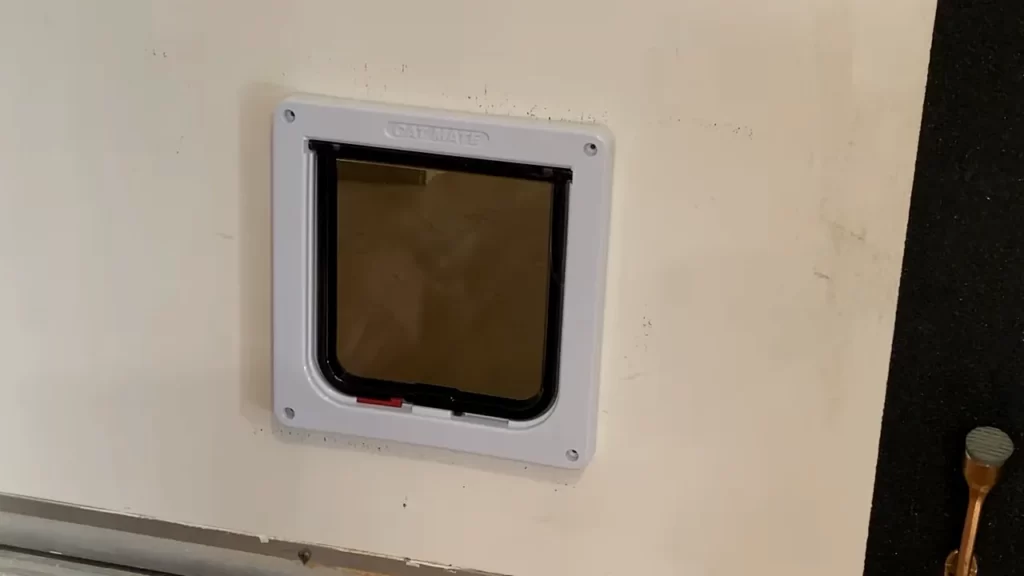
Installing The Cat Door Frame
Securing the Frame Components Together
Before you can begin installing the cat door frame, you need to secure all the frame components together. This includes attaching the side panels to the top and bottom panels using the screws provided in the installation kit. Make sure that the frame is securely fastened, as this will ensure a solid and stable structure for your cat door.
Placing the Frame in the Cut Opening
Once the frame components are secured together, you can now place the frame in the cut opening on your exterior door. Take measurements to ensure that the frame fits snugly and make any necessary adjustments before proceeding. It’s important to double-check the alignment and levelness of the frame to ensure proper functionality of the cat door.
Attaching the Frame to the Exterior Door
With the frame in position, it’s time to attach it to the exterior door. Use the screws provided in the installation kit to secure the frame in place. Place the screws through the pre-drilled holes in the frame and into the door, making sure to tighten them sufficiently. This will ensure that the frame is securely attached and will prevent any shifting or movement once the cat door is in use.
Attaching The Cat Door Flap
Once you have successfully installed the cat door frame into your exterior door, it is time to attach the cat door flap. This step is crucial as it will allow your furry friend to easily enter and exit the house without any hassle. Follow these simple instructions to securely attach the cat door flap to the frame.
Inserting the Flap into the Frame
The first step in attaching the cat door flap is to insert it into the frame. Ensure that the flap is in the correct position and aligns properly with the frame. Take note of the orientation of the flap, as some models may have specific instructions regarding which way the flap should face. Once you have determined the correct orientation, gently push the flap into the opening of the frame until it fits snugly.
Securing the Flap with Screws
Next, you will need to secure the cat door flap with screws. This will prevent any accidental dislodging or unauthorized access. Begin by locating the screw holes on the cat door frame. These holes are usually pre-drilled and readily visible. Take note of the number of holes and the suggested screw size provided by the manufacturer, as this will ensure a secure attachment.
Once you have identified the screw holes, use the appropriate size of screws to attach the flap to the frame. Position the screws in the holes and tighten them using a screwdriver or a suitable tool. Be sure not to overtighten the screws, as this may damage the frame or compromise the functionality of the cat door.
After securing the flap with screws, gently test the door to ensure it opens and closes smoothly. Your cat should be able to push through the door without any difficulty.
That’s it! You have successfully attached the cat door flap to the frame. Now, sit back and watch as your furry friend enjoys the freedom of coming in and out whenever they please. Installing a cat door can greatly enhance your cat’s quality of life and provide them with the independence they crave.
Reinstalling The Exterior Door
Once you have successfully installed the cat door in your exterior door, it’s time to reinstall the door itself. This step is crucial to ensure the door functions properly and provides security for your home. Follow the steps below to reinstall the exterior door:
Reinforcing the Door and Frame (If Necessary)
Before rehanging the exterior door, it’s important to check if any reinforcement is needed for the door and the frame. Over time, the door may have become loose or the frame may have shifted, resulting in poor sealing or difficulty in locking. If such issues are present, reinforce the door and frame using the following steps:
- Inspect the door frame for any visible damage or looseness. If you notice any, use wood filler or epoxy putty to repair it.
- Check the hinges for any loose screws. Tighten them as necessary or replace them if they are damaged.
- If the door doesn’t close properly, you may need to adjust the strike plate. Loosen the screws holding the plate in place, reposition it slightly, and tighten the screws again. Ensure that the latch bolt aligns with the strike plate.
- If you find that your weather stripping is worn or damaged, replace it to maintain proper insulation and energy efficiency.
Reattaching the Hardware (Doorknob, Deadbolt, etc.)
Once you have reinforced the door and frame, it’s time to reattach the hardware. Make sure to have the following tools ready: a screwdriver, a drill, and the necessary screws.
- Begin by attaching the doorknob to the door. Line up the spindle with the latch assembly and insert it through the hole. Secure it in place using the mounting screws provided with the doorknob.
- Next, install the deadbolt lock. Position the lock in the desired location and mark the screw holes. Use a drill to create pilot holes, then attach the lock using the provided screws.
- Ensure both the doorknob and deadbolt operate smoothly. Test them to make sure they lock and unlock without any issues.
Rehanging the Exterior Door
After reinforcing the door and reattaching the hardware, it’s time to rehang the exterior door. Enlist the help of a friend or family member for this step, as the door may be heavy.
- Place the exterior door back into the frame, making sure it is aligned and level.
- Check the gaps around the door to ensure they are even. If needed, use shims to adjust the positioning.
- With the help of your assistant, insert the hinge pins back into the hinges, securing the door to the frame.
- Test the door by opening and closing it to ensure it operates smoothly and seals properly.
Congratulations! You have now successfully reinstalled your exterior door, ensuring security and functionality. Take a moment to admire your handiwork and enjoy the convenience of your newly installed cat door!
Checking For Proper Functionality
Once you have successfully installed the cat door in your exterior door, it is crucial to ensure that it functions properly. This involves testing the flap opening and closing as well as evaluating the security of the door. By conducting these checks, you can ensure the safety and convenience of your furry friend. Let’s dive into each of these aspects in detail.
Testing the Flap Opening and Closing
One of the most important aspects of a cat door is its ability to open and close smoothly. After installation, take a moment to test the flap’s functionality. Gently push the flap inward and observe if it swings back into place. The ideal cat door should have a flap that moves effortlessly, allowing your cat to enter and exit without any resistance. If you find that the flap is not opening or closing properly, there are a few troubleshooting steps you can take. First, check if there is any debris or obstructions in the flap’s pathway. Remove any dirt, hair, or objects that may be hindering its movement. Additionally, ensure that the proper magnets or closure mechanisms are installed correctly, providing enough force to keep the flap closed securely.
Evaluating the Security of the Door
Aside from functionality, it is crucial to evaluate the security of the door once the cat door is installed. As much as we want our feline friends to have the freedom to come and go as they please, it’s essential to maintain the safety of our homes. Firstly, check if there are any gaps or spaces between the cat door and the exterior door. This could potentially create a weak point in your home’s security, allowing unwanted pests or intruders to enter. If you find any gaps, consider adding weatherstripping or using silicone caulk to seal them. This will help ensure that the door remains secure against outside elements. Additionally, inspect the door for any signs of damage or weakness that may compromise its integrity. Look for cracks, rotting wood, or loose hinges. If any issues are discovered, it’s essential to address them promptly to maintain the security of your home. By thoroughly testing the flap opening and closing and evaluating the security of the door, you can ensure that your cat door is functioning optimally. This will provide your furry friend with the freedom to explore their surroundings safely and give you peace of mind knowing that your home remains secure.
Adding Sealant For Weatherproofing
When installing a cat door in an exterior door, it’s important to take steps to ensure that it is properly sealed and weatherproofed. This will help to protect your home from drafts, moisture, and other outdoor elements. One crucial step in achieving a secure and weatherproof installation is to apply a high-quality sealant around the cat door frame. This will help to create a barrier against water and air infiltration, keeping your home safe from any potential damage.
Applying Sealant around the Cat Door Frame
Once you have completed the installation of the cat door into your exterior door, it’s time to apply the sealant. This step is essential for preventing any leaks or drafts from coming through the gaps around the frame.
To apply the sealant, follow these simple steps:
- Clean the surface: Before applying the sealant, make sure that the area around the cat door frame is clean and free from any dust or debris.
- Choose the right sealant: Select a high-quality, weather-resistant sealant that is suitable for outdoor use. Silicone or polyurethane sealants are often recommended for this purpose.
- Load the sealant gun: Load the sealant into a sealant gun, following the manufacturer’s instructions.
- Apply the sealant: Start by applying a bead of sealant along the gap between the cat door frame and the exterior door, making sure to cover any visible openings. Use a smooth and steady motion to ensure an even application.
- Smooth the sealant: After applying the sealant, you can use a caulk smoothing tool or your finger dipped in soapy water to smooth out the sealant and create a neat finish. This will also help to ensure a tight seal.
- Allow the sealant to dry: Give the sealant enough time to dry according to the manufacturer’s instructions. This will help to ensure that it properly sets and provides maximum weatherproofing.
Ensuring a Secure and Waterproof Installation
In addition to applying sealant around the cat door frame, there are a few other steps you can take to ensure a secure and waterproof installation:
- Check the door for any gaps or cracks: Before installing the cat door, inspect the exterior door for any existing gaps or cracks. Fill them with weatherstripping or caulk to prevent any drafts or water from entering.
- Properly secure the cat door: Follow the manufacturer’s instructions to securely fasten the cat door to the exterior door. Use the provided screws and ensure that they are tightened enough to hold the door in place without compromising its structural integrity.
- Test for leaks: After the sealant has dried, carefully inspect the cat door and its surrounding area for any signs of leaks. If you notice any gaps or areas where water or air can pass through, apply additional sealant as needed.
- Maintain regular checks: Keep an eye on the cat door and its sealant periodically to ensure that it remains in good condition. Replace any worn-out or damaged sealant to maintain the weatherproofing integrity.
By taking the time to properly seal and weatherproof your cat door installation, you can enjoy the convenience of a pet-friendly access point without compromising the comfort and energy-efficiency of your home. With these steps, you can ensure a secure and waterproof installation that will keep both your furry friend and your home protected from the elements.
Introducing Your Cat To The New Cat Door
Encouraging and Training Your Cat to Use the Door
Introducing your cat to a new cat door may seem like a daunting task, but with some patience and positive reinforcement, it can be a smooth transition. Here are some tips to encourage and train your cat to use the door:
- Start by familiarizing your cat with the cat door. Allow them to approach it and sniff around to get comfortable with its presence.
- Use treats or their favorite toys to create positive associations with the cat door. Place treats near the door and allow your cat to approach and investigate. Repeat this process several times to build their confidence.
- To encourage your cat further, gently hold the door open and guide them through using treats or toys as a reward. Repeat this process multiple times, gradually reducing your assistance over time.
- Consider using a clicker training method to reinforce your cat’s behavior. Click and reward them with a treat each time they approach, investigate, or use the cat door correctly.
- If your cat is hesitant, never force them through the cat door. This can create negative associations and make the training process more challenging. Instead, continue with positive reinforcement and allow your cat to progress at their own pace.
Monitoring the Cat’s Progress and Comfort
Once you have introduced your cat to the new cat door and started training, it is important to monitor their progress and ensure their comfort. Here are a few steps you can take:
- Observe your cat from a distance to see how they respond to the cat door. Are they approaching it willingly? Are they using it confidently? Take note of any signs of discomfort or hesitation.
- Check the cat door regularly to make sure it is functioning properly. Ensure that it opens and closes smoothly and that there are no obstructions that could cause your cat to become stuck.
- Adjust the door’s size according to your cat’s needs. If your cat seems to struggle with the size of the opening, consider resizing it to make it more accessible and comfortable for them.
- Provide ongoing encouragement and praise as your cat continues to use the door. This positive reinforcement will help solidify the behavior and make it a natural part of their routine.
- If you notice any signs of stress or anxiety in your cat during the training process, take a step back and slow down. Give them time to adjust and seek guidance from a veterinarian or animal behaviorist if needed.
Remember, each cat is unique, and the time it takes for them to adapt to a cat door can vary. Patience, positive reinforcement, and consistent training will increase the likelihood of success. With a little time and effort, your cat will soon be confidently using their new cat door.
Frequently Asked Questions For How To Install A Cat Door In An Exterior Door
Can You Put A Cat Door In An Exterior Door?
Yes, you can install a cat door in an exterior door, allowing your cat to come and go as they please.
How Do You Put A Cat Door In An Existing Door?
To install a cat door in an existing door, measure the cat’s height and width, then mark the door accordingly. Drill holes in the corners of the marked area, then use a jigsaw to cut out the opening. Attach the cat door frame with screws, ensuring it is secure.
Test the door to ensure proper functioning.
How Difficult Is It To Install A Cat Door?
Installing a cat door is fairly easy. Just follow the instructions provided with the door. Mark and cut the hole in the door, position the door frame, and secure it in place. It shouldn’t take long and soon your cat will have easy access.
How Much Does It Cost To Have A Cat Door Installed?
The cost of installing a cat door can vary, but typically ranges between $50 to $400, depending on factors like the type of door, location, and additional installation requirements. It’s always best to get a quote from a professional installer for an accurate estimate.
How Do I Choose The Right Cat Door For My Exterior Door?
Choose a cat door that fits the size of your cat and can be easily installed in your exterior door without compromising its security.
What Tools Do I Need To Install A Cat Door In An Exterior Door?
All you need are a measuring tape, a pencil, a jigsaw or reciprocating saw, a drill, a screwdriver, and a level.
Conclusion
Installing a cat door in your exterior door can give your feline friend the freedom they desire. By following the step-by-step instructions outlined in this blog post, you can easily complete this project. Remember to measure accurately, use the right tools, and take your time for a successful installation.
Enjoy watching your cat confidently enter and exit their new door, bringing both convenience and happiness to your home.