o install a door jamb, start by measuring and cutting the jamb to fit the door opening. Then, attach the jamb to the framing with screws and shims for stability and alignment.
Are you looking to install a door jamb in your home? Installing a door jamb is an essential step in affixing a door to its frame. It provides stability, support, and alignment for the door, ensuring proper functionality. In this guide, we will take you through the process of installing a door jamb in a few simple steps.
With our clear instructions, you’ll be able to complete this task with ease and confidence. So, let’s dive in and get started on installing your door jamb!
Getting Started
Before you begin installing a door jamb, it’s important to gather all the necessary materials and measure and prepare the door frame. This will help ensure a smooth and successful installation process. In this post, we will guide you through the essential steps to get started with installing a door jamb.
Materials needed for the installation
If you want to ensure a hassle-free installation, make sure you have all the required materials ready. Here’s a handy checklist of items you’ll need:
| Materials | Quantity |
|---|---|
| Door jamb | 1 |
| Door hinges | 3 |
| Screws | As needed |
| Wood shims | As needed |
| Hammer | 1 |
| Chisel | 1 |
| Screwdriver | 1 |
| Tape measure | 1 |
| Pencil | 1 |
Measuring and preparing the door frame
To ensure a proper fit, accurate measurements of the door frame are essential. Follow these steps to measure and prepare the door frame for installation:
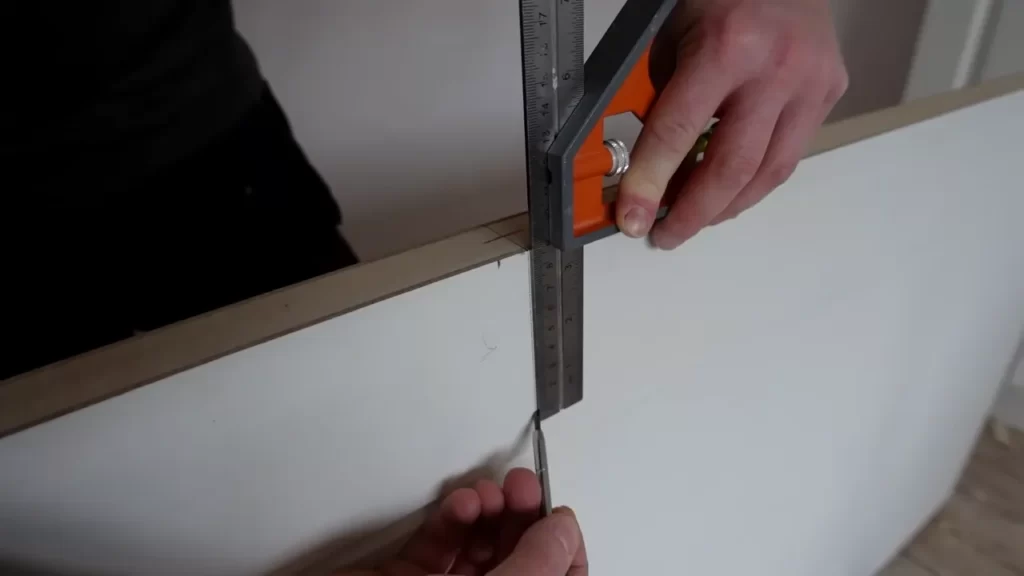
- Measure the height and width of the doorway using a tape measure.
- Based on the measurements, trim the door jamb to fit the dimensions of the doorway, using a saw if necessary.
- Locate the position where the hinges will be installed on the door jamb and mark them with a pencil.
- Using a chisel, create recesses on the marked areas to accommodate the hinges.
- Hold the door jamb in place and check for proper alignment. Make any necessary adjustments with wood shims to ensure the jamb is plumb and level.
- Secure the door jamb to the wall framing with screws, ensuring it is securely fastened.
By following these steps, you are on your way to successfully installing a door jamb. In the next section of this guide, we will cover the actual installation process in detail. Stay tuned!
Removing The Old Door Jamb
Before installing a new door jamb, it’s crucial to first remove the old one. This process requires careful disassembly to avoid any damage to the surrounding structure. In this section, we will outline the necessary steps to safely remove the old door jamb and ensure a smooth transition to the installation of the new one.
Steps to Safely Remove the Old Door Jamb

Follow these steps to efficiently remove the old door jamb:
- 1. Start by carefully removing any trim or molding surrounding the door jamb. This can be done using a pry bar or a putty knife to gently pry it away from the wall. Take caution not to damage the adjacent wall surface.
- 2. Once the trim is removed, locate and remove any screws or nails securing the door jamb to the surrounding structure. These are typically found on the sides and top of the frame. A screwdriver or a crowbar can be used for this step.
- 3. After removing the screws or nails, check if the old door jamb is caulked or glued to the wall. If so, gently run a utility knife along the edges to cut through the caulk or glue. This will help release the door jamb from the wall without causing any damage.
- 4. With the screws, nails, and caulk/glue cut, carefully pry the old door jamb away from the wall. Start from one side and work your way to the other, using a pry bar or a crowbar. Apply even pressure to avoid splintering the wood or damaging the wall surface.
- 5. During the removal process, it’s possible to encounter stubborn nails or screws that are difficult to remove. In such cases, you can use a reciprocating saw or a hacksaw to carefully cut through the nails or screws, allowing for easier removal of the door jamb.
Repairing any Damage Caused During Removal
It’s important to inspect the surrounding area for any damage caused during the removal of the old door jamb. If you notice any areas that need repair, follow these steps:
- 1. Fill any small holes or cracks with wood filler. Apply the filler using a putty knife, smoothing it out until it’s level with the surrounding surface. Allow it to dry according to the manufacturer’s instructions.
- 2. For more significant damage, such as large holes or broken sections of the wall, consult a professional for the best repair method. They may recommend patching the area with new drywall or applying a patching compound to ensure a seamless finish.
- 3. Once the repairs are complete, sand any rough edges or uneven surfaces for a smooth finish. This will ensure the newly installed door jamb fits properly and looks aesthetically pleasing.
By following these steps to safely remove the old door jamb and repair any damage, you’re now ready to proceed with the installation of the new door jamb. Stay tuned for our next blog post where we will guide you through the installation process in detail.
Installing The New Door Jamb
Installing the new door jamb is a crucial step in the process of door installation. It ensures that the door frame is properly aligned and secure, ensuring smooth operation and increased security. In this section, we will walk you through the steps of aligning and positioning the new door jamb and attaching it to the door frame.
Aligning and Positioning the New Door Jamb
To ensure a proper fit, it is essential to align and position the new door jamb correctly. Here is a step-by-step guide to help you:
- Measure and mark the desired location for the door jamb on the door frame using a tape measure and a pencil. Make sure to align it vertically and horizontally with the existing frame.
- Use a level to ensure that the marked location is plumb and level. Adjust as necessary by shimming or sanding the door frame.
- Place the new door jamb in the marked location, aligning it with the existing frame. Ensure that it fits snugly and is flush with the surrounding wall surface.
- Check the alignment using a level. Adjust as needed by tapping gently with a hammer or using shims to make the necessary adjustments.
Attaching the New Door Jamb to the Door Frame
Now that the new door jamb is correctly aligned and positioned, it’s time to attach it to the door frame. Follow these steps:
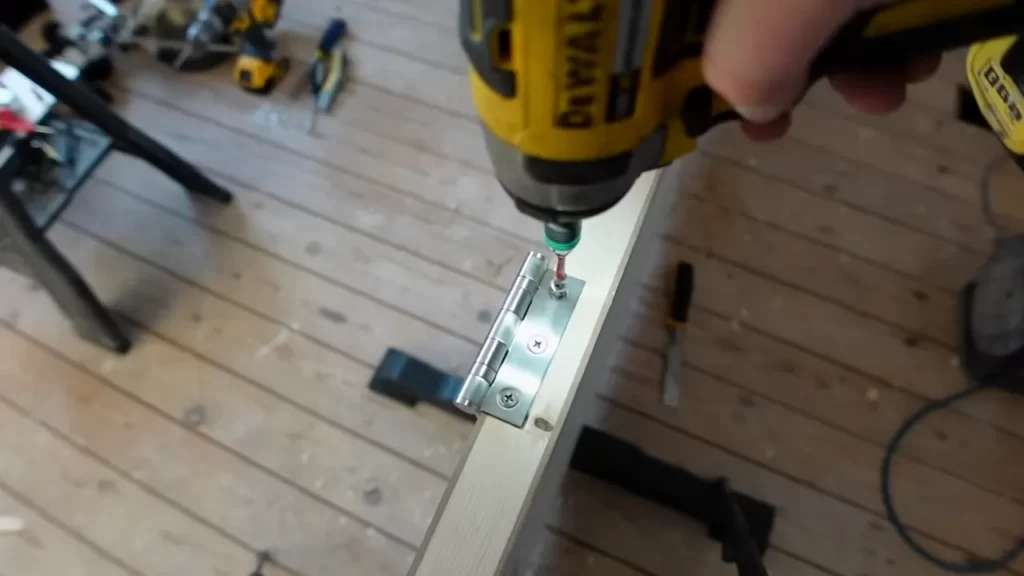
- Starting at the top, use a drill to create pilot holes through the jamb and into the door frame. This will prevent the wood from splitting when driving the screws.
- Secure the door jamb to the frame by driving screws through the pilot holes. Use a screwdriver or a drill with a screwdriver bit for this step. Make sure to drive the screws in firmly, but be cautious not to overtighten and strip the holes.
- Repeat the process for the middle and bottom sections of the door jamb, ensuring that it remains aligned and plumb throughout.
- Once all the screws are in place, check the alignment and operation of the door. Open and close the door to ensure it swings smoothly and latches securely.
By following these steps, you can confidently install the new door jamb and ensure a secure and functional door. Take the time to align and position the jamb correctly, as it will significantly impact the overall quality of the installation. Now, let’s move on to the next step, which involves installing the door hardware.
Adjusting And Securing The Door
After successfully installing the door jamb, it’s crucial to adjust and secure the door properly to ensure it functions smoothly and provides optimum security. This involves checking the alignment of the door, installing hinges and door hardware, and performing a thorough test to ensure everything is in working order. Let’s dive into these steps in more detail.
Checking the alignment of the door
Before proceeding with the installation of hinges and door hardware, it’s important to verify if the door is properly aligned within the door jamb. This step ensures that the door opens and closes without any obstructions and provides a tight seal when closed.
The alignment can be checked by following these steps:
- Close the door and examine the gap between the door and the jamb on all sides. The gaps should be even, with no significant variations.
- Inspect the top edge of the door to ensure it is parallel to the top of the door jamb. You can use a level to make this assessment.
- If you notice any misalignments, adjustments can be made by loosening the screws that hold the door in place. Gently tap the top or bottom of the door with a mallet until it aligns correctly. Once aligned, tighten the screws to secure the door in its new position.
Installing hinges and door hardware
Once the door is properly aligned, you can proceed with installing the hinges and door hardware. These components are essential for the proper functioning of the door and ensuring its security.

The steps to install hinges and door hardware are as follows:
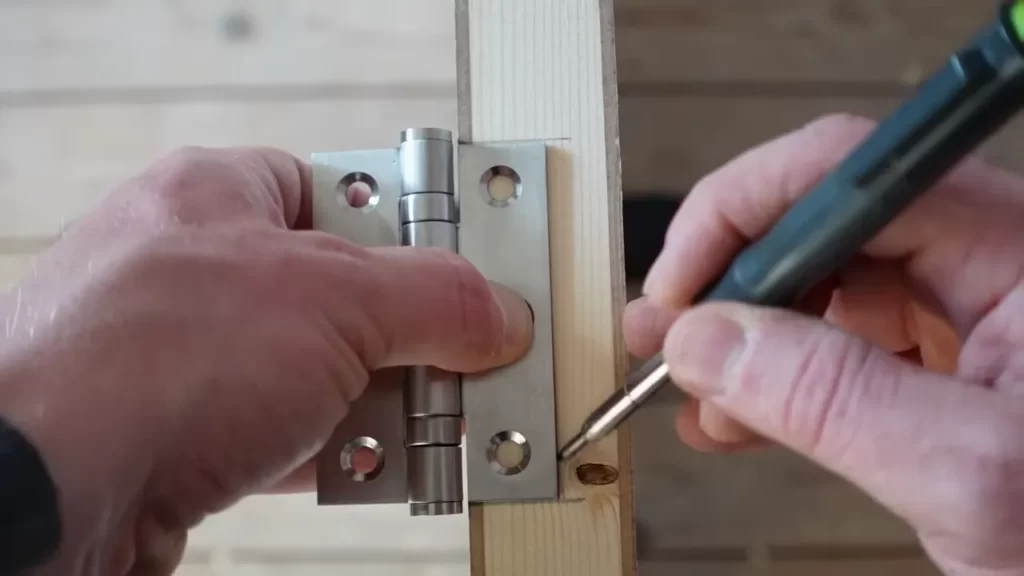
- Mark the locations for hinges on both the door and the jamb. Ensure that the hinges are aligned correctly and at the desired height.
- Pre-drill the holes for the screws using a drill bit slightly smaller than the screws provided with the hinges.
- Attach the hinges to the door and the jamb using the screws, ensuring they are securely fastened.
- Install the door handle, latch, and any other required hardware according to the manufacturer’s instructions.
Testing the door for proper functioning
Once the hinges and door hardware are in place, it’s essential to test the door for proper functioning. This step ensures that the door opens, closes, and latches correctly, providing smooth operation and optimal security.
Here are some key points to consider while testing the door:
- Open and close the door multiple times to check for any sticking, rubbing, or misalignment issues. Adjust the hinges if necessary.
- Test the latch and door handle to ensure they engage and disengage smoothly.
- Verify that the door seals tightly when closed, with no noticeable gaps or drafts.
By carefully following these steps and thoroughly testing the door, you can ensure that your door jamb installation is complete and the door functions properly. Correct alignment, secure hinges, and properly functioning door hardware are crucial for both the functionality and security of your door.
Frequently Asked Questions On How To Install A Door Jamb
How Do You Install A Door Jamb?
To install a door jamb, follow these steps: 1. Measure the door opening and purchase a pre-hung door with a matching jamb. 2. Remove the old jamb. 3. Position the new jamb in the opening and shim it to make it level and plumb.
4. Secure the jamb by nailing it to the framing. 5. Install the door and attach the hinges.
What Is The Difference Between Door Frame And Door Jamb?
A door frame refers to the entire structure that surrounds and supports a door, while a door jamb specifically refers to the vertical sides of the frame where the door is hinged. The jamb holds the door in place and allows it to swing open and closed.
Do You Nail Door Jamb?
Yes, we do nail door jambs. Our experts carefully install door jambs to ensure a secure fit.
How Much Space Should Be Between Door And Jamb?
The ideal space between a door and its jamb should be approximately 1/8 to 3/16 of an inch. This allows for smooth opening and closing while ensuring a proper fit. It is essential to maintain this gap for effective functionality and to prevent rubbing or sticking.
How Do I Measure The Door Jamb Size?
To measure the door jamb size, start by measuring the width of the door frame and then the height from the floor to the top of the frame.
What Tools Do I Need To Install A Door Jamb?
You will need a hammer, screwdriver, chisel, level, nails, shims, and a measuring tape to install a door jamb properly.
Conclusion
To wrap up, installing a door jamb can seem like a daunting task, but with the right tools and knowledge, you can tackle it successfully. Remember to measure carefully, follow the steps outlined in this guide, and take your time to ensure a proper installation.
By doing so, you’ll enjoy a well-fitted door jamb that enhances the security and aesthetic appeal of your doorway. Happy installing!