To install closet door knobs, start by measuring and marking the position for the knob. Then, drill a hole and attach the knob securely with screws.
Essential Tools For Installing Closet Door Knobs
When it comes to installing closet door knobs, having the right tools at your disposal is essential to ensure a smooth and hassle-free installation process. With the right set of tools, you can easily and efficiently complete the task at hand, giving your closet doors a fresh new look.
Screwdriver
A screwdriver is one of the most basic yet essential tools you’ll need for installing closet door knobs. It allows you to tighten screws and secure the knobs firmly in place. When choosing a screwdriver, make sure to opt for one that matches the type and size of screws you’ll be using. This will prevent any damage to the screws or the knob itself.
Drill
If your closet doors do not already have pre-drilled holes for the door knobs, you’ll need a drill to make the necessary holes. A drill with a bit suitable for the size of the knob’s screws will enable you to create precise and neat holes. Remember to use caution and ensure the drill is perpendicular to the surface to avoid any damage.

Tape Measure
Before installing the closet door knobs, it is important to determine the accurate placement for a visually appealing and functional result. A tape measure will come in handy for measuring and marking the correct positions for drilling the holes. This measurement precision helps to ensure that the knobs are evenly aligned and symmetrically positioned.
Pencil or Marker
Having a pencil or marker is essential for marking the spots where the holes need to be drilled. It helps provide clear reference points and ensures that the holes are positioned accurately on the doors. Make sure to use a pencil or marker that contrasts with the color of your doors, so the marks are easily visible during the installation process.
Optional Tools For Convenience And Precision
When it comes to installing closet door knobs, having the right tools can make the job easier and ensure a precise result. While some tools may be optional, they can provide convenience and improve the overall quality of the installation. Here are a few optional tools that you may want to consider using:
<h3>Level</h3>
One of the optional tools that can greatly aid in installing closet door knobs is a level. A level is a simple tool that helps ensure your door knobs are installed in a straight and level position. This is particularly important for sliding closet doors with multiple knobs, as misalignment can cause the doors to not close properly.
<h3>Template or jig for hole placement</h3>
Another handy tool for installing closet door knobs is a template or jig for hole placement. This tool allows you to accurately mark and drill the holes for the knobs, ensuring they are evenly spaced and aligned. Using a template or jig can save you time and eliminate the guesswork involved in measuring and marking hole locations on your own.
If you don’t have a template or jig, you can create your own by measuring and marking the hole positions on a piece of sturdy cardboard or plywood. This makeshift template can be used repeatedly for consistent hole placement.
<h3>Summary</h3>
While these tools may be optional, they can greatly enhance the installation process of your closet door knobs. Using a level will help you achieve a straight and level installation, while a template or jig for hole placement ensures precise and even hole positioning. Consider utilizing these optional tools for a convenient and precise installation of your closet door knobs.
Measuring And Marking For Knob Placement
Determining the height of the knob
When it comes to installing closet door knobs, one of the most important aspects is determining the correct height for placement. The height of the knob can affect the overall functionality and appearance of the door. To ensure that you install the knob at the optimal height, follow these simple steps:
- Stand in front of the closed door and visualize where the knob would be most convenient to reach. This may vary depending on the height of the individuals using the closet, so consider the needs of everyone in your household.
- Measure the distance from the bottom edge of the door to your desired knob height using a tape measure.
- Mark the height measurement on the edge of the door using a pencil, making sure the mark is clear and visible.
- Repeat this process on the other side of the door to ensure that the knob will be aligned properly when the door is closed.
Marking the center of the door
Once you have determined the correct height for the knob, the next step is to mark the center of the door for proper placement. Follow these steps to ensure accurate marking:
- Measure the width of the door using a tape measure.
- Divide the width measurement in half to locate the center point.
- Using a pencil, make a small mark at the center point on both the front and back faces of the door.
- Connect the marks with a straight line to accurately define the center of the door.
By following these simple steps, you can ensure that your closet door knobs are installed at the correct height and properly centered on the door. Taking the time to measure and mark for knob placement will ultimately result in a functional and aesthetically pleasing addition to your closet.
Drilling The Hole For The Knob
One essential step in installing closet door knobs is drilling the hole for the knob. This process ensures that the knob is attached securely and functions properly. To properly drill the hole, you need to consider the appropriate drill bit size and drill at the marked spot.
Selecting the Appropriate Drill Bit Size
Before drilling the hole for your closet door knob, it is crucial to select the appropriate drill bit size. The drill bit size should match the diameter of the knob’s screw. Using the wrong size can result in an ill-fitting hole, which can compromise the knob’s stability and functionality.
To determine the correct drill bit size, refer to the manufacturer’s instructions that come with your closet door knob. The instructions should specify the recommended drill bit size for installation. If you don’t have the instructions, you can also measure the diameter of the knob’s screw using a caliper or ruler. Once you have the correct measurement, select a drill bit of the corresponding size.
Drilling the Hole at the Marked Spot
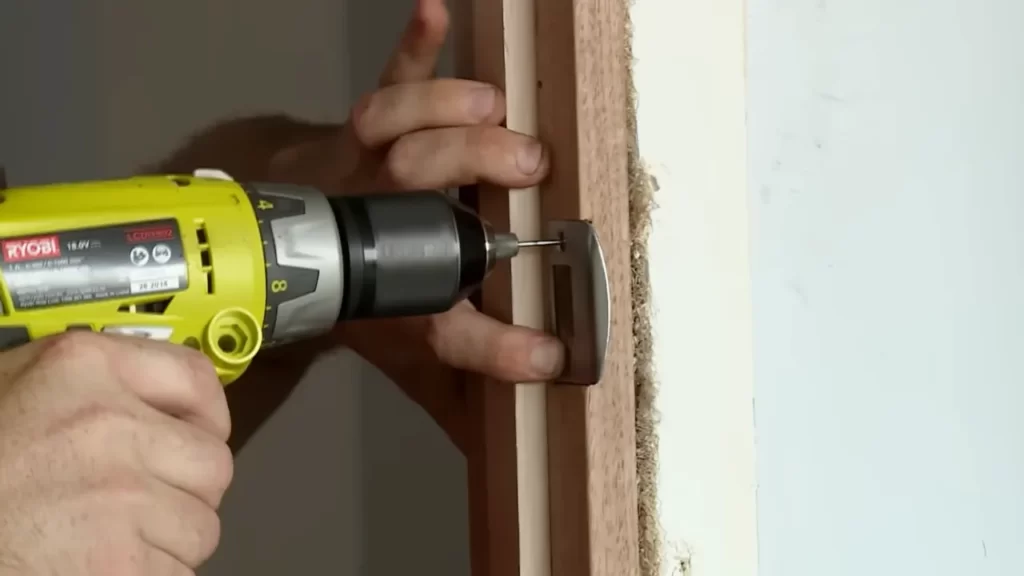
Once you have the appropriate drill bit size, it’s time to drill the hole at the marked spot on your closet door. The marked spot indicates the ideal position for the knob based on your desired placement and the door’s design.
- Begin by placing the tip of the drill bit on the marked spot.
- Hold the drill firmly and apply moderate pressure to start drilling.
- Drill straight into the door surface, ensuring that the drill bit is perpendicular to the door.
- Continue drilling until the desired depth is reached. The depth should be slightly shorter than the length of the knob’s screw, allowing enough room for the screw to secure the knob tightly.
- Once the hole is drilled, remove any wood debris or sawdust from the hole and clean the surrounding area.
By drilling the hole at the marked spot with the appropriate drill bit size, you will ensure that your closet door knob is installed securely and functions smoothly. Make sure to follow the manufacturer’s instructions and take necessary precautions while drilling.
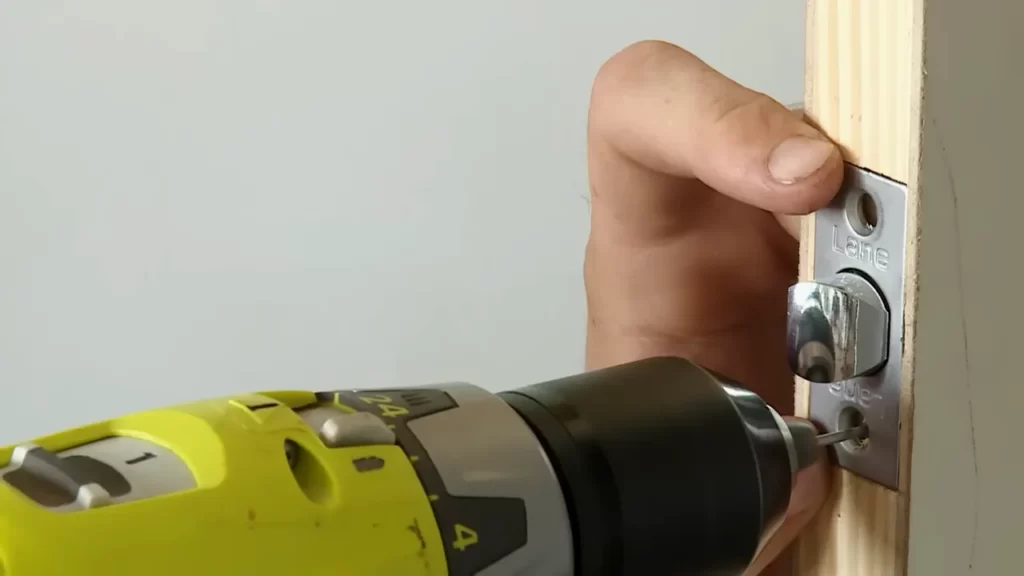
Inserting The Knob Through The Hole
After preparing the knob for installation, the next step is to align it with the hole and insert it securely. This process needs to be done carefully to ensure a proper fit and functionality of your closet door knob. In this section, we will guide you through the steps on how to insert the knob through the hole.
Preparing the knob for installation
Before inserting the knob through the hole, it is important to prepare it properly. This involves checking the knob for any loose screws or parts that need to be tightened. Ensure that all components are clean and free from dirt or debris that can hinder the knob’s performance.
If your knob comes with a latch or strike plate, make sure they are aligned correctly with the hole in the door. This will ensure smooth operation and prevent any unnecessary friction when using the knob.
Aligning the knob with the hole and inserting it
Now that you have prepared the knob, it’s time to align it with the hole in the door and insert it securely. Follow these steps:
- Start by holding the knob in your hand, ensuring that the screw holes are facing towards the door.
- Align the screw holes of the knob with the holes in the latch or strike plate, if applicable.
- With one hand, hold the knob in place against the outside of the door. Use your other hand to insert the screws through the holes and into the knob.
- Tighten the screws using a screwdriver or appropriate tool, ensuring they are securely fastened but not overtightened which can damage the knob or door.
Once the screws are tightened, give the knob a gentle test to ensure it operates smoothly. If there is any resistance or the knob doesn’t turn as expected, you may need to make slight adjustments in the alignment or tighten the screws further.
By following these simple steps, you can easily insert and install a closet door knob, providing a functional and stylish addition to your closet door. Now that you have successfully inserted the knob, you can move on to the final step of installing any additional hardware or accessories, such as a backplate or rosette, to complete the look and enhance the functionality of your closet door knob installation.
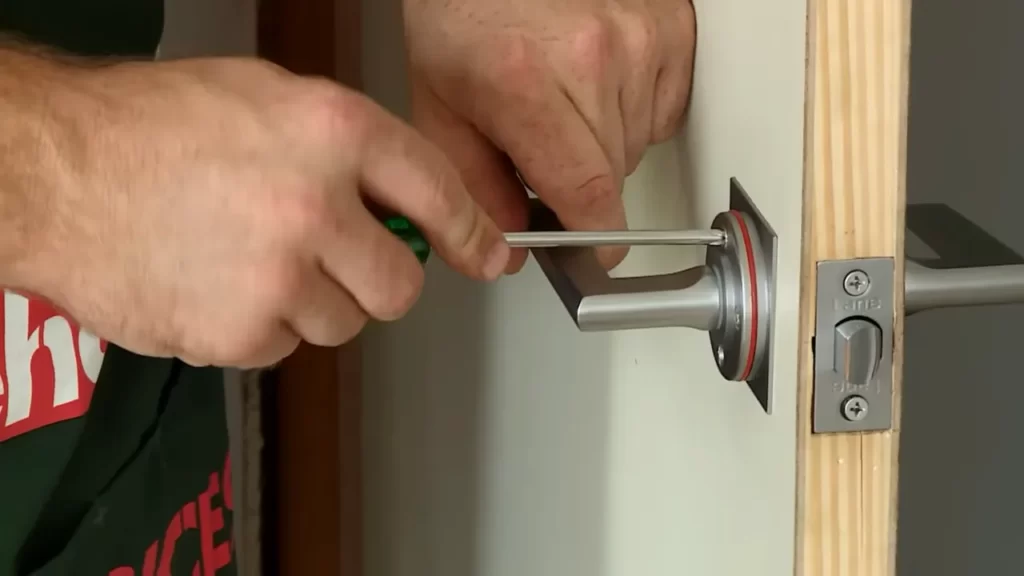
Securing The Knob In Place
Tightening the screws or bolts
Once you have positioned the closet door knob securely on the door, the next step is to tighten the screws or bolts to ensure that the knob remains firmly in place. Tightening the screws or bolts will prevent the knob from coming loose and provide stability when you open and close the closet door.
To begin, locate the screws or bolts that came with your closet door knob. Depending on the type of knob you have chosen, you may need a screwdriver, a wrench, or another tool to tighten them properly. It’s essential to use the correct tool to avoid damaging the screws or bolts.
Next, turn each screw or bolt clockwise with the appropriate tool until you feel resistance. Be careful not to over-tighten them, as this can strip the threads or cause other problems. Once all the screws or bolts are securely tightened, give the knob a gentle tug to test its stability.
Testing the knob for stability
Ensuring that the closet door knob is stable is crucial, as you don’t want it to come loose or wobble when you use it. To test its stability, start by firmly gripping the knob and giving it a few small tugs in different directions. The knob should feel secure and remain firmly attached to the door.
If the knob feels loose or wobbly, you may need to tighten the screws or bolts a little more. Additionally, check for any visible gaps between the knob and the door surface. If there are any gaps, it may indicate that the screws or bolts are not tightened enough.
Once you are satisfied with the stability of the closet door knob, give it a final test by opening and closing the door several times. Pay attention to how the knob feels and whether it remains securely in place. If you notice any issues, such as the knob becoming loose again, repeat the tightening process until the problem is resolved.
Conclusion
Securing the knob in place involves tightening the screws or bolts and testing the knob for stability. By taking these steps, you can ensure that your closet door knob remains securely attached and functions smoothly. Remember to use the appropriate tools and avoid over-tightening, as this can cause damage. With a properly secured knob, you can enjoy convenient access to your closet while adding a stylish touch to your space.
Ensuring Smooth Knob Operation
How to Install Closet Door Knobs
When it comes to installing your closet door knobs, it is important to ensure smooth knob operation. The last thing you want is to struggle with opening and closing your closet doors because of a faulty knob mechanism. In this article, we will guide you through the process of installing closet door knobs and provide tips for ensuring that they operate smoothly.
Lubricating the Knob Mechanism if Necessary
If you notice that your closet door knobs are not operating as smoothly as they should be, it may be time to lubricate the knob mechanism. Over time, dirt and grime can build up inside the mechanism, causing it to become sticky or difficult to turn.

To ensure smooth knob operation, follow these steps:
- Start by removing the knob from the door. You can do this by unscrewing the screws that hold it in place.
- Once the knob is removed, take a clean cloth and wipe away any visible dirt or debris from both the knob and the door surface.
- Next, apply a small amount of lubricant to the knob mechanism. You can use a specialized lubricant, such as graphite lubricant or silicone spray, which are readily available at most hardware stores. Be sure to follow the manufacturer’s instructions for proper application.
- Gently rotate the knob to distribute the lubricant evenly throughout the mechanism.
- Finally, reattach the knob to the door using the screws you removed earlier. Make sure to tighten the screws securely, but be careful not to overtighten them, as this can cause damage to the knob or the door.
By lubricating the knob mechanism, you can ensure that your closet door knobs operate smoothly and effortlessly.
In conclusion, it is important to ensure smooth knob operation when installing closet door knobs. By following the steps outlined above and lubricating the knob mechanism if necessary, you can avoid any issues with sticky or difficult-to-turn knobs. Remember, a well-functioning knob is essential for easy access to your closet and a hassle-free experience.
Fixing Loose Or Wobbly Knobs
One common issue that homeowners face with closet door knobs is their tendency to become loose and wobbly over time. This can be not only frustrating but also pose the risk of the knobs falling off completely. However, fixing loose or wobbly knobs is a relatively simple task that can be done without the need for professional help. In this section, we will explore two effective methods to resolve this problem – tightening any loose screws or bolts and using adhesive to secure the knob.
Tightening any loose screws or bolts
If your closet door knob feels loose, the first step you should take is to check if any screws or bolts securing the knob are loose. To tighten them, follow these steps:
- Identify the screws or bolts on the backside of the knob.
- Using a screwdriver or a wrench, tighten the screws or bolts in a clockwise direction.
- Ensure that each screw or bolt is securely tightened, but be careful not to overtighten as it may cause damage.
- Test the knob by gently pulling and twisting it to verify if it feels stable and secure.
By checking and tightening any loose screws or bolts, you can eliminate the wobbling and enhance the functionality of your closet door knob.
Using adhesive to secure the knob
If the screws or bolts are not the cause of the knob’s wobbliness, using adhesive can provide a more robust solution. Here’s how you can secure the knob with adhesive:
- Remove the loose knob completely from the closet door.
- Inspect the backside of the knob and the corresponding area on the door for any dirt, debris, or old adhesive residue.
- Clean the surfaces thoroughly with a mild detergent and water solution to ensure proper adhesion.
- Apply a small amount of strong adhesive, such as epoxy or construction adhesive, onto the backside of the knob.
- Place the knob back onto the door, aligning it correctly with the existing screw or bolt holes.
- Press and hold the knob firmly against the door for the adhesive to bond properly.
- Allow the adhesive to dry completely as per the manufacturer’s instructions before using the knob.
Using adhesive can provide a long-lasting fix for a loose or wobbly closet door knob, ensuring it remains secure and stable over time.
Now that you know how to fix loose or wobbly knobs by tightening screws or bolts and using adhesive, you can easily tackle this common issue on your own. With these methods, you can ensure that your closet door knob operates smoothly and adds a touch of functionality to your space.
Customizing The Knob’S Appearance
When it comes to enhancing the overall aesthetic of your closet doors, customizing the knob’s appearance can make a significant difference. By personalizing your door knobs, you can add a unique touch that reflects your style and complements the design of your space. In this section, we will explore a couple of ways to customize the appearance of your closet door knobs.
Painting or staining the knob
One simple and cost-effective way to customize your door knobs is by painting or staining them. This allows you to match the knob’s color with your existing décor or create a contrasting element that stands out. Here are a few steps to help you achieve the desired look:
- Start by removing the knobs from the doors. Use a screwdriver to loosen the screws that attach the knobs.
- Prepare the knobs for painting or staining by lightly sanding them. This will create a smooth surface and help the paint or stain adhere better.
- If you’re painting the knobs, apply a primer first to ensure better adhesion and coverage. Choose a paint color that suits your taste and the overall aesthetic of the room.
- If you prefer staining, select a stain color that matches your desired look. Apply the stain using a brush or a cloth, following the manufacturer’s instructions. Let it dry completely.
- Once the paint or stain is dry, apply a clear topcoat for added durability and protection. This will prevent the knob from chipping or fading over time.
- After the topcoat has dried, reattach the knobs to your closet doors using the screws.
Adding decorative elements or covers
Another way to customize your closet door knobs is by adding decorative elements or covers. This allows you to incorporate unique designs or motifs that match your personal style or the overall theme of your room. Here are a few ideas to get you started:
- Consider adding adhesive decals or stickers to the surface of the knobs. These come in various designs, from floral patterns to geometric shapes, allowing you to create a custom look effortlessly.
- If you’re feeling crafty, you can use decorative washi tape or fabric to wrap around the knobs. This adds texture and personality to your doors.
- Explore the wide range of decorative knob covers available in the market. These covers come in different materials, such as ceramic or metal, and can feature intricate designs or embellishments.
No matter which method you choose, make sure the decorative elements or covers are securely attached to the knob to avoid any accidents or damage to your doors. Let your creativity shine and transform your plain closet door knobs into stunning pieces that elevate the overall look of your space.
Frequently Asked Questions Of How To Install Closet Door Knobs
How Do You Install A Closet Door Knob?
To install a closet door knob, follow these steps: 1. Measure and mark the desired position for the knob on the door. 2. Drill a hole at the marked point using the appropriate drill bit size. 3. Insert the knob assembly into the hole, aligning it properly.
4. Tighten the screws to secure the knob in place. 5. Test the knob to ensure it functions properly.
Where Do You Put Knobs On Folding Closet Doors?
Knobs on folding closet doors are typically placed on the center of the door panel. This provides an easy grip for opening and closing the door. Make sure to align the knob vertically for a symmetrical look.
Is It Easy To Install Door Knobs?
Installing door knobs is relatively easy. Just follow the manufacturer’s instructions, use basic tools, and ensure proper alignment. With a little effort and care, you can successfully install door knobs yourself.
How High To Install Closet Door Handles?
Install closet door handles at a height that feels comfortable and convenient for you. Generally, a standard height for closet door handles is around 36 to 48 inches from the floor. However, you can adjust the height to suit your needs and preferences.
Conclusion
Installing closet door knobs is a simple task that can enhance the functionality and aesthetic appeal of your closets. By following the step-by-step instructions in this blog post, you can easily complete the installation process. Remember to choose the right knobs that match your decor style and take into consideration the size and material of the door.
With a little time and effort, you can transform your closets into organized and attractive spaces. Start your DIY project today and enjoy the convenience of well-designed closet door knobs.