o install a swinging door, measure the door opening, choose the correct hinge and hardware, attach the hinges to the door and the door frame, and adjust the swing of the door. Installing a swinging door requires precise measurements, appropriate hardware, and careful adjustments to ensure a smooth swing.
Welcome to the comprehensive guide on how to install a swinging door. Whether you are looking to update the look of your home or improve functionality, installing a swinging door can be a great option. We will walk you through the step-by-step process of installing a swinging door, from measuring the door opening to adjusting the swing for a perfect fit.
So, let’s get started and learn how to install a swinging door in your home.
Choosing The Right Swinging Door
When it comes to installing a swinging door, one of the most important decisions you’ll need to make is choosing the right door for your space. The right door will not only enhance the aesthetic appeal of your home but also provide functionality and durability.
Considerations for Selecting a Swinging Door
Before diving into the options, it’s crucial to consider a few key factors to ensure you select the perfect swinging door for your needs. Here are some considerations to keep in mind:
Assessing the Space and Measurements
The first step in selecting a swinging door is to accurately assess the available space and take meticulous measurements. This will help determine the size and type of door that will fit seamlessly into your space. Measure the width, height, and depth of the door frame, accounting for any obstructions such as moldings or trim.
Keep in mind that the swing radius of the door must also be considered. This is crucial as it determines the clearance needed when the door is opening and closing. Ensure there is enough space for a full swing without any obstructions such as furniture or walls.
Determining the Material and Style Options
Another important consideration when choosing a swinging door is the material and style options available. The material you choose will not only impact the durability and maintenance of the door but also the overall aesthetic of the space.
Common materials for swinging doors include wood, steel, and glass. Each material has its own unique characteristics and advantages. Wood provides a warm and classic look, while steel offers strength and security. Glass doors, on the other hand, allow for natural light and can create a spacious feel.
In addition to the material, the style of the swinging door should complement the overall design of your home. Whether you’re looking for a traditional, modern, or minimalist look, there are various styles available to suit your taste. Consider factors such as panel design, color, and decorative accents.
Moreover, it’s important to consider your specific needs and preferences. Are you looking for a door that provides privacy or one that allows visibility between rooms? Will the door be primarily used for interior or exterior purposes? Answering these questions will help narrow down your options and find the perfect swinging door for your space.
In conclusion, selecting the right swinging door involves careful consideration of factors such as the available space, accurate measurements, material options, and style preferences. By taking the time to assess these factors, you can ensure that the swinging door not only enhances the functionality of your space but also adds an element of style and sophistication.
Measuring And Preparing The Door Frame
When installing a swinging door, it is imperative to start with the correct measurement and preparation of the door frame. This crucial step will ensure a smooth installation process and a perfectly fitting door. In this section, we will discuss the essential tools you will need, accurate measurements of the door opening, and how to prepare the door frame for installation.
Essential tools for measuring and preparing the door frame
Before jumping into the process, gather the necessary tools to make the job easier and more efficient. Here are the essential tools you will need:
- Tape measure
- Pencil
- Level
- Screwdriver or drill
- Chisel
- Sandpaper
- Hinges and screws
Accurately measuring the door opening
To ensure a proper fit, accurate measurements of the door opening are crucial. Follow these steps:
- Start by measuring the width of the door opening. Measure from one side of the frame to the opposite side. Take measurements at the top, middle, and bottom of the opening. Record the narrowest measurement to ensure the door does not bind or scrape against the frame.
- Next, measure the height of the door opening. Measure from the top of the opening to the floor. Again, take measurements on both sides and in the middle, recording the shortest measurement.
Make sure to write down these measurements and take them with you when purchasing the swinging door.
Preparing the door frame for installation
Before installing the swinging door, it is essential to prepare the door frame to accommodate it. Follow these steps:
- Remove any existing door and hardware from the frame, ensuring the area is clear.
- Check the door frame for any obstructions, such as nails or screws. Remove them using a screwdriver or drill if necessary.
- Using a chisel, gently remove any excess or protruding wood from the door frame, ensuring a smooth surface. Be careful not to damage the frame in the process.
- Take sandpaper and smooth out any rough patches or uneven areas in the door frame. This step will ensure a seamless fit for the swinging door.
- Lastly, attach the hinges to the door frame using the appropriate screws. Make sure they are aligned correctly and securely fastened.
Once these steps are completed, your door frame will be ready for the swinging door installation.
Installing The Swinging Door
Installing a swinging door can be a great way to add functionality and style to your home. Whether you’re replacing an old door or installing a new one, this step-by-step guide will walk you through the process. In this section, we will cover gathering the necessary tools and materials, preparing the door for installation, and provide a detailed guide for installing the swinging door. Let’s get started!
Gathering the necessary tools and materials for installation
Before diving into the installation process, it’s important to gather all the necessary tools and materials to ensure a smooth and efficient installation. Here’s a list of what you’ll need:
| Tools | Materials |
|---|---|
| Measuring tapeDrillScrewdriverChiselLevelSawPencilMasking tapeSafety goggles | Swinging doorDoor hingesScrewsDoor knobDoor frameWood shimsWood puttySanding blockPaint or stain |
Preparing the door for installation
Now that you have gathered all the necessary tools and materials, it’s time to prepare the door for installation. Follow these steps:
- Measure the door frame to ensure the swinging door will fit properly. Take accurate measurements of the height, width, and depth.
- Using a saw, trim the door to the correct size if necessary. Remember to take off an equal amount from both sides.
- Next, mark the desired location for the hinges on the swinging door with a pencil.
Step-by-step guide for installing the swinging door
Now that the door is prepped and ready, let’s dive into the installation process:
- Step 1: Place the door in the door frame and use shims to ensure it is level and plumb. Secure the door temporarily with masking tape.
- Step 2: Mark the locations for the hinges on the door frame with a pencil. Use a level to ensure they are aligned properly.
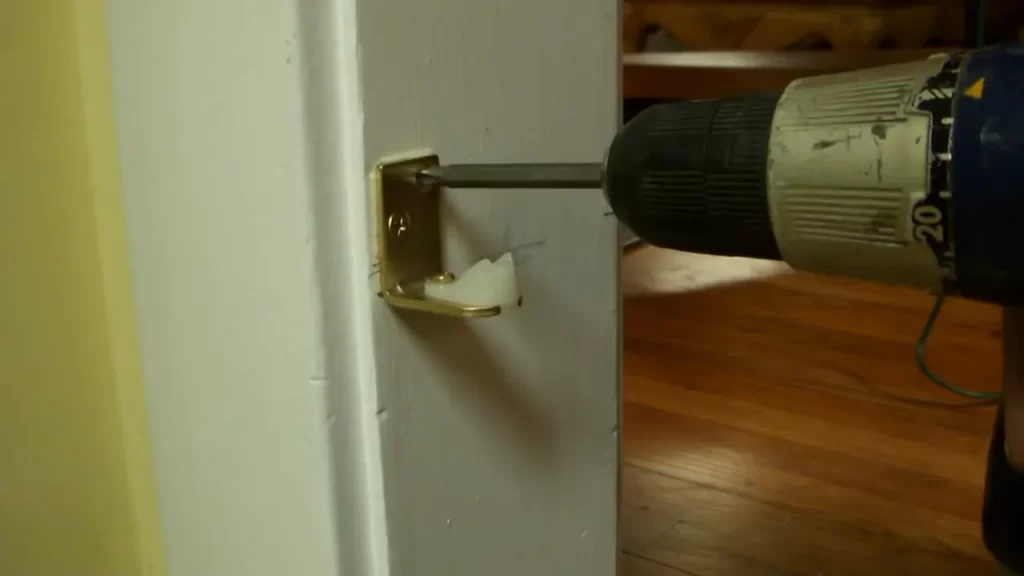
- Step 3: Drill pilot holes for the hinges on the door frame. Make sure the holes are slightly smaller than the screws to provide a tight fit.
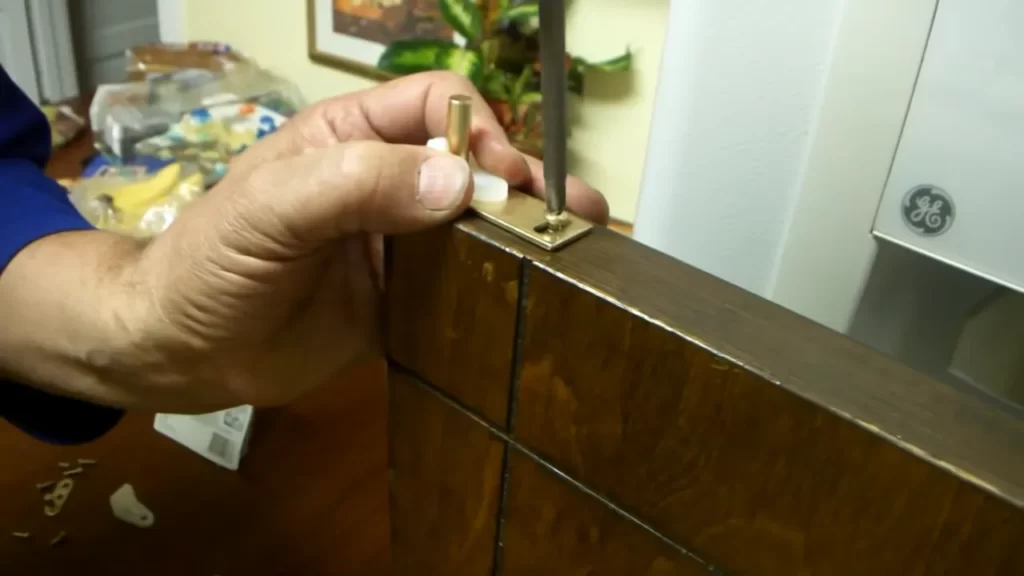
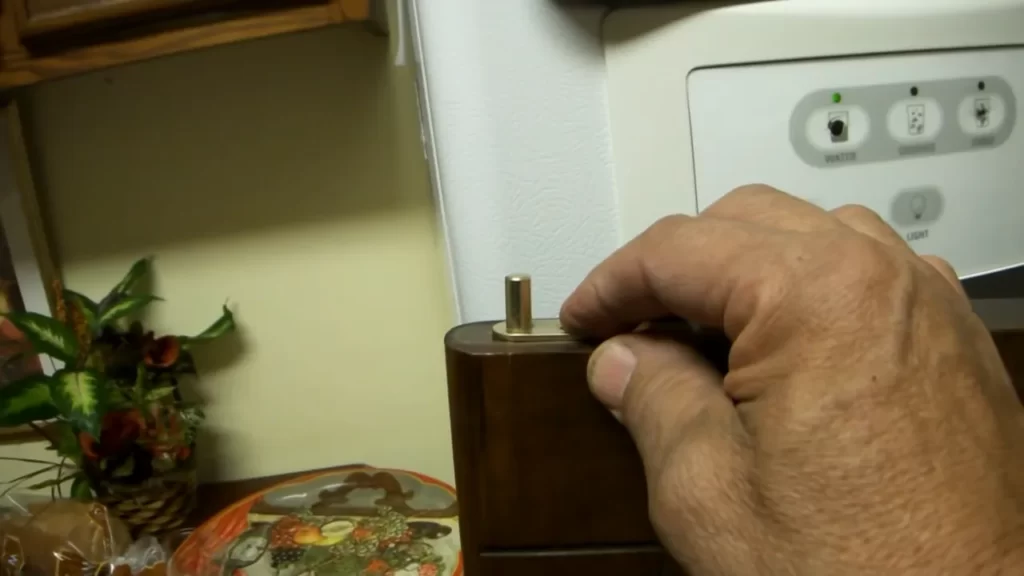
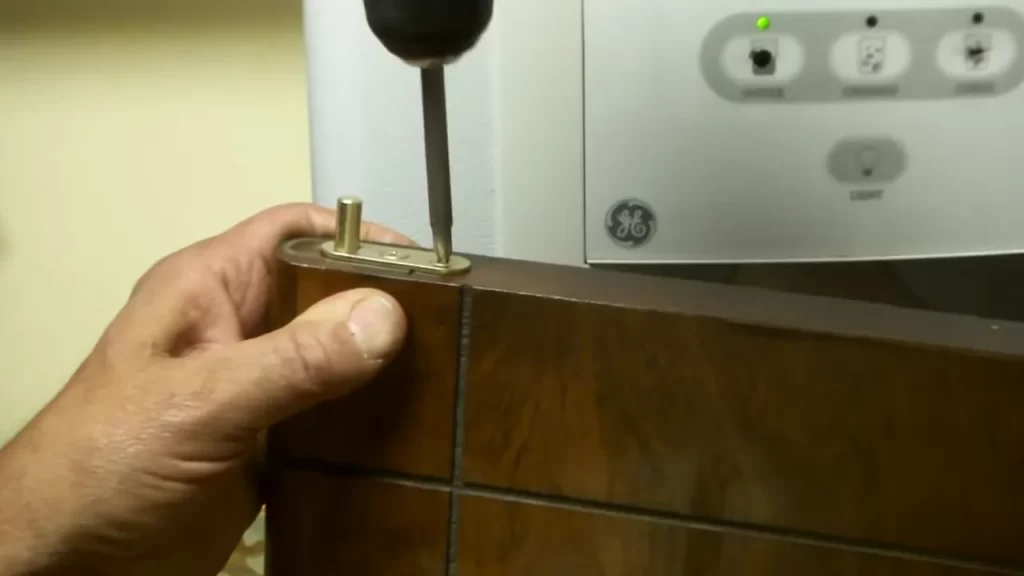
- Step 4: Attach the hinges to the door frame using screws. Ensure they are aligned properly and securely tightened.
- Step 5: With the help of a friend, lift the door and place it on the hinges. Make sure the door is properly aligned and centered within the frame.
- Step 6: Attach the hinges to the door using screws, making sure they are aligned properly and tightly secured.
- Step 7: Install the door knob according to the manufacturer’s instructions. Ensure it operates smoothly and securely.
- Step 8: Check the door for any gaps or unevenness. Use wood shims to adjust and fine-tune the fit if needed.
- Step 9: Apply wood putty to the screw holes and any imperfections on the door. Sand it down once it dries.
- Step 10: Finally, paint or stain the door to your desired finish. Allow it to dry completely before using your newly installed swinging door.
Follow these steps carefully when installing a swinging door, and you’ll be able to enjoy its functionality and aesthetic appeal for years to come.
Adjusting And Testing The Swinging Door
When installing a swinging door, adjusting and testing the door is a crucial step to ensure proper alignment and functionality. This step involves fine-tuning the hinges for smooth movement and testing the door swing. By following the steps below, you can ensure that your swinging door operates smoothly and functions correctly.
Ensuring Proper Alignment and Functionality
Before adjusting the door hinges, it’s essential to make sure the swinging door is properly aligned. This step ensures that the door will open and close smoothly without any issues. To ensure proper alignment:
- Check that the frame of the doorway is square, ensuring that the sides are parallel and the top and bottom are level.
- Measure the diagonals of the doorway frame to confirm that they are equal in length. This will indicate that the frame is square.
- Place the swinging door in the frame and check that it fits properly. The door should be flush with the frame on all sides, with no gaps or unevenness.
- If any adjustments are needed to ensure proper alignment, use shims or adjust the frame as necessary to achieve the desired results.
Adjusting the Door Hinges for Smooth Movement
Once the swinging door is properly aligned, the next step is to adjust the door hinges for smooth movement. Follow these steps to adjust the hinges:
- Start by examining the hinges for any loose screws or bolts. Tighten any that may have come loose during installation.
- Next, check the positioning of the hinges. They should be evenly spaced and aligned with each other.
- If the door is rubbing or sticking against the frame, carefully loosen the screws on the hinges to allow for adjustment.
- Gradually adjust the hinges by tightening or loosening the screws based on the specific needs of the door. Make small adjustments and test the door’s movement after each one to ensure smooth operation.
- Continue adjusting the hinges until the swinging door opens and closes smoothly without any obstructions or resistance.
Testing the Door Swing and Adjusting as Needed
After adjusting the door hinges, it’s essential to test the swing of the door to ensure proper functionality. Follow these steps to test and adjust the door swing:
- Stand inside the room and hold the door handle or knob.
- Slowly open and close the door, checking for any obstructions or sticking points.
- If the door is rubbing or hitting against the frame, adjust the hinges further until the issue is resolved.
- Continue testing the door swing and making adjustments as needed until the door opens and closes smoothly without any issues.
By following these steps, you can adjust and test your swinging door for optimal functionality. Remember to take your time during this process and make small adjustments until the desired results are achieved. With a properly adjusted swinging door, you can enjoy smooth operation and easy access between rooms.
Finishing Touches And Maintenance Tips
Once you have installed a swinging door, there are a few finishing touches and maintenance tips to keep in mind. These will not only ensure the door functions properly but also add to its overall aesthetic appeal. In this section, we will discuss how to add weatherstripping and door hardware, properly seal and paint the swinging door, and provide maintenance tips for keeping it in top condition.
Adding Weatherstripping and Door Hardware

When it comes to a swinging door, weatherstripping plays a crucial role in preventing drafts and ensuring energy efficiency. The weatherstripping material you choose should be durable and able to withstand the elements. Start by measuring the height and width of the door frame, then cut the weatherstripping accordingly. Apply it around the outer edges of the door frame using adhesive, making sure there are no gaps for air to seep through.
Next, let’s move on to the door hardware. Door handles, knobs, hinges, and latches not only contribute to the door’s functionality but also enhance its appearance. Choose hardware that complements the style and design of your swinging door. Before installation, mark the positions for the handles, knobs, and hinges using a pencil or tape measure. Then, using the appropriate tools, carefully attach the hardware to the door, ensuring they are securely fastened.
Properly Sealing and Painting the Swinging Door
To extend the lifespan of your swinging door and protect it from moisture and other external factors, it is essential to properly seal and paint it. Start by cleaning the door surface thoroughly, removing any dirt, dust, or debris. If necessary, sand any rough areas to achieve a smooth finish.
Next, apply a wood sealer or primer to the entire door surface, including the edges. This will create a barrier that prevents moisture from seeping into the wood. Once the sealer or primer has dried, it’s time to paint your swinging door. Choose a paint color that complements your interior or exterior design. Apply paint in thin, even coats, allowing sufficient drying time between each layer. Make sure to cover all areas, including the edges, to ensure complete protection and a flawless finish.
Maintenance Tips for Keeping the Swinging Door in Top Condition
In addition to the initial finishing touches, regular maintenance is necessary to keep your swinging door in top condition.
Here are some maintenance tips to follow:
- Periodically clean the swinging door with a mild detergent and water to remove dirt and grime. Avoid using abrasive cleaners that may damage the finish.
- Inspect the weatherstripping regularly to make sure it is intact and sealing the door properly. Replace any damaged or worn weatherstripping promptly to maintain energy efficiency.
- Check the door hardware, including hinges and latches, to ensure they are tight and functioning correctly. Lubricate moving parts as needed to prevent squeaking or sticking.
- Keep an eye out for any signs of damage or rot in the wood. Apply a fresh coat of paint or sealer as necessary to maintain its appearance and protect it from moisture.
- During extreme weather conditions, such as heavy rain or storms, take extra precaution by securing the swinging door properly and ensuring there are no leaks or drafts.
By following these maintenance tips, your swinging door will not only look great but also continue to function smoothly for years to come.
Frequently Asked Questions Of How To Install A Swinging Door
How Do You Install A Swinging Door?
To install a swinging door, start by measuring and marking the desired height and width. Then, remove the existing door and hinges. Install the new hinges and hang the door. Finally, adjust the door’s swing and secure it with screws or nails.
What Tools Do You Need To Install A Swinging Door?
To install a swinging door, you will need a measuring tape, pencil, screwdriver, chisel, hammer, level, and drill. Additionally, depending on the door type and installation method, you may need screws or nails, shims, and a router.
How Long Does It Take To Install A Swinging Door?
The time to install a swinging door varies depending on the complexity and your experience. Generally, it can take anywhere from 1 to 3 hours. Factors such as removing the old door, adjusting the hinges and hardware, and fine-tuning the fit can affect the installation duration.
Can I Install A Swinging Door Myself?
Yes, you can install a swinging door yourself if you have basic carpentry skills and the necessary tools. However, if you are unsure or unfamiliar with the process, it is recommended to consult a professional to ensure proper installation and avoid any potential issues.
Conclusion
Installing a swinging door may seem like a daunting task, but with the right guidance, it can be a smooth process. By following the step-by-step instructions and considering essential factors like measurements, materials, and tools, you can successfully install a swinging door in your home.
With a little patience and attention to detail, you’ll be enjoying the convenience and aesthetic appeal of a swinging door in no time. Happy door installing!