To install a front door lock, start by measuring the door thickness and selecting a lock that is compatible. Then, remove the existing lock and install the new one according to the manufacturer’s instructions.
Ensure the lock is properly aligned and secure before testing and using it for optimum security. Introducing a new front door lock can greatly enhance the security and protection of your home. With the installation process being relatively straightforward, taking the right steps will ensure a successful installation.
By following the guidelines provided by the lock manufacturer and keeping precision in mind, you can easily replace your front door lock and enhance the safety of your property. We will provide a concise guide on how to install a front door lock effectively. So, let’s explore the necessary steps to achieve this.
Factors To Consider When Selecting A Front Door Lock
Choosing the right front door lock is crucial for ensuring the safety and security of your home. There are several factors to consider when selecting a front door lock, including security, durability, and style and design. By taking these factors into account, you can find the perfect lock that not only provides top-notch protection but also complements the overall aesthetics of your front door.
Security
When it comes to selecting a front door lock, security should be your top priority. A secure lock is the first line of defense against potential burglaries or intrusions. Look for locks that are resistant to picking, drilling, and bumping. Strong deadbolts and high-quality materials like solid steel or brass can significantly enhance the security level of your lock.
Durability
A front door lock is exposed to various weather conditions and frequent usage, so it’s essential to choose a lock that is durable and can withstand the test of time. Opt for locks made from sturdy materials that are known for their long-lasting performance. Stainless steel or solid brass locks are excellent options as they are resistant to corrosion and wear, ensuring the lock remains functioning for years to come.
Style and Design
While security and durability are essential, the style and design of the front door lock should not be overlooked. Your lock should not only provide security but should also complement the overall aesthetics of your front door. Consider the architectural style of your home and choose a lock that matches the design. There are various styles available, from traditional to modern, allowing you to find a lock that seamlessly blends with your home’s exterior.
In conclusion, when selecting a front door lock, it is important to prioritize security, durability, and style and design. By considering these factors, you can ensure that you choose a lock that provides optimum protection, longevity, and enhances the overall appearance of your home. Remember, investing in a high-quality front door lock is an investment in the safety and security of your loved ones and your valuable possessions.
Types Of Front Door Locks
Installing a front door lock is an essential step in ensuring the security of your home. With various types of front door locks available, it’s important to choose one that suits your needs and preferences. In this section, we will explore the different types of front door locks, including deadbolt locks, handle/lever locks, and electronic door locks.
Deadbolt Locks
Deadbolt locks are widely known for their sturdy construction and high level of security. They offer excellent resistance against forced entry, making them popular choices for front doors. Deadbolt locks consist of a solid metal bolt that extends into a strike plate, providing a strong barrier that prevents the door from being easily pried open.
When choosing a deadbolt lock, consider opting for a single-cylinder deadbolt if your door does not have a nearby window. Single-cylinder deadbolts require a key from the outside and have a thumb-turn on the inside. On the other hand, double-cylinder deadbolts require a key to operate from both sides, providing an extra layer of security but also posing a safety concern in emergency situations.
Handle/Lever Locks
If you are looking for convenience and ease of use, handle/lever locks might be the ideal choice for your front door. These locks combine a handle or lever with a built-in lock mechanism, eliminating the need for a separate deadbolt. Handle/lever locks are commonly found on residential properties and offer a simple yet effective way to secure your home.
When installing a handle/lever lock, it’s crucial to ensure that the door is properly reinforced, as these locks can be vulnerable to forced entry if the door frame is weak. Additionally, consider choosing a handle/lever lock with a keyless entry option, allowing you to enter your home using a unique code or a remote control.
Electronic Door Locks
Electronic door locks have gained popularity in recent years due to their advanced features and convenience. These locks utilize electronic components such as keypads, fingerprint scanners, or smartphone integration to provide secure access to your home. Electronic door locks offer various advantages, including ease of installation, remote access control, and the ability to track entry history.
When installing an electronic door lock, it’s essential to ensure that it is compatible with your front door and that you have a reliable power source. Some electronic door locks are battery-operated, while others require a direct electrical connection. It’s also vital to choose a reputable brand with robust security features to ensure the protection of your home.
When it comes to installing a front door lock, choosing the right type is crucial for the safety and security of your home. Deadbolt locks offer exceptional strength, handle/lever locks provide convenience, and electronic door locks bring advanced features to the table. Evaluate your needs and preferences to determine which type suits your requirements best.
Gather The Necessary Tools And Materials
Before you begin installing a front door lock, it’s important to gather the necessary tools and materials. Having everything on hand will make the process smoother and more efficient.
Screwdriver
One of the staple tools you’ll need is a screwdriver. It’s essential for removing the existing door lock and installing the new one. Make sure you have both a flathead and a Phillips head screwdriver available. This way, you’ll be prepared for any type of screw that may be in your door lock.
Drill and Drill Bits
A drill is another crucial tool when it comes to front door lock installation. You may need to bore holes for the lockset and deadbolt, depending on the type of lock you’re installing. Be sure to have a drill with the appropriate drill bits ready. Different locks may require different sized holes, so having a variety of drill bits will ensure you’re prepared for any scenario.
Tape Measure
Accuracy is key when it comes to fitting a front door lock. A tape measure will help you measure the precise dimensions necessary for installation. Pay attention to the hole diameter, backset (the measurement from the edge of the door to the center of the hole), and the distance between the lockset and deadbolt holes. Taking accurate measurements will ensure a proper fit and enhanced security.
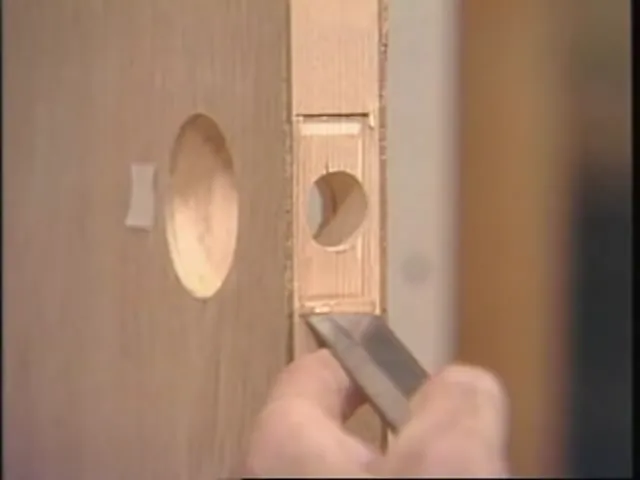
Chisel
A chisel is an essential tool for removing any excess wood around the lockset and deadbolt holes. It helps you achieve a clean and precise fit. Having a sharp chisel will make the task easier and ensure a professional-looking installation. Remember to wear safety goggles and exercise caution when using a chisel.
New Front Door Lock
Of course, you’ll need a new front door lock for the installation. Choose a lock that fits your preferences and security needs. Whether you’re opting for a traditional lockset or a more modern electronic lock, having it ready beforehand will make the installation process much smoother.
Removing The Existing Door Lock
When it comes to securing your home, installing a front door lock is an essential step. Whether you want to replace an old or damaged lock or upgrade to a more secure option, removing the existing door lock is the first task on your to-do list. In this guide, we will walk you through the process of removing the door lock in a few easy steps.
Unscrewing the Door Knob/Lever
The door knob or lever is the most visible part of the lock on the exterior side of the door. To remove it:
- Locate the screws on the interior side of the door knob/lever.
- Using a screwdriver, unscrew the screws counterclockwise until they are fully removed.
- Gently pull the door knob/lever away from the door.
- If it doesn’t come off easily, make sure all screws are completely removed and try again.
Removing the Strike Plate
The strike plate is the metal plate attached to the door frame where the latch engages when the door is closed. To remove it:
- Using a screwdriver, unscrew the screws holding the strike plate to the door frame.
- Place the screws aside in a safe place to avoid losing them.
- Gently pry the strike plate away from the door frame using a flathead screwdriver or a pry bar.
- Check for any additional screws securing the strike plate and remove them if present.
Taking Out the Deadbolt Lock (if applicable)
If your door has a deadbolt lock in addition to the main door lock, it needs to be removed separately. Follow these steps:
- Locate the screws securing the deadbolt lock on the interior side of the door.
- Unscrew the screws counterclockwise until they are fully removed.
- Hold onto the deadbolt lock with one hand while carefully pulling it out from the door with the other hand.
By following these steps, you will be able to successfully remove the existing door lock, making way for the installation of a new one.
Measure And Mark The Door
Before installing a front door lock, it’s crucial to measure and mark the door to ensure proper placement and a secure fit. Taking the time to determine the right height and marking the locations for drilling will save you from any potential headaches later on. Here’s a step-by-step guide on how to measure and mark the door for your front door lock installation.
Determining the Proper Height and Placement
The first step in measuring and marking the door is to determine the proper height and placement for your front door lock. This will depend on your personal preference, the type of lock you’re installing, and any existing hardware on the door.
Start by measuring the height of the existing door handle, if applicable. You’ll want to align your front door lock with the handle for a cohesive look. Use a tape measure to measure the distance from the bottom of the door to the center of the existing handle and make a note of this measurement.
Next, consider the standard height for front door locks, which is typically around 36 inches from the bottom of the door. This height ensures that the lock is easily accessible for most individuals. Keep in mind that you can adjust this height to best suit your needs and preferences.
Once you’ve determined the height, use a pencil to make a mark on the door at the desired location. Double check your measurements and alignment before moving on to the next step.
Marking the Locations for Drilling
Now that you’ve established the proper height and placement for your front door lock, it’s time to mark the locations for drilling. This step is essential to ensure that the lock aligns correctly with the door frame and operates smoothly.
Start by placing the front door lock against the marked location. Use a level to ensure that the lock is perfectly straight. Once you’re satisfied with the positioning, use a pencil to mark the screw holes on the door.
If your front door lock comes with a deadbolt, repeat the same process for marking the location of the deadbolt. Make sure that the deadbolt aligns with the existing strike plate on the door frame for proper functionality.
After marking the screw holes for both the lock and deadbolt, step back and double check everything. Ensure that the marks are clear and accurate, and that the lock and deadbolt align properly with the door and door frame.
With the door properly measured and marked, you’re now ready to move on to the next step: drilling the holes and installing your front door lock. Stay tuned for our next guide on how to install a front door lock, where we’ll cover the drilling and installation process in detail.
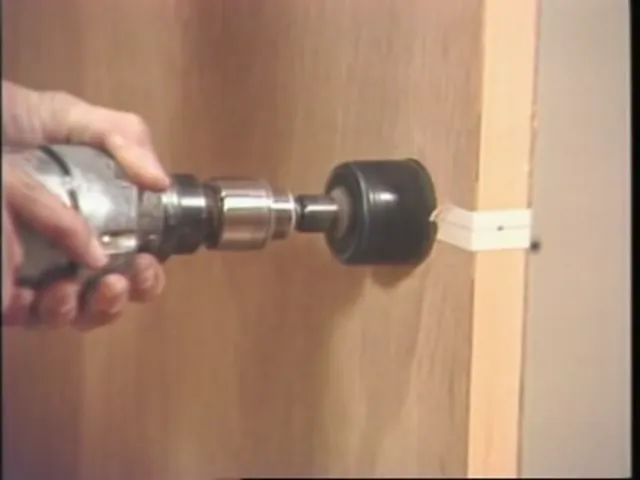
Drilling The Holes
One of the essential steps in installing a front door lock is drilling the holes. This process involves creating the necessary openings for the lockset and handle/lever. To ensure a proper fit and functionality, it is imperative to use the correct drill bit for the lock and create the holes accurately.
Using the Correct Drill Bit for the Lock
Before you begin drilling, it is crucial to determine the type and size of the drill bit required for your specific front door lock. Most locksets come with instructions or a template that specifies the compatible drill bit size. Use a drill bit that matches the size recommended by the manufacturer to ensure a precise and secure fit.
While different locksets may have varying requirements, it is common to use a 2 ⅛-inch drill bit for the lockset hole and a 1-inch drill bit for the handle/lever hole. Always double-check the manufacturer’s instructions to avoid any mistakes or damage to your front door.
Creating the Holes for the Lockset and Handle/Lever
Once you have the correct drill bit, it’s time to create the holes for the lockset and handle/lever. Begin by positioning the template provided by the lock manufacturer onto the door, ensuring it is aligned properly. The template serves as a guide for precise hole placement.
Secure the template in place using masking tape or clamps to prevent any movement during drilling. This will help you achieve accurate results and avoid any discrepancies in alignment.
Now, mark the spots where you need to drill the holes according to the template. Use a pencil or marker to make clear, visible marks on the door surface.
When you are ready to drill, align the tip of the drill bit with the marked spots for the lockset hole. Gently apply pressure and start drilling with a slow, steady motion. Be cautious not to exert excessive force or drill too quickly, as this can cause splintering or damage to the door.
Once you have completed drilling the hole for the lockset, repeat the same process for the handle/lever hole. Remember to position the drill bit accurately according to the marked spot.
After drilling both holes, carefully remove the tape or clamps and clean any debris or wood shavings from the door. You can use a brush or a cloth to ensure the surface is clean and ready for the next steps of the front door lock installation process.
By using the correct drill bit and accurately creating the holes for the lockset and handle/lever, you will ensure a successful installation and a well-functioning front door lock for added security and peace of mind.
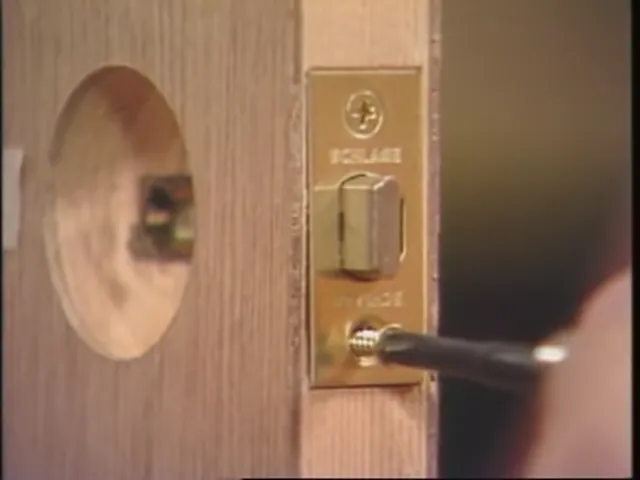
Installing The Deadbolt Lock
Installing a deadbolt lock on your front door is an essential step in enhancing the security of your home. A deadbolt lock offers stronger resistance against forced entry compared to a typical doorknob lock. In this section, we will guide you through the process of installing the deadbolt lock, with the focus on three key steps: inserting the cylinder and bolt, attaching the exterior and interior locks, and testing the lock for smooth operation.
Inserting the Cylinder and Bolt
The first step in installing a deadbolt lock is to insert the cylinder and bolt mechanism. This mechanism consists of a cylinder that houses the keyway and a bolt that extends from the cylinder into the door jamb, securely locking the door in place. Follow these steps to insert the cylinder and bolt:
- Begin by removing the existing latch or deadbolt from the door, ensuring that the hole for the deadbolt is clean and free from any debris.
- Take the cylinder assembly and insert it into the hole from the exterior side of the door. Ensure that the keyway is facing upwards.
- From the interior side of the door, slide the bolt into the hole, aligning it with the cylinder assembly.
- Make sure the bolt is fully extended and retracted by turning the key inside the cylinder. This will help you confirm that the cylinder and bolt are properly aligned and functioning smoothly.
Attaching the Exterior and Interior Locks
Once you have successfully inserted the cylinder and bolt, it’s time to attach the exterior and interior locks. These are the components that will allow you to lock and unlock the deadbolt from both sides of the door. Follow these steps to attach the exterior and interior locks:
- Start with the exterior lock. Position it on the exterior side of the door, aligning it with the cylinder assembly. Make sure the screw holes on both the lock and the door align perfectly.
- Secure the lock in place by inserting the screws provided and tightening them with a screwdriver. Be careful not to overtighten the screws, as this could affect the functionality of the lock.
- Once the exterior lock is securely attached, move to the interior side of the door. Align the interior lock with the cylinder assembly, ensuring that the lock aligns with the opening in the door to accommodate the bolt.
- Attach the interior lock using the provided screws and tighten them securely. Again, take care not to overtighten.
Testing the Lock for Smooth Operation
After successfully installing the cylinder, bolt, and exterior and interior locks, it’s crucial to test the lock for smooth operation. Follow these steps to test the lock:
- Turn the key in the cylinder to extend and retract the bolt. Ensure that the bolt moves smoothly and without any binding.
- Try locking and unlocking the deadbolt from both the exterior and interior sides of the door. Make sure the lock engages smoothly and securely.
- If you encounter any issues or stiffness in the lock’s operation, double-check the alignment of the cylinder, bolt, and locks. Adjust as necessary to ensure smooth operation.
- Finally, test the lock’s resilience by applying gentle pressure to the door. Ensure that the deadbolt remains securely in place without any give or movement.
By following these steps and ensuring the smooth operation of your deadbolt lock, you can greatly enhance the security of your front door and provide peace of mind for you and your loved ones.
Installing The Handle/Lever Lock
Attaching the Lockset and Handle/Lever
Once you have prepared the front door for installation, it’s time to move on to attaching the lockset and handle/lever. This is an important step in ensuring the security and functionality of your front door lock. To start, gather the necessary tools and equipment, including the lockset, handle/lever, screws, and a screwdriver. Carefully read the manufacturer’s instructions provided with the lockset to ensure proper installation. Before attaching the lockset, align it with the pre-drilled holes on the edge of the door. Make sure the latch is facing the correct direction and that the strike plate aligns with the doorjamb. Once the lockset is properly aligned, position the handle/lever over the spindle and insert it into the base plate. Secure it in place by tightening the screws provided. Ensure the handle/lever is securely attached, as any looseness can affect the functionality of the lock.
Tightening the Screws
After attaching the lockset and handle/lever, the next step is to tighten the screws. Use a screwdriver that matches the size of the screws provided with the lockset. Start by tightening the screws in a diagonal pattern, alternating between them until they are snug. Avoid overtightening, as this can cause damage to the lockset or door. Check each screw to ensure it is securely fastened, as loose screws can lead to a loose handle/lever and compromised security.
Testing the Lock for Proper Functionality
Once the lockset and handle/lever are securely attached and the screws are tightened, it’s time to test the lock for proper functionality. This step is essential to ensure that the lock works as intended and provides the desired level of security. Prior to testing the lock, close the door completely. First, test the handle/lever by operating it from both the inside and outside of the door. The handle/lever should move smoothly and without any resistance. Verify that the latch fully extends and retracts when the handle/lever is operated. Next, test the key functionality. Insert the key into the lock and turn it in both directions. The key should rotate smoothly and engage the latch, allowing it to retract and extend properly. If any issues are detected during the testing process, carefully review the manufacturer’s instructions and make any necessary adjustments. It’s important to resolve any issues before considering the installation complete. By following these steps – attaching the lockset and handle/lever, tightening the screws, and testing the lock for proper functionality – you can ensure that your front door lock is installed correctly and functions as intended. A correctly installed lock provides peace of mind and enhances the security of your home.
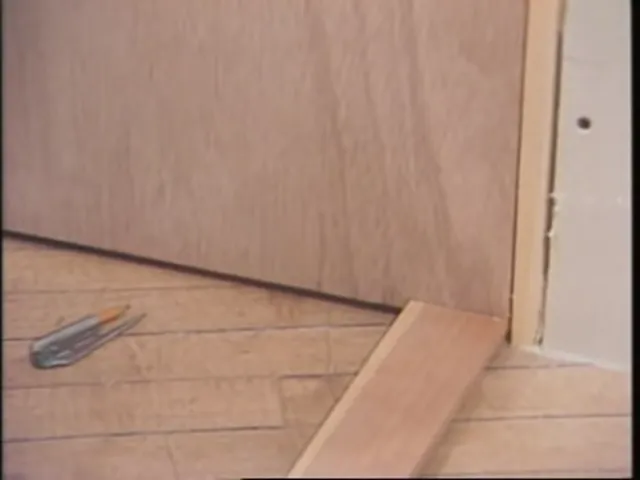
Preparing The Door
Before installing a front door lock, it is crucial to prepare the door properly. This will ensure a seamless installation process and optimum functionality of your new lock. In this section, we will guide you through the steps involved in preparing your door for a new lock.
Detaching the Existing Lock Components
The first step in preparing the door is to detach any existing lock components. This includes removing the old lockset, latch, and strike plate. By doing this, you create a clean slate for the installation of your new front door lock.
To detach the existing lock components, follow these simple steps:
- First, locate the screws that secure the old lockset to the door.
- Using a screwdriver, unscrew these screws and carefully remove the lockset from the door.
- Next, locate the screws that hold the latch in place.
- Using a screwdriver, remove these screws and gently pull out the latch.
- Finally, look for the screws that secure the strike plate to the door jamb.
- Unscrew these screws and remove the strike plate.
By detaching the existing lock components, you create a clean surface for the installation of your new front door lock. This step is essential to ensure a secure and properly functioning lock.
Checking the Door’s Compatibility with the Electronic Lock
Before proceeding with the installation of an electronic lock, it is important to check if your door is compatible with this type of lock. Electronic locks require a different set of conditions compared to traditional mechanical locks.
To check the door’s compatibility with the electronic lock, follow these guidelines:
| Compatibility Aspect | Guidelines |
|---|---|
| Door Material | Ensure that your door is made of a material suitable for the electronic lock, such as wood or metal. |
| Door Thickness | Check the thickness of your door. Electronic locks usually require a certain door thickness for proper installation. |
| Pre-drilled Holes | Verify if your door has pre-drilled holes for the electronic lock. These holes are necessary to mount and secure the lock properly. |
| Power Source | If your electronic lock requires a power source, ensure that there is an accessible power outlet nearby or that it can be powered by batteries. |
| Wi-Fi Connectivity | If your electronic lock offers Wi-Fi connectivity, make sure that your door is within range of your home network. |
By checking the compatibility of your door with the electronic lock, you can avoid any potential installation issues or complications. This step will help ensure a smooth and successful installation process.
Mounting The Electronic Lock
Attaching the Exterior and Interior Components
To properly mount your electronic front door lock, you will need to attach both the exterior and interior components in the correct order. Start by positioning the exterior keypad or touchpad onto the door, making sure it aligns properly with the existing holes. Then, secure it in place using the provided screws or bolts. Ensure that the keypad is facing the right direction—usually, the buttons should be oriented towards the user.
Next, move to the interior side of the door and place the mounting plate onto the latch and screw it in tightly. Make sure that the plate is securely attached, as this will hold the lock mechanism in place. Once the mounting plate is in position, carefully connect the exterior keypad/touchpad to the mounting plate, following the manufacturer’s instructions. Ensure that all connections are tight and secure.
Connecting the Wiring (if applicable)
If your electronic lock requires wiring, you’ll need to connect it properly to ensure proper functionality. Begin by identifying the wiring harness from the lock mechanism and locate the corresponding wire leads. In most cases, these wires will be color-coded or labeled for easy identification.
Next, refer to your lock’s installation manual or manufacturer’s instructions to determine the correct wiring configuration. Match the wire leads from the lock mechanism to the corresponding terminals on the wiring harness, and use wire connectors or electrical tape to secure the connection. Ensure that the wiring is neatly organized and tucked away to avoid any potential interference or damage.
Programming the Lock for Personalized Access
After successfully mounting and wiring your electronic lock, the final step is to program it for personalized access. This will allow you to set up unique codes or access methods for yourself and others who need entry to your home.
Start by accessing the lock’s programming menu, usually accessible through the exterior keypad or touchpad. Follow the step-by-step instructions provided by the manufacturer to program your desired codes or access methods for different individuals. Ensure that you pick unique codes that are easy for you and others to remember but difficult for outsiders to guess.
If applicable, take advantage of additional features such as fingerprint recognition or smartphone integration to enhance security and convenience. Once you have completed the programming process, make sure to test the lock repeatedly to verify that all codes and access methods are functioning correctly.
Testing The Front Door Lock
Ensuring Proper Locking and Unlocking
After successfully installing your front door lock, the next step is to test its functionality. Testing the front door lock is crucial to ensure that it properly locks and unlocks, providing you with the security you need. Follow these simple steps to ensure your lock functions as intended:
- Locking the door:
- Unlocking the door:
Checking for Smooth Operation
Ensuring that your front door lock operates smoothly is paramount for a reliable security measure. Follow these steps to check for a smooth operation:
- Testing the key:
- Operating the doorknob or lever:
By following these simple steps, you can ensure that your front door lock is in optimal condition and provides the security you expect. Regularly testing and checking your lock’s functionality is recommended to detect any potential issues early on, allowing for timely maintenance or replacement. Remember, a well-maintained front door lock is the key to a secure home.
Troubleshooting Common Issues
Even with proper installation, front door locks can sometimes encounter common issues that may hinder their functionality. In this section, we will discuss some of these issues and provide solutions to address them effectively. By troubleshooting these problems, you can ensure that your front door lock operates smoothly, providing the security and convenience you desire.
Misalignment of Lock Components
One frequent issue that homeowners may encounter is the misalignment of lock components. This can occur due to weather conditions, house settling, or simple wear and tear over time. When the lock components — including the strike plate, latchbolt, and deadbolt — are misaligned, the lock may not operate smoothly or may not lock at all.
To resolve this issue:
- Inspect the alignment of the strike plate, ensuring it is properly aligned with the latchbolt. If necessary, adjust the position of the strike plate by loosening the screws and shifting it until it aligns correctly.
- Check the alignment of the latchbolt and make sure it smoothly enters the strike plate hole without any resistance. If the latchbolt does not align properly, adjust its position by loosening the screws on the faceplate and repositioning it as needed.
- Ensure that the deadbolt aligns with the strike plate hole when locked. If the deadbolt does not align correctly, adjust the strike plate position accordingly.
By properly aligning the lock components, you can resolve the misalignment issue and ensure optimal functionality of your front door lock.
Difficulties with Lock Functionality
Another common issue that homeowners may encounter is difficulties with lock functionality. This can include problems such as keys sticking, difficulty turning the lock, or the lock not latching properly.
To address these difficulties:
- Apply a lubricant, such as graphite powder or silicone spray, to the key and insert it into the lock cylinder. Turn the key back and forth several times to distribute the lubricant evenly and ensure smooth operation.
- If the lock still does not function properly, remove the lock cylinder and clean it using compressed air or a dusting cloth. Remove any debris or dirt that may be affecting the lock’s operation.
- Inspect the latch and strike plate for any obstructions or misalignments. Remove any debris or adjust the strike plate position if necessary.
By addressing these lock functionality issues, you can restore proper operation and ensure the security of your front door.
Seeking Professional Help when Needed
In some cases, troubleshooting common issues with front door locks may require the expertise of a professional locksmith. If you have attempted the suggested solutions and the problem persists, it may be time to seek professional help.
A skilled locksmith can assess the situation, identify any underlying issues, and provide the necessary repairs or adjustments. It is important not to force the lock or attempt extensive repairs on your own, as this may cause further damage and costlier repairs in the long run.
By seeking professional help when needed, you can ensure that your front door lock is properly functioning and secure, providing you with peace of mind.
Regular Cleaning And Lubrication
Removing Dirt and Dust
To maintain the longevity and functionality of your front door lock, regular cleaning is essential. Over time, dirt, dust, and debris can accumulate in the lock mechanism, causing it to jam or work less efficiently. Thankfully, keeping your lock clean is a simple task that can be completed in a few easy steps.
First, begin by thoroughly inspecting the lock for any visible dirt or dust. You can use a flashlight to illuminate hard-to-see areas. Once you have identified the problem areas, take a soft-bristle brush and gently scrub away the dirt. Be sure to concentrate on the keyhole, as this is often the most susceptible spot for debris to accumulate.
If the dirt is stubborn and refuses to budge, you can use a can of compressed air to blow away the particles. The air pressure will dislodge any trapped dust, ensuring that your lock is as clean as possible. Remember to focus on the keyhole and any other tiny crevices where dirt may be hiding.
Applying Lubricant for Smooth Movement
Once you have successfully removed all the dirt and dust from your lock, the next step is to lubricate it. Lubrication is essential for ensuring smooth movement and preventing rust or corrosion. By following these simple steps, you can guarantee the lasting performance of your front door lock.
- Choose the right lubricant: It is important to select the appropriate lubricant for your lock. Avoid using products that contain petroleum-based ingredients, as these can cause damage to certain lock finishes. Instead, opt for a silicone-based or graphite lubricant, as they offer excellent lubrication without any harmful side effects.
- Apply the lubricant: With the chosen lubricant in hand, carefully insert the nozzle into the keyhole of the lock. Apply a small amount of lubricant, ensuring that it reaches all parts of the lock mechanism. Avoid over-lubricating, as this can lead to sticky residue build-up. If you are unsure about the quantity, it is always better to start with less and add more if needed.
- Work the lock: After applying the lubricant, insert and remove the key several times to distribute it evenly within the lock. This will help to ensure that all moving parts are adequately coated and protected.
Regular cleaning and lubrication are essential steps in maintaining the optimal performance of your front door lock. By removing dirt and dust and applying a suitable lubricant, you can prevent unnecessary wear and tear and ensure the smooth operation of your lock for years to come.
Checking For Loose Screws And Components
When it comes to ensuring the security of your home, one of the first areas to focus on is your front door lock. This essential piece of hardware not only keeps your family safe but also offers peace of mind. However, over time, it is natural for screws and components to become loose, compromising the effectiveness of your lock.
Tightening any Loose Screws
In order to maintain the integrity of your front door lock, it’s crucial to regularly check for and tighten any loose screws. Loose screws can not only affect the overall functionality of the lock but also make it easier for potential intruders to tamper with.
To ensure the tightness of the screws, follow these steps:
- Start by locating the screws on your front door lock. These screws are typically found on the interior side of the lock.
- Using a Phillips head screwdriver, gently tighten each screw clockwise until they are securely tightened.
- Make sure not to over-tighten the screws, as this can cause damage to both the lock and the door.
- Once all the screws are tightened, test the lock by turning the key or operating the latch mechanism to ensure smooth functionality.
Repairing or Replacing Components as Needed
In addition to tightening loose screws, it’s important to inspect and assess the condition of the various components of your front door lock. Over time, certain parts can wear out or break, compromising the security of your home.
If you notice any damaged or worn components, follow these steps to repair or replace them:
- Identify the specific component that requires repair or replacement. This could be the latch, strike plate, cylinder, or any other part of the lock.
- Consult the lock manufacturer’s instructions or seek professional guidance if necessary.
- Procure the replacement part either from a local hardware store or order it online.
- Once you have the replacement component, remove the old part carefully using the appropriate tools.
- Install the new component according to the manufacturer’s instructions, ensuring proper alignment and secure fixation.
- Test the lock again to ensure that the repaired or replaced component has restored the lock’s functionality and security.
By regularly checking for loose screws and components in your front door lock and taking prompt action to tighten or repair them, you can ensure optimal security for your home. Remember, a well-maintained lock offers comprehensive protection and peace of mind for you and your loved ones.
Maintaining Security With Proper Lock Usage
One of the most important aspects of home security is making sure your front door lock is properly installed and used. While installing a front door lock is the first step towards ensuring the safety of your home, it is equally important to maintain security through proper lock usage. By educating household members and ensuring the locks are always engaged, you can significantly enhance the security of your home.
Educating Household Members about Proper Locking
Educating everyone in your household about the importance of proper locking is crucial for maintaining security. Here are some points to emphasize:
- Always lock the front door when leaving the house, even if it’s just for a few minutes.
- Lock the door before going to bed at night for added security and peace of mind.
- Remind children and other family members to lock the door behind them when they enter or leave the house.
- Explain the significance of not giving out keys to strangers and being cautious while sharing them with close friends or relatives.
Ensuring Locks are Always Engaged
One common mistake people make is forgetting to engage the lock after closing the front door. To ensure your locks are always engaged:
- Make it a habit to check the lock before leaving the house to ensure it is secured.
- Install a deadbolt lock in addition to the regular lock for enhanced security.
- Consider installing a smart lock that allows you to remotely monitor and control the locking status.
- Regularly inspect and maintain the lock mechanism to ensure it is functioning properly.
Maintaining security with proper lock usage is vital for the safety and well-being of your home and loved ones. By educating household members about proper locking practices and ensuring the locks are always engaged, you are taking proactive steps towards keeping your home secure.
Frequently Asked Questions Of How To Install Front Door Lock
Can You Install A Front Door Lock Yourself?
Yes, you can install a front door lock yourself. It’s a simple process that requires basic tools and following the lock manufacturer’s instructions. Just ensure you’re comfortable with the task and take the necessary safety precautions.
Is It Hard To Change A Front Door Lock?
Changing a front door lock is not a difficult task. It can be done easily with basic tools and a little know-how. Just follow the instructions provided with the lock or seek professional help if needed.
How Do You Install A Door Lock Without Drilling?
To install a door lock without drilling, you can opt for adhesive or magnetic locks. These locks attach to the surface of the door without any drilling or damage. Simply clean the door surface, peel off the adhesive backing, and stick the lock in place.
It’s a hassle-free alternative for adding security to your door.
How Do You Install A Door Latch Lock?
To install a door latch lock, follow these steps: 1. Choose a suitable location on the door. 2. Mark the spot for the latch and drill a hole. 3. Attach the strike plate and align it properly. 4. Install the latch assembly and secure it in place.
5. Test the lock to ensure it functions correctly.
Conclusion
Learning how to install a front door lock is an important skill for any homeowner. By following these step-by-step instructions, you can successfully secure your home and increase your peace of mind. Remember to gather all the necessary tools, read the instructions carefully, and take your time during the installation process.
Regular maintenance and periodic checks are also essential for ensuring the longevity and functionality of your front door lock. Happy home security!