To install a deadbolt in a door, begin by marking the deadbolt hole and latch hole on the door according to the template provided. Then, use a hole saw to drill the holes, followed by chiseling out a recess for the latch plate.
Finally, attach the deadbolt and latch to the door using screws and test their functionality. Introducing a deadbolt to a door is a crucial step in improving home security. Whether you’re upgrading an existing door or installing a new one, adding a deadbolt provides an extra layer of protection against potential intruders.
While the installation process might seem daunting, it can be accomplished with a few simple steps. We will guide you through the process of installing a deadbolt in a door, ensuring the safety and security of your home.
Factors To Consider When Selecting A Deadbolt
Choosing the right deadbolt for your door is a crucial step in ensuring the security of your home. With numerous options available in the market, it can be overwhelming to determine which deadbolt is the best fit for your needs. However, by considering a few key factors, you can make an informed decision that not only enhances the security of your home but also provides durability and compatibility with your door.
Security Features
Your deadbolt should have robust security features that offer protection against forced entry and unauthorized access. Look for the following security features when selecting a deadbolt:
- Bump-proof technology: Ensure the deadbolt is equipped with bump-proof technology, which prevents intruders from using bump keys to open the lock.
- Drill resistance: Look for deadbolts that have hardened steel casings and anti-drill plates to deter thieves from drilling through the lock.
- Pick resistance: Consider deadbolts with advanced pick-resistant mechanisms, such as side pins or spool pins, to prevent lock picking.
- Reinforced strike plate: Check if the deadbolt comes with a reinforced strike plate that is securely attached to the door frame, offering additional strength against forced entry attempts.
Material and Durability
The material and durability of the deadbolt play a vital role in its longevity and effectiveness. Look for deadbolts made from high-quality materials that offer durability and resistance to wear and tear. Common materials used in deadbolts include:
| Material | Advantages |
|---|---|
| Brass | Durable and resistant to corrosion |
| Stainless Steel | Highly durable and offers excellent resistance to rust |
| Nickel | Strong and provides good resistance against wear |
By choosing a deadbolt made from sturdy materials, you can ensure that your lock withstands the test of time while providing reliable security.
Compatibility with the Door
Before purchasing a deadbolt, check its compatibility with your door. Consider the following factors:
- Door thickness: Measure the thickness of your door to ensure the deadbolt is suitable for it.
- Backset measurement: Determine the distance from the edge of the door to the center of the deadbolt hole (typically 2 ⅜ or 2 ¾ inches).
- Pre-existing holes: Take note of any pre-existing holes on your door to ensure they align with the deadbolt you choose.
By considering the door’s specifications, you can select a deadbolt that fits properly and functions optimally, providing maximum security for your home.
Selecting the right deadbolt is an investment in the safety and security of your home. By prioritizing security features, material and durability, and compatibility with your door, you can make an informed decision that ensures your peace of mind. Remember, a well-chosen deadbolt enhances both the security and beauty of your door, offering protection for you and your loved ones.
Recommended Deadbolt Brands
When it comes to home security, one of the most effective measures you can take is to install a deadbolt on your doors. Deadbolts provide an extra layer of protection and make it difficult for intruders to break in. However, with so many options available in the market, choosing the right deadbolt can be overwhelming. To help you make an informed decision, we have compiled a list of our top recommended deadbolt brands. These brands have been tested for security, durability, and ease of installation, ensuring that you can secure your home without any hassle.
Brand 1
If you are looking for a deadbolt brand that combines quality, style, and affordability, Brand 1 is an excellent choice. With a reputation for producing reliable and sturdy deadbolts, Brand 1 offers a wide range of options to suit different door types and security needs.
- High-strength materials: Brand 1 deadbolts are constructed from high-strength materials such as solid brass or stainless steel, ensuring that they can withstand heavy use and attempts at forced entry.
- Multiple finishes: Whether you prefer a traditional look or a modern aesthetic, Brand 1 has you covered. They offer deadbolts in a variety of finishes, including polished brass, satin nickel, and oil-rubbed bronze.
- Easy installation: Brand 1 deadbolts come with easy-to-follow installation instructions and all the necessary hardware, making it a breeze to install them on your doors.
Brand 2
For those seeking a deadbolt brand known for its cutting-edge technology and advanced security features, look no further than Brand 2. This brand has earned a reputation for designing innovative deadbolts that are not only secure but also convenient to use.
- Smart lock compatibility: Brand 2 deadbolts are compatible with smart home systems, allowing you to control and monitor your locks remotely using your smartphone or voice commands.
- Keyless entry options: If you prefer to forgo traditional keys, Brand 2 offers keyless entry deadbolts with keypad or fingerprint scanner options. This eliminates the need to carry keys and provides added convenience and security.
- High-security features: Brand 2 deadbolts often come equipped with advanced security features such as anti-pick pins, bump-resistant cylinders, and reinforced strike plates, making them extremely difficult to bypass.
Brand 3
Brand 3 is renowned for its commitment to producing premium deadbolts that prioritize both security and design. With Brand 3, you can rest assured that you are getting a deadbolt that not only keeps your home safe but also enhances its overall aesthetic.
- Aesthetic appeal: Brand 3 offers a wide range of deadbolt styles and finishes, allowing you to find the perfect match for your home decor. From sleek and modern to classic and elegant, you can find a deadbolt that complements your personal style.
- High-security options: Despite their emphasis on design, Brand 3 deadbolts do not compromise on security. They feature robust construction, hardened steel bolts, and additional security pins to deter intruders.
- Long-lasting durability: Brand 3 is known for its attention to detail and commitment to quality. Their deadbolts are built to last, ensuring that you will enjoy reliable protection for years to come.
By choosing a deadbolt from one of these recommended brands, you can have peace of mind knowing that your home is well-protected. Remember to consider factors such as your specific security needs, door type, and personal preferences when making your final decision.
Essential Tools For Installing A Deadbolt
When it comes to enhancing the security of your home, installing a deadbolt on your doors is an essential step. A deadbolt provides an extra layer of protection, preventing potential intruders from easily gaining access to your property. In order to successfully install a deadbolt, you will need a few essential tools that will help you get the job done efficiently and effectively. These tools include a drill, chisel, screwdriver, and tape measure.
Drill
A drill is a vital tool when it comes to installing a deadbolt. It allows you to create the necessary holes in the door and frame to accommodate the deadbolt’s components. Make sure to use a drill with adjustable speed settings to ensure precise and controlled drilling. Additionally, using a drill bit specifically designed for woodworking will help prevent any splitting or damage to the door or frame.
Chisel
The chisel is another crucial tool that will assist you in creating the recesses needed to install the deadbolt strike plate and latch plate. It allows you to carve out precise and clean cutouts in the door and frame, ensuring proper alignment and fit for the deadbolt components. When selecting a chisel, opt for one with a sharp and durable blade to achieve the best results.
Screwdriver
A screwdriver is a versatile tool that you will need for various steps during the deadbolt installation process. It is used to attach and secure the deadbolt components, such as the strike plate, latch plate, and cylinder. Make sure to have both a flathead and a Phillips head screwdriver handy, as different screws may require different types of screwdrivers.
Tape Measure
A tape measure is an essential tool that will help ensure accurate measurements for proper deadbolt installation. It allows you to measure the distances needed to position the elements correctly, including the deadbolt hole, the strike plate, and the latch plate. Opt for a durable and reliable tape measure, preferably one that is at least 25 feet long, to provide flexibility and ease of use.
By having these essential tools at your disposal, you will be well-prepared to install a deadbolt on your door. Remember to take necessary safety precautions, such as wearing safety glasses and gloves, and follow the manufacturer’s instructions for your specific deadbolt model.
Required Materials
Before diving into the process of installing a deadbolt in a door, it’s essential to gather all the necessary materials. Having these items on hand will streamline the installation process and ensure a successful outcome. Here are the key materials you’ll need:
Deadbolt lockset
The deadbolt lockset is the centerpiece of this installation project. Make sure you have a high-quality deadbolt lockset that meets your desired security needs. Opt for a solid and durable lockset that provides enhanced protection to your home or property.
Strike plate and screws
The strike plate and screws are vital components that complement the deadbolt lockset. The strike plate reinforces the door jamb and enhances the strength and security of the door. Be sure to check the compatibility of the strike plate and screws with your chosen deadbolt lockset to ensure a seamless fit.
Installation template
An installation template is an invaluable tool that simplifies the installation process. It helps you precisely mark the positions where the deadbolt and strike plate should be installed on the door. The template ensures accurate alignment, saving you time and effort.
Pencil
Don’t forget to grab a pencil for marking measurements on the door. A pencil allows for easy erasing and adjustments, ensuring precise placement of the deadbolt lockset and strike plate.
Now that you have a clear idea of the required materials, it’s time to move on to the installation process. Gather these items and let’s start securing your door with a deadbolt!
1. Prepare The Door
Before you can install a deadbolt in a door, it’s important to properly prepare the door. This involves measuring and marking the installation points and using a template to outline the positions for both the deadbolt and the strike plate.
Measure and mark the installation points
To ensure a secure and properly aligned deadbolt installation, you’ll need to measure and mark the installation points on your door. Begin by taking accurate measurements to determine the ideal placement for the deadbolt.
Measure the door’s thickness, typically at the edge, using a tape measure. This measurement will help you select the appropriate deadbolt size for your door. It’s important to choose a deadbolt that matches your door’s thickness to ensure a proper fit.
Once you have the correct measurements, mark the centerline of the door where you want the deadbolt to be installed. This will serve as your reference point for all subsequent measurements.
Using a straightedge or ruler, measure and mark the height at which you want the deadbolt to be installed. Most commonly, deadbolts are installed about 6 to 12 inches above the door knob, but you can adjust the height to suit your preferences and needs.
Use a template to outline the deadbolt and strike plate positions
To ensure accurate and consistent placement of the deadbolt and strike plate, it’s recommended to use a template. This template can be either a commercially available one or one you create yourself.
A template ensures that the holes for the deadbolt and strike plate are positioned correctly, ensuring a smooth installation process.
To create a template, simply trace the outline of the deadbolt and strike plate onto a piece of cardboard or paper. Cut out the traced shape to create a template that you can easily position on the door.
Place the template on the door, aligning it with the centerline and height marks you made earlier. Use a pencil to mark the positions of the holes for the deadbolt and strike plate on the door through the template.
With the installation points measured, marked, and outlined using a template, your door is now prepared for the next steps of installing a deadbolt. In the following sections, we will cover the steps to actually install the deadbolt and strike plate on your door.
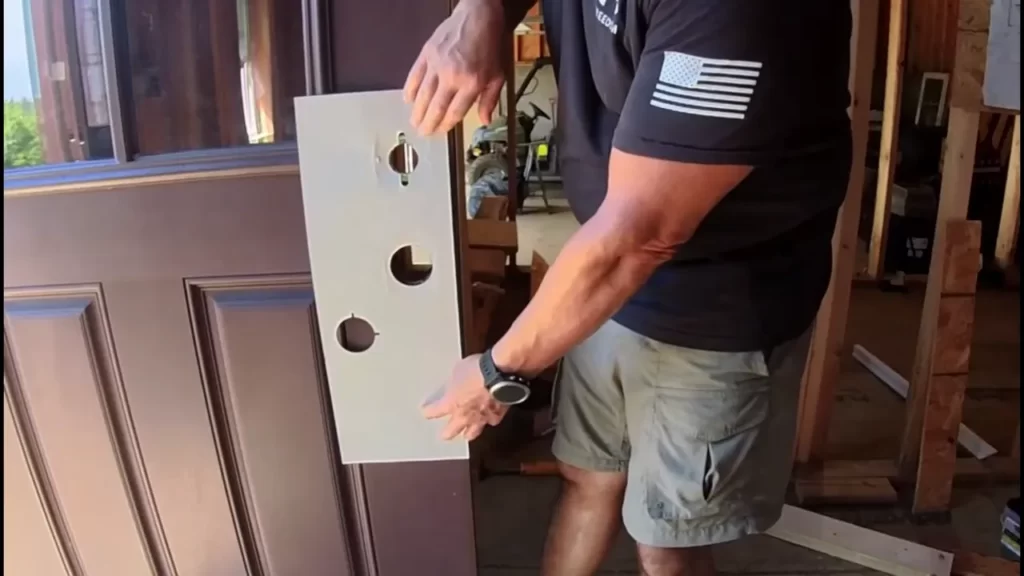
2. Drill Holes
Once you have marked the locations for the deadbolt and the latch on your door, the next step is to drill the necessary holes. Follow these steps to ensure a proper installation:
Use a hole saw to create the deadbolt hole
The deadbolt hole is where the actual deadbolt mechanism will be installed. This hole needs to be drilled through the edge of the door. You can use a hole saw of an appropriate size for your deadbolt. Here’s how to do it:
- Measure and mark the center of the deadbolt hole on the edge of the door.
- Attach the hole saw to your power drill, making sure it is securely fastened.
- Position the hole saw over the marked center point on the door edge.
- Apply firm pressure and start drilling slowly. Let the saw do the work and avoid forcing it.
- Continue drilling until the hole saw goes all the way through the door.
Use a spade bit to create the latch hole
The latch hole is where the latch plate will be inserted. This hole needs to be drilled into the door frame. Follow these steps to create the latch hole correctly:
- Measure and mark the center of the latch hole on the door frame.
- Attach a spade bit of the appropriate size to your power drill.
- Position the spade bit over the marked center point on the door frame.
- Apply steady pressure and start drilling. Keep the drill straight and avoid tilting it.
- Continue drilling until the spade bit has created a hole deep enough to accommodate the latch plate.
Drill pilot holes for the screw locations
Pilot holes are necessary to ensure a secure installation of your deadbolt. These holes are drilled into the door and door frame at the screw locations. Here’s how to do it:
- Measure and mark the screw locations on the door and door frame.
- Select a drill bit that is slightly smaller in diameter than the screws you will be using.
- Attach the drill bit to your power drill.
- Position the drill bit on each marked screw location.
- Apply gentle pressure and start drilling pilot holes. Make sure not to drill too deep.
- Repeat the process for all the screw locations.
3. Chisel The Mortises
Now that you have prepared the door and marked the spots for the latch and strike plate, it’s time to chisel the mortises. This step is crucial for ensuring that the deadbolt fits properly and functions smoothly. By using a chisel, you can create recesses in the door where the latch and strike plate will be installed.
Here’s a step-by-step guide on how to chisel the mortises:
- Gather the required tools:
Before you begin, make sure you have all the necessary tools at hand. You will need a chisel, a hammer, a screwdriver, and a door jig. Having these tools ready will save you time and minimize the risk of damaging the door or the hardware.
- Secure the door:
To avoid any accidental movement or slipping while chiseling, it’s important to secure the door in place. You can use clamps or have someone hold the door steady for you. This will ensure precise and accurate cuts.
- Chisel the latch mortise:
Start by using the chisel to create a recess for the latch. Place the chisel on the marked area and make a series of shallow cuts along the outline. Gradually increase the depth of the cuts until you reach the desired depth for the latch. Be cautious not to go too deep or remove too much material. Use a combination of chisel and screwdriver to clean out the excess wood and shape the mortise.
- Chisel the strike plate mortise:
Next, move on to chiseling the mortise for the strike plate. Align the strike plate with the latch mortise and mark the outline. Once marked, repeat the process of making shallow cuts with the chisel along the outline. Take your time to ensure a tight and proper fit for the strike plate. Remove any excess wood using the chisel and screwdriver until the mortise matches the size and shape of the strike plate.
By following these steps, you will be able to chisel the mortises for the latch and strike plate accurately. Remember to take your time and be precise in your cuts for a professional-looking installation. Once the mortises are chiseled, you can proceed to the final step of installing the deadbolt, securing your door and adding an extra layer of security to your home.
4. Install The Deadbolt
Installing a deadbolt is an essential step to enhance the security of your door. Follow these guidelines to ensure a proper and secure installation.
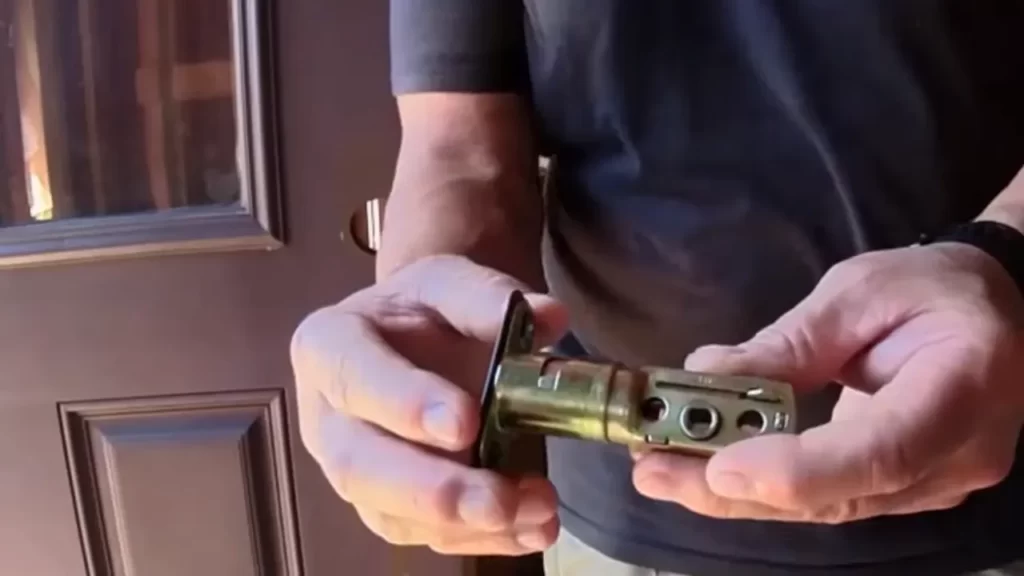
Insert the deadbolt assembly into the hole
To get started, insert the deadbolt assembly into the prepared hole on the edge of your door. Make sure the tapered side faces the door jamb, allowing the deadbolt to slide in and out smoothly. Ensure the small hole in the assembly aligns with the latch assembly on the door’s edge.
If needed, use a hammer or mallet to gently tap the deadbolt assembly into place until it sits flush against the door’s surface. Take care not to apply excessive force and damage the door in the process.
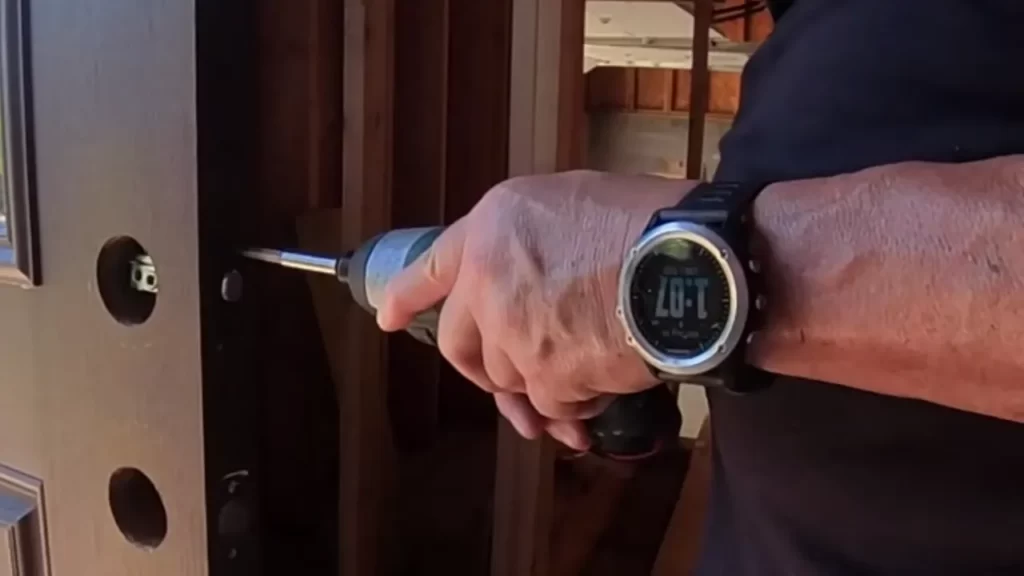
Secure it with screws
Once the deadbolt assembly is properly positioned, it’s time to secure it with screws. Grab the screws provided with the deadbolt kit and insert them through the screw holes in the assembly and into the corresponding holes in the door.
Tighten the screws using a screwdriver, ensuring they are snug but not overtightened. Be cautious not to strip the holes or damage the threads. Confirm that the assembly is firmly attached to the door.
Test the operation of the deadbolt
Before considering the installation complete, it’s crucial to test the operation of the deadbolt to ensure its functionality and security. With the door open, extend the deadbolt fully and attempt to retract it by rotating the thumbturn or using the key.
If the deadbolt retracts smoothly and effortlessly, you’re good to go. However, if you encounter any resistance or difficulties, double-check the alignment of the deadbolt assembly and make any necessary adjustments.
Remember: When testing the deadbolt operation, ensure it fully extends into the strike plate. A properly installed deadbolt will provide an added layer of security, granting you peace of mind.
5. Install The Strike Plate
Welcome back to our step-by-step guide on how to install a deadbolt in a door! So far, we’ve covered the importance of choosing the right deadbolt, preparing the door, marking the location, and drilling holes for the deadbolt lock and cylinder. Now, let’s move on to the next crucial step – installing the strike plate.
Once you’ve successfully drilled the necessary holes for the deadbolt, it’s time to position and attach the strike plate onto the door frame. The strike plate is a metal plate with holes that align with the holes you drilled for the lock and deadbolt. It provides a secure anchor point for the latch and ensures the door locks smoothly and securely.
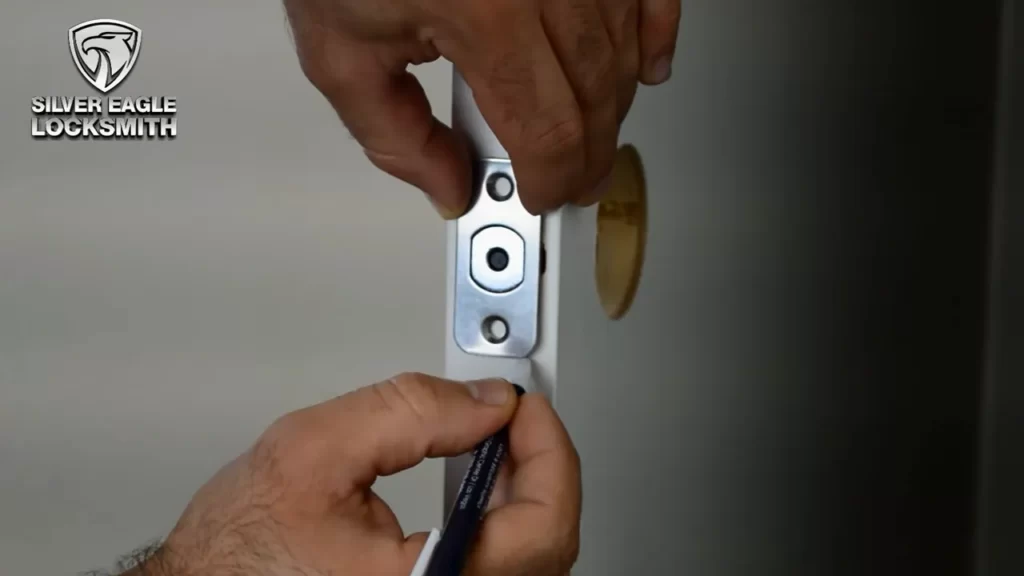
Position the strike plate on the door frame
Before screwing the strike plate into place, make sure to position it correctly on the door frame. The strike plate should align perfectly with the drilled holes for the lock and deadbolt. It’s crucial to ensure that the latch aligns properly with the strike plate, allowing the deadbolt to smoothly slide in and engage.
Use a pencil to mark the screw holes for the strike plate on the door frame. These marks will serve as guides when it’s time to attach the plate securely in place.
Screw it into place
Now that you have marked the screw holes, grab your trusty screwdriver or power drill. Make sure to choose screws that are long enough to secure the strike plate firmly to the door frame, but not so long that they poke through the other side. Too short, and the strike plate won’t stay in place securely. Too long, and it might affect the operation of the deadbolt.
Align the strike plate with the marked screw holes and, keeping it firmly pressed against the door frame, start screwing one screw at a time. Make sure to tighten each one gradually, moving from hole to hole, to ensure an even and secure attachment.
Once all the screws are in place, give the strike plate a gentle tug to check its stability. If it feels loose, it’s essential to tighten the screws further to ensure the plate is securely fastened. Remember, a loose strike plate might affect the effectiveness of your deadbolt, compromising the security of your door.
That’s it for installing the strike plate! You’re now one step closer to making your door more secure with a deadbolt. In our next section, we’ll cover the final step – testing and adjusting your deadbolt to ensure proper functionality. Stay tuned!
6. Test And Adjust
Test the Deadbolt’s Functionality
Once the deadbolt has been properly installed, it is crucial to test its functionality before considering the installation process complete. Testing the deadbolt will ensure that it is operating smoothly and providing the necessary security for your door.
To test the deadbolt, close the door and attempt to turn the key from inside the house. If the key turns smoothly and the deadbolt locks into place without any hindrance or resistance, then you can move on to the next step. However, if you encounter any difficulties while turning the key or if the deadbolt does not lock properly, adjustments may be required to ensure proper operation.
Make any Necessary Adjustments to Ensure Proper Operation
In some cases, adjustments may be necessary to ensure that the deadbolt operates smoothly and provides optimal security for your door. Fortunately, making adjustments to a deadbolt is usually a straightforward process that can be done without professional assistance.
Start by inspecting the alignment of the deadbolt latch and strike plate. If they are misaligned, it can cause the key to bind or prevent the deadbolt from fully extending. To adjust the alignment, loosen the screws that hold the strike plate in place, slightly shift its position, and tighten the screws back up. test the deadbolt’s functionality again to see if the adjustment solved the problem.
If the deadbolt still does not operate smoothly after adjusting the alignment, consider lubricating the moving parts with a graphite-based lubricant. Apply the lubricant to the keyhole and the bolt latch, ensuring that the lubricant reaches all the internal components. This will help reduce friction and allow the deadbolt to function correctly.
If you have tried both aligning the latch and lubricating the moving parts but the deadbolt still does not operate smoothly, it may be necessary to consult a professional locksmith or seek assistance from the manufacturer. They will have the expertise and knowledge to diagnose and resolve any complex issues that cannot be easily fixed through simple adjustments.
By thoroughly testing the deadbolt’s functionality and making any necessary adjustments, you can ensure that your door is properly secured and provides the necessary protection for your home or office. Taking the time to test and adjust the deadbolt will give you peace of mind, knowing that your door can withstand unwanted intruders and maintain the security of your space.
Maintenance Tips For Your Deadbolt
Lubricate the moving parts regularly
To ensure smooth operation, it is important to lubricate the moving parts of your deadbolt regularly. Lubrication not only helps to prevent rust and corrosion but also extends the lifespan of your lock. With just a few simple steps, you can keep your deadbolt functioning smoothly for years to come.
Start by selecting a suitable lubricant. Look for a high-quality, graphite-based lubricant or a silicone-based lubricant, as these are specifically designed for lock mechanisms. Avoid using oil-based lubricants as they can attract dust and debris, leading to clogging.
Once you have the right lubricant, apply a small amount to the keyhole, the latch, and the bolt itself. Insert the key into the keyhole and turn it several times to distribute the lubricant evenly. Then, operate the deadbolt from both sides of the door to ensure that the lubricant reaches all the moving parts.
Remember to wipe off any excess lubricant with a clean cloth to prevent it from attracting dirt or dust. Repeat this process every few months or whenever you notice your deadbolt becoming stiff or difficult to operate.
Inspect the screws and strike plate for any loosening
Regularly inspecting the screws and strike plate of your deadbolt is crucial for maintaining the security and functionality of your lock. Over time, these components can become loose due to frequent use or natural wear and tear. By addressing any loosening promptly, you can prevent further damage and ensure your deadbolt remains secure.
Using a screwdriver, check the tightness of the screws on both the strike plate and the deadbolt mechanism. If you find any loose screws, tighten them firmly without over-tightening to avoid stripping the screw holes. Make sure all the screws are flush with the door surface.
In addition to tightening, also check for any signs of damage such as stripped screw holes or bent strike plates. If you notice any issues, consider replacing the damaged components to ensure a secure fit.
By implementing these maintenance tips, you can ensure that your deadbolt continues to provide the security and peace of mind you rely on. Regular lubrication and inspections will not only keep your lock functioning smoothly but also extend its lifespan, saving you time and money in the long run.
Frequently Asked Questions For How To Install A Deadbolt In A Door
Can You Add A Deadbolt To A Regular Door?
Yes, you can add a deadbolt to a regular door. It provides extra security by adding another lock to the door.
Is It Hard To Install A Deadbolt?
Installing a deadbolt is not difficult. It can be done easily with basic tools and some DIY knowledge. Just follow the step-by-step instructions provided with the deadbolt, and you’ll have it installed in no time.
How Much Does It Cost To Install A Deadbolt?
The cost to install a deadbolt varies, but it ranges from $100 to $200 on average. Factors affecting the cost include the type of deadbolt, complexity of installation, and additional security features. Professional locksmiths are recommended for proper installation to ensure the safety of your property.
How Do You Install A Deadlock On A Door?
To install a deadlock on a door, follow these steps: – First, choose a suitable deadlock and gather the necessary tools. – Next, mark the position on the door where the deadlock will be installed. – Then, drill the required holes for the deadlock components.
– Install the deadlock by attaching the lock body and strike plate. – Finally, test the deadlock to ensure it works properly.
Conclusion
Installing a deadbolt in a door may seem like a daunting task, but with the right guidance, it can be accomplished smoothly. By following the step-by-step instructions provided in this blog post, you can ensure enhanced security for your home or office.
Remember to gather the necessary tools, measure accurately, and take your time during the installation process. With a little patience and effort, you’ll have a properly functioning deadbolt that provides peace of mind.