To install a pocket door kit, first, measure and mark the door opening. Then, secure the track and brackets, attach the rollers to the door, and hang it on the track.
Installing a pocket door kit can be a great space-saving solution for your home. Pocket doors slide into a recessed opening in the wall, rather than swinging open like traditional doors. This can be especially beneficial for smaller rooms or tight hallways where a swinging door would be cumbersome.
In addition to saving space, pocket doors also offer a sleek and modern look to any interior. If you’re considering installing a pocket door kit, this guide will walk you through the steps to help you complete the installation process smoothly and efficiently.
Tools And Materials Needed
Tools and Materials Needed
Installing a pocket door kit is a great way to save space and add a touch of elegance to your home. Whether you’re a seasoned DIY enthusiast or a beginner looking to tackle your first project, installing a pocket door kit is a manageable task that can easily be completed in a day or two.
List of Required Tools
To get started, gather the following tools:
- Measuring tape
- Pencil
- Saw
- Screwdriver
- Level
- Chisel
- Drill
- Hammer
- Sanding block
Types of Pocket Door Kits Available
There are a variety of pocket door kits available in the market, each designed to suit different needs and preferences. Here are a few popular types:
| Type | Description |
|---|---|
| Pre-assembled Pocket Door Kit | This type of kit comes fully assembled, making installation quick and easy. It includes a pre-hung door panel and a track system, eliminating the need to build the pocket frame. |
| Frame-only Pocket Door Kit | If you prefer to customize your pocket door, a frame-only kit is a great option. It includes the necessary hardware and track system, allowing you to choose your own door panel. |
| Soft-close Pocket Door Kit | For those who value convenience and quietness, a soft-close kit is an ideal choice. It features a mechanism that ensures the door closes slowly and softly, reducing noise and preventing slamming. |
| Double Pocket Door Kit | If you’re looking to create a large opening between two rooms, a double pocket door kit is perfect. It includes two door panels that slide into opposite pockets, creating a wide entryway. |
Now that you’re familiar with the tools and materials needed for installing a pocket door kit and the different types available, you’re ready to embark on your project. Remember to follow the manufacturer’s instructions and take your time to ensure a successful installation. Soon enough, you’ll be enjoying the benefits of a stylish and space-saving pocket door in your home.
Measuring And Planning
Before embarking on the installation of a pocket door kit, it’s essential to take accurate measurements and carefully plan the project. This will ensure that the door fits perfectly and functions smoothly once installed. In this guide, we will walk you through the process of measuring the door opening and determining the correct size of the pocket door kit.
How to measure the door opening
Measuring the door opening accurately is the first step towards a successful pocket door installation. Here’s a step-by-step guide to help you get it right:
- Carefully measure the width of the door opening from one side to the other. To ensure accuracy, measure at three different points: the top, middle, and bottom.
- Take note of the smallest measurement you obtained. This is the width you should use for selecting the pocket door kit.
- Next, measure the height of the door opening from the floor to the top of the opening. Again, measure at three different points: the left side, middle, and right side.
- Take note of the smallest measurement obtained. This will be the height you will use in selecting your pocket door kit.
- When measuring, always use a tape measure and ensure it is held straight and level for accurate readings.
Determining the correct size of the pocket door kit
Once you have the measurements of your door opening, it’s time to determine the correct size of the pocket door kit. Here’s what you need to do:
1. Using the width measurement you obtained earlier, refer to the manufacturer’s specifications or consult their website to find the suitable pocket door kit for your door opening width. Be sure to consider any recommended clearances or allowances provided by the manufacturer.
2. Likewise, using the height measurement taken, refer to the manufacturer’s specifications or website to select the appropriate pocket door kit size for your door opening height.
3. Verify the compatibility of the selected pocket door kit size with the wall structure and stud spacing to ensure a proper and secure installation.
By accurately measuring your door opening and selecting the right pocket door kit size, you are setting the foundation for a successful installation. Remember, taking the time to plan and measure will save you from potential problems and setbacks later on in the project. So grab that tape measure, follow the steps outlined here, and get ready to enjoy the benefits of a stylish and space-saving pocket door!
Step 1: Removing Existing Door
Before you can install a pocket door kit, you need to first remove the existing door. This step is crucial as it prepares the doorway for the installation process. When removing the door from its hinges, there are a few things you need to keep in mind to ensure a smooth and successful removal.
Removing the door from its hinges
When removing the door from its hinges, follow these steps:
- Start by closing the door completely and locate the hinges on the side facing the inside of the room.
- Inspect the hinges to identify the type of hinge mechanism used. It can be a standard hinge, ball bearing hinge, or concealed hinge.
- Using a screwdriver or a drill with the appropriate bit, start removing the screws that secure the hinge plates to the door frame.
- Once all the screws are removed, gently lift the door up and away from the hinges.
- Set the door aside in a safe location, away from the construction area.
Preparing the doorway for installation
Once the door has been removed, it’s time to prepare the doorway for the installation of the pocket door kit. This involves ensuring the doorway is clean, level, and free of obstructions.
Here’s what you need to do:
- Remove any remaining hardware, such as door handles and strike plates, from the door frame using a screwdriver.
- Clean the doorway thoroughly, removing any dust, dirt, or debris that might interfere with the installation process.
- Inspect the doorway for any irregularities or obstructions. If there are any, address them before proceeding with the installation.
- Make sure the doorway is level by using a level tool. If there are any discrepancies, use shims or leveling compounds to correct them.
By following these steps, you will have successfully completed the first step of installing a pocket door kit. With the existing door removed and the doorway prepared, you are now ready to move on to the next step: assembling the pocket door frame.
Step 2: Assembling The Pocket Door Frame
Now that you have gathered all the necessary tools and materials for installing a pocket door, it’s time to move on to the next step: assembling the pocket door frame. The frame is a crucial component of the pocket door kit and ensures the smooth operation of the door. In this step-by-step guide, we will walk you through the process of assembling the frame for your pocket door.
Understanding the components of the pocket door kit
Before diving into the assembly process, it’s important to familiarize yourself with the various components that make up the pocket door kit. Here’s a quick overview:
| Component | Description |
|---|---|
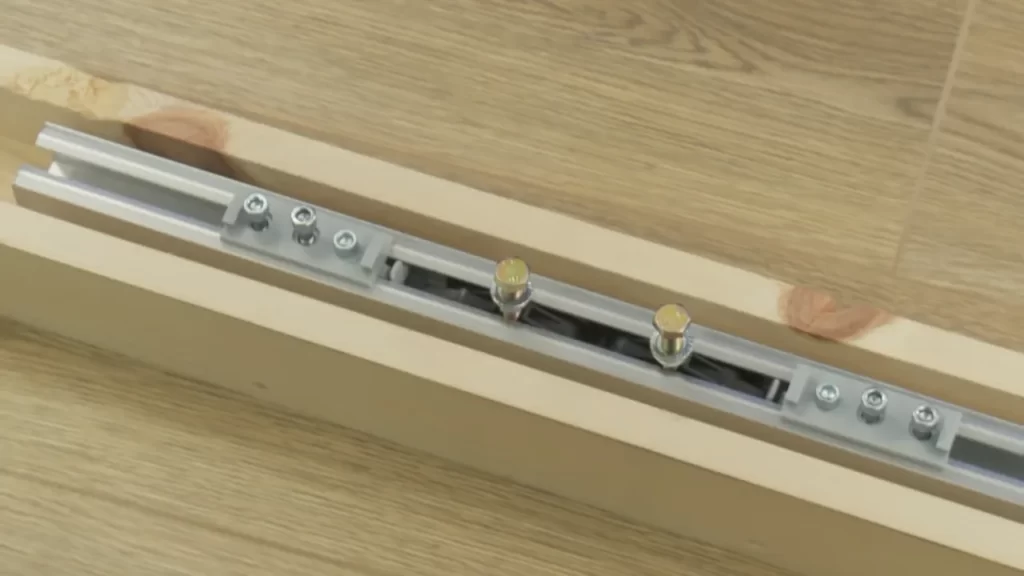
| Track and rollers | A sturdy metal track that supports the door and allows it to slide smoothly. |
| Split studs | Vertical frames that create the sides of the pocket where the door will slide into. |
| Header and footer plates | Horizontal frames that form the top and bottom of the pocket. |
Having a good understanding of these components will make the assembly process much smoother.
Step-by-step instructions for assembling the frame
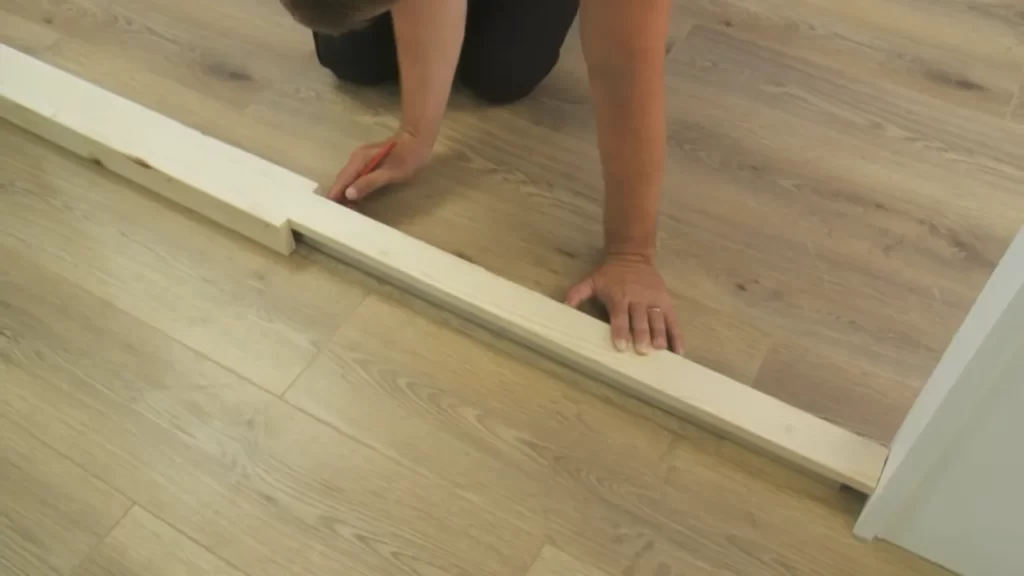
- Start by measuring the height and width of your door opening. Use these measurements to cut the split studs and header/footer plates to the appropriate size.
- Secure the split studs into the wall on both sides of the door opening, making sure they are plumb and level.
- Attach the header and footer plates to the split studs, using screws or nails to hold them in place securely.
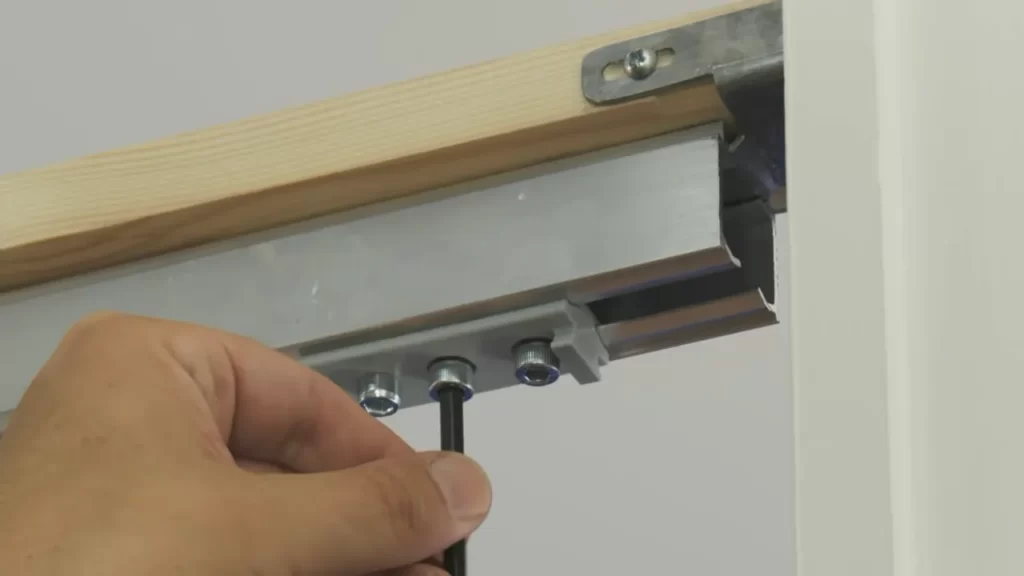
- Next, attach the track and rollers to the header plate. Follow the manufacturer’s instructions to ensure proper installation.
- Double-check that the frame is plumb, level, and secure before proceeding to the next step.
Once you have successfully assembled the pocket door frame, you’re one step closer to enjoying the space-saving benefits of a pocket door. In the next step, we will guide you through the process of installing the actual door into the frame, so stay tuned!
Step 3: Installing The Frame
Step 3: Installing the Frame
Now that you have prepared the doorway and gathered all the necessary tools, it’s time to move on to the most crucial step – installing the frame for your pocket door. The frame acts as the backbone of the entire pocket door system, providing stability and functionality. Follow the instructions below to ensure a successful installation.
Positioning the Frame in the Doorway
The first and foremost step in installing the pocket door frame is to position it correctly in the doorway. Make sure you have the right measurements and align the frame accordingly. You can use a measuring tape and a level to ensure accuracy. Follow these steps for proper positioning:
- Begin by placing the frame inside the doorway, making sure it is flush with the wall on either side. This will help create a seamless appearance once the door is in place.
- Use the measuring tape to check if the frame is centered and level. Adjust as necessary.
- Keep in mind that the frame should be installed with the rough opening in mind. The rough opening is typically wider and taller than the actual door size, allowing for necessary adjustments.
- Once you are satisfied with the frame’s positioning, mark the locations where the frame will be secured to the surrounding structure.
Securing the Frame to the Surrounding Structure
After positioning the frame, it’s time to secure it to the surrounding structure. This will ensure stability and durability for your pocket door system. Follow these steps to properly secure the frame:
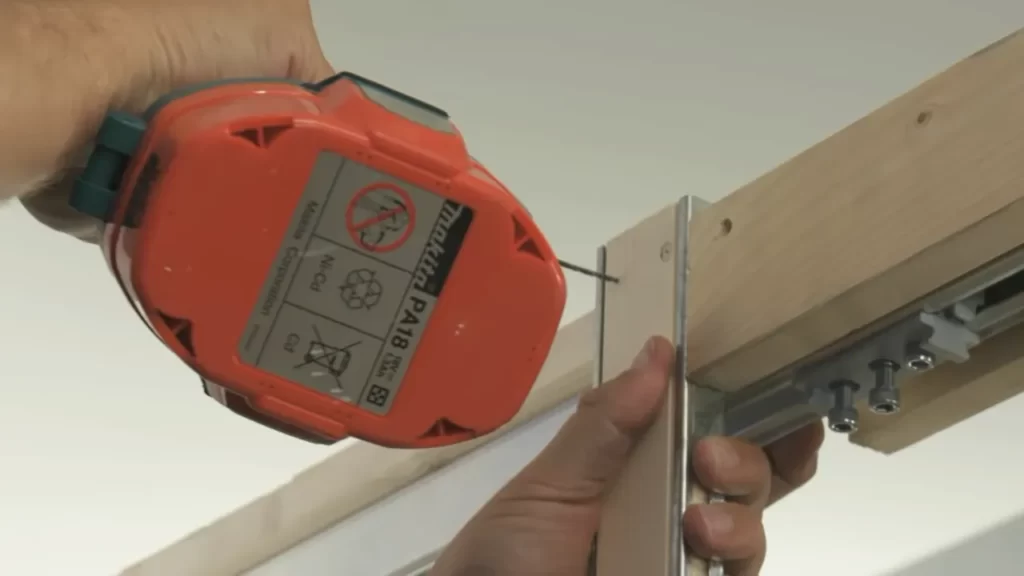
- Using a drill, create pilot holes at the marked locations on the frame.
- Take screws that are appropriate for the material of your surrounding structure (such as wood or metal), and insert them into the pilot holes. Make sure the screws are long enough to anchor the frame securely.
- Tighten the screws with a screwdriver or drill, but be careful not to over-tighten and cause damage to the frame or surrounding structure.
- Check the frame’s stability by giving it a gentle shake. If it feels secure, you’re ready to move on to the next step. If not, double-check the screws’ tightness and make any necessary adjustments.
- Lastly, use a level to ensure that the frame is still aligned properly. If needed, make slight adjustments to achieve a level position.
By following these steps, you have successfully installed the frame for your pocket door. This integral component sets the stage for the rest of the installation process, bringing you one step closer to enjoying the benefits of a functional and space-saving pocket door system.
Step 4: Hanging The Door
Once you have prepared the opening, installed the track, and mounted the rollers, it is time to hang the pocket door. This step involves attaching the door to the rollers and adjusting it for smooth operation. Follow the instructions below to complete this process:
Attaching the door to the rollers
Attaching the door to the rollers is an essential part of installing a pocket door kit. Here’s a step-by-step guide on how to do it:
- First, carefully lift the pocket door and align the rollers with the door hangers on top of the track.
- Once the rollers are in position, gently lower the door onto the track, ensuring that the rollers fit securely into the door hangers. Make sure to check that the door is level and properly aligned.
- Next, locate the screws provided with the pocket door kit. These screws are designed to secure the door to the rollers.
- With the screws in hand, insert them into the designated holes on the door hangers. Take your time to tighten them sufficiently but avoid overtightening, as this could affect the smooth movement of the door.
By following these steps, you can securely attach the door to the rollers and ensure that it moves smoothly within the pocket.
Adjusting the door for smooth operation
After attaching the door to the rollers, it’s important to make any necessary adjustments to ensure that it operates smoothly. Here’s what you need to do:
- Start by checking if the door glides effortlessly along the track. If you notice any resistance or sticking points, it may be due to misalignment.
- To adjust the door’s position, locate the adjustment screws on the rollers. These screws allow you to raise or lower the door and adjust its vertical position.
- Using a screwdriver, turn the adjustment screws clockwise or counterclockwise as needed. Make small adjustments at a time, testing the door’s movement after each adjustment.
- Continue tweaking the adjustment screws until the door glides smoothly from the open to the closed position without any obstruction or resistance.
Remember to periodically check the door’s alignment and adjust as necessary to maintain optimal performance.
By properly attaching the door to the rollers and adjusting it for smooth operation, you can ensure that your pocket door kit functions flawlessly. With this step complete, you are one step closer to enjoying the advantages of a stylish and space-saving pocket door in your home.
Step 5: Securing The Frame And Finishing Touches
Once you have successfully installed the pocket door kit frame and hung the door, the next step is to secure the frame and add the finishing touches. This step is crucial to ensure the stability and functionality of your pocket door. In this section, we will guide you through the process of installing the door guides and stoppers, as well as securing the frame with screws and brackets.
Installing the door guides and stoppers
The door guides and stoppers play a vital role in keeping the pocket door aligned and preventing it from swinging too far in either direction. Here’s how you can install them:
- Begin by determining the top and bottom of the pocket door.
- Measure and mark the locations where the door guides will be installed, usually on the floor or the door jamb.
- Attach the door guides using the screws provided in the kit. Make sure they are securely fastened.
- Next, position the door stoppers at the appropriate locations, typically on the door jamb or the track.
- Secure the stoppers in place using the screws provided.
- Test the door movement to ensure it glides smoothly between the door guides and stops at the desired positions.
Securing the frame with screws and brackets
Properly securing the pocket door frame is essential to prevent any shifting or movement that could affect the door’s functionality. Follow these steps to secure the frame:
- Identify the mounting points on the frame where screws and brackets will be used.
- Using a power drill, carefully screw the frame to the surrounding walls or studs. Make sure to position the screws in the designated areas to maintain the structural integrity of the frame.
- If your pocket door kit includes brackets, attach them to the frame and secure them to the adjacent walls using screws.
- Double-check the tightness of all screws and brackets to ensure a solid and secure frame installation.
Once you have completed these steps, your pocket door frame should be properly secured, and your door should be ready for final adjustments and finishing touches.
Maintaining The Pocket Door
Once you have successfully installed a pocket door kit, it is important to understand how to maintain it properly. By taking a few simple steps, you can ensure that your pocket door and frame are in good condition and function smoothly for years to come. In this section, we will explore some valuable tips for keeping the door and frame in good condition, as well as how to lubricate the rollers and hinges to maintain optimal performance.
Tips for Keeping the Door and Frame in Good Condition
To ensure the longevity of your pocket door, it is important to follow these tips for keeping the door and frame in good condition:
- Regularly inspect the door for any signs of wear and tear, such as cracks or dents. If you notice any damage, it is important to repair or replace the affected parts as soon as possible.
- Keep the track clean and free from debris. Dirt and dust can accumulate in the track, causing the door to stick or slide unevenly. Use a vacuum cleaner or a soft brush to remove any debris and ensure smooth operation.
- Check the alignment of the door regularly. If the door becomes misaligned, it may not slide smoothly or could get stuck. Adjust the door’s position using the adjustment screws until it is properly aligned.
- Avoid slamming the door shut. This can cause unnecessary stress on the frame and may lead to misalignment or damage. Instead, close the door gently to preserve its integrity.
- Paint or seal the door and frame regularly. This will protect them from moisture and reduce the chances of warping or rotting. Follow the manufacturer’s guidelines for the appropriate sealing materials and frequency of application.
Lubricating the Rollers and Hinges
In addition to general maintenance, it is crucial to lubricate the rollers and hinges of your pocket door to ensure smooth operation. Here’s how you can do it:
- Start by cleaning the rollers and hinges with a soft cloth to remove any dirt or debris.
- Apply a thin layer of silicone-based lubricant to the rollers and hinges. Avoid using oil-based lubricants as they can attract more dirt and grime over time.
- Move the door back and forth several times to distribute the lubricant evenly. This will help the door slide smoothly along the track.
- If you notice any excess lubricant, use a clean cloth to wipe it away.
- Repeat this lubrication process every few months or as needed to maintain optimal performance.
By following these maintenance tips and regularly lubricating the rollers and hinges of your pocket door, you can ensure that it operates smoothly and remains in good condition for years to come. Taking the time to care for your pocket door will help you avoid any potential issues and ensure that it continues to add functionality and style to your space.
Troubleshooting Common Issues
Installing a pocket door kit can be a great way to save space and add a touch of modernity to your home. However, like any DIY project, it’s not uncommon to run into a few hiccups along the way. In this section, we’ll address some of the most common issues that may arise during the installation process and provide practical solutions to troubleshoot them.
Dealing with misaligned doors
Misaligned doors can be a frustrating problem, causing difficulties when opening and closing. Fortunately, there are several methods you can try to rectify this issue:
- Ensure that the track is level: Use a spirit level to check that the track is installed horizontally. If it’s not level, adjust the brackets accordingly.
- Check the door height: Measure the distance between the floor and the bottom of the door on both sides. If they are not equal, adjust the door by loosening the screw on the hanger brackets and sliding the door up or down.
- Inspect the rollers: Examine the rollers on the hanger brackets to ensure they are not damaged or obstructed. If necessary, replace the rollers to improve door alignment.
- Reinstall the track: If the misalignment persists, it may be necessary to remove the track and reinstall it. Make sure to follow the manufacturer’s instructions carefully.
Fixing squeaky or stuck doors
Squeaky or stuck doors can be an annoying nuisance, but with a little troubleshooting, you can get them back in working order:
- Apply lubrication: Squeaky doors are often the result of dry or worn-out rollers. Apply a lubricant, such as silicone spray or powdered graphite, to the rollers and track to alleviate the squeaking.
- Check for debris: Inspect the track for any dirt, dust, or debris that may be causing the door to stick. Wipe clean the track using a damp cloth or brush to remove any obstructions.
- Tighten loose screws: Over time, screws may become loose, causing the door to stick. Inspect the door and track for any loose screws and tighten them as needed.
- Adjust the floor guide: If the door is sticking at the bottom, check the position of the floor guide. It should be properly aligned with the grooves on the door, allowing smooth movement.
By following these troubleshooting tips, you can overcome common issues that may arise during the installation of a pocket door kit. With a little patience and perseverance, you’ll soon enjoy the convenience and space-saving benefits of a smoothly functioning pocket door.
Choosing The Right Hardware
Types of door handles and locks suitable for pocket doors
When it comes to choosing the right hardware for your pocket doors, one of the key decisions you’ll need to make is selecting the most suitable door handles and locks. The right handles and locks not only enhance the functionality of your pocket doors but also contribute to the overall aesthetics of your space. Here are a few types of handles and locks that are often considered ideal for pocket doors:
1. Flush Door Pulls
Flush door pulls are sleek and minimalistic, making them a popular choice for pocket doors. These handles are recessed into the door, creating a smooth surface that won’t obstruct the door’s movement. Flush door pulls are not only space-saving but also provide a seamless and modern look to your pocket door.
2. Edge Pulls
Edge pulls are discreet handles that are installed into the edge of the door, allowing you to conveniently pull the door open. These handles are designed to be unobtrusive and blend in with the door’s design. If you prefer a more subtle and hidden handle option for your pocket door, edge pulls are a great choice.
3. Privacy Locks
If privacy is a concern, especially for pocket doors used in bathrooms or bedrooms, privacy locks are a must-have. These locks are typically installed on the inside of the door and allow you to secure the door from the inside. Privacy locks provide peace of mind and ensure that your personal space remains private when needed.
Factors to consider when selecting hardware
Choosing the right hardware for your pocket door involves considering a few important factors to ensure seamless functionality and long-term durability. Here are some key factors you should consider before making a decision:
1. Door Thickness and Weight
Different pocket door kits are designed to accommodate doors of varying thicknesses and weights. It’s crucial to check the specifications of the hardware you’re interested in to ensure it is compatible with your door. Heavy-duty pocket door kits may be required for thicker or heavier doors to provide adequate support and smooth operation.
2. Durability and Quality
Investing in high-quality hardware ensures long-lasting performance. Look for door handles and locks made from durable materials such as stainless steel or solid brass, as they are less prone to wear and tear. Choosing hardware from reputable manufacturers can also give you peace of mind knowing that you are purchasing reliable and well-crafted products.
3. Aesthetics and Design
Consider the overall style and design of your space when selecting hardware. Opt for handles and locks that complement the existing decor and enhance the visual appeal of your pocket doors. Whether you prefer a modern, minimalist look or a more classic and traditional design, there are a variety of options available to suit your personal taste. In conclusion, selecting the right hardware for your pocket doors is an important step in ensuring functionality, durability, and aesthetics. By considering factors such as door handles and locks suitable for pocket doors, as well as the door’s thickness and weight, durability, and design, you can make an informed decision that will enhance the overall look and performance of your pocket doors.
Enhancing The Door’S Appearance
Adding Trim or Molding to the Frame
One way to enhance the appearance of your pocket door is by adding trim or molding to the frame. This simple step can make a big difference in how the door blends with your overall decor. By choosing the right trim or molding, you can create a seamless transition from the wall to the door, giving it a polished and professional look. Installing trim or molding is relatively easy and can be done by following these steps:
- Measure the length and width of your door frame to determine the amount of trim or molding you will need.
- Select the type of trim or molding that matches your desired aesthetic and the style of your home. This could be a simple casing, a decorative molding, or even a trim with intricate details.
- Cut the trim or molding to the appropriate length and angle using a miter saw.
- Apply a thin bead of construction adhesive to the backside of the trim or molding.
- Press the trim or molding firmly against the door frame, making sure it is aligned correctly.
- Use finishing nails or a brad nailer to secure the trim or molding in place.
- Fill any gaps or nail holes with wood filler, and then sand the surface smooth.
- Apply a coat of paint or stain to the trim or molding to match your desired finish.
Painting or Staining the Door to Match the Surrounding Decor
To further enhance the appearance of your pocket door, consider painting or staining the door to match the surrounding decor. This can create a cohesive and seamless look, tying the door into the overall design of the room. Whether you choose to paint the door a bold color to make it a focal point or stain it to highlight the natural beauty of the wood, following these steps can help you achieve a flawless finish:
- Clean the door surface and remove any existing paint or finish using sandpaper or a paint stripping solution.
- Make any necessary repairs to the door, such as filling in dents or scratches with wood filler.
- Apply a primer to the door to ensure proper adhesion of the paint or stain.
- If you are painting the door, choose a high-quality paint and apply it evenly using a brush or roller. Apply multiple coats if needed, allowing each coat to dry completely before applying the next.
- If you are staining the door, select a stain color that complements your existing decor. Apply the stain with a brush or rag, following the manufacturer’s instructions for application and drying times. Consider applying a clear topcoat to protect the stained surface.
- Allow the paint or stain to dry completely before handling or reinstalling the door.
By adding trim or molding to the frame and painting or staining the door to match the surrounding decor, you can transform your pocket door into an attractive and cohesive element of your interior design. These simple enhancements not only improve the overall appearance of the door but also create a more inviting and polished space.
Frequently Asked Questions For How To Install Pocket Door Kit
How Difficult Is It To Install A Pocket Door?
Installing a pocket door is relatively easy. It requires basic carpentry skills and tools. Measure the opening, build a frame, attach the track, and insert the door. With the right instructions, it can be a simple and rewarding DIY project.
Can You Install A Pocket Door In A Pre Existing Wall?
Yes, it is possible to install a pocket door in a pre-existing wall. Professional help may be required to ensure proper fit and alignment.
How Do You Install A Pocket Door Jamb Kit?
To install a pocket door jamb kit, follow these steps: 1. Start by removing the existing door trim and track. 2. Install the jamb brackets on both sides of the doorway. 3. Attach the header track above the opening. 4.
Insert the door into the track and adjust the rollers for smooth operation. 5. Finally, install the door trim and any necessary finishing touches.
Can You Install A Pocket Door Where A Regular Door Is?
Yes, you can install a pocket door in the place of a regular door.
Conclusion
Installing a pocket door kit can greatly enhance both the functionality and aesthetics of your space. By following the step-by-step guide provided in this blog post, you can successfully upgrade your door system with ease. Remember to gather the necessary tools, measure twice before cutting, and take your time during the installation process.
With patience and precision, you’ll have a smooth-sliding pocket door in no time! Happy DIY-ing!