To install the Nest Doorbell, follow these steps: 1. Download the Nest app on your smartphone.
2. Scan the QR code on the doorbell to connect it to your Wi-Fi network. The Nest Doorbell is an innovative smart doorbell that offers advanced features to enhance your home security and convenience. It allows you to see and speak to visitors at your door from anywhere using your smartphone.
Installing the Nest Doorbell is a straightforward process that can be completed in a few simple steps. We will guide you through the installation process of the Nest Doorbell, ensuring that you can start enjoying its benefits quickly and easily. Let’s get started!
Gather The Necessary Tools
Before you start installing your Nest Doorbell, it’s important to gather all the necessary tools to ensure a smooth and hassle-free installation process. Having the right tools at hand will not only save you time but will also help you prevent any potential damage to your doorbell or the surrounding area. This section will provide you with a checklist of essential tools for the Nest Doorbell installation and explain why each tool is crucial.
Checklist of Tools for Nest Doorbell Installation
To begin with, here’s a comprehensive checklist of tools you’ll need for the installation of your Nest Doorbell:
| Screwdriver | A screwdriver is essential for removing or loosening existing screws on your doorbell mount, making it easier to install the Nest Doorbell. |
| Drill | A drill will be necessary if you need to create new holes for the doorbell mount. Ensure you have the appropriate drill bit size for drilling into your chosen surface. |
| Tape Measure | A tape measure is useful for ensuring the proper positioning of the doorbell mount. It helps you accurately measure the distance between the mount and other objects, such as door frames or windows. |
| Level | A level is crucial for aligning the doorbell mount correctly. It ensures that your Nest Doorbell will be perfectly straight and well-balanced, optimizing its performance and appearance. |
| Pencil | Having a pencil on hand allows you to mark the precise location for the new holes you’ll need to drill. It helps you avoid errors and ensures accurate installation. |
| Wire Cutters | If the existing wiring is too long or needs adjustment during installation, wire cutters can help you trim the wire to the desired length, making the connection neater and more secure. |
| Stud Finder | A stud finder can be handy if you plan to mount your doorbell on a wall. It helps you locate and mark the position of studs for a more secure installation. |
Why These Tools Are Essential for Smooth Installation
Now that you have a checklist of the necessary tools, let’s delve into why each of these tools is essential for a smooth Nest Doorbell installation.
- Screwdriver: The screwdriver allows you to remove any existing screws on your doorbell mount, facilitating the installation process.
- Drill: A drill is crucial if you need to create new holes for the doorbell mount. Without a drill, it would be challenging to securely attach the mount to the desired location.
- Tape Measure: With a tape measure, you can accurately measure the distance between the mount and other objects, ensuring proper positioning and alignment.
- Level: A level ensures that your Nest Doorbell will be perfectly straight and aligned. This enhances its aesthetic appeal and prevents any technical issues that may arise from incorrect positioning.
- Pencil: Marking the precise location for the new holes with a pencil helps you achieve accurate installation and avoid any mistakes.
- Wire Cutters: In case the wiring needs adjustment, wire cutters allow you to trim the wire to the desired length, ensuring a clean and secure connection.
- Stud Finder: If you plan to mount your doorbell on a wall, a stud finder is essential for locating and marking the position of studs. This guarantees a stable and secure installation.
By gathering these essential tools, you’ll be well-prepared for a smooth and successful installation of your Nest Doorbell. Having each tool readily available will save you time, effort, and potential frustration, ensuring a hassle-free experience from start to finish.
Ensure Proper Power Supply
One of the key factors in successfully installing the Nest Doorbell is ensuring a proper power supply. The doorbell operates using low-voltage power, which means that it needs to be connected to the existing wiring in your home. Understanding the power requirements and checking the existing wiring are crucial steps in this process. In this section, we will explore these steps in detail to help you ensure a smooth and trouble-free installation.
Understanding Power Requirements for Nest Doorbell
Before diving into the installation process, it’s essential to understand the power requirements for the Nest Doorbell. The doorbell operates using a voltage range of 16-24 volts AC and requires a minimum of 10VA of power. It’s crucial to ensure that your home’s existing wiring and transformer can meet these requirements.
How to Check and Prepare the Existing Wiring
Checking and preparing the existing wiring is the next step in ensuring a proper power supply for your Nest Doorbell. Here’s a step-by-step guide:
- Start by turning off the power supply to the doorbell system from the circuit breaker. This will help prevent any accidents during the inspection process.
- Locate your existing doorbell chime and remove the cover. You should see two wires connected to the chime. These wires are responsible for delivering power to the doorbell.
- Use a multimeter to test the voltage across the two wires. Set the multimeter to the AC voltage mode and touch the probes to the exposed ends of the wires. The reading should fall within the 16-24 volts AC range.
- If the voltage reading is within the required range, the existing wiring is compatible with the Nest Doorbell. However, if the reading is lower or higher than the specified range, you may need to consider upgrading your home’s transformer or wiring to ensure proper power supply. In such cases, it’s recommended to seek professional assistance.
- Once you have confirmed that the voltage is within the acceptable range, you can proceed with preparing the wiring for the Nest Doorbell installation. This involves ensuring there is enough slack in the wires, removing any old doorbell components, and making sure the wiring is securely fastened in place.
Ensuring a proper power supply is a crucial step in installing the Nest Doorbell. By understanding the power requirements and checking the existing wiring, you can ensure a smooth and successful installation process. Now that you have completed the necessary preparations, you are ready to move on to the next steps of the installation process.
Assess The Wi-Fi Connection
Before diving into the installation of your Nest Doorbell, it is crucial to assess the strength and stability of your Wi-Fi connection. A stable Wi-Fi connection is essential for a seamless experience with your doorbell, ensuring that you never miss a visitor or an important notification. To help you evaluate and optimize your Wi-Fi signal, here are some key steps to follow:
Importance of a Stable Wi-Fi Connection for Nest Doorbell
A stable Wi-Fi connection plays a vital role in allowing your Nest Doorbell to function optimally. The doorbell relies on your Wi-Fi network to transmit video and audio signals, enabling you to see and communicate with visitors remotely. A weak or unreliable Wi-Fi connection can result in delayed notifications, interrupted video streams, or even a complete disconnect from your doorbell, rendering it ineffective.
How to Evaluate and Strengthen Your Wi-Fi Signal
Evaluating and strengthening your Wi-Fi signal doesn’t have to be a daunting task. Follow these steps to ensure your Wi-Fi network is up to the task of supporting your Nest Doorbell:
1. Check Signal Strength
Walk around your house and note the signal strength of your Wi-Fi network on your smartphone or computer. Make a note of any areas where the signal is weak or drops completely. These spots can indicate potential Wi-Fi dead zones that may need attention.
2. Position Your Router Strategically
Place your Wi-Fi router in a central location within your home, away from obstructions such as walls and metal objects. This will help distribute the signal evenly throughout your living space and reduce the chances of weak spots.
3. Reduce Interference
Minimize interference by keeping your router away from other electronic devices, such as cordless phones, microwaves, or baby monitors. These devices can disrupt the Wi-Fi signal and affect its overall performance.
4. Upgrade Your Router Firmware
Regularly check for router firmware updates and install them when available. These updates often include bug fixes and performance enhancements that can improve your Wi-Fi signal strength.
5. Consider Wi-Fi Extenders or Mesh Networks
If you have identified significant Wi-Fi dead zones in your home, consider using Wi-Fi extenders or setting up a mesh network. These devices help extend your Wi-Fi coverage, ensuring a strong signal reaches every corner of your house.
By following these steps, you can assess and improve your Wi-Fi signal strength, ensuring your Nest Doorbell functions flawlessly. A stable Wi-Fi connection is the foundation for a reliable and efficient doorbell system that keeps you secure and connected.
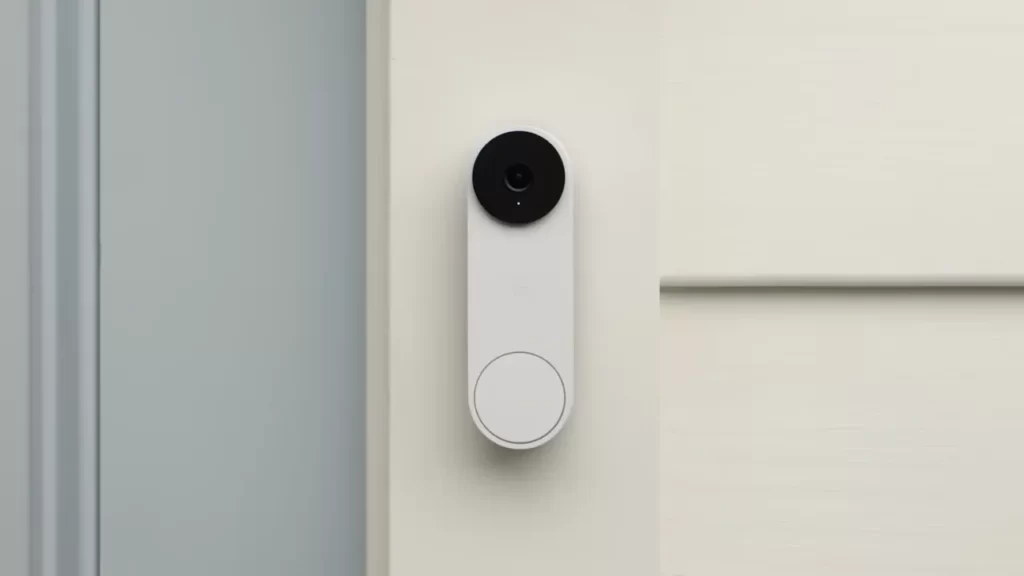
Step 1: Mounting The Doorbell And Preparing The Mounting Kit
If you’ve recently purchased a Nest Doorbell and you’re eager to get it up and running, you’re in the right place. In this step-by-step guide, we’ll walk you through the process of mounting your Nest Doorbell and preparing the mounting kit. By the end of this tutorial, you’ll have your doorbell securely installed and ready to provide you with peace of mind and convenience. Let’s get started!
How to Choose the Right Location for Mounting
Choosing the correct location for mounting your Nest Doorbell is crucial for optimal performance and security. Here are some key factors to consider:
- Find a spot with a clear line of sight to your front porch or entrance, ensuring a comprehensive view of any approaching visitors.
- Ensure the doorbell is positioned at a height that allows for easy reach, ideally around 48 inches from the ground.
- Take into account the existing wiring and doorbell chime, ensuring compatibility and easy installation.
- Consider the availability of Wi-Fi signal strength in the chosen location, as a stable connection is essential for seamless functionality.
Once you’ve evaluated these factors, you’re ready to move on to the next step.
Ensuring Sturdy Placement with the Mounting Kit
Now that you’ve chosen the ideal location for your Nest Doorbell, let’s ensure its sturdy placement using the provided mounting kit. Follow these steps:
- Begin by attaching the mounting bracket to the designated location, using the screws and anchors included in the kit. Make sure it is tight and secure, providing a stable foundation for the doorbell.
- Next, attach the backplate of the doorbell to the mounting bracket. Align the holes on the backplate with the screws on the bracket and slide it into place. Secure it in position using the provided security screw.
- Double-check the stability of the doorbell by gently tugging on it. If it feels wobbly or loose, tighten the screws and ensure it is securely fastened.
With your Nest Doorbell now properly mounted and the mounting kit in place, you’re ready to move on to the next step of the installation process. Stay tuned for our upcoming blog post, where we’ll guide you through the wiring and setup of your doorbell.
Step 2: Connecting The Wiring And Adjusting Power
Settings
Once you have safely mounted your Nest Doorbell, it’s time to connect the electrical wiring and configure the power settings to ensure optimal performance. This step is crucial in ensuring that your doorbell functions correctly and is powered correctly. In this section, we will guide you through the process of safely handling and connecting the electrical wiring, as well as configuring the power settings.
Safely Handling and Connecting the Electrical Wiring
Before you start handling the electrical wiring, it’s important to prioritize your safety. Always remember to turn off the power to your existing doorbell and make sure you’re wearing protective gloves and goggles. Safety should be your number one priority, so take the necessary precautions before proceeding. Once you’re ready, follow these steps:
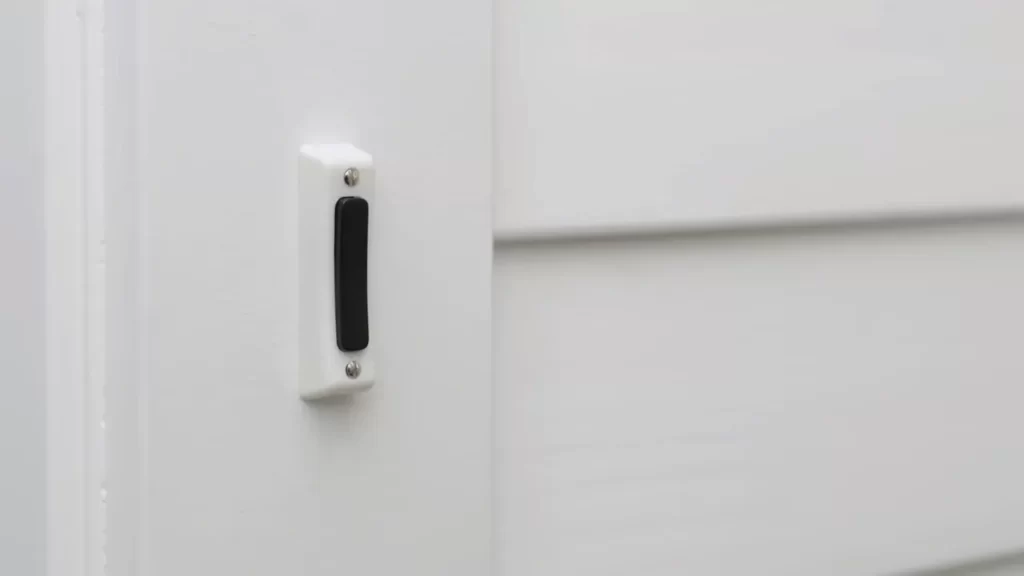
- Start by unscrewing the existing doorbell button from the wall. Keep all the screws and wires nearby, as you will need them during the installation process.
- Identify the wires attached to the old doorbell button. Typically, you will have two wires: one labeled “Front” and the other labeled “Trans”.
- Remove the wires from the existing doorbell button by loosening the screws that secure them in place. Make sure to remember which wire is connected to which terminal.
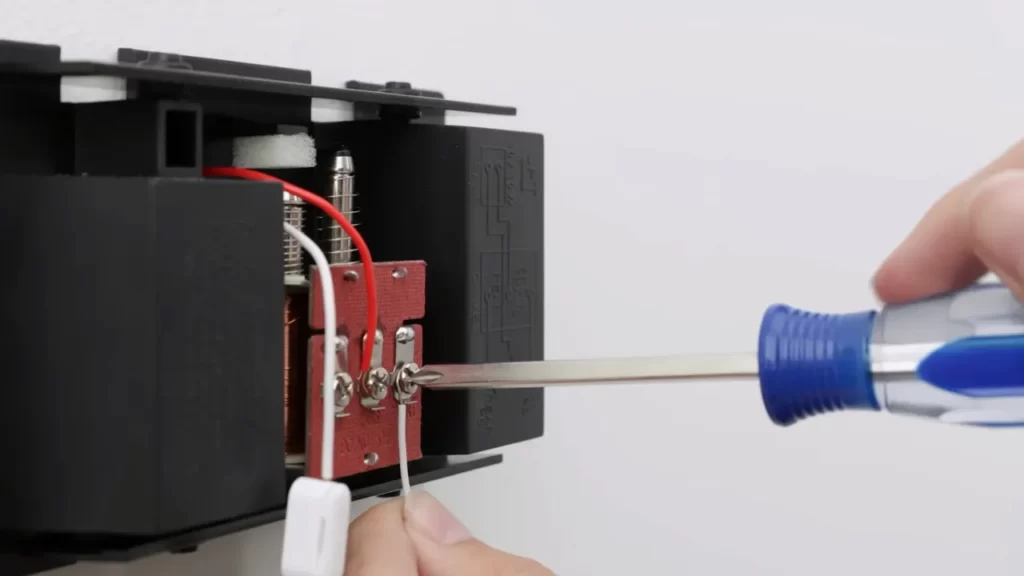
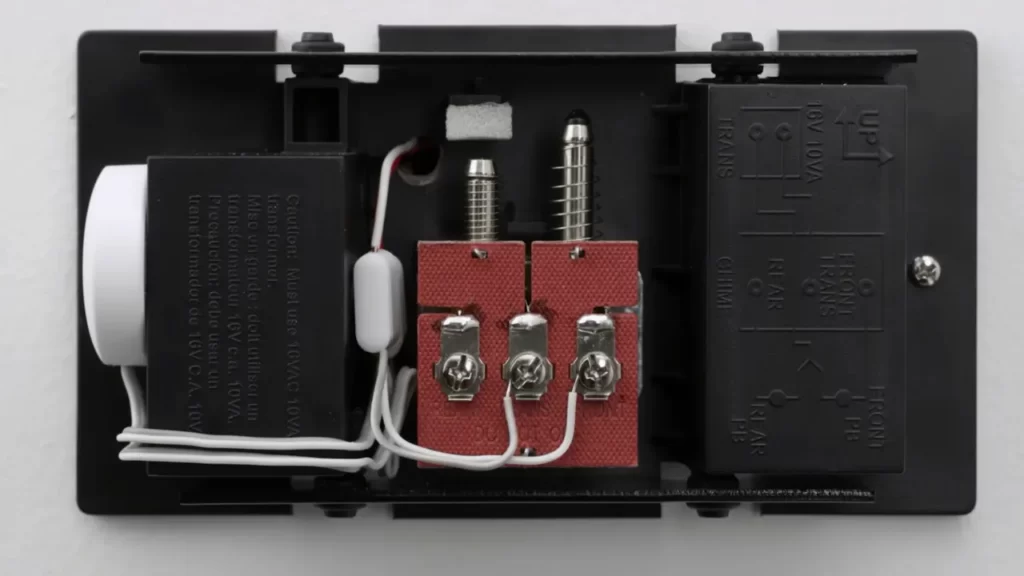
- Next, locate the wiring terminals on the back of your Nest Doorbell. These terminals are usually labeled “Front” and “Trans” or may have different labels depending on the model. Consult the installation manual if you’re unsure.
- Using the screws provided, connect the wires from the old doorbell to the corresponding terminals on your Nest Doorbell. Ensure a secure connection by tightening the screws.
- If your Nest Doorbell has additional wiring terminals, refer to the installation manual for specific instructions on connecting those wires.
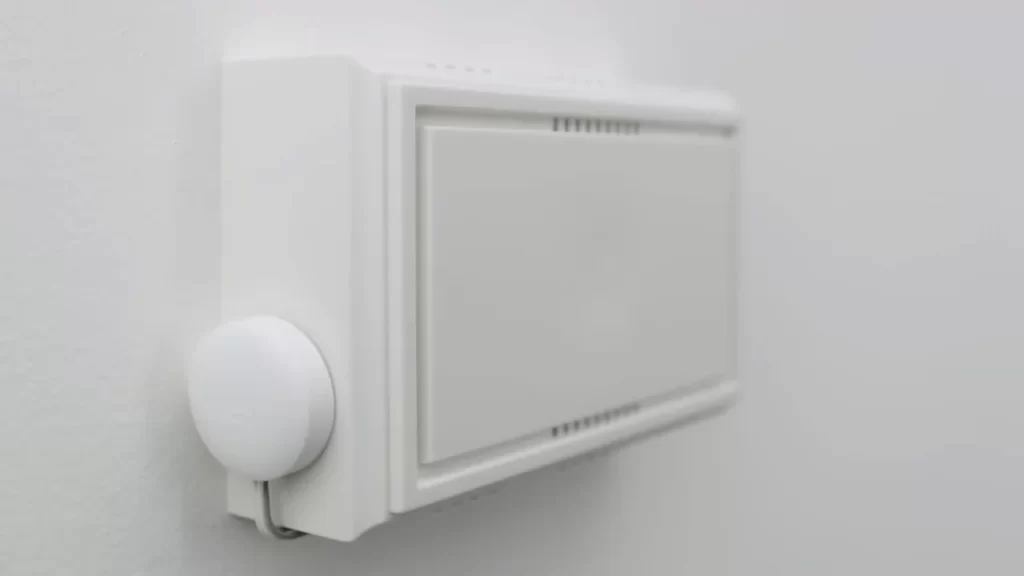
- After all the connections have been made, gently tuck the wires into the wall cavity and attach your Nest Doorbell onto the mounting bracket.
- Lastly, double-check all the wiring connections and ensure they are secure.
Configuring the Power Settings for Optimal Performance
Once you have successfully connected the wiring, it’s time to configure the power settings for your Nest Doorbell. Follow these steps:
- Open the Nest app on your smartphone and select your Nest Doorbell from the device list.
- Navigate to the settings menu and select “Power and battery”.
- Here, you can adjust the power settings to optimize the performance of your doorbell. Depending on your specific requirements and the wiring setup in your home, you may have different options like “Standard” or “Nest Connector”. Choose the option that best suits your needs.
- If you’re unsure about the ideal power setting, consult the installation manual or reach out to Nest customer support for assistance.
- Once you have selected the appropriate power setting, save the changes and exit the settings menu.
Congratulations! You have successfully connected the wiring and configured the power settings for your Nest Doorbell. The next step is to test the doorbell and ensure that everything is functioning as expected. If you encounter any issues during the installation process, refer to the troubleshooting section in the installation manual or seek professional assistance.
Step 3: Configuring The Nest Doorbell With The Nest App
After successfully installing your Nest Doorbell, the next crucial step is to configure it with the Nest App on your mobile device. This will enable you to access all the amazing features that the Nest Doorbell has to offer, ensuring easy monitoring and control of your doorbell wherever you are. In this step, we will guide you through the process of downloading and setting up the Nest App on your mobile device, as well as connecting your Nest Doorbell to the app for seamless monitoring.
Downloading and Setting Up the Nest App on Your Mobile Device
To get started, follow these simple steps to download and set up the Nest App on your mobile device:
- Open the app store on your mobile device, whether you’re using an Android or iOS.
- In the search bar, type in “Nest App” and hit enter.
- Locate the official Nest App from the search results and tap on it.
- Click on the “Install” or “Get” button to download the app onto your device.
- Once the app is successfully installed, open it and create a new Nest account if you don’t already have one.
With the Nest App installed on your mobile device and a Nest account created, you are now ready to connect your Nest Doorbell to the app for easy monitoring.
Connecting the Nest Doorbell to the App for Easy Monitoring
Now that you have the Nest App installed on your mobile device, follow these simple steps to connect your Nest doorbell:
- Launch the Nest App on your mobile device.
- Login to your Nest account using the credentials you created earlier.
- Tap on the “Add product” button in the app’s dashboard.
- Select “Nest Doorbell” from the list of available products.
- Follow the on-screen instructions to put your Nest Doorbell in pairing mode.
- Once in pairing mode, the Nest App will automatically detect your doorbell. Tap on it to initiate the pairing process.
- Provide the necessary information, such as your Wi-Fi network credentials, to complete the setup process.
- Once the setup is complete, you can customize the settings and preferences of your Nest Doorbell through the app.
With your Nest Doorbell successfully configured with the Nest App, you can now enjoy the convenience and peace of mind that comes with easy monitoring and control of your doorbell from anywhere using your mobile device.
Network Connectivity Problems And Solutions
Installing the Nest Doorbell can bring many benefits to your home security, but like any other smart device, it relies on a stable and reliable network connection. However, network connectivity issues can sometimes arise, causing frustration and hindering the smooth functioning of your Nest Doorbell. In this section, we will explore common network connectivity problems that may occur during installation and provide practical solutions for resolving them.
Identifying and Resolving Wi-Fi Connection Issues
One of the initial steps in troubleshooting network connectivity problems with your Nest Doorbell is to identify and address any Wi-Fi connection issues. Here are a few things you can do to ensure a strong and stable Wi-Fi connection:
- Check your Wi-Fi signal strength: Poor signal strength can lead to intermittent connectivity problems. Use a Wi-Fi signal analyzer app or check the signal strength indicator on your device to verify if you are within range of your Wi-Fi router.
- Move your Wi-Fi router closer: If the signal strength is weak, try moving your Wi-Fi router closer to the Nest Doorbell’s installation location. Ideally, there should be minimal obstructions between the router and the device.
- Reset your Wi-Fi router: Sometimes, resetting your Wi-Fi router can help resolve temporary connectivity issues. Locate the reset button on your router (refer to the manufacturer’s instructions), press and hold it for a few seconds, and wait for the router to reboot.
Troubleshooting Network Configuration for Seamless Operation
In addition to Wi-Fi connection issues, network configuration problems can also impact the performance of your Nest Doorbell. Consider the following troubleshooting steps to ensure seamless operation:
- Verify router compatibility: Ensure that your Wi-Fi router is compatible with the Nest Doorbell. Check the manufacturer’s specifications or refer to the Nest Doorbell’s documentation for recommended router compatibility.
- Check for IP address conflicts: Ensure that there are no IP address conflicts within your network. Two devices using the same IP address can cause network connectivity problems. Consult your router’s manual or contact your internet service provider for assistance in resolving IP address conflicts.
- Enable UPnP: Universal Plug and Play (UPnP) allows devices on your network to discover and communicate with each other seamlessly. Ensure that UPnP is enabled on your Wi-Fi router to facilitate proper device communication.
- Configure port forwarding: Port forwarding allows external devices to access the Nest Doorbell’s network services. Consult your router’s manual or refer to the manufacturer’s documentation on how to properly configure port forwarding to ensure proper communication with the Nest Doorbell.
By following these troubleshooting steps, you can overcome common network connectivity problems and ensure a seamless installation and operation of your Nest Doorbell. Remember to always refer to the manufacturer’s documentation and seek technical support if needed.
Power Supply Challenges And Workarounds
Installing the Nest Doorbell can be an exciting project that can enhance your home’s security. However, as with any electrical installation, power supply challenges may arise. In this section, we will address potential wiring problems and provide alternative power options when wiring is inadequate.
Potential Wiring Problems and How to Address Them
When it comes to wiring your Nest Doorbell, encountering certain challenges is not uncommon. It is essential to identify and address these issues before proceeding with the installation. Let’s explore some potential wiring problems you might face and the steps to overcome them:
- Insufficient Wiring Length: One common issue is finding that the existing doorbell wiring is not long enough to reach the desired location for your Nest Doorbell. In this case, you can utilize wire extenders or, if necessary, replace the entire wire. Ensure that the wire you use is compatible with the voltage requirements of the doorbell.
- Incompatible Transformer: Another challenge may arise if your current doorbell transformer does not provide sufficient power for the Nest Doorbell. Check the voltage rating of your transformer; it should be between 16V and 24V. If your transformer falls outside this range, you will need to replace it with a compatible one to ensure reliable power supply.
- Faulty Wiring: Faulty or damaged wiring can also cause issues during the installation process. It is crucial to inspect the existing wiring carefully. Look for any signs of wear and tear, exposed wires, or loose connections. If you notice any problems, it is advisable to replace the wiring to avoid potential hazards and ensure a stable power supply for your Nest Doorbell.
Alternative Power Options When Wiring is Inadequate
If the existing doorbell wiring cannot meet the power requirements of the Nest Doorbell, don’t worry – there are alternative power options available. Consider the following options:
- Battery Power: The Nest Doorbell can operate using its built-in battery. This is a convenient option if you encounter challenges with wiring or have no existing doorbell system. Ensure that you follow the manufacturer’s guidelines for battery installation and charging to maintain optimal performance.
- Plug-in Transformer: Another solution is to use a plug-in transformer. This option eliminates the need for extensive wiring modifications and allows you to power your Nest Doorbell through a nearby electrical outlet. Make sure to choose a transformer that provides the appropriate voltage for the doorbell’s requirements.
By addressing potential wiring problems and considering alternative power options, you can still enjoy the benefits of a Nest Doorbell installation even if the existing wiring poses challenges. Safety should always be a priority when working with electrical components, so if you have any doubts or concerns, it is recommended to consult a professional electrician.
Nest App Setup And Configuration Fixes
Welcome to our guide on how to install the Nest Doorbell! In this section, we will focus on the Nest App Setup and Configuration Fixes that you may encounter during the installation process. From app compatibility issues to error messages and firmware update problems, we’ll provide you with step-by-step solutions to help you get your Nest Doorbell up and running smoothly.
Dealing with App Compatibility Issues and Error Messages
Setting up the Nest Doorbell requires a compatible smartphone or tablet and the Nest app. However, there may be instances where you encounter app compatibility issues or error messages during installation. Here are a few common issues you might face and how to resolve them:
1. App Compatibility Issues
When installing the Nest Doorbell, it’s crucial to ensure that your mobile device is compatible with the Nest app. To check compatibility, refer to the Nest website or app store for the latest information on supported devices. If you encounter compatibility issues, try the following:
- Check for the latest software updates for your device and install them. Often, compatibility issues are resolved through software updates.
- Ensure that your mobile device meets the minimum system requirements specified by Nest. If your device falls short of meeting these requirements, it may not be compatible.
- Try using a different device that meets the recommended specifications. This will help you determine if the issue lies with your device or the app.
2. Error Messages
During the setup process, you may encounter error messages that can hinder the installation of your Nest Doorbell. Here are a few common error messages and how to address them:
| Error Message | Solution |
|---|---|
| Error: Device not found | Double-check that your Nest Doorbell is properly connected to the Wi-Fi network. Ensure that the Wi-Fi signal is strong and try resetting the doorbell if necessary. If the issue persists, contact Nest Support for further assistance. |
| Error: Cannot connect to Nest service | Make sure your mobile device is connected to the internet, either through Wi-Fi or cellular data. Restart the Nest app and try again. If the error persists, check the status of the Nest service on the Nest website or contact Nest Support. |
| Error: Firmware update failed | This error typically occurs when there is a problem updating the firmware on your Nest Doorbell. Verify that your Wi-Fi connection is stable and try initiating the firmware update again. If the issue persists, contact Nest Support for further assistance. |
Understanding and Resolving Firmware Update Problems
Keeping your Nest Doorbell’s firmware up to date is crucial to ensure optimal performance and access to the latest features. However, you may encounter problems during the firmware update process. Here’s how you can understand and resolve these issues:
1. Failure to Start Firmware Update
If your Nest Doorbell fails to start the firmware update, try the following troubleshooting steps:
- Ensure that your Nest Doorbell is connected to a stable Wi-Fi network with a strong signal. A weak signal may interfere with the firmware update process.
- Power cycle your Nest Doorbell by disconnecting it from the power source for a few seconds, then plugging it back in. This can help resolve any temporary glitches.
- Restart the Nest app and initiate the firmware update again.
2. Firmware Update Stuck or Taking Too Long
If the firmware update seems to be stuck or taking an unusually long time, follow these steps:
- Ensure that your mobile device is connected to a stable internet connection. Interruptions in the internet connection can cause the firmware update to stall.
- Keep in mind that firmware updates can take some time to complete. Be patient and allow sufficient time for the update to finish. Avoid interrupting the process to prevent any potential issues.
- If the update remains stuck for an extended period, contact Nest Support for guidance.
By following these steps, you’ll be able to address app compatibility issues, error messages, and firmware update problems that you may encounter while setting up your Nest Doorbell. Should you encounter any further issues, don’t hesitate to reach out to Nest Support for personalized assistance.
Integrating The Nest Doorbell With Other Smart
Home Devices
Exploring Compatibility and Potential Integrations
Integrating the Nest Doorbell with other smart home devices opens up a world of possibilities for enhancing your home security and automation. With its advanced features and seamless connectivity, the Nest Doorbell can easily integrate with a wide range of smart home systems. This allows you to create a fully integrated ecosystem where your doorbell, lights, locks, and more work together to simplify and maximize your home’s functionality. In this section, we’ll explore the compatibility of the Nest Doorbell with various devices and discuss the potential integrations that you can leverage to create a smarter home.
Benefits of Syncing the Doorbell with Smart Home Systems
Syncing your Nest Doorbell with your smart home systems offers numerous benefits that go beyond just answering your door remotely. By integrating the doorbell with other devices, you can enhance both the security and convenience of your home. Let’s take a closer look at these benefits:
1. Enhanced Security
When your Nest Doorbell is synced with your smart home security system, you can receive real-time alerts and notifications on your smartphone or tablet whenever someone approaches your door. This allows you to monitor and control access to your home, even when you’re not there. You can also pair the doorbell with your security cameras to capture footage and deter potential intruders. Additionally, integrating the doorbell with your smart locks enables you to grant or deny access remotely, providing an added layer of security.
2. Streamlined Automation
Integrating the Nest Doorbell with other smart home devices allows for seamless automation that simplifies your daily tasks. Imagine the convenience of having your lights automatically turn on when someone approaches your door, or your thermostat adjusting to your desired temperature as soon as you arrive home. By syncing the doorbell with devices like smart lights, speakers, and thermostats, you can create personalized routines and effortlessly control multiple aspects of your home with a single command.
3. Increased Peace of Mind
Knowing that your smart home devices are all working together seamlessly to keep your home secure can provide a sense of peace and tranquility. Whether you’re at work, running errands, or on vacation, you can have confidence that your home is protected and being monitored. The integration of your Nest Doorbell with other smart home systems offers peace of mind and allows you to stay connected to your home no matter where you are.
4. Customizable Control
Integrating the Nest Doorbell with other smart home devices gives you the flexibility to customize and control your home environment according to your preferences. Whether it’s adjusting the brightness and color of your lights, setting up custom notifications, or creating personalized routines, the ability to control all your devices from a single platform allows for a truly personalized smart home experience.
By integrating your Nest Doorbell with other smart home devices, you can create a seamlessly connected and intelligent home. The possibilities are endless, and the convenience and security benefits are unmatched. So why wait? Start exploring the compatibility and begin integrating your Nest Doorbell with your smart home devices today!
Maximizing Advanced Nest Doorbell Functions
Maximizing Advanced Nest Doorbell Functions
Utilizing Motion Detection and Customization Options
One of the key features of the Nest Doorbell is its advanced motion detection capabilities. This allows you to receive real-time notifications when someone approaches your doorstep, whether it’s a friendly neighbor dropping by or an unexpected visitor. To make the most of this function, it’s important to customize your motion settings to suit your needs.
Understanding Facial Recognition and Security Enhancements
Another powerful feature of the Nest Doorbell is its facial recognition technology. By analyzing the faces captured by the camera, the doorbell can learn to recognize familiar faces, such as family members or trusted friends. This not only enhances the security of your home but also provides added convenience as you can receive specific alerts for recognized individuals.
Frequently Asked Questions On How To Install The Nest Doorbell
Can I Install Nest Doorbell Myself?
Yes, you can install the Nest Doorbell yourself. It is designed for DIY installation.
How Do I Install Nest Doorbell?
To install the Nest Doorbell, follow these steps: Connect the doorbell to your existing wiring or use the included power plug. Download and open the Nest app on your smartphone. Follow the in-app instructions to link the doorbell to your Wi-Fi network.
Mount the doorbell using the included hardware. Adjust the settings to customize your doorbell’s features.
Does Nest Doorbell Need To Be Wired?
No, the Nest Doorbell does not need to be wired. It can be powered by a rechargeable battery instead.
How Do I Connect My Nest Doorbell To Wifi?
To connect your Nest Doorbell to WiFi, follow these steps: 1. Open the Nest app on your device. 2. Tap on the Settings icon. 3. Select “Doorbell Settings”. 4. Choose “Wi-Fi Connection”. 5. Follow the on-screen instructions to connect your doorbell to your WiFi network.
Conclusion
Installing the Nest Doorbell is a straightforward process that can enhance your home security. By following the step-by-step instructions in this guide, you can easily set up your doorbell and start enjoying its features. From connecting to your Wi-Fi network to customizing motion detection settings, the Nest Doorbell offers a seamless and user-friendly experience.
Take control of your home’s security and enjoy the peace of mind that comes with a reliable video doorbell system.