To install a doorbell, first, choose a suitable location on the door or wall, then attach the doorbell button using screws or adhesive, and finally, connect the wires to a doorbell receiver or chime and secure it in place. Doorbells are a convenient and essential feature for any home or office, alerting occupants to visitors at the door.
Installing a doorbell may seem like a daunting task, but with a few simple steps, you can have your doorbell up and running in no time. In this guide, we will walk you through the process of installing a doorbell, from choosing the location to connecting the wires and securing the doorbell receiver.
By following these instructions, you’ll have a working doorbell that will enhance the functionality and accessibility of your space. So, let’s get started on installing your very own doorbell.
Factors To Consider Before Installation
Factors to Consider Before Installation
Installing a doorbell can enhance the security and convenience of your home. However, before you dive into the installation process, there are a few factors to consider. By carefully examining these factors, you can choose the right doorbell that suits your specific needs and preferences.
Different Types of Door Bells
Before you install a doorbell, it’s crucial to understand the different types available and their unique features. Here are some common types of doorbells:
- Standard Doorbells: These doorbells are the most common option and typically require electrical wiring.
- Wireless Doorbells: Wireless doorbells are a popular choice as they don’t require any wiring. They operate on batteries or plug directly into an electrical outlet.
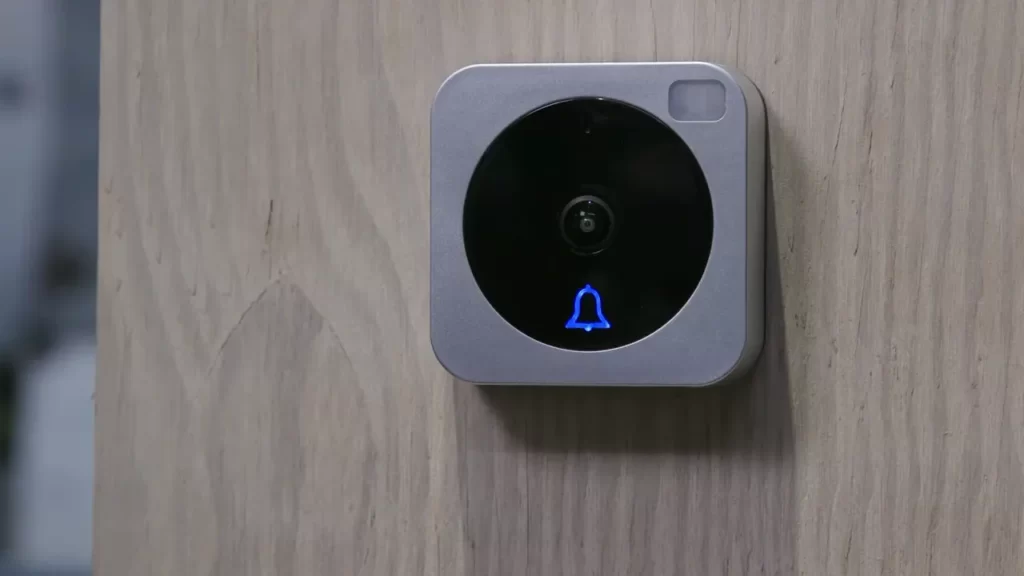
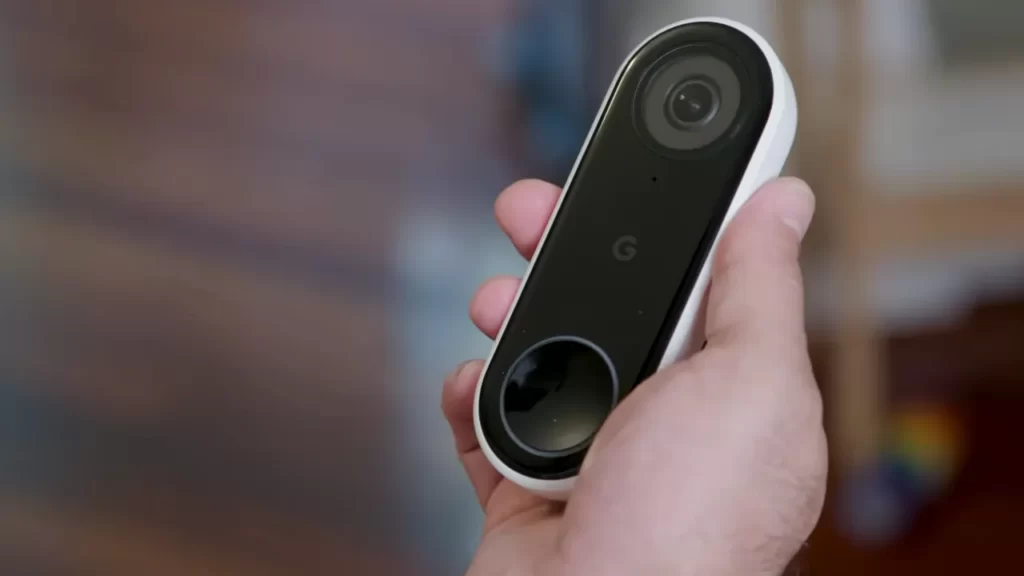
- Smart Doorbells: Smart doorbells offer advanced features, such as video recording and smartphone connectivity. They usually require a Wi-Fi connection.
Power Source Options
When installing a doorbell, you need to consider the power source options available. Here are a few options to keep in mind:
- Battery-powered: Battery-powered doorbells are ideal if you don’t have access to electrical wiring. They are easy to install and maintain, but keep in mind that you’ll need to replace the batteries periodically.
- Hardwired: If you prefer a more permanent solution, a hardwired doorbell might be the right choice. These doorbells are directly connected to the electrical wiring in your home, ensuring a constant power supply.
- Plug-in: Plug-in doorbells are a convenient option for those who don’t want to deal with wiring. These doorbells simply plug into an electrical outlet and are ready to use.
Wireless vs Wired Door Bells
When it comes to doorbell installation, you must decide between wireless and wired options. Each type has its own advantages and considerations:
| Wireless Doorbells | Wired Doorbells |
|---|---|
| Easy installation without wiring | Permanent power supply |
| Flexibility to place the doorbell anywhere | Reliable performance without battery changes |
| Portability if you move houses | Compatibility with existing doorbell wiring |
Each option has its own set of pros and cons, so it’s essential to consider your specific requirements before making a decision.
By considering factors such as the type of doorbell, power source options, and wireless versus wired systems, you can make an informed choice before proceeding with your doorbell installation. Ensure that you carefully evaluate these factors to select a doorbell that fits seamlessly into your home and lifestyle.
Essential Tools
Installing a doorbell may seem like a complex task, but with the right tools and a little bit of know-how, it can be a simple and rewarding DIY project. In this guide, we will walk you through the steps of installing a doorbell, starting with the essential tools you will need for the job.
<h3>Screwdriver</h3>
A screwdriver is a must-have tool for any DIY enthusiast. When it comes to installing a doorbell, a screwdriver is essential for attaching the mounting bracket and securing the doorbell button to the wall or door frame. Make sure to choose a screwdriver that matches the type of screws included with your doorbell kit, whether they are Phillips head or flathead screws.
<h3>Electrical Tester</h3>
Before starting any electrical work, it is important to ensure the power to the doorbell circuit is turned off to prevent any accidents. An electrical tester, such as a voltage tester or a non-contact circuit tester, should always be used to verify that there is no voltage present. This tool will give you peace of mind and help keep you safe throughout the installation process.
<h3>Wire Cutters</h3>
When installing a doorbell, you may need to trim or cut wires to the appropriate length. Wire cutters are indispensable for this task, as they allow you to make clean and precise cuts. With wire cutters in hand, you can easily trim any excess wire and ensure a neat and professional installation.
<h3>Pliers</h3>
Pliers are another handy tool to have when installing a doorbell. They can be used for a variety of tasks, such as twisting and securing wire connections, bending wires to fit into tight spaces, and crimping wire connectors. With a good pair of pliers, you can tackle any wiring challenges that may arise during the installation process.
Now that you know the essential tools required for installing a doorbell, you are ready to embark on your DIY project. Gather these tools and get ready to complete the installation process step-by-step. Stay tuned for our next blog post, where we will guide you through the necessary steps to install a doorbell successfully.
Materials Needed
Installing a doorbell is a simple and rewarding project that can enhance the security and convenience of your home. Before you get started, gather the following materials to ensure a successful installation:
Door Bell Kit
A doorbell kit is the heart of your doorbell system. It typically includes the doorbell button, chime unit, and any necessary wiring connections. Look for a kit that matches your personal preferences and style of your home.
Transformer
A transformer is a crucial component of your doorbell system. It converts the high voltage from your home’s electrical system into a lower voltage that your doorbell can handle. Make sure to choose a transformer that is compatible with your doorbell kit’s voltage requirements.
Wiring
Wiring is necessary to connect the various components of your doorbell system. Ensure you have the appropriate wiring that matches the specifications of your doorbell kit and transformer. Depending on the complexity of the installation, you may need different types of wiring, such as two-conductor or three-conductor wire.
Mounting Bracket
A mounting bracket provides the necessary support for your doorbell button. It ensures that the button is securely attached to your preferred location, whether it’s on wooden siding, brick, or any other surface. The type of mounting bracket you need may vary depending on the design of your doorbell kit and the surface you are mounting it on.
With these essential materials at hand, you’re ready to proceed with your doorbell installation. Follow the next steps in our installation guide to successfully set up your doorbell system and enjoy the benefits it brings!
Step 1: Turn Off Power And Locate Door Bell
Installing a doorbell can be a simple and rewarding DIY project that adds convenience and security to your home. Before you begin, it’s important to turn off the power to the doorbell to ensure your safety. Additionally, you’ll need to locate the existing doorbell and assess its condition. In this step-by-step guide, we will walk you through the process of turning off the power and locating the doorbell.
Locating Existing Door Bell
Start by locating the existing doorbell in your home. The doorbell is typically installed near the front door or in a prominent area where it can be easily heard. Take a moment to listen for any sounds indicating the doorbell’s location. It might be helpful to have someone press the doorbell button while you try to locate the source of the sound.
If you’re unable to locate the doorbell by sound, you can visually inspect each room, paying close attention to walls, near the front door, and areas where wiring might be visible.
Switch off Power to the Door Bell
Now that you have located the doorbell, it’s time to switch off the power. This is a crucial step to prevent any electric shocks or damage to the doorbell system. Follow the steps below to safely turn off the power:
- Identify the circuit breaker or fuse box in your home.
- Locate the circuit breaker or fuse corresponding to the doorbell.
- Switch off the circuit breaker or remove the fuse completely to disconnect power to the doorbell.
Once you have switched off the power, it’s important to double-check that the doorbell is no longer functional by pressing the doorbell button. If the doorbell doesn’t produce any sound or if the chime doesn’t ring, you have successfully turned off the power.
Remember, safety is always a priority when working with electrical systems. If you are unsure or uncomfortable with the process of turning off the power, it’s best to consult a professional electrician.
Now that you have turned off the power and located the existing doorbell, you are ready to move on to the next step of the installation process. In the next section, we will guide you through removing the old doorbell and preparing for the installation of the new one.
Step 2: Remove Old Door Bell
Removing the old doorbell is an important step in installing a new one. This ensures a clean slate and allows for proper installation of the new device. To successfully remove the old doorbell, follow the steps below:
Disconnecting the Wiring
The first step in removing the old doorbell is to disconnect the wiring. Before you begin, ensure that the power to the doorbell system is turned off to prevent any accidents or electrical shock. Once the power is off, follow these steps:
- Locate the transformer connected to the doorbell system. It is usually mounted near the electrical panel or in an accessible location in the house.
- Open the cover of the transformer to expose the wiring connections.
- Identify the wires connected to the doorbell and carefully disconnect them. Take note of the wire colors and their corresponding terminals for reference when installing the new doorbell.
Note: If you are unsure about disconnecting the wiring, it is recommended to consult a professional electrician to avoid any potential hazards.
Detaching the Mounting Bracket
After disconnecting the wiring, the next step is to detach the mounting bracket of the old doorbell. The mounting bracket is the part that holds the doorbell securely in place. Here’s how you can detach it:
- Inspect the doorbell to locate the screws or other fasteners holding it onto the wall or frame.
- Using a screwdriver or appropriate tool, carefully remove the screws or fasteners to release the mounting bracket from the wall or frame.
- Gently pull the old doorbell away from the wall, ensuring you don’t damage any surrounding surfaces or wiring.
- Set aside the mounting bracket for disposal or future use, depending on the condition.
Now that you have successfully removed the old doorbell and its mounting bracket, you are ready to move on to the next step in the installation process: ‘Step 3: Installing the New Doorbell.’
Step 3: Install The New Mounting Bracket
Now that you have marked the area and prepared the wiring, it’s time to install the new mounting bracket for your doorbell. The mounting bracket acts as a secure base for your doorbell and ensures it stays in place. In this step, we will guide you through two important aspects of installing the mounting bracket – positioning and securing.
Positioning the Mounting Bracket
Proper positioning of the mounting bracket is essential to ensure that your doorbell is easily accessible and visible. Here’s how you can position the mounting bracket:
- Hold the mounting bracket against the wall or doorframe at your desired height. Make sure it is level and aligned.
- Use a pencil to mark the positions of the screw holes on the wall or doorframe.
- Double-check the alignment of the marks before proceeding.
By following these steps, you can ensure that the mounting bracket is properly positioned for optimal functionality and aesthetics.
Securing the Mounting Bracket
Once the mounting bracket is correctly positioned, it’s time to secure it in place. Follow these steps to securely attach the mounting bracket:
- Using a power drill or screwdriver, insert screws into the previously marked holes on the wall or doorframe.
- Tighten the screws until the mounting bracket is firmly secured.
- Ensure that the bracket is level throughout the process.
Securing the mounting bracket is crucial to prevent any movement or shaking of your doorbell, ensuring it remains stable and functional. Take your time to tighten the screws properly so that your doorbell is securely mounted.
Now that you have positioned and secured the new mounting bracket, you are ready to move on to the next step, which is installing the actual doorbell unit. Stay tuned for our next guide!
Step 4: Connect The Wiring
Once you have chosen the perfect spot for your doorbell and have mounted it securely, the next step is to connect the wiring. This is a crucial step as it ensures that your doorbell will function properly and be able to transmit the signal from the button to the chime inside your home. In this step, we will discuss the types of wiring connections you may encounter and provide guidance on how to wire the doorbell.
Types of Wiring Connections
Before you start, it’s important to understand the different types of wiring connections that are commonly used for doorbells. These include:
- Single-Wire System: This type of system uses a single wire to connect the doorbell button, transformer, and chime together.
- Two-Wire System: In a two-wire system, two separate wires are used to connect the doorbell button, transformer, and chime. One wire is used for the front doorbell button, while the other wire is used for the back doorbell button.
- Wireless System: As the name suggests, a wireless system does not require any wiring connections. Instead, it uses wireless technology to transmit the signal from the button to the chime.
Wiring the Door Bell
Now that you are familiar with the types of wiring connections, let’s dive into how to wire the doorbell. Follow these steps to ensure a successful wiring installation:
Step 1: Gather the Tools and Materials
Before you start, make sure you have all the necessary tools and materials handy. This may include wire strippers, electrical tape, a screwdriver, and of course, the doorbell kit itself.
Step 2: Turn Off the Power
Safety first! Before you start working with any electrical equipment, it’s important to turn off the power to the doorbell circuit. Locate the breaker or fuse that controls the doorbell circuit and switch it off to avoid any accidents.
Step 3: Connect the Wires
Refer to the instructions provided with your doorbell kit to determine which wires need to be connected. Typically, there will be separate terminals on the doorbell button, transformer, and chime for the wires to be attached.
Step 4: Test the Connection
After you have connected the wires, it’s time to test the connection. Turn the power back on and press the doorbell button to check if the chime rings. If everything is working correctly, proceed to the next step.
Step 5: Secure the Wiring
Once you are satisfied with the wiring and the doorbell is functioning properly, secure the wiring using electrical tape or wire clips to prevent any accidental damage.
Step 6: Restore the Power
Finally, restore the power to the doorbell circuit by switching the breaker or fuse back on. Your doorbell is now successfully wired and ready to use!
Installing a doorbell may seem like a daunting task, but with the right guidance and a little bit of patience, it can be easily accomplished. Now that you know how to connect the wiring, you are one step closer to bringing a convenient and functional feature to your home.
Step 5: Mount The Door Bell
After completing the necessary wiring connections, it’s time to mount your door bell. This step is crucial to ensure that your door bell is securely attached to your mounting bracket and properly aligned with your front door. Here’s how:
Attaching the Door Bell to the Mounting Bracket
Begin by placing the door bell on top of the mounting bracket.
Align the screw holes on the back of the door bell with the corresponding holes on the mounting bracket.
Once aligned, insert the screws through the holes and firmly tighten them using a screwdriver or drill. Be careful not to overtighten, as this may damage the door bell or strip the screw holes.
Ensuring Proper Alignment
Now that the door bell is attached, it’s important to ensure that it is properly aligned with your front door. Follow these steps:
- Step 1: Stand in front of your door and assess the door bell’s position. Make sure it is centered and at a height that is easily reachable for visitors.
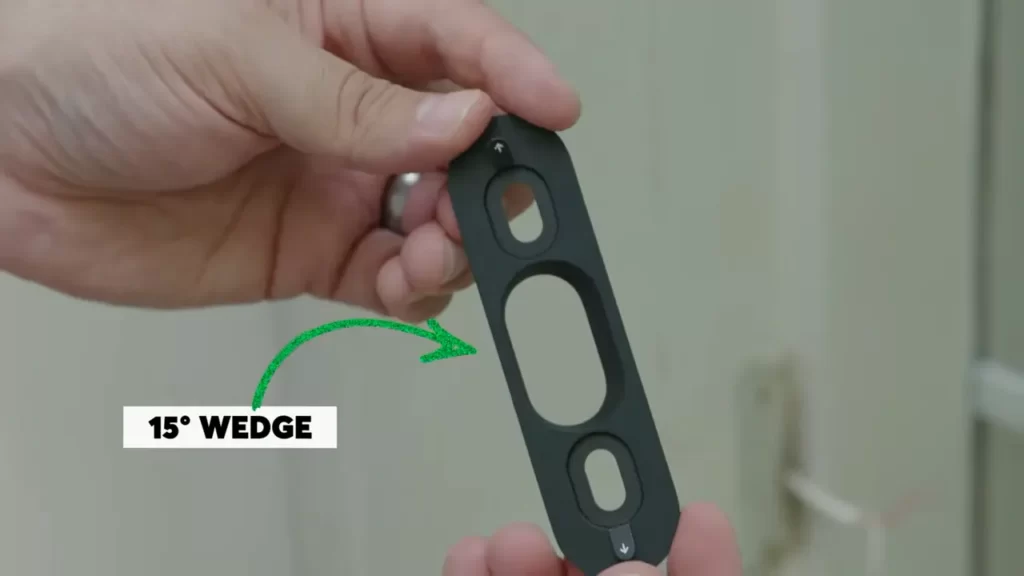
- Step 2: If necessary, adjust the angle of the door bell by loosening the tightening screw on the mounting bracket. Once adjusted, retighten the screw to secure the desired angle.
- Step 3: Test the door bell by pressing the button. Confirm that it rings clearly and that the sound can be heard from both inside and outside your home.
Remember, proper alignment is key to ensuring the functionality and effectiveness of your door bell. Take the time to carefully position it so that it can be easily seen and heard by visitors.
Step 6: Power On And Test The Door Bell
Turning on the Power
After successfully completing the previous steps of installing your door bell, it’s time to turn on the power and bring your new door bell to life. Before proceeding, ensure that the door bell is securely mounted on the wall, the wiring connections are tight, and the door bell cover is properly secured.
To turn on the power, follow these simple steps:
- Locate the circuit breaker panel in your home. This is usually found in the basement or utility room.
- Identify the circuit breaker that controls the power supply to the door bell. It is often labeled as “door bell” or “bell”.
- Switch the circuit breaker to the “on” position. You may hear a click or see a light indicating that the power is now flowing to the door bell.
Once the power is turned on, you can now move on to the next step and test the functionality of your door bell.
Testing the Door Bell for Functionality
Testing the door bell is an important step to ensure that it is working properly and will alert you when someone is at your door. Follow these steps to test the door bell:
- Stand outside your door and press the door bell button. Listen for a clear and audible sound.
- If you don’t hear a sound, go back inside and check the wiring connections. Make sure they are securely connected and there are no loose wires.
- If the wiring connections are fine and you still don’t hear a sound, switch off the power again and check if there are any loose connections inside the door bell itself. Refer to the manufacturer’s instructions for guidance on how to access the internal components.
- If everything seems to be in order and there are no loose connections, switch on the power again and test the door bell once more.
- If you hear a sound this time, congratulations! Your door bell is now functioning properly.
Remember that testing the door bell is not only about the sound but also about its compatibility with other devices or systems. If you have a smart home system or want to connect your door bell to an existing intercom or security system, consult the respective manuals to ensure compatibility and proper setup.
Now that you have successfully powered on and tested your door bell, you can proceed to adjust any volume settings or additional features according to the manufacturer’s instructions. Enjoy the convenience and security that a functional door bell brings to your home!
Door Bell Not Working After Installation
So, you’ve just installed your brand new door bell but it’s not working? Don’t worry, we’ve got you covered. In this section, we’ll explore a few troubleshooting steps to help you figure out why your door bell isn’t working as expected. Follow these simple steps to identify and resolve the issue.
Check Wiring Connections
The first thing you should do is check the wiring connections of your door bell. Make sure all the wires are securely connected and there are no loose connections. Sometimes, during installation, the wires may get accidentally disconnected or not properly inserted. Take a look at the wire connections and ensure they are snug and secure.
Verify Power Source
The next step is to ensure your door bell is receiving power from the right source. Check the power source, whether it is a battery or wired connection, and make sure it is in working condition. If it’s a battery-operated door bell, try replacing the batteries with fresh ones to rule out any power-related issues. For wired connections, use a multimeter to check if there is any power supply issue.
Test with Different Door Bell
If the above steps don’t solve the problem, the issue could be with the door bell itself. To confirm this, try testing with a different door bell. Borrow one from a friend or neighbor, or purchase a cheap one to use for testing purposes. Connect the different door bell to your existing wiring and see if it works. If the different door bell functions properly, then it’s likely that your original door bell is defective and needs to be replaced.
By following these troubleshooting steps, you should be able to identify the reason why your door bell is not working after installation. Remember to always be cautious when working with electrical devices and follow the manufacturer’s instructions for installation and troubleshooting.
Insufficient Volume Or Poor Sound Quality
One common issue that homeowners may face with their doorbell installation is insufficient volume or poor sound quality. A doorbell is meant to alert you when someone is at your door, so it is crucial that it is loud enough and provides clear sound. If you find yourself struggling to hear your doorbell or the sound quality is not up to par, there are a few troubleshooting steps you can take to address the problem.
Adjusting Volume Settings
A simple solution to address insufficient volume or poor sound quality is to adjust the volume settings of your doorbell. Most modern doorbells come with volume control options that allow you to increase or decrease the sound output. To do this:
- Locate the volume control button or switch on your doorbell. This may be located on the side of the doorbell unit or within the settings menu if you have a wireless doorbell system.
- Adjust the volume settings to a higher level. Test the doorbell after each adjustment to find the optimal volume level for your needs.
If adjusting the volume settings does not improve the sound quality, there are other factors that may be contributing to the issue.
Considering Additional Accessories
To enhance the volume and sound quality of your doorbell, you may consider investing in additional accessories such as:
| Accessory | Description |
|---|---|
| Doorbell Extender | A doorbell extender or signal booster can amplify the sound of your doorbell, making it louder and clearer. This device is particularly useful for larger homes or those with thick walls that may obstruct the sound. |
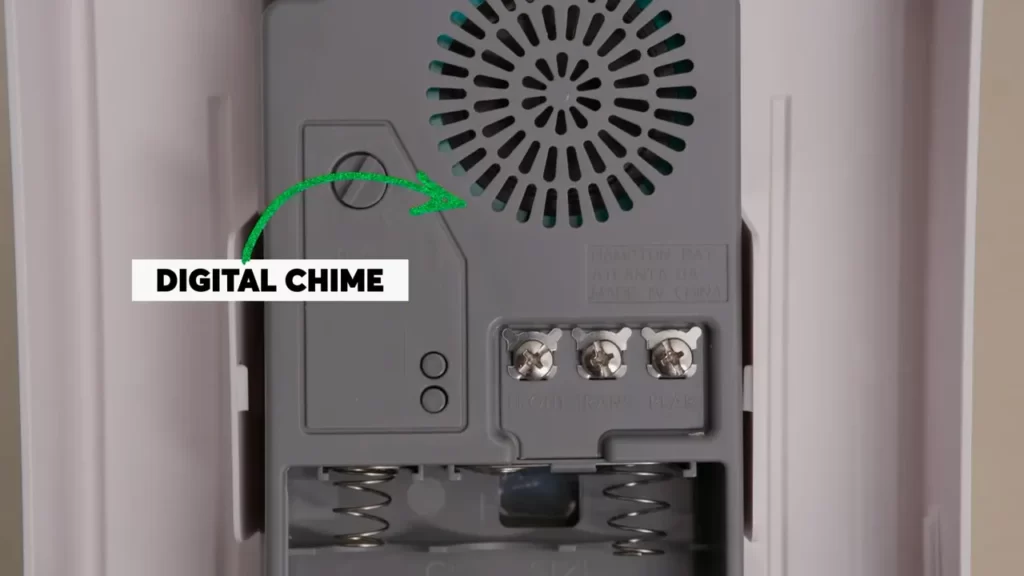
| Wireless Chime | A wireless chime can be placed in different areas of your home, allowing you to hear the doorbell from wherever you are. This is especially helpful if you often find yourself in a part of the house where the doorbell sound is not audible. |
By considering these additional accessories, you can overcome the issue of insufficient volume or poor sound quality with your doorbell.
Ensuring that your doorbell provides sufficient volume and clear sound is essential for ensuring that you never miss a visitor. By adjusting the volume settings and considering additional accessories, you can address the problem of insufficient volume or poor sound quality with your doorbell installation.
Door Bell Ringing Continuously
If your door bell is ringing continuously, it can be quite annoying and disruptive. Not only does it disrupt the peace and quiet of your home, but it can also be a sign of a problem with your door bell system. In this section, we will discuss how to troubleshoot and fix the issue of a door bell ringing continuously. By following these steps, you can restore peace and tranquility to your home.
Check Wiring Connections
The first thing you should check when dealing with a continuously ringing door bell is the wiring connections. Over time, the wiring connections can become loose or damaged, causing the door bell to malfunction. Here’s how you can check the wiring connections:
- Turn off the power to the door bell system by switching off the circuit breaker or removing the fuse.
- Remove the cover of the door bell to access the wiring.
- Inspect the wiring connections to ensure they are securely attached.
- If you notice any loose or damaged wiring connections, tighten or replace them as necessary.
- After checking and correcting any wiring issues, put the cover back on and restore power to the door bell system.
By checking and ensuring the proper wiring connections, you can eliminate any issues related to loose or damaged wiring that might be causing the door bell to ring continuously.
Replace Faulty Components
If checking the wiring connections doesn’t resolve the issue, the next step is to check and replace any faulty components. Over time, door bell components such as the transformer, button, or chime can wear out or become damaged, leading to continuous ringing. Here’s what you can do:
- Start by removing the cover of the door bell to access the components.
- Inspect each component for any signs of damage or wear.
- If you notice any faulty components, such as a cracked button or a burned-out transformer, replace them with new ones.
- Make sure to choose components that are compatible with your door bell system.
- After replacing the faulty components, put the cover back on and test the door bell to see if the continuous ringing has stopped.
By replacing any faulty components, you can eliminate any issues caused by worn-out or damaged parts of the door bell system.
In conclusion, a door bell ringing continuously can be a frustrating problem to deal with. However, by checking the wiring connections and replacing any faulty components, you can resolve the issue and enjoy a properly functioning door bell system once again.
Regular Testing And Inspection
Regular testing and inspection of your doorbell is vital to ensure it is in proper working condition and can effectively alert you when someone is at your door. By following a few simple steps, you can keep your doorbell functioning optimally. In this section, we will discuss two crucial aspects of regular testing and inspection: testing the doorbell periodically and inspecting the wiring and components.
Testing the Door Bell Periodically
To begin, periodically testing your doorbell is crucial to ensure it is functioning properly. This simple task can help identify any issues and allow you to rectify them before they become major problems. Follow these steps to test your doorbell:
- Start by visually inspecting the exterior of your doorbell for any visible damage or loose connections. Pay close attention to the wires, buttons, and any other components.
- Press the doorbell button to check if you can hear a sound. If you do not hear a sound, this could indicate a problem with the wiring or the doorbell mechanism itself.
- If you hear a sound, listen for any unusual or distorted noises. A clear, crisp sound indicates a healthy doorbell, while a distorted or muffled sound may signal a problem.
Inspecting Wiring and Components
In addition to periodic testing, it is important to inspect the wiring and components of your doorbell regularly. This step will help identify any potential safety hazards or issues that may affect the functionality of your doorbell. Follow these guidelines to inspect your doorbell’s wiring and components:
- Start by turning off the power supply to your doorbell system to ensure your safety during the inspection process.
- Gently remove the cover or housing of your doorbell to expose the internal components.
- Inspect the wiring for any signs of damage, such as frayed or exposed wires. If you notice any issues, it is crucial to repair or replace the damaged wiring promptly.
- Check the connections between the wires and the doorbell mechanism. Ensure they are secure and free from corrosion or rust.
- Inspect other components, such as the doorbell transformer, chime, and any additional accessories. Look out for any signs of wear and tear or loose connections.
Regular testing and inspection of your doorbell will not only ensure its proper functioning but also enhance the security of your home. By following these guidelines, you can maintain your doorbell system effectively and promptly address any concerns that may arise. Remember, a well-maintained and functional doorbell is an essential part of your home’s security and convenience.
Cleaning And Maintenance
Regular cleaning and maintenance of your doorbell is essential to keep it functioning properly. Over time, dust, debris, and dirt can accumulate on the buttons, affecting their sensitivity. In this section, we will guide you through the step-by-step process of cleaning your doorbell to ensure optimal performance.
Cleaning the Door Bell Buttons
The buttons on your doorbell are prone to collecting dirt, fingerprints, and other forms of residue. This can hinder their responsiveness and overall appearance. Follow these simple steps to clean your doorbell buttons:
- Start by turning off the power to your doorbell to avoid any electrical safety hazards.
- Gently wipe the buttons with a soft, microfiber cloth to remove any loose debris or dust.
- If necessary, dampen the cloth with a mild cleaning solution or isopropyl alcohol. Avoid using abrasive cleaners or solvents as they may damage the buttons.
- Wipe the buttons again, ensuring to reach all the crevices and edges.
- Dry the buttons thoroughly with a clean cloth or allow them to air dry completely.
- Once the buttons are dry, you can turn the power back on and test their responsiveness.
Removing Dust and Debris
In addition to cleaning the buttons, it’s important to regularly remove any dust and debris that may have accumulated around your doorbell. This will help prevent build-up and ensure proper functioning. Follow these steps to remove dust and debris:
- Use a soft brush, such as a small paintbrush or toothbrush, to gently sweep away any loose dust or debris from around the doorbell.
- If there are hard-to-reach areas, you can use a can of compressed air to blow away the dust.
- For more stubborn debris, you can use a damp cloth or sponge to wipe the affected areas.
- Make sure to dry the doorbell thoroughly once you are finished.
By following these cleaning and maintenance tips, you can ensure that your doorbell remains in top shape and functions reliably for years to come.
Replacing Batteries Or Transformer
Signs of Battery/Transformer Replacement
If you’ve noticed your doorbell isn’t functioning properly, with the sound becoming weak or non-existent, it might be time to replace the batteries or transformer. Identifying the signs of battery/transformer replacement is essential in ensuring that your doorbell continues to operate smoothly and reliably.
Here are a few indicators that it’s time to consider replacing the batteries or transformer:
- The doorbell sound becomes faint or stops completely
- The doorbell button requires a lot of pressure to activate
- The doorbell intermittently works or doesn’t ring at all
- Unusual buzzing or humming sounds coming from the doorbell
- The LED light on the doorbell unit is dim or not illuminating at all
Step-by-Step Battery/Transformer Replacement Process
Replacing the batteries or transformer in your doorbell is a straightforward process that can be done in a few simple steps. By following this step-by-step guide, you’ll be able to restore your doorbell’s functionality quickly and effortlessly.
- Step 1: Safety first
- Step 2: Open the doorbell unit
- Step 3: Remove and replace the batteries or transformer
- Step 4: Test the doorbell
- Step 5: Reassemble and secure the doorbell unit
By following these simple steps, you can easily replace the batteries or transformer in your doorbell and restore its functionality. Remember to always refer to the manufacturer’s instructions and prioritize safety throughout the process.
Frequently Asked Questions Of How To Install Door Bell
Can I Install A Doorbell Myself?
Yes, you can install a doorbell yourself. With some basic tools and following the instructions, it can be a relatively simple DIY project. However, if you’re not comfortable with electrical work, it’s best to hire a professional to ensure safety and proper installation.
How Do You Install A Doorbell At Your House?
To install a doorbell at your house, follow these steps: 1. Choose a suitable doorbell with the desired features. 2. Locate the existing doorbell wires or install new wiring if necessary. 3. Turn off the power to the doorbell circuit at the breaker.
4. Connect the wires to the doorbell according to the manufacturer’s instructions. 5. Finally, turn the power back on and test the doorbell to ensure it’s working properly.
Do You Need Wiring For A Doorbell?
Yes, wiring is required for a doorbell as it connects the doorbell button to the chime or receiver, allowing it to produce sound or send a notification. Wiring ensures proper functioning and communication between the different components of the doorbell system.
How Much Does It Cost To Install A Doorbell System?
The cost of installing a doorbell system varies, but it typically ranges from $100 to $300.
Conclusion
Installing a doorbell is a simple and straightforward process that can enhance the convenience and security of your home. With just a few basic tools and a little patience, you can successfully install a doorbell yourself. By following the step-by-step instructions in this guide, you can ensure that your doorbell is properly installed and functioning correctly.
So, why wait? Install your doorbell today and start enjoying the benefits it brings.