o install a sail shade, start by attaching one corner to a nearby sturdy structure and then secure the opposite corner with a post or pole, ensuring proper tension. (19 words) Sail shades are an excellent way to create shade in your outdoor space, providing protection from the sun’s rays and adding a stylish touch to your patio or garden.
Installing a sail shade is a relatively simple process that can be completed with just a few basic tools. We will discuss the step-by-step instructions on how to install a sail shade, so you can enjoy your outdoor area comfortably and stylishly.
(62 words)
Choosing The Right Location For Your Sail Shade
Installing a sail shade can be a great way to add shade and aesthetic appeal to your outdoor space. However, choosing the right location is crucial to ensure that your sail shade functions effectively and provides the desired shade. In this section, we will discuss the important factors to consider when selecting a location for your sail shade.
Factors to Consider when Selecting a Location
Before installing your sail shade, it is important to carefully assess the potential locations to determine the most suitable spot. Here are the key factors to keep in mind:
Assessing Sun Exposure and Shade Needs
The primary purpose of a sail shade is to provide shade and protection from the sun’s rays. Therefore, it is essential to assess the sun exposure in different areas of your outdoor space. Take note of areas that receive the most intense sunlight and areas that need shade the most during certain times of the day. This will help you determine the optimal location for your sail shade.
Evaluating Wind Direction and Strength
Another important consideration when selecting a location for your sail shade is the wind. Wind can have a significant impact on the performance and longevity of your sail shade. Evaluate the prevailing wind direction in your area and choose a location that provides some protection from strong winds. Additionally, consider the strength of the wind in different areas of your outdoor space and avoid installing the sail shade in an area with consistently strong gusts.
Checking for Obstacles or Potential Hazards
Before finalizing the location, carefully inspect the area for any potential obstacles or hazards. These can include trees, power lines, fences, or structures that might interfere with the installation or pose a safety risk. Ensure there is enough clearance space around the sail shade, allowing it to fully extend and function effectively.
By considering these factors – sun exposure, wind direction and strength, and potential obstacles – you can choose the perfect location for your sail shade. Remember that selecting the right spot is key to enjoying the full benefits of your sail shade and creating a comfortable outdoor space.
Gathering The Necessary Tools And Materials
Before you start installing a sail shade, it’s important to gather all the necessary tools and materials. This will ensure a smooth installation process and help you avoid any delays. Let’s take a look at the essential tools and materials you’ll need.
Essential Tools for Sail Shade Installation
When it comes to installing a sail shade, having the right tools is crucial. Here are the essential tools that you will need:
1. Measuring Tape and Marking Tools
In order to accurately measure and mark the locations for your sail shade installation, a measuring tape and marking tools are essential. They will help you determine the exact dimensions and ensure that your sail shade is installed correctly.
2. Ladders or Scaffolding
Depending on the height and location of your sail shade installation, you may need ladders or scaffolding to reach the necessary height. Make sure you have these tools handy to ensure a safe and comfortable installation process.
3. Drill and Appropriate Drill Bits
A drill is essential for securing the sail shade poles or posts to the ground or wall. Make sure you have a reliable drill and the appropriate drill bits for the type of surface you will be drilling into.
4. Anchoring Hardware
To ensure the stability and strength of your sail shade, you will need anchoring hardware. This includes anchors, bolts, and screws that will secure the poles or posts firmly in place. Choose high-quality and weather-resistant hardware for long-lasting installation.
Required Materials for Installation
In addition to the tools, you will also need specific materials to install your sail shade. Here are the materials you should gather:
1. Sail Shade Fabric
The main component of a sail shade is the fabric. Choose a durable and UV-resistant fabric that is suitable for outdoor use. Measure and cut the fabric according to the dimensions of your installation area.
2. Sail Shade Poles or Posts
To create the structure for your sail shade, you will need poles or posts. These should be sturdy and able to withstand the tension from the fabric. Make sure they are the appropriate height and material for your specific installation needs.
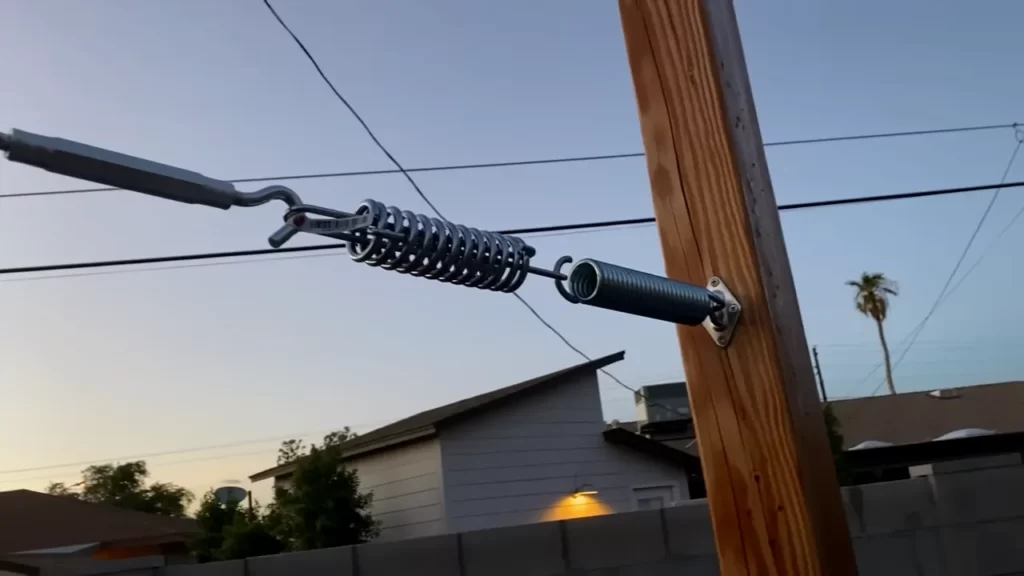
3. Guy-wires and Tensioning Hardware
To ensure proper tensioning and stability of your sail shade, you will need guy-wires and tensioning hardware. These will help secure the fabric tightly and prevent sagging or flapping in strong winds. Choose high-quality materials that can withstand outdoor elements.
By gathering all the necessary tools and materials beforehand, you will be well-prepared to install your sail shade. This will save you time and ensure a successful installation that provides shade and protection for your outdoor space.
Measuring And Evaluating The Installation Area
Before you begin installing a sail shade, it’s crucial to measure and evaluate the installation area to ensure a proper fit and secure installation. This step will help determine the size and shape of your sail shade, assess the structural integrity of potential mounting points, and identify suitable anchoring areas. By following these guidelines, you can ensure a successful installation that provides optimal shade and durability.
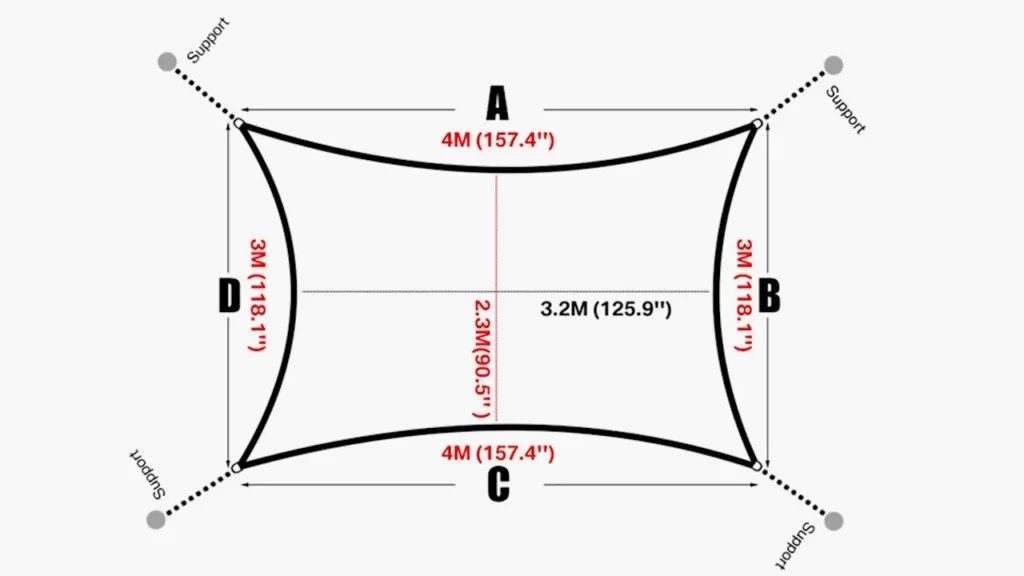
Determining the Size and Shape of Your Sail Shade
When deciding on the size and shape of your sail shade, it’s important to consider the available space as well as your specific needs and preferences. To determine the appropriate size, measure the area you wish to cover.
Measuring the Area for Coverage
To accurately measure the area for coverage, use a measuring tape or a suitable measuring tool. Measure the length and width of the desired shaded area, taking into account any obstructions or areas that should remain uncovered. Be sure to measure multiple times to ensure accuracy.
Choosing the Shape of the Sail Shade
Next, consider the shape of your sail shade. Sail shades typically come in rectangular, square, or triangular shapes. The shape you choose will depend on the available space, desired aesthetic, and functionality. Rectangular and square sail shades provide maximum coverage, while triangular shades can add an interesting visual element to your outdoor space.
Assessing the Structural Integrity of Mounting Points
Before installing your sail shade, it’s important to assess the structural integrity of potential mounting points. These could include existing structures, such as buildings or pergolas, or dedicated posts and poles. Ensure that the mounting points are strong and stable enough to support the weight and tension of the sail shade.
Examining Existing Structures
Existing structures can be excellent mounting points for sail shades, but they must be thoroughly examined to ensure they can withstand the additional load. Check for any signs of wear, damage, or weakness that could jeopardize the stability and safety of both the structure and the sail shade.
Identifying Suitable Mounting Points for Anchoring
In addition to examining existing structures, identify suitable mounting points for anchoring the sail shade. These can include posts, poles, or attachment points on walls or fences. The chosen mounting points should be sturdy and securely fixed in place, able to withstand the tension and pull of the sail shade in various weather conditions.
Installing The Anchoring Points
Installing Support Poles or Posts
When installing a sail shade, one of the crucial steps is setting up the anchoring points. Support poles or posts play a significant role in ensuring the stability and functionality of your sail shade. Here’s how you can install them: Firstly, determine the number of support poles or posts required for your sail shade. This typically depends on the size and shape of the shade. A larger sail shade may require more support for proper tension and stability.
Digging Holes for Poles or Posts
Once you have determined the number of support poles or posts needed, the next step is to dig holes in the desired location. Use a post hole digger or an auger to create holes that are deep enough to provide a strong foundation. Make sure the holes are wide enough to accommodate the poles or posts.
Setting Poles or Posts in Concrete
To ensure the stability and durability of your sail shade, it’s advisable to set the support poles or posts in concrete. This involves mixing quick-setting concrete according to the manufacturer’s instructions and pouring it into the holes around the poles. Allow the concrete to dry and set before moving on to the next step.
Ensuring Proper Alignment and Stability
Proper alignment and stability are vital for the effectiveness of your sail shade. Use a level to ensure that the support poles or posts are perfectly vertical. An uneven or leaning installation may result in an improperly tensioned sail shade, which can compromise its functionality and aesthetics. Take the time to double-check the alignment before proceeding.
Attaching Anchoring Hardware to Existing Structures
If you have existing structures like walls or columns that can serve as anchoring points, it’s essential to attach the anchoring hardware securely. This may involve using brackets, hooks, or other types of hardware to connect the sail shade to the existing structures. Ensure that the hardware is suitable for the load and is properly installed for maximum stability.
Locating and Preparing Attachment Points
To establish attachment points for your sail shade, it’s crucial to locate suitable areas on the support poles or posts. Look for pre-drilled holes or attachment points specifically designed for sail shades. Clean and prepare the attachment points, removing any debris or sharp edges that could potentially damage the shade fabric.
Installing Anchoring Hardware Securely
Once the attachment points are ready, it’s time to install the anchoring hardware securely. Depending on the type of hardware used, this may involve screwing, bolting, or clamping the hardware into place. Ensure that the hardware is tight and secure, as any loose connections could compromise the stability and tension of the sail shade. Remember, proper installation of the anchoring points is crucial for the functionality, stability, and longevity of your sail shade. By following these steps and taking the necessary precautions, you can enjoy the benefits of a beautifully installed sail shade that provides shade and enhances your outdoor space.
Mounting The Sail Shade
When it comes to installing a sail shade, one of the most crucial steps is properly mounting it. A solid and secure installation will ensure that your sail shade not only looks great but also functions effectively in providing shade and protection from the sun. In this section, we will guide you through the process of attaching the sail shade to poles or posts, determining attachment points on the sail shade, using tensioning hardware for stability and tautness, adjusting the sail shade for optimal coverage, fine-tuning the tensioning, and checking for even coverage and no sagging.
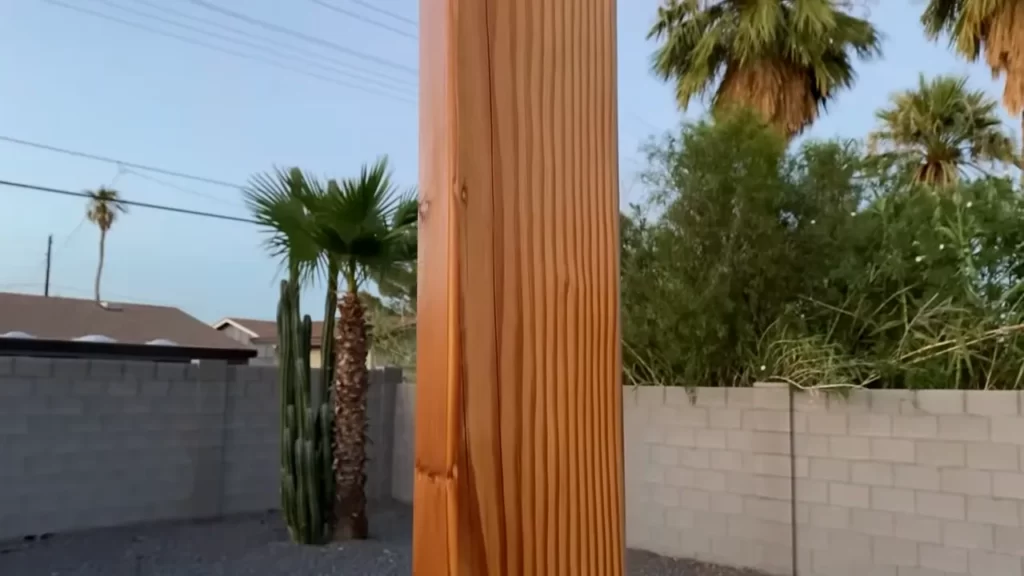
Attaching the Sail Shade to Poles or Posts
Before attaching the sail shade to poles or posts, ensure that the poles or posts are sturdy enough to support the tension of the sail shade. If you’re using wooden poles or posts, make sure they are treated to withstand outdoor conditions. To attach the sail shade, use stainless steel eye bolts and secure them to each pole or post using the appropriate hardware. Make sure the eye bolts are positioned at the correct height and angle to create the desired shape and tension of the sail shade.
Determining Attachment Points on the Sail Shade
When determining attachment points on the sail shade, consider the size and shape of the shade, as well as the available mounting space. Ideally, you should have at least three attachment points to evenly distribute the tension. Mark the attachment points on the sail shade using fabric chalk or a marker. Ensure that the attachment points are evenly spaced and aligned with the corresponding poles or posts.
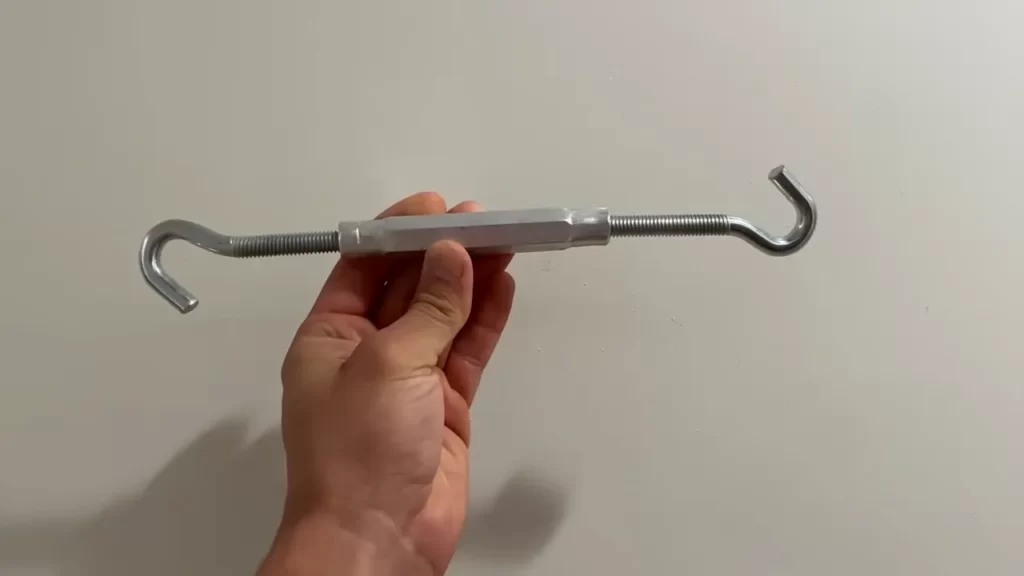
Using Tensioning Hardware for Stability and Tautness
To achieve stability and tautness, it’s essential to use tensioning hardware such as turnbuckles, D-rings, or shackles. Attach one end of the turnbuckle to the eye bolt on the pole or post, and the other end to the attachment point on the sail shade. Use the turnbuckle to adjust and tighten the tension of the sail shade until it is taut and wrinkle-free.
Adjusting the Sail Shade for Optimal Coverage
Once the sail shade is securely attached and tensioned, adjust its position to ensure optimal coverage. Tilt the sail shade slightly to one side to allow water to run off during rain. Make sure the shade is positioned to provide maximum coverage during the hottest parts of the day. Take into account the angle of the sun and the desired shaded area when adjusting the sail shade.
Fine-tuning the Tensioning of the Sail Shade
To fine-tune the tensioning of the sail shade, closely inspect the fabric for any sagging or wrinkles. If there are any areas with noticeable sagging, adjust the tension by tightening or loosening the turnbuckles. Repeat this process until the sail shade is evenly tensioned and exhibits a smooth and taught appearance.
Checking for Even Coverage and No Sagging
After adjusting the tension, take a step back and visually inspect the sail shade for even coverage and no sagging. Ensure that the shade is properly tensioned and that the fabric is not sagging in any area. Use your hands to gently push and pull on the fabric to confirm its stability and resistance to sagging. If any areas require further adjustment, make the necessary changes until the sail shade provides even coverage and a visually pleasing appearance.
Ensuring Safety And Longevity Of Your Sail Shade
Installing a sail shade can provide a stylish and functional addition to your outdoor space. Not only does it offer protection against the sun’s harmful rays, but it also adds a touch of elegance to your patio or backyard. To ensure the safety and longevity of your sail shade, regular maintenance and inspections are essential. By following these guidelines, you can keep your sail shade in top condition for years to come.
Regular Maintenance and Inspections
To keep your sail shade in optimal condition, regular maintenance and inspections are crucial. Set a routine to inspect the fabric, hardware, and overall structure of the shade. Consider performing these checks at least once every month. During the inspection, pay attention to the following:
- Look for signs of wear and tear on the fabric, such as fraying or fading.
- Check for any loose or missing stitching that may compromise the shade’s integrity.
- Inspect the hardware, including the eyelets, turnbuckles, and attachment points, for signs of rust or damage.
By conducting regular inspections, you can detect any issues early on and address them promptly, preventing further damage to your sail shade.
Clearing Debris and Ensuring Proper Drainage
One of the most important aspects of maintaining your sail shade is keeping it free from debris and ensuring proper drainage. Leaves, twigs, and other debris can accumulate on the shade, potentially causing damage and affecting its ability to withstand wind. To prevent these issues, follow these steps:
- Regularly remove any debris by gently sweeping the fabric with a soft broom or using a leaf blower on a low setting.
- Ensure proper drainage by checking that the sail shade is properly tensioned and installed at an angle to allow rainwater to run off.
By clearing debris and ensuring proper drainage, you can prolong the lifespan of your sail shade and prevent issues caused by excess weight or water accumulation.
Checking for Loose or Damaged Hardware
Loose or damaged hardware can compromise the stability and safety of your sail shade. It is essential to regularly check all attachment points and hardware components. Here’s what you should do:
- Tighten any loose turnbuckles or attachment points using the appropriate tools.
- Replace any damaged or rusted hardware to maintain the structural integrity of the sail shade.
By addressing any issues with the hardware promptly, you can prevent potential accidents or damage to the shade.
Protecting the Sail Shade from Extreme Weather Conditions
Extreme weather conditions can pose a risk to your sail shade, including strong winds and intense sunlight. To protect your sail shade effectively, take these precautions:
- Reinforce the shade’s tension during periods of high wind by adjusting the turnbuckles.
- Consider using removable bungee cords or additional hooks to secure the outer edges of the shade during windy conditions.
- Apply a UV protectant spray to the fabric to minimize sun damage and fading.
By taking these protective measures, you can ensure that your sail shade remains durable and able to withstand various weather conditions.
Taking Down the Sail Shade in Stormy Weather
When stormy weather is expected, it is advisable to take down the sail shade to prevent any potential damage. Strong winds, heavy rain, and hail can put excessive stress on the shade, leading to tears or even structural failure. Follow these steps to take down your sail shade:
- Remove all tension from the sail by loosening the turnbuckles.
- Detach the fabric from the hardware, starting from one corner and working your way around.
- Store the sail shade in a dry place to avoid water damage.
Remember to reinstall the sail shade once the stormy weather has passed, ensuring proper tension and attachment.
Applying Protective Coatings or Treatments to the Fabric
An additional way to enhance the longevity of your sail shade is by applying protective coatings or treatments to the fabric. These treatments help repel water, resist UV rays, and prevent the growth of mildew or mold. Follow the manufacturer’s instructions or consult a professional to determine the most suitable protective treatment for your sail shade fabric.
In conclusion, regular maintenance, inspections, and proper care are vital to ensure the safety and longevity of your sail shade. By implementing these guidelines, you can enjoy your sail shade for years to come, enhancing both the aesthetics and functionality of your outdoor space.
Troubleshooting Common Issues
Installing a sail shade for your outdoor space comes with numerous benefits, from providing shade and protection to creating a stylish and inviting atmosphere. However, like any outdoor feature, sail shades can sometimes encounter common issues that may require troubleshooting. In this section, we will address some of the most common problems that you may encounter during the installation process and offer solutions to help you overcome them.
Addressing Fading or Discoloration of the Fabric
Over time, exposure to sunlight and other weather elements can cause the fabric of your sail shade to fade or become discolored. To address this issue:
- Consider choosing a quality fabric that is specifically designed to resist fading. Look for UV-resistant and fade-resistant materials to ensure longevity.
- Apply a fabric protectant or UV treatment spray to enhance the sun protection and prevent fading. Be sure to follow the manufacturer’s instructions for application.
- Regularly clean the fabric using a mild soap solution and a soft brush or sponge. Avoid abrasive cleaners or brushes that can damage the fabric.
Dealing with Excessive Sagging or Tension
If you notice that your sail shade is sagging excessively or has too much tension, follow these steps to address the issue:
- Adjust the tension on the corner fittings of your sail shade. Loosen or tighten the tensioning hardware, depending on the desired outcome.
- Check the positioning of your anchor points. Ensure that they are securely fixed and at the correct distance from each other to provide adequate tension.
- Consider installing additional support structures, such as poles or cables, to help distribute the tension more evenly across the sail shade.
Resolving Issues with Loose or Unstable Anchoring
Loose or unstable anchoring can compromise the stability and functionality of your sail shade. Here’s how you can resolve this issue:
- Ensure that your anchor points are firmly secured to a stable structure, such as a wall, post, or sturdy ground surface.
- Check the integrity of the anchor fixings. Replace any worn-out or damaged fixings to ensure a secure connection.
- Consider using additional anchor points or hardware, such as turnbuckles or carabiners, to provide extra stability and minimize movement.
By addressing these common issues and applying the appropriate solutions, you can overcome challenges during the installation and maintenance of your sail shade. Taking proactive steps to troubleshoot and resolve issues will help ensure that your sail shade remains durable, aesthetically pleasing, and functional for years to come.
Frequently Asked Questions On How To Install A Sail Shade
How Do You Attach A Sail Shade To A House?
To attach a sail shade to a house, you can use various methods. One option is to mount brackets onto the exterior wall and connect the shade fabric to them. Another option is attaching eye bolts to sturdy posts or beams, then securing the shade sail using turnbuckles or snap hooks.
Can I Install My Own Shade Sail?
Yes, you can install your own shade sail. Just make sure to follow these 5 guidelines: 1) Keep sentences short, with 20 words maximum. 2) Write in an SEO-friendly and unique manner. 3) Use active voice and avoid certain phrases.
4) Write in a human-like manner. 5) Keep the answer within 50 words.
How Do You Hang Shade Sails?
Hang shade sails by following these steps: First, choose sturdy anchor points and attach hardware. Then, measure and mark the sail’s corners. Next, attach the sail to the anchor points using tensioning devices. Lastly, adjust tension and secure any remaining loose edges.
Should A Shade Sail Be Tight Or Loose?
A shade sail should be tight for proper installation and functionality. A tight shade sail prevents sagging and ensures its stability in wind. A loose sail may not provide adequate shade and may be more prone to damage.
Conclusion
To sum up, installing a sail shade is a cost-effective and stylish way to transform your outdoor space into a comfortable oasis. By following the step-by-step guide provided in this blog post, you can easily complete the installation process yourself.
Remember to consider the location, gather the necessary tools, and securely fasten the sail shade. With proper installation, you’ll be able to enjoy the benefits of shade and shelter for years to come. So go ahead, embrace the beauty of a sail shade and make the most of your outdoor living area.