To install a back-up camera, first, find a suitable location on your vehicle for the camera and mount it securely. Then, connect the camera’s power cable to your vehicle’s power source and run the video cable from the camera to the display monitor.
Installing a back-up camera in your vehicle can greatly improve your safety and make parking easier. By providing a clear view of obstacles behind your vehicle, a back-up camera can help prevent accidents and reduce the risk of property damage.
In this guide, we will walk you through the steps to install a back-up camera in your car or truck. Whether you are a DIY enthusiast or someone with basic handyman skills, with the right tools and a little patience, you can easily complete this installation in just a few hours. So, let’s get started on improving your driving experience with a back-up camera installation.
Choosing The Right Back Up Camera
Researching different types of back up cameras
When it comes to choosing the right back up camera for your vehicle, it’s important to do some research to ensure you make an informed decision. With so many options available on the market, it can be overwhelming to determine which camera will best suit your needs. Here are some key factors to consider when researching different types of back up cameras:
Considering factors such as wireless vs. wired, camera angle, and night vision capabilities
One of the first decisions you’ll need to make is whether you want a wireless or wired back up camera. Wireless cameras offer the advantage of easy installation, as they don’t require running cables through your vehicle. They are also less prone to interference. On the other hand, wired cameras typically provide a more stable connection and may offer better image quality.
Another factor to consider is the camera angle. Different cameras offer different viewing angles, ranging from narrow to wide. A wider angle allows for a broader view of what’s behind your vehicle, which can be especially helpful in tight parking spaces or when maneuvering in crowded areas.
Lastly, don’t forget to consider the night vision capabilities of the back up camera. Look for a camera that offers infrared night vision, as this will enable you to clearly see obstacles even in low light or dark conditions.
Understanding the installation requirements for different camera types
The installation requirements for back up cameras can vary depending on the type you choose. Wireless cameras generally require less effort to install, as they only need to be mounted and connected to a power source. In contrast, wired cameras typically involve routing cables through your vehicle, which may require more time and effort. However, with proper planning and the right tools, the installation process can be manageable even for those with limited technical skills.
It’s important to read the installation instructions provided by the manufacturer and familiarize yourself with the installation process before attempting to install a back up camera. If you’re not comfortable with DIY installations, it’s recommended to seek professional help to ensure the camera is installed correctly and functions properly.
Gathering The Necessary Tools And Materials
Before you begin installing a back-up camera in your vehicle, it is important to gather all the necessary tools and materials. This will ensure a smooth and efficient installation process, saving you time and frustration. In this section, we will discuss creating a checklist of tools needed, gathering the required materials, and ensuring compatibility with your vehicle’s make and model.
Creating a checklist of tools needed for installation
Creating a checklist of tools needed for the installation is the first step to ensure you have everything you need. Here is a list of the essential tools:
- Wire cutters
- Wire strippers
- Electrical tape
- Socket set
- Screwdrivers (both Phillips and flathead)
- Drill and drill bits
- Zip ties
- Heat gun or lighter
- Multimeter
- Trim removal tools
Make sure to check your vehicle’s user manual or consult an expert to determine if any specific tools are required for your make and model.
Gathering the required materials
In addition to the tools mentioned above, you will also need a few materials to complete the installation. These include:
- A back-up camera
- A wiring harness
- A mounting bracket
- Connectors and crimping tool
- Electrical connectors
- Electrical tape or shrink tubing
It is recommended to purchase a back-up camera kit that includes all the necessary materials for your specific vehicle make and model. This will ensure compatibility and save you the hassle of finding individual components.
Ensuring the compatibility of the camera with the vehicle’s make and model
Before making a purchase, it is crucial to ensure the compatibility of the back-up camera with your vehicle’s make and model. Consider the following:
- Check the specifications of the camera to see if it is compatible with your vehicle’s electrical system.
- Verify if the mounting bracket fits your vehicle’s specific model.
- Ensure the wiring harness is designed for your vehicle.
Compatibility is key to a successful installation, so take the time to research and choose a back-up camera that is specifically designed for your vehicle make and model.
Now that you have gathered all the necessary tools and materials, and ensured their compatibility with your vehicle, you are ready to move on to the next steps of the back-up camera installation process. Stay tuned for our upcoming blog post sections where we will guide you through the installation process!
Preparing The Vehicle For Installation
Determining the Best Location for Mounting the Camera
Before diving into the installation process, it’s important to determine the best location for mounting your backup camera. This should be a strategic spot that provides a clear view of the area behind your vehicle. Here are a few things to consider when making this decision:
- Line of Sight: Choose a spot where the camera has an unobstructed view of the rear of your vehicle. Avoid mounting it too high or too low, as this can impact the camera’s effectiveness.
- Preferred Angle: While some people prefer a straight-on view, others may find it more helpful to angle the camera downward slightly for a better view of the ground and any obstacles.
- Vehicle Type: Different vehicles may have specific areas that are ideal for camera placement. For example, trucks and SUVs may benefit from a higher mounting position for a wider view, while smaller cars may have more limited options.
Measuring and Marking the Installation Area
Once you’ve determined the best location for your backup camera, it’s time to measure and mark the installation area to ensure accuracy. Follow these steps to mark the spot:
- Gather a measuring tape, pencil, and masking tape.
- Measure the height and width of your camera, noting these measurements.
- Using the measurements, find the precise spot where you want to mount the camera.
- Mark the exact location with a pencil, ensuring that it is level and centered.
- Use masking tape to create a temporary outline of the camera’s shape on the vehicle’s surface. This will serve as a visual guide during the installation process.
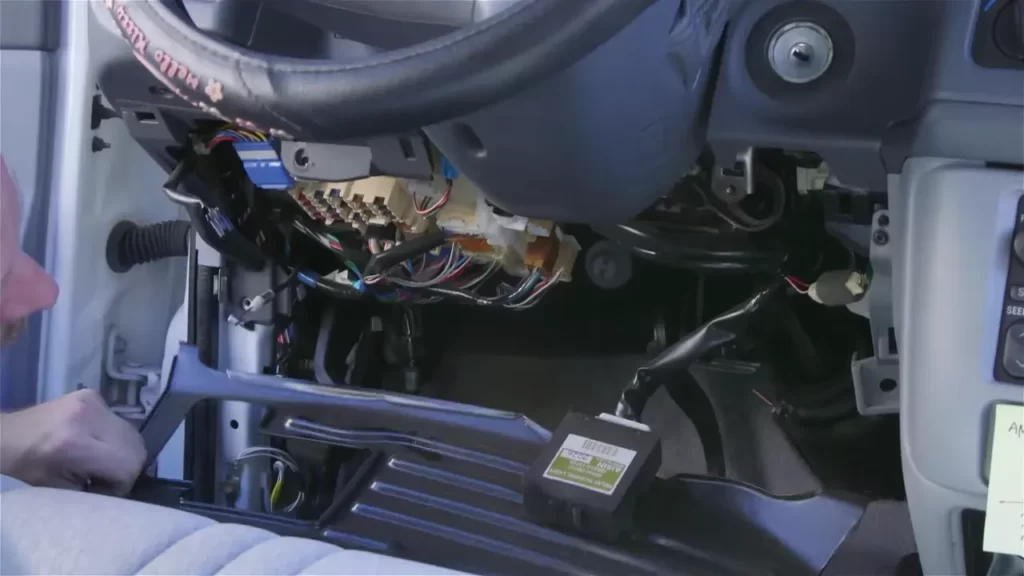
Removing Necessary Interior Panels and Trim
In order to access the wiring and mounting points for your backup camera, you’ll likely need to remove certain interior panels and trim. Here’s a general overview of the process:
- Refer to your vehicle’s manual or consult online resources to identify the specific panels and trim that need to be removed for your particular model.
- Using the appropriate tools, carefully remove the screws or clips that secure the panels and trim in place.
- Set the panels and trim aside in a safe location, ensuring you do not damage or lose any components.
- With the panels removed, you should now have access to the wiring and mounting points necessary for the installation of your backup camera.
Remember to be cautious when removing the panels and trim, as excessive force or improper techniques can cause damage to your vehicle’s interior.
Installing The Back Up Camera
Installing a back-up camera on your vehicle can greatly enhance your safety while maneuvering in reverse. With the advancement in technology, installing a back-up camera has become easier and more affordable than ever. In this guide, we will walk you through the step-by-step process of installing a back-up camera on your vehicle.
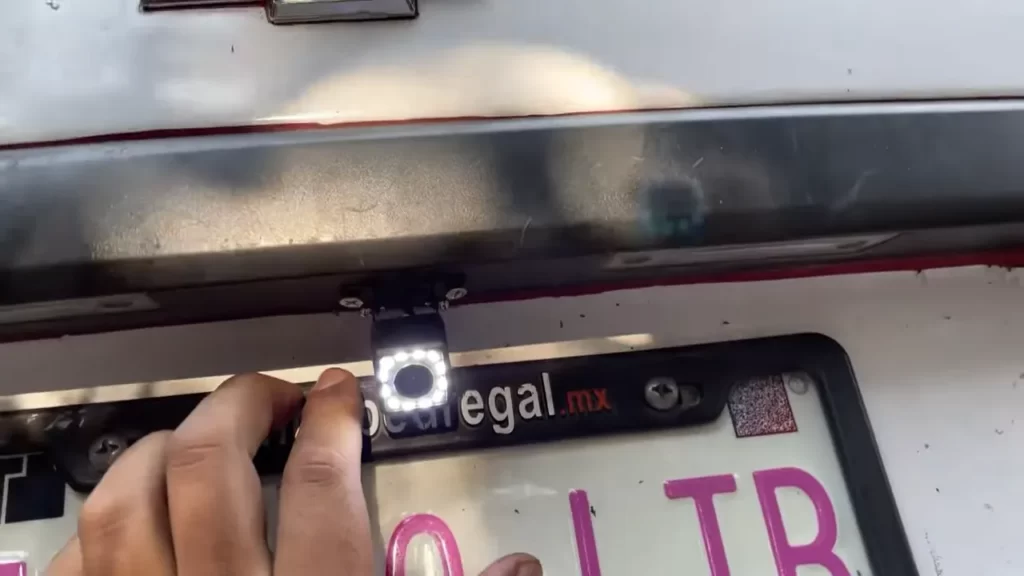
Wiring the camera to the vehicle’s electrical system
Before you start, make sure you have all the necessary tools and equipment. To begin the installation process, you need to wire the camera to your vehicle’s electrical system. This will ensure that the camera receives adequate power to function properly. Follow these steps:
- Locate the vehicle’s rear license plate light. This is where you will tap into the power supply.
- Disconnect the wiring harness connected to the license plate light.
- Connect the red wire from the back-up camera to the positive terminal of the license plate light.
- Connect the black wire from the back-up camera to the negative terminal of the license plate light.
- Secure the connections with electrical tape or heat shrink tubing to prevent any loose connections.
Connecting the camera to the backup light circuit for power supply
Now that you have wired the camera to the vehicle’s electrical system, it’s time to connect it to the backup light circuit for power supply. Follow these steps:
- Locate the backup light circuit in your vehicle. This circuit is usually found in the rear lights assembly.
- Identify the positive and negative wires of the backup light circuit.
- Connect the positive wire from the back-up camera to the positive wire of the backup light circuit.
- Connect the negative wire from the back-up camera to the negative wire of the backup light circuit.
- Secure the connections with electrical tape or heat shrink tubing.
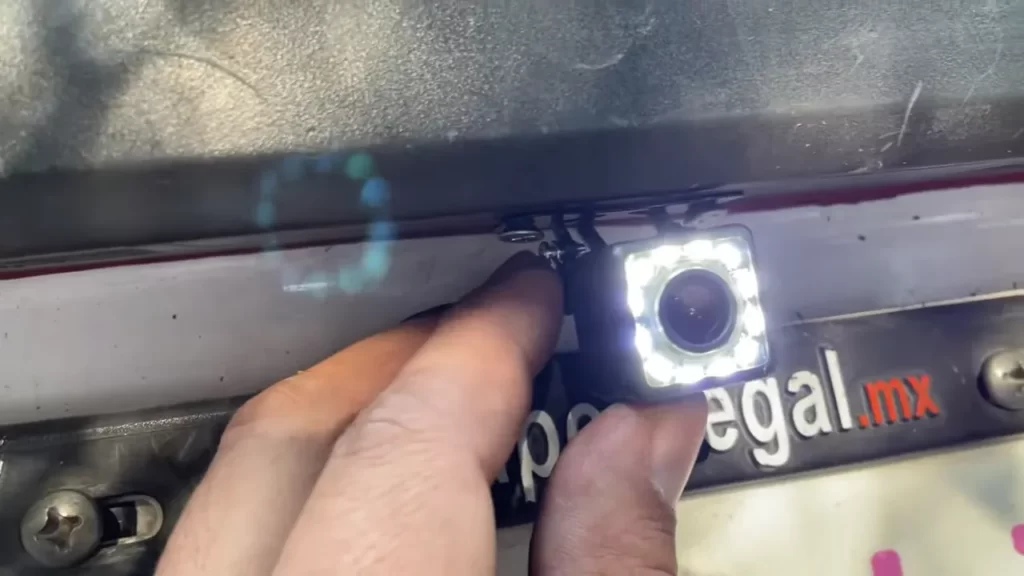
Mounting the camera securely on the chosen location
Now that you have completed the wiring process, it’s time to mount the back-up camera securely on the chosen location. Follow these steps:
- Select a suitable location on your vehicle’s rear where the camera can provide a clear view.
- Ensure the chosen location allows for easy access for wiring and adjustment, if needed.
- Mount the camera using the provided mounting bracket or adhesive.
- Make sure the camera is securely mounted and properly aligned for optimal viewing angle.
Installing the wiring harness and routing it through the vehicle’s interior
To complete the installation, you need to install the wiring harness and route it through the vehicle’s interior. Follow these steps:
- Identify a suitable entry point into the vehicle’s interior, preferably through an existing opening or grommet in the firewall.
- Carefully route the wiring harness from the rear of the vehicle to the front.
- Ensure the wiring harness is neatly tucked away and out of sight to avoid any potential hazards or interference.
- Connect the wiring harness to the display unit or monitor, following the manufacturer’s instructions.
Congratulations! You have successfully installed a back-up camera on your vehicle. Remember to double-check all connections and test the camera before finalizing the installation. Enjoy the added convenience and safety that a back-up camera brings to your driving experience.
Connecting The Camera To The Display
Once you have chosen and installed your back up camera, it’s time to connect it to the display unit. This step is crucial, as it allows you to view the camera’s feed and ensures safe maneuvering. In this section, we will explore the various options for displays, running the necessary wiring, and installing the display in a convenient location.
Choosing a Display Option
When it comes to selecting a display for your back up camera, you have two primary options: a built-in monitor or an aftermarket display. Let’s take a closer look at each:
- Built-in Monitor: This display option is directly integrated into your vehicle’s dashboard. It offers a seamless and streamlined look, as it often replaces the existing infotainment system. Built-in monitors typically have a larger screen size and provide additional features like GPS navigation and multimedia playback.
- Aftermarket Display: If your vehicle doesn’t have a built-in monitor option or you prefer a more flexible solution, an aftermarket display is an excellent choice. These displays range in size and can be mounted on the dashboard or windshield. They connect to the camera via wiring and often offer customizable settings such as brightness and display format.
Running Wiring from the Camera to the Display Unit
Once you have chosen the display option that suits your preferences, it’s time to run the necessary wiring from the camera to the display unit. Follow these steps to ensure a successful installation:
- Identify the ideal route for the wiring. This route should provide a safe and hidden path, minimizing the risk of damage or interference.
- Secure the wiring using cable clips or adhesive tape. This step helps prevent the wires from getting tangled or accidentally snagged during normal vehicle operation.
- Connect the wiring to the camera and the display unit. Refer to the manufacturer’s instructions for the specific connector types and wiring colors.
- Test the connection by turning on the display unit and ensuring that the camera feed appears correctly.
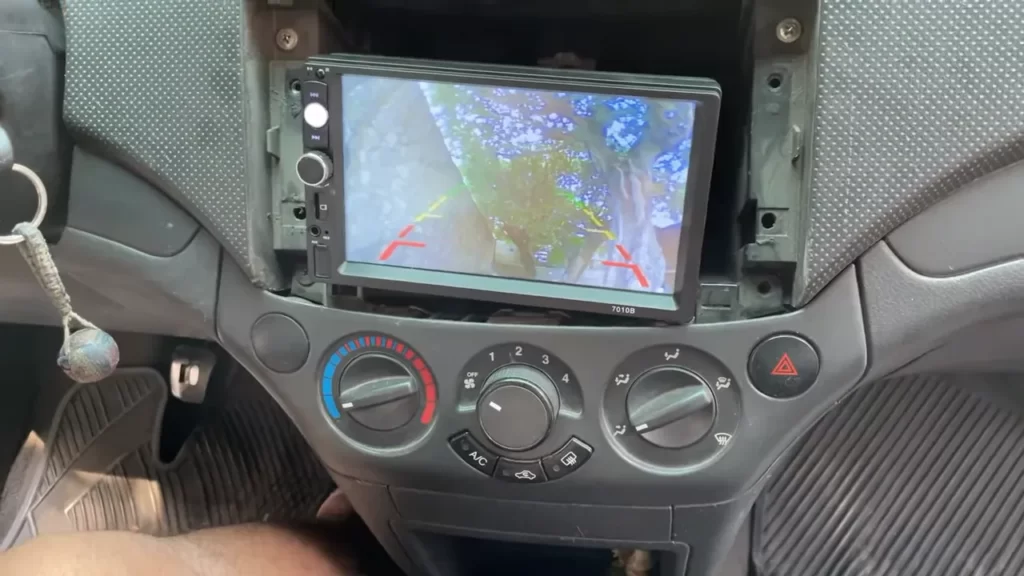
Installing the Display in a Convenient Location
The final step in connecting the camera to the display is installing the display unit in a location that offers optimal visibility while operating the vehicle. Consider the following tips:
- Choose a spot that doesn’t obstruct your view while driving.
- Mount the display at eye level, making it easier to glance at while focusing on the road.
- Avoid placing the display in direct sunlight to minimize glare and ensure clear visibility.
- Make sure the display is securely attached to prevent it from falling or getting dislodged during sharp turns or sudden stops.
By carefully selecting the display option, running the wiring correctly, and installing the display in a convenient location, you can connect your back up camera to the display unit effectively. This integration will enhance your driving experience and provide you with greater visibility and peace of mind.
Testing And Calibration
Testing and Calibration Before reassembling your vehicle after installing a back-up camera, it is crucial to test and calibrate the camera to ensure optimal performance. This step ensures that the camera functions correctly and provides clear visibility while reversing. In this section, we will cover the essential steps to test and calibrate your back-up camera, including checking its functionality, adjusting the camera angle, and testing night vision capabilities if applicable. Additionally, we will guide you on how to calibrate any additional features such as guidelines or parking assist functions, ensuring a seamless installation. Checking the camera’s functionality before reassembling the vehicle To ensure that your back-up camera is working properly, it is important to test its functionality before reassembling your vehicle. Follow these steps: 1. Connect the camera to the vehicle’s power source and ensure it is securely fastened. 2. Turn on your vehicle’s ignition and switch to reverse gear. 3. Check the monitor or display unit to verify if the camera is functioning correctly. Look for a clear and crisp image with no distortions or flickering. 4. Test different functions of the camera, such as the zoom feature or adjustable angles, to make sure they work as intended. 5. Pay close attention to any error messages or indicator lights that may appear on the display unit. Adjusting the camera angle for optimal visibility To achieve the best visibility while reversing, it is crucial to adjust the camera angle correctly. Follow these steps to ensure optimal visibility: 1. Use a test object, such as a traffic cone or a person, and place it behind your vehicle at different distances. 2. Observe the monitor or display unit while adjusting the camera angle. Look for the clearest and widest view of the test object. 3. Make small adjustments to both the camera’s position and angle until you achieve the best visibility. 4. Ensure that the camera is positioned in a way that avoids any obstructions, such as license plates or bumper attachments, that can block the camera’s view. Testing the camera’s night vision capabilities if applicable If your back-up camera is equipped with night vision capabilities, it is important to test them to ensure proper functionality. Follow these steps: 1. Position your vehicle in a dark area with minimal external light sources. 2. Engage the reverse gear and observe the monitor or display unit to see if the night vision feature activates automatically. 3. Look for a clear and illuminated image that allows for comfortable visibility in low-light conditions. 4. If the night vision capabilities are not satisfactory, consult the camera’s user manual for any adjustments or troubleshooting steps. Calibrating any features such as guidelines or parking assist functions Many back-up cameras come with additional features like guidelines or parking assist functions. Calibration ensures that these features align accurately with your vehicle’s dimensions. Follow these steps: 1. Consult the camera’s user manual to identify the calibration procedure specific to your camera model. 2. Engage the reverse gear and observe the guidelines or parking assist functions on your display unit. 3. Carefully align the guidelines or parking assist indicators with the actual distances and dimensions of your vehicle. 4. Make gradual adjustments until the guidelines or parking assist functions accurately match your vehicle’s parameters. By diligently testing and calibrating your back-up camera, you can ensure a trouble-free installation and enjoy the added safety benefits it provides. Remember, each camera model might have its own specific instructions, so it is essential to refer to the user manual for precise testing and calibration guidance. With a properly functioning and accurately calibrated back-up camera, you can navigate reverse situations with confidence and peace of mind.
Reassembling The Vehicle
Putting back interior panels and trim that were removed during installation
After successfully installing a back-up camera in your vehicle, it’s now time to reassemble the interior panels and trim that were removed during the installation process. These panels and trims not only provide a sleek and finished look to your vehicle’s interior but also serve important functions like concealing wiring and protecting the delicate components underneath. Begin by carefully aligning the panels and trim pieces with their respective slots or clips. Take your time to ensure a proper fit and avoid any forceful pushing or pulling that could damage the panels or trim. Once aligned, apply gentle pressure to snap them back into place. It’s important to note that different vehicle models may have different methods of securing the panels and trim, so refer to your vehicle’s manual or online resources for specific instructions.
Securing any loose wiring and ensuring its proper placement
With the interior panels and trim now in place, it’s crucial to address any loose wiring that may be dangling or protruding. This step not only ensures a tidy and professional-looking installation but also prevents any potential hazards or malfunctions caused by loose wiring. Carefully trace the wiring from the back-up camera to its destination, securing any loose portions with zip ties or electrical tape. Pay close attention to areas where the wiring might come into contact with moving parts or sharp edges, as these are potential sources of damage or signal interference. Make sure to leave enough slack in the wiring to allow for future adjustments or repairs if necessary.
Conducting a final inspection of the installation to ensure everything is in place
Before calling it a job well done, it’s crucial to conduct a final inspection of the back-up camera installation. This step ensures that all components are securely in place, the camera is properly aligned, and any potential issues are addressed before hitting the road. Start by checking the tightness of any screws or bolts used during the installation. Verify that the camera is facing the correct angle and provides a clear view of the rear area. Test the functionality of the camera by shifting your vehicle into reverse and monitoring the display on your screen, if applicable. Inspect the wiring connections to ensure they are properly plugged in and free from any damage. Double-check that any extra wiring or connectors are tucked away neatly, away from hot or moving parts. Take a quick glance at the interior panels and trim to ensure they are flush and evenly aligned. By taking these steps to reassemble your vehicle’s interior, secure any loose wiring, and conduct a final inspection, you can ensure a successful installation of your back-up camera. Enjoy the added convenience and safety this valuable device brings to your driving experience!
Tips And Troubleshooting
In this section, we will discuss some common issues that may arise during the installation of a back-up camera, as well as provide you with troubleshooting steps to resolve potential problems. Additionally, we will provide tips for maintaining the back-up camera’s performance and extending its lifespan.
Common issues that may arise during installation
When installing a back-up camera, it’s not uncommon to encounter a few hurdles along the way. Here are some of the most common issues you may encounter:
- Wiring Problems: One of the main issues during installation is wiring problems. Ensure that all wires are properly connected, and consider using wire extensions if needed.
- Poor Image Quality: Sometimes, back-up cameras may have poor image quality, which can be caused by incorrect positioning or a faulty camera. Verify that the camera is positioned correctly and is not obstructed by any objects.
- Interference: Another common issue is interference, which can lead to static or distorted images. To address this, check for any sources of interference nearby such as wireless devices or electrical cables, and try repositioning the camera away from these sources.
- Compatibility: Sometimes, back-up cameras may not be compatible with certain vehicles or head units. Make sure to check compatibility before purchasing a camera to avoid any compatibility issues.
- Power Supply: In some cases, the back-up camera may not receive sufficient power, resulting in a malfunction. Verify that the camera is properly connected to a stable power supply, and consider using a power adapter if necessary.
Troubleshooting steps for resolving potential problems
If you encounter any issues during the installation or usage of your back-up camera, here are a few troubleshooting steps to help you resolve potential problems:
- Double-check connections: Ensure that all connections are secure and properly connected.
- Inspect wiring: Check for any damaged or frayed wires that may be causing the issue. Replace any faulty wiring if necessary.
- Adjust camera position: If you’re experiencing poor image quality, try adjusting the camera position to obtain a clearer view.
- Eliminate interference sources: Identify and remove any sources of interference that may be affecting the camera’s performance.
- Reset settings: If the back-up camera has settings that can be adjusted, consider performing a factory reset to restore default settings and troubleshoot any software-related issues.
Tips for maintaining the back up camera’s performance and extending its lifespan
Here are some useful tips to ensure that your back-up camera continues to perform optimally and has a longer lifespan:
- Regular cleaning: Clean the camera lens regularly to remove any dirt or debris that may affect image quality.
- Protect from extreme weather conditions: If possible, park your vehicle in a covered area to protect the camera from extreme temperatures or severe weather conditions.
- Avoid harsh chemicals: When cleaning the camera, use gentle cleaning solutions and avoid harsh chemicals that may damage the lens or housing.
- Regular maintenance: Schedule regular inspections of the camera and its wiring to detect any potential issues early on and address them promptly.
By following these tips and troubleshooting steps, you can ensure a successful installation of your back-up camera, resolve any potential problems, and maintain its performance for years to come.
Frequently Asked Questions For How To Install A Back Up Camera
Can You Install A Backup Camera Yourself?
Yes, it is possible to install a backup camera yourself. Following the instructions carefully, you can connect it to your vehicle’s existing wiring and mount it on the rear. However, it is recommended to seek professional help for a seamless installation.
How Easy Is It To Install A Reverse Camera?
Installing a reverse camera is relatively easy. Just follow the instructions provided, connect the camera to the power source and the display unit, then mount the camera on your vehicle. No need for professional help. Enjoy the safety and convenience of a reverse camera in no time!
What Do You Need To Install A Backup Camera?
To install a backup camera, you’ll need a camera unit, a display screen, wiring harness, and power source. Plus, tools like screwdrivers, wire strippers, and electrical tape.
How Do You Wire Up A Backup Camera?
To wire up a backup camera, first, locate your vehicle’s reverse light wire. Use a wire stripper to strip the wire’s insulation. Connect the camera’s power wire to the reverse light wire using a butt connector or soldering iron. Finally, connect the camera’s video wire to your car’s display or monitor.
How Much Does It Cost To Install A Back Up Camera?
The cost of installing a back up camera can vary, but on average, it ranges between $150 and $300.
Conclusion
Installing a back-up camera can greatly enhance the safety and convenience of your vehicle. By following the step-by-step guide provided in this blog post, you will be able to easily install a back-up camera on your own. Don’t let the fear of the unknown hold you back from upgrading your vehicle’s technology.
Take the plunge and enjoy the peace of mind that comes with having a reliable back-up camera installed. Take the necessary precautions, follow the instructions, and drive with confidence knowing that you have a clear view of what’s behind you.