To install a screen window, measure the window opening and purchase a screen frame that fits the measurements. Then, attach the screen frame to the window frame using screws or adhesive strips.
Be sure to secure the screen tightly to avoid any gaps or loose corners.
Tools And Materials Needed
When it comes to installing a screen window, having the right tools and materials is essential. Without them, the process can become frustrating and time-consuming. In this section, we will discuss the tools and materials you will need for a successful screen window installation project.
<h3>List of tools required for the installation process</h3>
Before you begin installing your screen window, make sure you have the following tools:
- A measuring tape – to accurately measure the dimensions of your window frame.
- A pencil – to mark the measurements on the frame.
- A utility knife – to cut the screen material to the correct size.
- A screen spline roller – to securely attach the screen to the frame.
- A flat-head screwdriver – to remove any existing screen or frame components.
- A miter box and saw – to accurately cut any frame pieces that may need trimming.
- A hammer – to secure nails or screws into the frame.
- An awl – to help guide the screen spline into the channel.
- A level – to ensure the frame is plumb and level during installation.
- A drill with a small drill bit – to create pilot holes for screws, if necessary.
<h3>List of materials needed for the project</h3>
In addition to the tools mentioned above, you will also need the following materials:
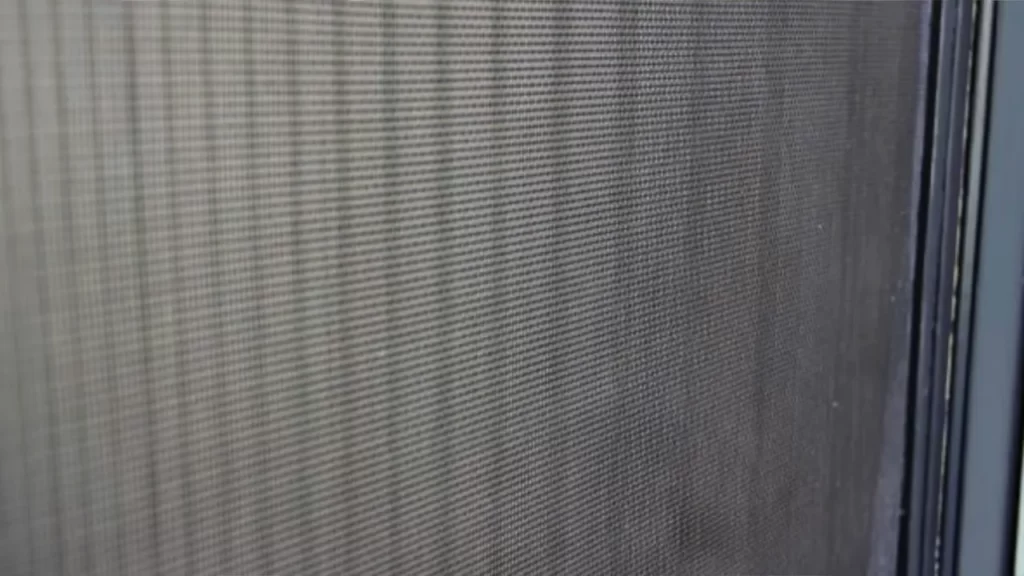
- Screen material – typically made of fiberglass or aluminum and available in various widths and colors.
- Screen spline – a flexible rubber or vinyl cord used to secure the screen material in the frame channel.
- Frame components – such as aluminum or wood frame pieces, corners, and connectors.
- Screws or nails – for securing the frame components together.
- Corner brackets – for reinforcing the frame corners and ensuring stability.
- Caulk or weatherstripping – to seal any gaps between the frame and the window opening.
- A tape measure – for precise measurements of the window opening.
- Window cleaner and a soft cloth – for cleaning the window before installation.
- Painter’s tape or masking tape – to protect the window glass and frame during installation.
Having these tools and materials at hand will ensure a smooth and efficient screen window installation process. Make sure you gather all the necessary items before getting started, so you don’t have to interrupt your progress later on.
Measuring And Preparing The Window Opening
Installing a screen window is a simple and effective way to keep pesky bugs and debris out of your home while still enjoying a cool breeze. However, before you can start the installation process, it’s crucial to measure and prepare the window opening accurately. This step ensures a proper fit and a seamless installation. In this guide, we’ll walk you through the process, step by step, to help you get it right.
Measuring the window opening accurately
The first step in installing a screen window is to measure the window opening accurately. This ensures that you get a screen window that fits perfectly and provides a tight seal. To measure the window opening, follow these simple steps:
- Before you begin measuring, make sure the window is clean and free of any obstructions that could affect the accuracy of your measurements.
- Start by measuring the width of the window opening. Use a tape measure to measure the distance from one side of the opening to the other. Be sure to measure at both the top and the bottom of the opening, as window frames can sometimes be slightly uneven.
- Next, measure the height of the window opening. Again, use a tape measure and measure from the top of the opening to the bottom. Just like with the width, measure at both the left and right sides to ensure accuracy.
- Once you have both the width and height measurements, double-check them to ensure accuracy. It’s always a good idea to measure twice to avoid any mistakes.
Now that you have your accurate measurements, you can move on to preparing the window frame for installation.
Preparing the window frame for installation
Now that you have the measurements for your screen window, it’s time to prepare the window frame for installation. Follow these steps to ensure a smooth installation process:
- Start by cleaning the window frame thoroughly. Use a damp cloth to remove any dirt, dust, or debris that may have accumulated on the surface. A clean frame helps the window adhere better and ensures a tight fit.
- Inspect the frame for any damage or signs of wear and tear. Look for cracks, loose screws, or any other issues that may affect the installation process. If you notice any problems, make the necessary repairs before proceeding.
- Apply a thin layer of silicone caulk along the inside edges of the window frame. This helps create a watertight seal and prevents any drafts or leaks. Be sure to smooth out the caulk with your finger for a neat finish.
- Before installing the screen window, measure and mark the center of the frame. This will serve as a guide when positioning the window to ensure it is aligned correctly.
- Finally, place the screen window into the prepared frame, making sure it fits snugly. Use a level to check that it is straight and adjust if necessary. Secure the window in place using the provided screws or clips.
By measuring the window opening accurately and properly preparing the window frame, you’ll ensure a seamless installation of your screen window. Take your time during this step to avoid any issues down the line, and enjoy the benefits of a bug-free home with refreshing airflow.
Choosing The Right Screen Window
When it comes to installing a screen window, selecting the right one can make all the difference between a successful installation and a frustrating one. This step is crucial as the screen window you choose will not only determine the level of protection it provides but also its overall effectiveness in keeping out insects and debris.
Factors to consider when selecting a screen window
Determining the appropriate size and type of screen window requires careful consideration of the following factors:
- Window opening dimensionsOne of the first things to consider when choosing a screen window is the dimensions of your window opening. Measure the height and width of the opening accurately to ensure a proper fit. Choosing a screen window that fits snugly within the frame will help prevent any gaps that insects could use to enter your home.
- Screen materialThe material of the screen is another important factor to consider. There are several options available, each with its own advantages and disadvantages. Some common screen materials include fiberglass, aluminum, and solar screen. Fiberglass screens are lightweight, resistant to corrosion, and offer good visibility. Aluminum screens, on the other hand, are durable and provide excellent airflow. Solar screens are designed to block heat and UV rays while still allowing visibility. Choose a material that best suits your needs and preferences.
- Screen colorThe color of the screen may not seem like a significant factor, but it can have an impact on the overall aesthetics of your home. Consider whether you want the screen to blend in with the window frames or if you prefer a contrasting color for visual appeal. While black or charcoal screens tend to be popular choices, there are also options available in different shades and patterns to match your personal style.
- Screen frame materialIn addition to the screen material, the frame material also plays a role in the overall durability and maintenance of the screen window. Common frame materials include aluminum, vinyl, and wood. Aluminum frames are lightweight, strong, and resistant to rust. Vinyl frames are low-maintenance and moisture-resistant, while wood frames offer a classic look and can be painted or stained to match your home’s aesthetics.
- Additional featuresConsider any additional features that may enhance the functionality of your screen window. For example, some screens come with a protective coating to resist fingerprints and smudges, making them easier to clean. Others may have a pet-resistant design to prevent damage caused by pets or a reinforced frame for added strength and security.
Taking these factors into account will help you make an informed decision when selecting a screen window for your home. Remember to measure your window opening accurately, choose the right screen material and color, consider frame material options, and explore any additional features that can enhance the durability and functionality of the screen window. By choosing the right screen window, you can enjoy a well-protected and insect-free environment.
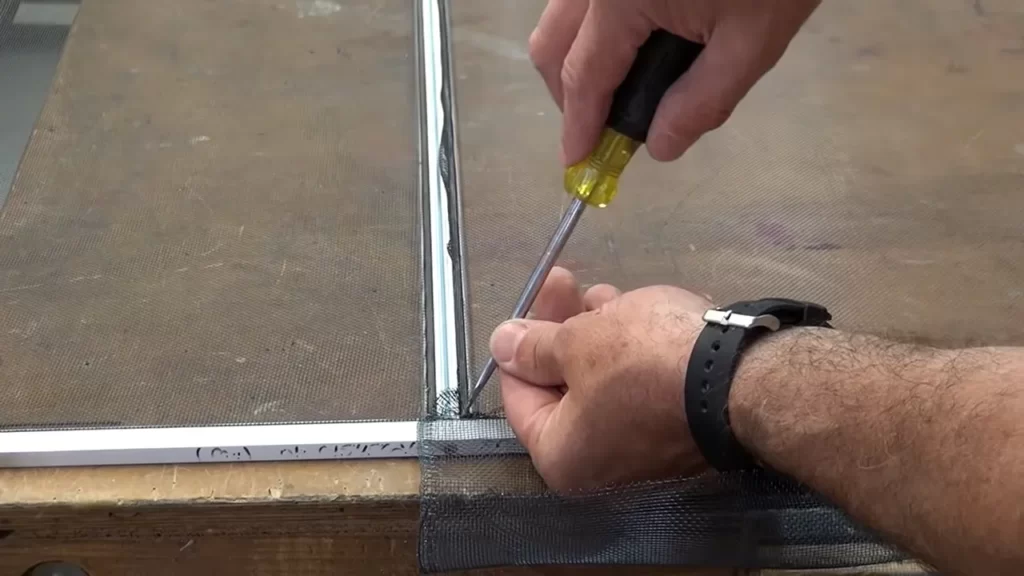
Removing The Existing Window Screen
In this section, we will guide you through the step-by-step process of removing the old window screen. It’s essential to properly remove the existing screen before installing a new one, ensuring a smooth and hassle-free process. Read on to discover the necessary steps and some useful tips for handling and storing the old screen.
Step-by-Step Guide to Remove the Old Window Screen
- Start by locating the retaining clips or screws that hold the screen in place. These clips are typically found along the edges of the window frame.
- Using a screwdriver or a pry bar, carefully remove the retaining clips or unscrew the screws. Be gentle to avoid damaging the window frame or the screen.
- Once the retaining clips or screws are removed, gently pull the old screen away from the window frame. Take care to avoid tearing the screen material as you do this.
- If the old screen is stuck or tightly secured, you can use a putty knife to gently pry it away from the frame. Again, exercise caution to prevent any damage.
- Once the old screen is completely detached, set it aside for later disposal or repair, if necessary.
Tips for Handling and Storing the Old Screen
Proper handling and storage of the old screen are crucial to ensure its longevity and prevent any accidents during the installation process. Here are a few helpful tips to keep in mind:
- Avoid bending or folding the screen material: To prevent damage to the old screen, make sure to handle it with care and avoid any bending or folding.
- Store the old screen in a clean, dry place: Find a suitable location to store the old screen where it won’t be exposed to moisture or dirt. This will help preserve its condition until it can be disposed of or repaired.
- Label the old screen if necessary: If you have multiple window screens to replace, labeling them can help ensure they are installed back in the correct locations.
- Consider recycling or repairing: If the old screen is still in good condition, you may want to explore the option of recycling or repairing it instead of disposing of it. This can help reduce waste and save money in the long run.
By following these step-by-step instructions and tips, you’ll be able to efficiently remove the existing window screen and prepare for the installation of a new one. Remember to take your time and handle the old screen with care to avoid any unnecessary complications. In the next section, we will guide you through the process of selecting and measuring your new screen window.
Installing The New Screen Window
Once you have prepared the screen material for installation, it’s time to move on to attaching the screen to the window frame. Follow this step-by-step guide to ensure a secure and sturdy installation.
Preparing the screen material for installation
Before attaching the screen to the window frame, you need to make sure that the material is properly prepared. Follow these steps:
- Clean the window frame thoroughly to ensure there are no dust or debris.
- Measure the dimensions of the frame accurately, allowing a slight overlap of the screen material.
- Cut the screen material according to the measurements, making sure to leave extra material on all sides.
- If necessary, trim the excess material using a pair of sharp scissors.
- Inspect the screen material for any damages or holes that need to be patched or repaired.
Step-by-step guide to attach the screen to the window frame
Now that you have prepared the screen material, follow these steps to attach it to the window frame:
- Place the screen material over the window frame, ensuring that it covers the entire opening.
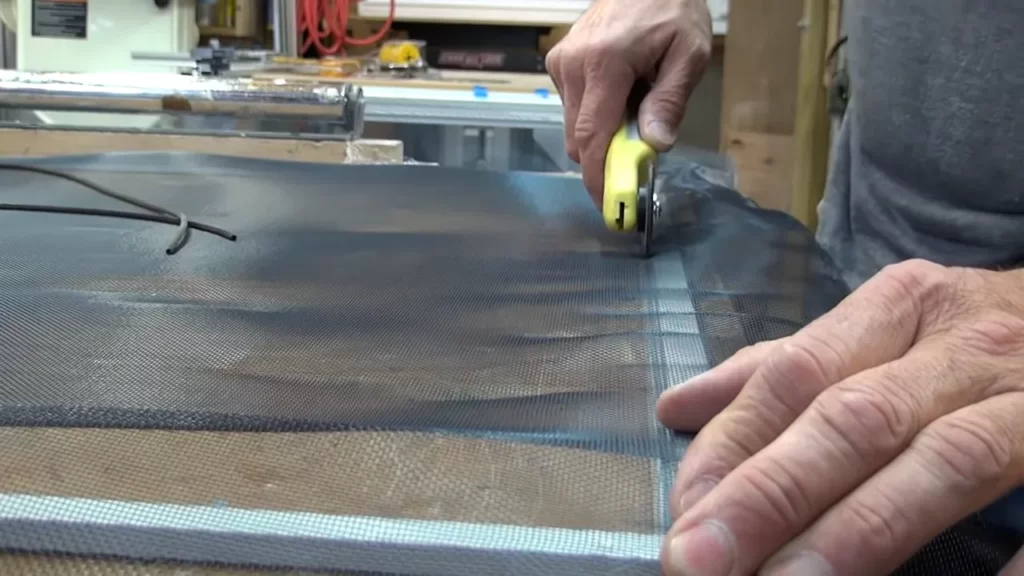
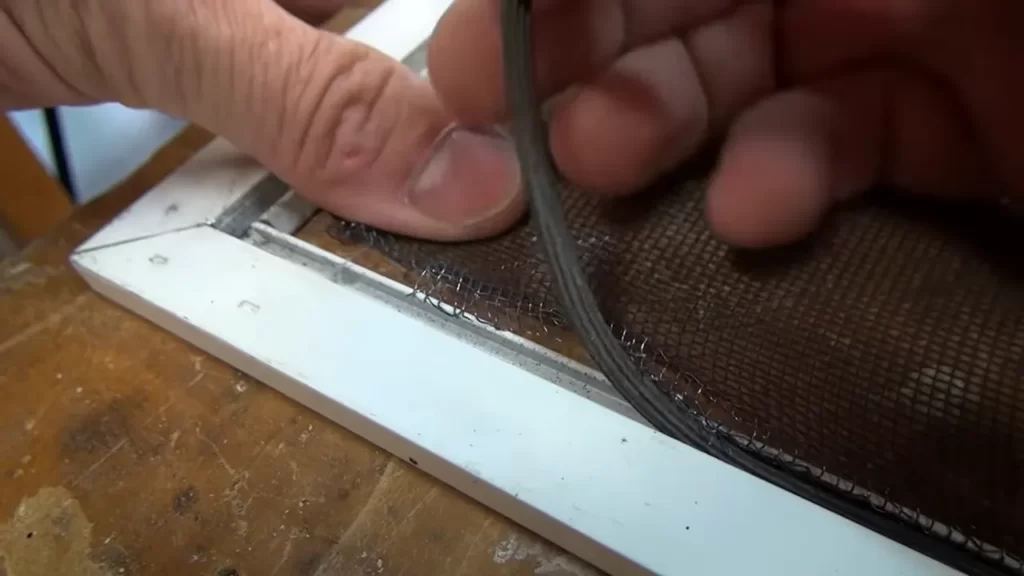
- Starting from one side, use a screen spline tool to press the screen material into the groove of the frame. Apply gentle pressure to ensure the material is securely held in place.
- Continue working your way around the frame, pressing the screen material into the groove with the spline tool. Take care to keep the material taut and wrinkle-free as you go.
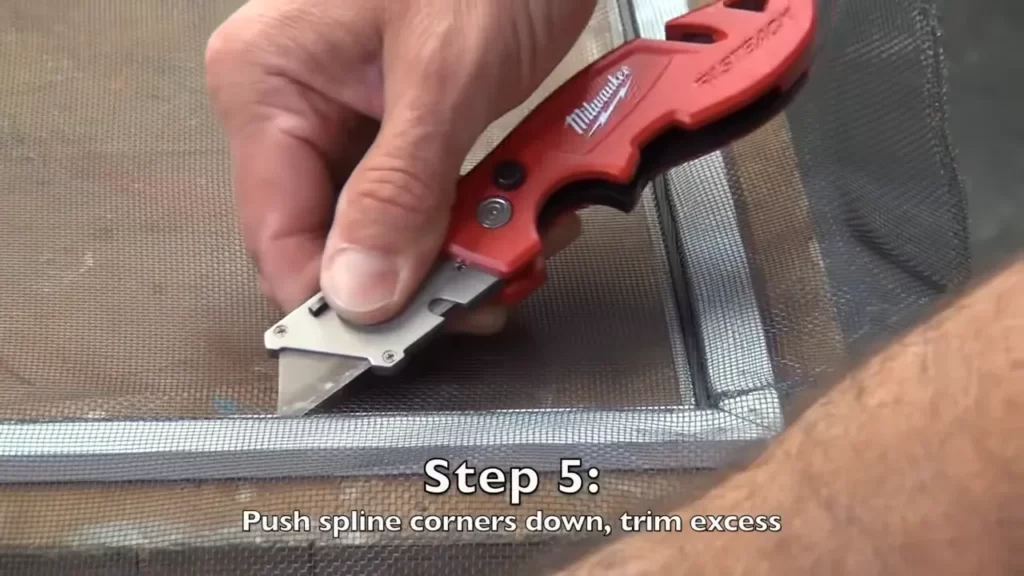
- If the screen material is slightly larger than the frame, use a utility knife to trim off the excess material. Make sure to cut at an angle to create a clean, finished edge.
- Once the screen material is securely attached to the frame, go around again with the spline tool to ensure it is tightly pressed into the groove. This will provide added stability and prevent any movement.
- Inspect the screen from both inside and outside to ensure there are no gaps or loose edges. If necessary, adjust and tighten the spline as needed.
- Finally, clean the surface of the screen with a soft cloth or brush to remove any dust or fingerprints.
By following these simple steps, you can easily install a screen window that not only enhances the appearance of your home but also provides protection from insects and allows for proper ventilation. With a little patience and attention to detail, your new screen window will be ready to enjoy in no time!
Securing The Screen Window
Once you have successfully installed your screen window, it’s important to properly secure it in place. This ensures stability, prevents any gaps or sagging, and helps maintain the integrity of the window. In this section, we’ll discuss some methods you can use to secure your screen window effectively.
Methods to Properly Secure the Screen Window in Place
When it comes to securing your screen window, there are a few methods you can consider. Each method serves the purpose of keeping the window firmly in place and preventing any unwanted movement. Here are some popular methods:
Method 1: Using Window Screen Clips
One common and straightforward method is to use window screen clips. These clips are specifically designed to hold the screen tightly against the window frame. They come in different shapes and sizes, but all serve the same purpose. To use window screen clips:
- Carefully position the screen in the window frame.
- Place the clips along the edges of the screen, ensuring they are evenly spaced.
- Press the clips firmly against the window frame to secure the screen in place.
This method is quick, easy, and provides a secure hold for your screen window.
Method 2: Installing Window Screen Frames
Another effective method is to install window screen frames. These frames are typically made of aluminum or vinyl and provide a sturdy structure for your screen. To install window screen frames:
- Measure the dimensions of your window frame and cut the screen frame accordingly.
- Fit the frame into the window opening, ensuring it sits snugly against the frame.
- Secure the frame by using screws or clips, depending on the frame design.
Window screen frames offer added stability and can help prevent any gaps or sagging that may occur over time.
Method 3: Applying Window Screen Adhesive
If you want a less visible method of securing your screen window, you can consider using window screen adhesive. This method involves applying adhesive directly to the window frame to create a bond with the screen. To apply window screen adhesive:
- Clean the surface of the window frame to ensure proper adhesion.
- Apply a thin layer of adhesive along the edges of the frame.
- Carefully press the screen against the adhesive, making sure it is centered and taut.
Window screen adhesive provides a secure hold while maintaining a clean and seamless appearance.
Method 4: Utilizing Tension Springs
Tension springs are an innovative option for securing your screen window. These springs are designed to exert pressure against the window frame, holding the screen tightly in place. To utilize tension springs:
- Attach the springs to the window frame, ensuring they are evenly spaced.
- Position the screen against the springs.
- Gradually extend the springs to apply tension and secure the screen.
Tension springs provide a reliable and adjustable solution to keep your screen window secure.
By using one of these methods, you can ensure that your screen window remains in place, providing a barrier against insects and debris while allowing fresh air to circulate. Choose the method that suits your needs and preferences, and enjoy the benefits of a securely installed screen window.
Finishing Touches And Maintenance
After successfully installing a screen window, there are a few finishing touches and maintenance tasks to keep in mind. These steps will not only enhance the overall appearance of the screen window but also ensure its longevity and functionality.
How to trim any excess screen material
To achieve a neat and professional look, it is important to trim any excess screen material after installation. Excess screen material not only detracts from the aesthetics but can also become a potential hazard. Trimming the screen material is a simple task that requires only a few tools:
- Measuring tape or ruler
- Sharp utility knife or scissors
Follow these steps to trim the excess screen material:
- Measure the length and width of the window frame.
- Using the measuring tape or ruler, mark the desired length and width on the screen material.
- Using a sharp utility knife or scissors, carefully cut along the marked lines, removing the excess screen material.
- Ensure that the edges are clean and neatly trimmed.
By trimming any excess screen material, you not only improve the overall appearance but also prevent any potential tripping hazards or damage to the screen.
Guide to properly clean and maintain the screen window
Maintaining the cleanliness and condition of your screen window is crucial to its longevity and functionality. Here is a comprehensive guide on how to properly clean and maintain your screen window:
- Regular cleaning: Regularly clean the screen window using a mild detergent or soap mixed with water. Gently scrub the screen using a soft-bristle brush or sponge to remove any dirt, dust, or debris.
- Rinse thoroughly: After cleaning, rinse the screen window thoroughly with water to remove any soap residue. Ensure that all areas of the screen, including the corners and edges, are rinsed properly.
- Drying: Allow the screen window to air dry naturally. Avoid using excessive heat or direct sunlight, as this may cause the screen material to warp or fade.
- Inspect for damage: Regularly inspect the screen window for any signs of damage, such as tears, holes, or loose frames. If any issues are detected, promptly repair or replace the damaged components to maintain the integrity of the screen.
- Weather maintenance: Depending on the climate and weather conditions in your area, consider applying a protective coating or sealant to the screen window. This will provide an additional layer of defense against harsh elements and prolong its lifespan.
By following these steps regularly, you can ensure that your screen window remains clean, functional, and visually appealing for years to come.
Troubleshooting Common Issues
Installing a screen window can greatly improve the ventilation and comfort of your home. However, it’s not uncommon to encounter a few hiccups along the way. In this section, we’ll address some of the common problems that you might encounter during the installation process. By following these troubleshooting tips, you’ll be well-equipped to tackle any issues that come your way, ensuring a seamless screen window installation.
Addressing common problems encountered during installation
During the installation of a screen window, you may come across a few common problems that can hinder the process. It’s important to identify and address these issues to ensure a successful installation. Here are some common problems you might encounter:
- Frame misalignment: If the frame of your window is not aligned properly, it can lead to difficulty in fitting the screen window. Make sure to check the alignment of the frame and adjust it if necessary.
- Torn or damaged screen: Sometimes, the screen itself may be torn or damaged, which can affect its functionality and appearance. Inspect the screen carefully before installation and replace it if needed.
- Fitting issues: Occasionally, the screen window might not fit snugly into the frame, leaving gaps or causing it to fall out easily. Check the measurements and ensure that the screen window is the correct size for your frame.
Troubleshooting tips for a seamless screen window
installation
Now that you are aware of the common issues that can arise during the installation of a screen window, let’s explore some troubleshooting tips to help you overcome these problems:
- Ensure proper measurements: Take accurate measurements of your window frame to ensure that the screen window fits perfectly. Double-check the measurements before making any adjustments or trimming the screen.
- Use the right tools: Having the proper tools on hand can make the installation process easier and more efficient. Use a screen rolling tool to help secure the screen into the frame and a utility knife to trim any excess material.
- Inspect the frame: Before installing the screen window, inspect the frame for any damage or misalignments. If necessary, make any needed repairs or adjustments to ensure a proper fit.
- Secure the screen window: To prevent the screen window from falling out or becoming loose, use screws or clips to secure it firmly into the frame. This will help to maintain a tight fit and prevent any gaps.
- Test for functionality: After the installation is complete, test the functionality of the screen window. Open and close the window to ensure that the screen operates smoothly and that there are no problems with its performance.
By following these troubleshooting tips, you’ll be able to address common issues that may arise during the installation of a screen window. With a little patience and attention to detail, you’ll achieve a seamless and successful installation, allowing you to enjoy the benefits of improved ventilation and insect protection for years to come.
Enhancing Durability And Security
Installing a screen window not only adds aesthetic appeal to your home but also provides numerous benefits such as extra ventilation, pest control, and protection against harmful UV rays. However, it is essential to take additional measures to enhance its durability and security. By implementing the following tips, you can ensure that your screen window remains in top-notch condition and provides maximum safety to your living space.
Additional measures to improve the longevity of the screen window
- Regular cleaning: To maintain the longevity of your screen window, it is crucial to keep it clean. Remove any dirt, dust, or debris that may accumulate on the screen regularly. Use a soft brush or vacuum cleaner with a brush attachment to gently clean both sides of the screen. Avoid using abrasive materials or harsh chemicals that could damage the screen’s surface.
- Weatherproofing: One effective way to enhance the durability of your screen window is to weatherproof it. Apply a thin layer of weatherproof sealant around the edges of the screen frame to prevent moisture and air leakage. This will not only improve the screen’s performance but also protect it from excessive wear and tear caused by harsh weather conditions.
- Reinforce the frame: Strengthening the frame of your screen window is essential to prevent sagging or warping. Consider adding additional support by installing corner braces or reinforcing plates. These extra measures will ensure that your screen remains securely in place and able to withstand regular use.
- Protective covers: When the screen window is not in use, consider installing protective covers to shield it from external elements. These covers act as a barrier against dirt, dust, and other potential damages that may shorten the screen’s lifespan.
Tips to enhance security features of the screen window
- Upgraded locks: One of the simplest yet effective ways to enhance the security features of your screen window is to upgrade its locks. Replace old and weak locks with high-quality ones that provide better resistance against potential break-ins or unauthorized access.
- Security screens: Consider installing security screens as an additional layer of protection for your screen window. These screens are designed with durable materials like stainless steel to provide enhanced security without compromising the natural light or airflow into your home.
- Window alarms: Another effective security measure to consider is installing window alarms. These devices emit a loud sound when someone attempts to tamper with or force open the window. The alarm acts as a deterrent against intruders and alerts you to any potential security breaches.
- Reinforced glass: If your screen window includes glass panels, opt for reinforced glass for added security. Reinforced glass is more resistant to breakage, making it harder for potential intruders to gain access to your home.
By following these additional measures to improve the longevity of your screen window and implementing tips to enhance its security features, you can enjoy a durable and secure screening solution that lasts for years to come.
Frequently Asked Questions For How To Install A Screen Window
Can I Install Window Screens Yourself?
Yes, you can install window screens yourself. It’s a simple process that doesn’t require professional help. Just measure your windows, purchase the appropriate screens, and follow the installation instructions provided. With a bit of patience and the right tools, you can easily install window screens on your own.
How Do You Put A Screen On A Window?
To install a screen on a window, follow these steps: 1. Measure the window frame accurately. 2. Choose a window screen that fits the measurements. 3. Place the screen on the frame and ensure it covers the entire opening. 4. Use a screen spline or adhesive to secure the screen in place.
5. Trim any excess screen material. Done!
Do You Install Window Screens From The Inside?
Yes, we install window screens from the inside.
Is It Hard To Install A Window Screen?
Installing a window screen is not difficult. It can be done easily with basic tools and a few simple steps. Just measure the screen size, secure it in the window frame, and ensure it fits snugly. Finally, check for any gaps or loose parts.
Conclusion
Installing a screen window is a straightforward process that can enhance the security and comfort of your home. By following the steps mentioned in this blog post, you can easily complete the installation yourself. Remember to measure accurately, choose the right materials, and use the proper tools.
With a little patience and attention to detail, you’ll have a perfectly installed screen window that will provide fresh air while keeping out insects and debris. So, go ahead and give your home the upgrade it deserves!