To install a backup camera, you need to follow these steps: identify a suitable location for the camera, mount it securely, connect the camera wires to the vehicle’s power source, and connect the monitor to the camera wires. Installing a backup camera in your vehicle can greatly enhance safety and visibility while reversing or parking, preventing accidents and damage.
With the right tools and a little patience, you can easily install a backup camera and enjoy its benefits.
Factors To Consider When Selecting A Backup Camera
Installing a backup camera in your vehicle is a smart decision for ensuring your safety and the safety of those around you. To make the most out of this investment, it’s important to consider a few crucial factors when selecting a backup camera. These factors will determine the effectiveness and functionality of the camera, ultimately enhancing your driving experience.
Night vision capabilities
One of the key factors to consider when selecting a backup camera is its night vision capabilities. This feature allows the camera to provide clear visibility even in low-light conditions, such as during nighttime or in dark parking lots. When choosing a backup camera, opt for models that offer enhanced night vision, as they utilize advanced technology to capture and display sharp images in the dark. This ensures that you can confidently navigate and park your vehicle, regardless of the lighting conditions.
Waterproof rating
Another important aspect to look for in a backup camera is its waterproof rating. Vehicles are exposed to various weather conditions, including rain, snow, and humidity. To ensure the longevity and durability of your backup camera, it’s essential to select one with a high waterproof rating. A waterproof backup camera will withstand the elements, allowing you to use it reliably in all weather conditions without the worry of damage or malfunction.
Field of view
The field of view offered by a backup camera is crucial in providing a comprehensive view of the area behind your vehicle. A wider field of view ensures that you can see more of the surroundings, reducing blind spots and increasing overall safety. When choosing a backup camera, consider the field of view it offers. Look for cameras with a wide-angle lens to capture a broader perspective, allowing you to spot obstacles, pedestrians, and other vehicles more effectively.
Taking these factors into account when selecting a backup camera will help you make an informed decision that best suits your needs. By choosing a camera with excellent night vision capabilities, a high waterproof rating, and an ample field of view, you’ll gain confidence and peace of mind while maneuvering your vehicle in any situation.
Essential Tools For Installation
Installing a backup camera can greatly enhance your driving experience by providing a clear view of what’s behind you. To ensure a smooth and successful installation, it’s important to have the right tools on hand. Here are the essential tools you’ll need:
Screwdriver
A screwdriver is an indispensable tool for installing a backup camera. It’s essential for removing and installing screws that hold various components together. Whether it’s a Phillips or flathead screwdriver, ensure you have the appropriate size for the job. With a screwdriver in your hand, you’ll be ready to tackle any mounting or wiring tasks required for your backup camera installation.
Drill
A drill is another essential tool for installing a backup camera. It allows you to create holes for mounting brackets or routing wires. Make sure you have the right drill bits to match the size of the holes needed for your specific installation. By having a drill at your disposal, you’ll have the flexibility to position your backup camera at the ideal location for optimal visibility.
Wire cutters and strippers
To properly connect the wiring of your backup camera, wire cutters and strippers are a must. These tools enable you to cut and strip the insulation off the wires, allowing for secure and reliable connections. When working with wires, be sure to use wire cutters and strippers appropriate for the gauge of the wires you’re working with, ensuring a clean and effective installation.
Electrical tape
Electrical tape is an essential tool for insulating and protecting wire connections. After making the necessary connections, wrap each exposed wire with electrical tape to prevent any potential short circuits or damage. It provides an extra layer of protection and ensures the longevity of your backup camera system.
Socket wrench
A socket wrench is useful for tightening and loosening nuts or bolts during the installation process. Depending on your vehicle and the specific mounting requirements of your backup camera, having a socket wrench with the appropriate sizes of sockets will make the installation easier and more efficient.
By having these essential tools on hand, you’ll be well-prepared to install your backup camera with confidence. With the right tools, you can ensure a professional and reliable installation that enhances your overall driving experience.
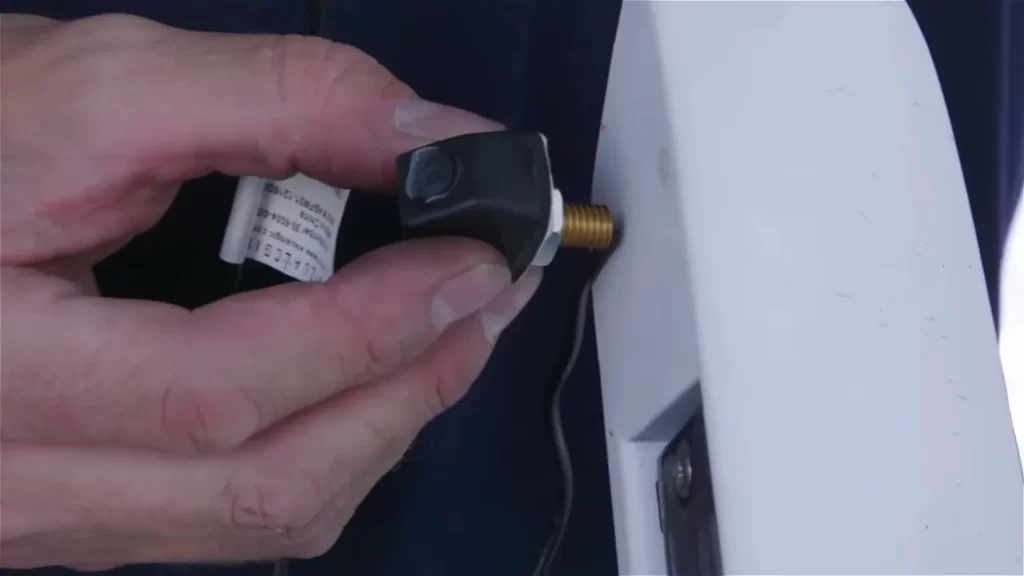
Rear License Plate Mounting
Positioning the camera above or below the license plate
When it comes to installing a backup camera on your vehicle, one important consideration is where to position the camera in relation to the rear license plate. The rear license plate mounting is a popular choice, as it provides a convenient and centralized location that ensures optimal visibility.
However, you have two options when it comes to the positioning of the camera with respect to the license plate – above or below. Both options have their own advantages, so let’s take a closer look at each:
Above the license plate:
Mounting the camera above the license plate offers several benefits. First and foremost, it provides a clear and unobstructed view of the surrounding area behind your vehicle. This can be especially useful in situations where the camera may be positioned lower, such as pickup trucks or SUVs with a higher rear bumper.
Additionally, mounting the camera above the license plate helps protect it from damage that may occur from road debris or other impacts. It also allows for easier cleaning and maintenance, as the camera is less likely to accumulate dirt and grime.
Below the license plate:
On the other hand, mounting the camera below the license plate is a popular choice for its discreet and seamless integration into the vehicle’s design. By blending with the license plate frame, the camera becomes less noticeable and preserves the aesthetics of the vehicle.
Furthermore, positioning the camera below the license plate typically offers a wider field of view, capturing a larger area behind the vehicle. This can be beneficial in situations where you need to monitor a wider range, such as parking in tight spaces or reversing in crowded areas.
Ultimately, the choice between positioning the camera above or below the license plate will depend on your personal preference and the specific requirements of your vehicle. Consider factors such as your vehicle type, visibility needs, and aesthetic preferences when making this decision.
Ensuring the camera aligns with the vehicle’s centerline
Another crucial aspect of installing a backup camera is ensuring that it aligns with the vehicle’s centerline. By positioning the camera along the centerline, you can accurately judge distances and have a balanced view of the surroundings.
To ensure proper alignment, follow these steps:
- Measure the width of your vehicle at the rear, taking into account any protruding parts such as side mirrors or rear spoilers.
- Divide the measured width by 2 to determine the distance from the center of the vehicle.
- Mark this distance on the rear of your vehicle, either above or below the license plate.
- This marked point will serve as the reference point for mounting the camera.
- Ensure that the camera is positioned symmetrically on either side of the reference point for a balanced view.
By adhering to these steps, you can ensure that the backup camera aligns correctly with the centerline of your vehicle, providing you with accurate information and enhancing your overall safety.
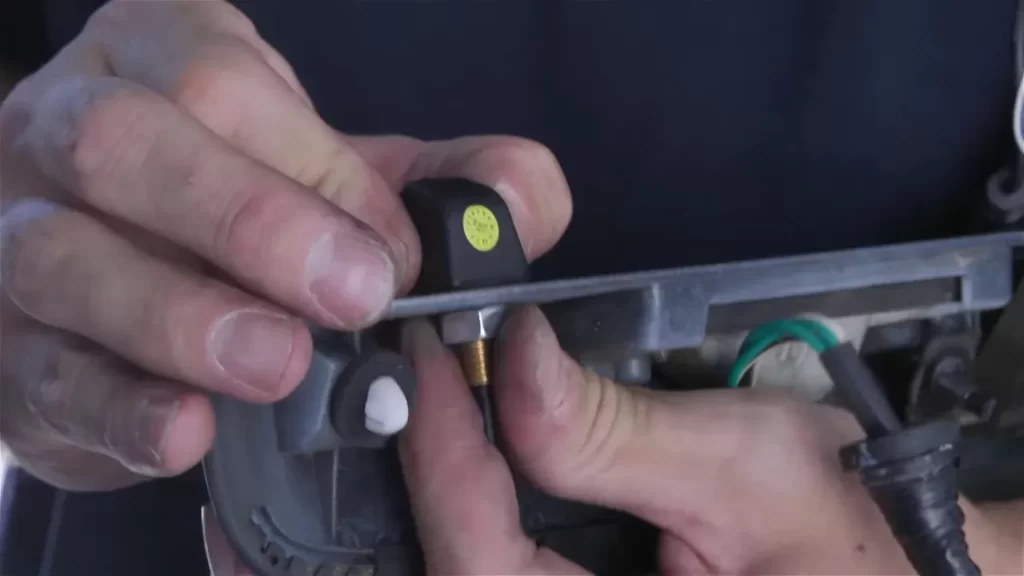
Other Mounting Options
Rear window or bumper placement
If you’re considering installing a backup camera in your vehicle, you’ll need to carefully choose the placement of the camera. While the most common options are to place the camera on the rear window or the bumper, each option has its pros and cons.
Rear window placement: Mounting the camera on the rear window offers a clear and unobstructed view of the rear of your vehicle. This placement is suitable for those who prioritize a clean and minimalist look. Additionally, cameras mounted on the rear window are relatively easier to install compared to other options.
Bumper placement: On the other hand, mounting the camera on the bumper provides a lower and wider angle view of the rear. This placement can be advantageous when it comes to parking and maneuvering in tight spaces. However, it may require some modifications to the bumper and can be more challenging to install compared to rear window placement.
Custom mounting brackets
Regardless of the placement option you choose, using custom mounting brackets can greatly enhance the installation process and ensure a secure attachment of the camera.
Advantages of custom mounting brackets:
- Improved stability: Custom mounting brackets are designed to securely hold the camera in place, reducing the risk of vibrations and potential damage from road bumps.
- Enhanced adjustability: These brackets often provide a greater range of adjustability, allowing you to fine-tune the camera’s position for optimal viewing angles.
- Easy installation: Custom mounting brackets are specifically designed to fit your vehicle, making the installation process more straightforward and hassle-free.
When choosing custom mounting brackets, ensure that they are compatible with both your vehicle and the backup camera model you have selected. This will ensure a seamless installation and maximum performance of your backup camera.
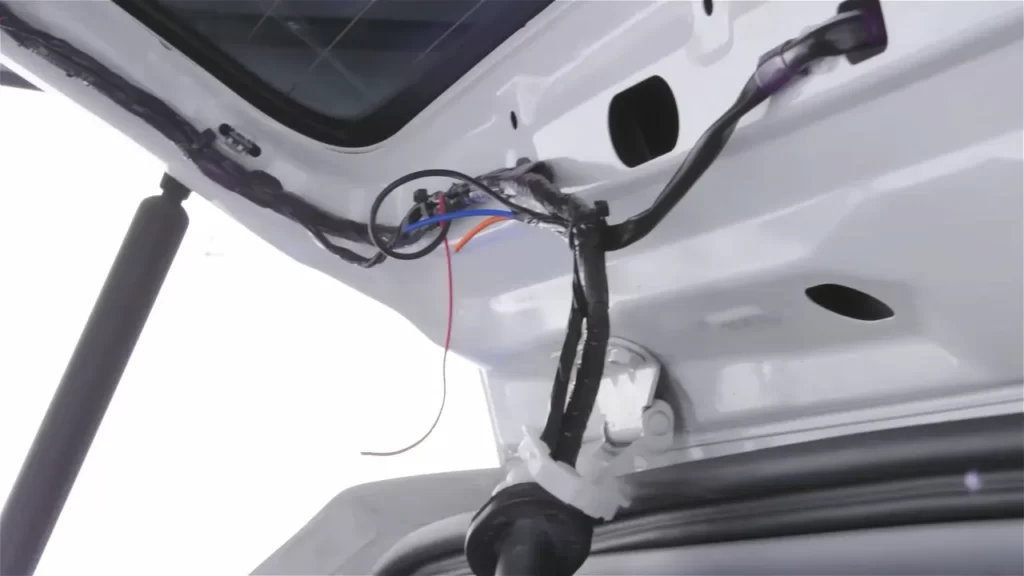
Locating The Reverse Light Wiring
Locating the Reverse Light Wiring
If you’re thinking about installing a backup camera in your vehicle, one of the key steps is locating the reverse light wiring. This is essential for the camera to function properly, as it needs to be connected to the reverse light circuit to activate when you shift into reverse. In this section, we’ll explore two methods you can use to identify the reverse light wires in your vehicle: identifying them visually and using a wiring diagram or multimeter.
Identifying the reverse light wires in the vehicle
The reverse light wires for your vehicle are crucial for the correct installation of a backup camera. To identify these wires visually, here’s a step-by-step guide:
- Start by locating the rear lights of your vehicle. These are usually located on the outer edges of the rear bumper or trunk.
- Look for wires that are connected to the reverse light bulb socket. These wires are usually colored differently than the other wires in the light assembly, such as white or light green.
- Once you’ve identified the wires connected to the reverse light bulb socket, trace them back to where they enter the vehicle’s wiring harness.
- Take note of the wire colors and make a mental or written note of their location.
Visual identification can be an effective method in some cases, but it’s not always foolproof. Some manufacturers may use different wire colors or have multiple wires connected to the reverse light circuit. To ensure accuracy, it’s best to use a wiring diagram or a multimeter.
Using a wiring diagram or multimeter to find the correct wires
Using a wiring diagram or multimeter can provide a more accurate and reliable method for identifying the reverse light wires in your vehicle. Here’s how you can proceed with each method:
Wiring Diagram:
- Obtain a wiring diagram for your specific vehicle make and model.
- Locate the section of the diagram that shows the lighting system.
- Look for the wiring diagram of the reverse light circuit.
- Identify the wire color(s) associated with the reverse lights.
Multimeter:
- Set your multimeter to measure voltage.
- Locate the reverse light bulb socket.
- Probe each wire connected to the socket using the multimeter.
- Shift your vehicle into reverse and observe the multimeter for any voltage reading.
- Take note of the wire(s) that showed a voltage reading.
By using a wiring diagram or multimeter, you can ensure that you have accurately identified the reverse light wires for your specific vehicle, eliminating any guesswork during the installation process.
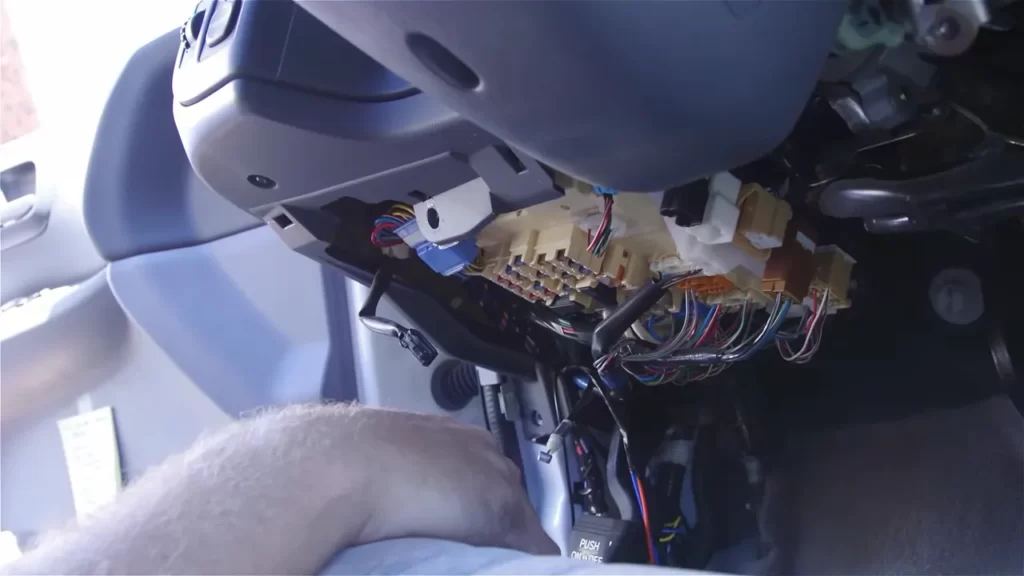
Tapping Into The Wiring
Splicing into the reverse light wires
One of the key steps in installing a backup camera is tapping into the wiring of your vehicle. By doing so, you’ll be able to connect the camera to the reverse lights, allowing it to activate whenever you shift your car into reverse. This ensures that you have a clear view of what’s behind you and increases overall safety.
When it comes to tapping into the wiring, you’ll need to locate the reverse light wires in your vehicle’s tail light assembly. These wires are generally color-coded, with one being the positive wire (+) and the other being the ground wire (-). The specific colors may vary depending on your vehicle’s make and model, so it’s important to consult your vehicle’s wiring diagram or manual to identify the correct wires.
Using wire connectors and electrical tape to secure the connection
Once you have identified the reverse light wires, the next step is to make a secure connection between the camera’s wiring and the vehicle’s wiring. This is where wire connectors and electrical tape come into play.
Start by stripping the insulation off the ends of both the camera’s wiring and the reverse light wires. This will expose the metal wires underneath, allowing for a solid connection. Next, insert the exposed wires into a wire connector, making sure that the positive and ground wires are connected correctly.
With the wires securely inserted into the wire connector, use a pair of pliers to crimp the connector, ensuring a tight and secure connection. This will prevent any accidental disconnection while driving. Once the connector is crimped, use electrical tape to wrap around the connector, providing an extra layer of protection against moisture and vibration.
It’s important to note that the wire connectors should be chosen based on the gauge of the wires. Using connectors that are too small or large for the wires can result in an unreliable connection. Therefore, it’s recommended to consult a professional or refer to the camera’s installation instructions to ensure the correct size connectors are used.
After securing the connection with wire connectors, wrap the entire connection with electrical tape. This will provide additional insulation and protection against the elements, ensuring that the wires remain intact and function properly over time.
In conclusion, tapping into the wiring of your vehicle is a crucial step when installing a backup camera. By following the steps outlined above and using wire connectors and electrical tape, you can ensure a secure and reliable connection between the camera and the reverse lights. This will allow you to enjoy the benefits of having a backup camera, enhancing your visibility and overall safety while driving.
Installing A Wireless Transmitter And Receiver
Once you have installed the backup camera and the monitor, the next step is to install a wireless transmitter and receiver to establish a seamless connection between these two components. This ensures that the camera feed is transmitted wirelessly to the monitor, allowing you to easily view the live video feed while reversing. Follow the steps below to successfully install the wireless transmitter and receiver.
Mounting the transmitter and receiver units
The first step in installing the wireless transmitter and receiver is to mount these units in their appropriate locations. Start by identifying suitable spots in your vehicle to mount both the transmitter and receiver. Consider factors such as accessibility and line-of-sight transmission.
1. Mount the transmitter: Find a secure location near the backup camera. The transmitter should be mounted in an elevated position to ensure optimal signal transmission. Make sure the mounting surface is clean and free from any debris. Use the included screws or brackets to secure the transmitter in place. Ensure that it is firmly attached, as vibration or movement could affect the signal quality.
2. Mount the receiver: Locate a convenient spot within your vehicle to mount the receiver. It should be placed in an easily accessible area, such as on the dashboard or near the monitor. Clean the mounting surface and use the provided screws or adhesive to affix the receiver securely. Take care to position it where it will not interfere with your driving or obstruct your view.
Pairing the camera and monitor
After mounting the transmitter and receiver units, the next step is to pair the camera and monitor to establish a wireless connection. Follow these steps for successful pairing:
- Turn on both the camera and monitor.
- Access the camera’s settings menu and navigate to the wireless pairing option.
- On the monitor, access the pairing or settings menu and search for available wireless devices.
- Once the camera appears on the monitor’s device list, select it to begin the pairing process.
- Wait for the camera and monitor to establish a connection. Depending on the model, this process may take a few seconds or a couple of minutes.
- Once the pairing is successful, you should see the live camera feed displayed on the monitor.
Note: Some camera and monitor models require a specific sequence of steps or additional setup procedures. Refer to the user manual accompanying your specific camera and monitor to ensure the correct pairing process.
By following these simple steps, you can easily install a wireless transmitter and receiver for your backup camera system. This will allow you to have a hassle-free, wireless connection between the camera and monitor, ensuring a clear and reliable video feed while you reverse your vehicle.
Wiring The Camera Directly To The Monitor
When installing a backup camera, one important step is to wire the camera directly to the monitor. This ensures a reliable and clear connection between the camera and the monitor, allowing you to see your surroundings clearly when reversing your vehicle. In this article, we will guide you through the process of wiring the camera directly to the monitor, so you can enjoy the benefits of added safety and convenience.
Running an RCA cable from the camera to the monitor
The first step in wiring the camera directly to the monitor is to run an RCA cable from the camera to the monitor. The RCA cable is responsible for carrying the video signal from the camera to the monitor, allowing you to see the live feed.
To run the RCA cable, follow these steps:
- Locate the camera’s video output port. This is usually a yellow RCA connector.
- Locate the monitor’s video input port. This is also a yellow RCA connector.
- Measure the distance between the camera and the monitor to determine the length of RCA cable needed.
- Choose a suitable RCA cable of the required length. It is recommended to use a high-quality shielded cable to minimize signal interference.
- Connect one end of the RCA cable to the camera’s video output port.
- Securely attach the other end of the RCA cable to the monitor’s video input port.
Securing the cable to avoid interference or damage
Once you have successfully run the RCA cable from the camera to the monitor, it is important to secure the cable properly to avoid interference or damage. This ensures a stable and reliable video signal, providing you with a clear view of your surroundings when using the backup camera.
Here are some tips to secure the cable:
- Use zip ties or cable clips to secure the RCA cable along the existing wiring harness of your vehicle. This will prevent the cable from dangling or getting caught on any moving parts.
- Avoid routing the RCA cable near any high-voltage wires or power sources, as this can introduce interference into the video signal.
- If necessary, use electrical tape or heat shrink tubing to protect the RCA cable connectors and prevent moisture or debris from entering.
- Regularly inspect the cable for any signs of wear or damage. If you notice any frayed wires or exposed insulation, replace the cable immediately to maintain a reliable connection.
By following these steps to wire the camera directly to the monitor and securing the cable properly, you can ensure a hassle-free installation and enjoy the benefits of a clear and reliable video feed from your backup camera.
Checking The Camera’S Functionality
Ensuring that your backup camera is functioning properly is crucial for a hassle-free and safe driving experience. By following a few simple steps, you can verify that the camera activates when the vehicle is put in reverse and test the video feed to ensure optimal visibility. Let’s take a closer look at how to check the functionality of your backup camera.
Verifying that the camera activates when the vehicle is put in reverse
In order to check if your backup camera activates when the vehicle is put in reverse, follow these quick and easy steps:
- Start by turning on your vehicle and putting it in reverse gear.
- Once in reverse, check the display screen on your dashboard or rearview mirror. The camera feed should automatically appear.
- Pay attention to any delays or glitches in the activation of the camera. If the camera does not activate or the image is not clear, further troubleshooting may be required.
- Take note of any abnormal behavior, such as flickering or distorted images, as it may indicate a potential issue with the camera itself or its connection.
Testing the video feed and adjusting the camera angle if necessary
After ensuring that the camera activates properly, it’s essential to test the video feed and make any necessary adjustments to ensure optimal camera angle. Follow these steps:
- First, take a look at the video feed on the display screen. Ensure that the image quality is clear and there are no obstructions or visual distortions.
- If needed, adjust the angle of the camera to ensure a wide view of the rear area. This will help you see any potential obstacles or hazards clearly.
- Consider testing the camera’s visibility during both daytime and nighttime conditions to ensure that it provides adequate visibility in various lighting situations.
- If the camera is equipped with any additional features, such as gridlines or distance markers, test their functionality as well.
By following these steps, you can accurately check the functionality of your backup camera and ensure that it is working as intended. Remember to consult your vehicle’s user manual or seek professional assistance if you encounter any difficulties or unusual behavior during the testing process.
Final Safety Check
Ensuring all connections are secure and properly insulated
Before considering the backup camera installation complete, it’s crucial to perform a final safety check. One of the essential checks is to ensure that all connections are secure and properly insulated. This step ensures that the camera will function reliably without any loose or exposed wires that could potentially cause malfunction or even damage to the camera system.
To ensure that the connections are secure, start by double-checking all the wiring connections between the camera, monitor, and power source. Look for any loose or disconnected wires, and firmly reconnect any that may need attention. Once the connections are secure, it’s important to properly insulate them to protect against moisture, dirt, and other external factors that may affect the longevity and performance of the camera system.
Verifying that the backup camera provides a clear and reliable view
Another important aspect of the final safety check is to verify that the backup camera provides a clear and reliable view. After installation, take the time to test the camera in real-life situations to ensure that it functions as intended.
Start by turning on the vehicle’s ignition and engaging the reverse gear. Carefully observe the monitor’s display to ensure there are no glitches or distortions in the video feed. Play close attention to the clarity, color accuracy, and overall quality of the image. Consider adjusting the camera angle or position if necessary to get the best view of the rear area.
It’s also important to test the camera in various lighting conditions, such as during the daytime and at night, to ensure that it provides a reliable view regardless of the time of day. A backup camera should offer a clear view of obstacles, pedestrians, or any potential hazards even in low-light conditions.
By performing a final safety check that includes ensuring all connections are secure and properly insulated and verifying the backup camera’s clear and reliable view, you can have peace of mind knowing that the camera system is working effectively and enhancing your vehicle’s safety. Make this final step an integral part of your backup camera installation process to ensure a successful and worry-free experience.
Frequently Asked Questions For How To Install Backup Camera
Can You Install A Backup Camera Yourself?
Yes, you can install a backup camera yourself. It is a simple DIY project that doesn’t require professional help. Just follow the instructions provided with the camera kit, and you’ll be able to install it easily.
How Do You Install A Reverse Camera In A Car?
To install a reverse camera in your car, follow these steps: 1. Choose a suitable camera and mount it on your vehicle’s rear. 2. Connect the camera’s power cable to the reversing light. 3. Run the camera’s video cable to the front of the car, avoiding any obstacles.
4. Connect the video cable to the display screen or infotainment system. 5. Test the camera’s functionality before finishing the installation.
Does Autozone Install Backup Cameras?
Yes, AutoZone does provide installation services for backup cameras.
Can You Install Backup Camera Without Drilling?
Yes, you can install a backup camera without drilling. There are wireless options available that can be easily and securely mounted on your vehicle. It’s a convenient solution for added safety and ease while reversing.
How To Install A Backup Camera In Your Car?
Installing a backup camera in your car is a relatively easy process. Follow the manufacturer’s instructions to mount the camera, connect it to the monitor, and power it up. Test the camera before completing the installation.
Conclusion
Installing a backup camera is a straightforward process that greatly enhances your safety while driving. By following the step-by-step instructions provided, you can easily complete this installation on your own. Remember to gather all the necessary tools and materials beforehand, and take your time to ensure everything is properly connected.
Once installed, you will have the added peace of mind knowing that you have a clear view of what’s behind your vehicle. Drive safe!