nstalling a deadbolt on a door requires measuring, marking, drilling, and screwing for proper placement and security. It is a simple process that can be accomplished with basic tools, such as a drill, a screwdriver, and a tape measure.
Planning And Preparation
Before you begin installing a deadbolt on your door, proper planning and preparation are key to ensuring a successful and secure installation. This involves gathering the necessary tools and materials, measuring and marking the door for optimal deadbolt placement, and choosing the right deadbolt for your specific door. Let’s dive into each of these steps in detail.
Necessary tools and materials for deadbolt installation
Before embarking on your deadbolt installation project, it’s important to have the following tools and materials ready:
| Tools | Materials |
|---|---|
| Power drillHammerScrewdriverChiselTape measurePencil | Deadbolt locksetStrike plateScrewsWood putty |
Having these tools and materials on hand will ensure that you’re well-equipped to tackle the installation process.
Measuring and marking the door for optimal deadbolt placement
Before drilling any holes, it’s crucial to measure and mark the door to determine the ideal placement for your deadbolt. Here’s how:
- Use a tape measure to measure the backset distance – the distance from the edge of the door to the center of the existing doorknob hole.
- Mark the desired height for the deadbolt on the edge of the door using a pencil. The standard height is typically around 40 inches above the floor, but you may want to adjust it based on your personal preference.
- Measure the distance between the edge of the door and the center of the deadbolt hole, ensuring it aligns with the backset distance.
- Make precise markings on the door using a pencil, indicating the center of the deadbolt hole as well as the surrounding area for the strike plate.
Accuracy is key during this step, as it will determine the functionality and security of your deadbolt.
Choosing the right deadbolt for your door
Not all deadbolts are created equal, so it’s important to select the right one for your specific door. Consider the following factors:
- Security level: Look for deadbolts with strong materials, such as solid brass or steel, and features like anti-drill plates and hardened bolts.
- Type: Choose between single-cylinder, double-cylinder, or electronic deadbolts, depending on your needs and preferences.
- Sizing: Ensure the deadbolt is compatible with the thickness of your door, typically ranging from 1-3/8 inches to 1-3/4 inches.
- Finish: Select a finish that matches your door’s overall aesthetic, such as satin nickel, bronze, or polished brass.
By considering these factors, you can choose a deadbolt that not only enhances your door’s security but also complements its style.
With the proper planning and preparation, you’re now ready to move on to the next step of installing your deadbolt. Stay tuned for our next blog post section on the actual installation process!
Removing The Existing Lock
When it comes to home security, one of the first lines of defense is a solid deadbolt lock on your door. Installing a deadbolt can be a straightforward process if you have the right tools and know the steps involved. In this guide, we will walk you through the process, starting with the initial step of removing the existing lock. So, let’s get started!
Removing the old lock and hardware
Before you install a new deadbolt, it is essential to remove the old lock and hardware from your door. Here is a step-by-step guide on how to efficiently remove the existing lock:
Step 1: Gather the necessary tools
Before you begin, make sure you have the following tools handy:
- A screwdriver (flathead or Phillips, depending on the type of screws used)
- A small drill (optional, but helpful for stubborn screws)
- A hammer (to tap any stubborn parts)
- Pliers (in case you need to remove any stubborn components)
Step 2: Unscrew the faceplate
Start by locating the screws that hold the faceplate in place. Most faceplates have two screws, one at the top and one at the bottom. Use your screwdriver to remove these screws, and set them aside in a safe place.
Step 3: Remove the cylinder and lock mechanism
Once the faceplate is off, you will have access to the cylinder and lock mechanism. Depending on the type of lock you have, you may need to unscrew or unclip it from the door. Refer to the manufacturer’s instructions or seek professional advice if you encounter any difficulties.
Step 4: Take out the strike plate
The strike plate is the metal plate attached to the door frame that the lock bolt latches onto when the door is closed. To remove it, unscrew the screws holding it in place using your screwdriver.
Patching or repairing the door if necessary

Once you have removed the old lock and hardware, it’s important to inspect the door for any damage or holes that may need to be patched or repaired. Here are a few steps to follow:
Step 1: Assess the condition of the door
Inspect the door surface, paying close attention to any holes or damage that could compromise the installation of the new deadbolt. If you discover any issues, you will need to address them before proceeding.
Step 2: Patch small holes or dents
If you come across small holes or dents, you can use a wood filler or putty to fill them in. Once the filler is dry, sand it down until it is smooth and level with the door surface.
Step 3: Repair larger damages
For larger damages such as cracks or deep gouges, consider using a wood epoxy or filler specifically designed for structural repairs. Follow the manufacturer’s instructions to ensure a proper repair.
By following these steps, you can ensure that your door is in good condition before installing the new deadbolt lock. In the next section, we will guide you through the process of installing the new hardware and deadbolt, so stay tuned!
Installing The Deadbolt
Installing the Deadbolt
Preparing the door for deadbolt installation
Before you can install a deadbolt on your door, you need to prepare the door itself. Follow these steps:
- Remove the doorknob and lock from the door using a screwdriver.
- Ensure that the door is clean and free of any dirt, debris, or remnants of the previous lock.
- Inspect the door to make sure it is in good condition and doesn’t require any repairs. If there are any holes or cracks, fill them in and sand the area smooth.
- Measure the backset, which is the distance from the edge of the door to the center of the doorknob hole. This measurement will determine where your deadbolt will be installed.
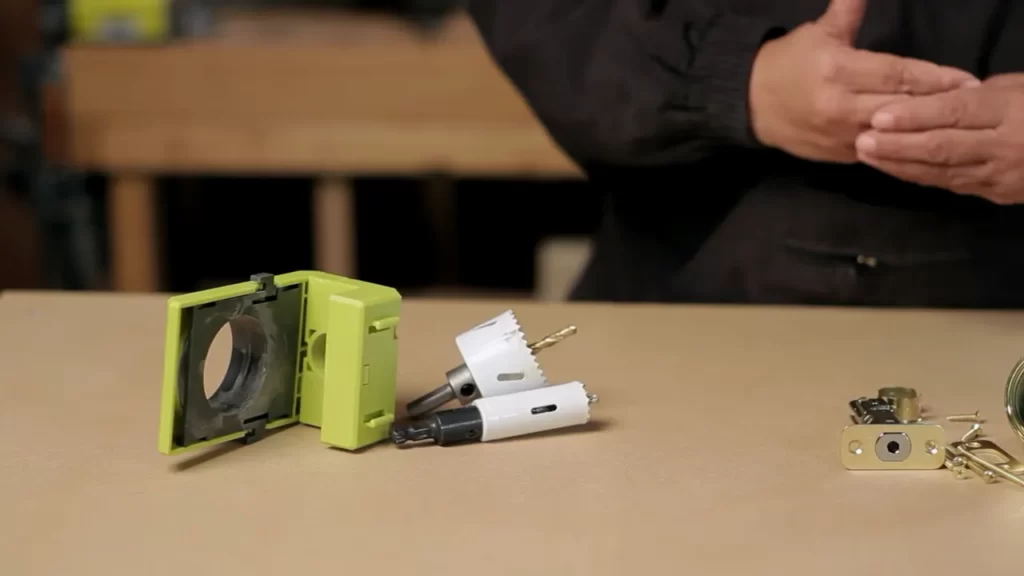
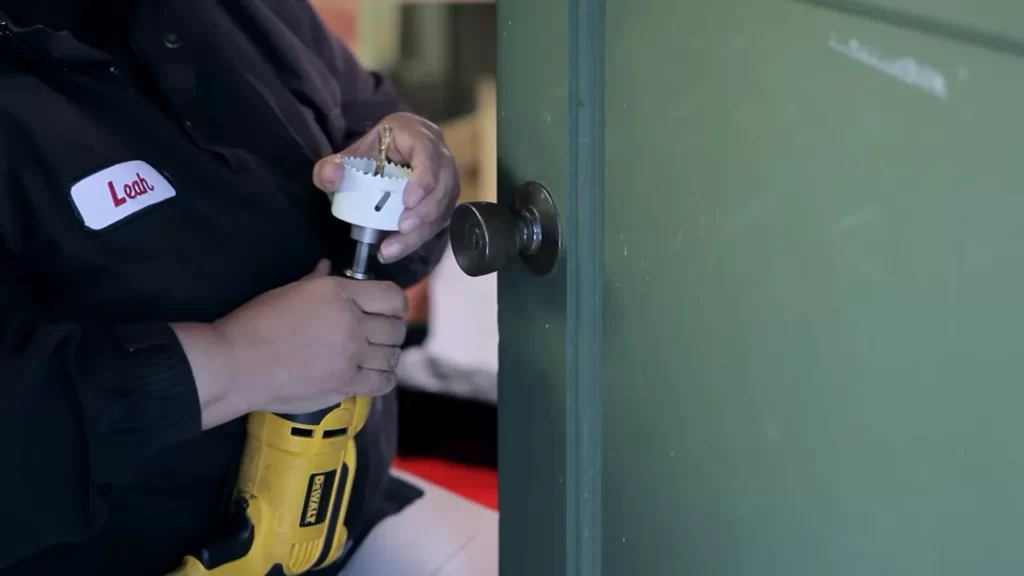
Drilling the necessary holes for the deadbolt
Once the door is prepared, you can move on to drilling the holes needed for the deadbolt:
- Mark the location of the deadbolt on the edge of the door, using your backset measurement as a guide.
- Drill a hole through the door at the marked location, using a hole saw or spade bit of the appropriate size for your deadbolt.
- Drill a smaller hole at a slight angle, connecting the larger hole to the edge of the door. This will allow the deadbolt to slide into the hole when it is installed.
Aligning and installing the deadbolt assembly
Now that the holes are drilled, you can proceed with aligning and installing the deadbolt assembly:
- Insert the deadbolt into the larger hole, making sure the latch extends fully when the bolt is retracted and that the bolt faceplate sits flush against the edge of the door.
- Align the faceplate on the door jamb, ensuring that it is level and centered.
- Mark the outline of the faceplate on the door jamb using a pencil.
- Chisel out a recess for the faceplate on the door jamb, making sure it is deep enough for the faceplate to sit flush.
- Screw the faceplate onto the door jamb using the provided screws.
- Test the deadbolt to ensure smooth operation and proper alignment with the faceplate.
Securing the deadbolt to the door
With the deadbolt assembly in place, it’s time to secure it to the door:
- Attach the strike plate to the door frame, making sure it aligns perfectly with the deadbolt when the door is closed.
- Mark the screw hole locations on the door frame using a pencil.
- Drill pilot holes at the marked locations to ensure the screws go in smoothly.
- Secure the strike plate to the door frame using the provided screws.
- Test the deadbolt once again to ensure it engages properly with the strike plate and that the lock mechanism functions smoothly.
Installing The Strike Plate
Installing the strike plate is an essential step when installing a deadbolt on a door. The strike plate is the metal plate that is affixed to the door jamb and receives the deadbolt latch. It ensures a secure and stable lock by reinforcing the area where the deadbolt engages with the door frame. Follow the steps below to correctly install the strike plate and ensure the proper fit and functionality of your deadbolt:
1. Marking and drilling holes for the strike plate
To begin, position the door in the closed position and hold the strike plate against the door jamb. Make sure it aligns with the latch hole and the edge of the door. Use a pencil or marker to mark the position of the holes on the door jamb.
Tip: Use a utility knife to score the area around the strike plate to prevent any splintering of the wood when drilling the holes.
Next, using an appropriate drill bit for the screws provided with the strike plate, drill pilot holes at the marked positions on the door jamb. Ensure that the drill bit size matches the diameter of the screws to prevent any splitting or cracking of the wood.
Tip: Place a piece of scrap wood on the opposite side of the door jamb to prevent any splintering or damage when drilling through.
2. Aligning and installing the strike plate
Once the pilot holes are ready, align the strike plate over the holes and ensure that it fits flush against the door jamb surface. You may need to adjust the position slightly to achieve proper alignment.
Insert the screws provided with the strike plate into the pilot holes and tighten them securely with a screwdriver. Be careful not to overtighten, as this may cause the wood to strip or the strike plate to become misaligned.
To ensure proper alignment, test the deadbolt latch by inserting it into the strike plate. The latch should smoothly and firmly engage with the strike plate without any resistance or misalignment. If necessary, adjust the strike plate position and tighten the screws as needed.
3. Ensuring proper fit and functionality of the deadbolt and strike plate
Once the strike plate is securely installed, test the functionality of the deadbolt lock. Close the door and extend the deadbolt into the strike plate. The deadbolt should smoothly and securely lock the door without any sticking or misalignment.
If there are any issues with the deadbolt’s operation, such as sticking or misalignment, double-check the strike plate position and tighten the screws as necessary. Additionally, ensure that the latch and strike plate are properly aligned and that the deadbolt is correctly installed.
Important: Regularly check the strike plate and tighten the screws if they become loose over time to maintain the security and effectiveness of your deadbolt lock.
By following these steps, you can successfully install the strike plate and ensure the proper fit and functionality of your deadbolt lock. Remember to take your time and make any necessary adjustments for a secure and reliable lock on your door.
Testing And Adjustments
When it comes to installing a deadbolt on a door, testing and adjustments play a crucial role in ensuring its smooth operation, optimal performance, and overall security. In this section, we will explore the necessary steps to test, adjust, and evaluate the installed deadbolt, adhering to HTML syntax.
Testing the deadbolt and strike plate for smooth operation
After the deadbolt installation on the door, the first step is to test its smooth operation. Here’s how you can perform the test:

- Insert the key into the lock cylinder and turn it clockwise to extend the deadbolt fully. Make sure the deadbolt smoothly extends and retracts without any unnecessary friction or resistance.
- Repeat this process multiple times to ensure consistent smoothness in operation. If you notice any sticking or stiffness, it may require some adjustments.
Making necessary adjustments for optimal performance
If you encounter any issues or inconsistencies during the testing process, it’s essential to make necessary adjustments for optimal performance. Follow these steps to ensure your deadbolt functions flawlessly:
- Check the alignment of the deadbolt with the strike plate. Ensure that the deadbolt fully extends into the strike plate’s hole when engaged. If misalignment is detected, you may need to deepen or widen the strike plate hole accordingly.
- Inspect the strike plate screws and ensure they are tightly secured. Loose screws can cause misalignment or ineffective locking.
- Examine the deadbolt’s latch length, which determines how far it extends into the strike plate’s hole. Adjust the latch length to provide a secure and snug fit.
- If the deadbolt doesn’t retract smoothly when turning the key counterclockwise, it may require lubrication. Apply a small amount of graphite-based lubricant to the lock mechanism.
- Test the cylinder rotations, making sure the key rotates smoothly without any binding or resistance. If needed, use a lightweight machine oil to lubricate the cylinder.
Checking the security and stability of the installed deadbolt
The final step in testing and adjustments is to assess the security and stability of the installed deadbolt. Consider the following aspects:
- Ensure the deadbolt provides a secure and tight fit when extended. It should not wobble or have excessive play.
- Inspect the strike plate’s screws once again to ensure they are tightened adequately, reinforcing the overall stability.
- Test the deadbolt’s resistance against a gentle push or force to verify its ability to withstand potential break-in attempts.
By thoroughly testing, making necessary adjustments, and evaluating the security and stability of the installed deadbolt, you can enhance the overall effectiveness of your door’s security system.
Deadbolt Maintenance And Upkeep
Proper maintenance and upkeep of your deadbolt is crucial to ensure its longevity and functionality. By following a few simple tips and guidelines, you can keep your deadbolt in excellent condition for years to come. This section will cover some valuable advice on maintaining your deadbolt, avoiding common issues, troubleshooting, and even upgrading it for enhanced security.
Tips for Maintaining the Longevity of Your Deadbolt
Keeping your deadbolt in optimal condition requires regular maintenance. Here are some tips to help you maintain the longevity of your deadbolt:
- Keep it clean: Dust and debris can accumulate in the keyhole and lock mechanism, leading to malfunctions. Regularly clean your deadbolt with a soft cloth and mild cleaner to remove any dirt or grime.
- Lubricate regularly: Apply a small amount of graphite lubricant or silicone-based lubricant to the keyhole and the moving parts of the lock. This will help prevent rust and ensure smooth operation.
- Inspect and tighten screws: Periodically check the screws and strike plate to ensure they are tight and secure. Loose screws can affect the deadbolt’s performance and compromise its effectiveness.
- Test the lock: Test your deadbolt regularly by locking and unlocking it with both the key and the thumbturn. Ensure the lock engages smoothly without any resistance or sticking.

Avoiding Common Issues and Troubleshooting
Understanding common issues that can arise with deadbolts will allow you to address them promptly. Here are some common problems and troubleshooting tips:
- Key sticking: If your key sticks in the deadbolt or has difficulty turning, it may be due to a dirty or worn-out lock. Clean the keyhole and apply lubricant to resolve the issue.
- Loose deadbolt: If your deadbolt becomes loose and wobbly, it may indicate loose screws or a misaligned strike plate. Tighten the screws or adjust the strike plate to fix the problem.
- Difficulty locking or unlocking: If you experience difficulty when locking or unlocking the deadbolt, the lock mechanism or the strike plate may require adjustment. Verify that the strike plate aligns perfectly with the deadbolt and adjust if necessary.
- Jammed deadbolt: In case the deadbolt gets jammed and refuses to move, avoid using excessive force. Insert the key and gently try to wiggle it while applying light pressure to release the deadlock.
Upgrading Your Deadbolt for Enhanced Security
If you want to enhance the security of your home, upgrading your deadbolt is a worthwhile investment. Consider the following options to improve the security of your door:
- Use a grade 1 deadbolt: Grade 1 deadbolts offer the highest level of security and are resistant to forced entry. These deadbolts are constructed with durable materials and advanced locking mechanisms.
- Install a smart deadbolt: A smart deadbolt allows you to control and monitor your lock remotely using a smartphone. Features like keyless entry, activity logs, and temporary access codes offer convenience and added security.
- Opt for a double-cylinder deadbolt: Double-cylinder deadbolts require a key to lock and unlock from both sides, reducing the risk of unauthorized entry through glass panels near the door.
- Add a door reinforcement plate: Installing a door reinforcement plate adds extra strength and security to your door, preventing it from being kicked in during a break-in attempt.
By implementing these upgrading options, you can significantly enhance the security of your home and gain peace of mind.
Remember, taking care of your deadbolt through proper maintenance, troubleshooting, and considering upgrades will ensure its reliability and longevity. Regularly inspect and maintain your deadbolt to keep your home secure and protected.
Frequently Asked Questions On How To Install A Deadbolt On A Door
Can You Install A Deadbolt Yourself?
Yes, you can install a deadbolt yourself. It is a simple process that can be done with basic tools. Just follow the manufacturer’s instructions, use a template to mark the holes, drill them, and attach the deadbolt.
Is A Deadbolt Hard To Install?
Installing a deadbolt is not difficult. With basic tools and some DIY skills, you can easily install a deadbolt. Just follow the provided instructions carefully for a secure and reliable installation.
How Much Does It Cost To Have A Deadbolt Installed?
The cost for installing a deadbolt varies depending on factors such as location, complexity, and the locksmith’s rates. Generally, you can expect to pay between $50 and $200.
Where Should Deadbolt Be Placed?
The deadbolt should be placed on the door frame, opposite the door’s latch, at a height of 40-48 inches from the bottom of the door.
How Do I Choose The Right Deadbolt For My Door?
To choose the right deadbolt for your door, consider factors like security level, size, material, and brand reputation.
What Tools Do I Need To Install A Deadbolt?
You will need a deadbolt kit, drill, hole saw, screwdriver, chisel, tape measure, and pencil.
Conclusion
Installing a deadbolt on your door is a crucial step to enhance the security of your home. By following these simple steps, you can ensure that your door is well-protected against unauthorized access. Remember to measure accurately, choose the right deadbolt, and follow the manufacturer’s instructions.
With a little time and effort, you can provide your family with peace of mind and a secure living environment. So, go ahead and take the necessary steps to install a deadbolt on your door today.