Installing a doggie door in a sliding glass door can be done by following a few simple steps. We will provide you with clear instructions to help you complete the installation process without any hassle.
Whether you have a small or large dog, this guide will ensure that your furry friend can easily access the outdoors whenever they need to. Not only will this provide convenience for your pet, but it will also give you peace of mind knowing that they can come and go as they please while maintaining the security of your home.
So, let’s get started on installing that doggie door!
Factors To Consider Before Installation
Before installing a doggie door in a sliding glass door, there are a few important factors that you need to consider. These factors will ensure that the installation goes smoothly and that the doggie door is suitable for your specific needs. Let’s take a closer look at these factors:
Size and Breed of Your Dog
When it comes to choosing a doggie door, the size and breed of your dog play a crucial role. You want to make sure that the door is large enough for your furry friend to comfortably pass through. Measure your dog’s height and width, and choose a door that allows ample space for them to enter and exit without any difficulty.
Bigger breeds might require larger doors, while smaller breeds can get by with smaller ones. It’s important to keep in mind that the size of your dog may change over time, so consider their potential future size as well.
Type of Sliding Glass Door
The type of sliding glass door you have will also impact the installation process. There are different types of sliding doors available: single panel, double panel, and sliding doors with a screen. Each type may require a slightly different installation method. Additionally, the material of the door, such as vinyl or aluminum, can also affect the installation process.
Take note of the specific details of your sliding glass door, such as the dimensions, structure, and any possible restrictions. This information will help you choose an appropriate doggie door and ensure a seamless installation.
Security Features
Security is of utmost importance when it comes to installing a doggie door. You want to ensure that your home remains secure, while still granting your dog the freedom to go in and out. Look for a doggie door that has built-in security features, such as a sturdy lock or an automatic closing mechanism.
In addition to the security features of the door itself, consider the location of the doggie door. Opt for a spot that is not easily accessible from the outside, such as a fenced backyard. This will provide an extra layer of security and peace of mind.
Ease of Installation
The ease of installation is another important factor to consider. Some doggie doors require professional installation, while others can be easily installed by yourself. If you are confident in your DIY skills, you may opt for a simpler installation process. However, if you are unsure or do not have the necessary tools, it might be best to hire a professional to ensure a proper installation.
When selecting a doggie door, read reviews and instructions to get an idea of the installation process. Look for doors that come with clear guidelines and all the necessary hardware. This will save you time and frustration during the installation.
Tools You Will Need
Installing a doggie door in a sliding glass door can provide your furry friend with the freedom to go in and out of the house as they please. But before you begin the installation process, it’s important to gather the necessary tools.
Measuring Tape
A measuring tape is an essential tool for accurately measuring the dimensions of your sliding glass door. Before purchasing a doggie door, you’ll need to measure the width and height of the door to ensure that the doggie door you choose will fit properly. Take your measurements carefully to avoid any errors.
Screwdriver
A screwdriver is necessary for removing the screws that secure the existing glass panel in your sliding glass door. Depending on the model of your sliding glass door, you may need either a Phillips head or a flathead screwdriver. It’s important to have a screwdriver that matches the type of screws in your door.
Drill
A drill will be required to create holes in the sliding glass door frame for installing the doggie door. Use an appropriate drill bit that matches the manufacturer’s specifications for the doggie door you have chosen.
Jigsaw
If your selected doggie door requires a larger opening than what is provided by the existing glass panel, you will need a jigsaw to carefully cut through the door frame. Use a fine-toothed blade to ensure a clean and precise cut.
Safety Glasses
It’s important to prioritize safety during the installation process. Wear safety glasses to protect your eyes from any potential flying debris when drilling or cutting through the sliding glass door frame.
Gloves
Wearing gloves is essential to protect your hands from any sharp edges or glass shards that may be encountered during the installation process. Choose gloves that provide both comfort and flexibility, allowing you to handle tools and materials effectively.
Materials You Will Need
Before you begin the installation process of a doggie door in your sliding glass door, it’s important to gather all the necessary materials. Having these items on hand will ensure a smooth and efficient installation process. Here are the materials you will need to get started:
Doggie Door Kit
A doggie door kit is the essential component you need for this project. It typically includes the doggie door itself, along with all the necessary hardware for installation. These kits are specifically designed to fit into sliding glass doors, providing a convenient entryway for your furry friend.
Weatherstripping
Weatherstripping is an important material to have for sealing any potential gaps or drafts around the doggie door. It helps in maintaining the insulation of your home, keeping it energy-efficient and comfortable. Make sure to choose a weatherstripping material that is durable and weather-resistant.
Silicone Caulk
Silicone caulk is necessary for securely sealing and waterproofing the edges of the doggie door. Applying silicone caulk around the door frame and any gaps will help keep out moisture and prevent any potential leaks. It’s important to choose a caulk that is specifically designed for outdoor use and is flexible.
Screws
Screws are essential for fastening the doggie door securely in place. The size and type of screws needed may vary depending on the doggie door kit you choose, so be sure to check the manufacturer’s instructions for specific requirements. It’s important to select screws that are long enough to secure the doggie door firmly but short enough to avoid damaging the glass.
Door Locking Mechanism (Optional)
If you want to maintain the security of your sliding glass door even with the doggie door installed, a door locking mechanism is highly recommended. These mechanisms provide an additional layer of protection against unauthorized access. There are various types of locking mechanisms available, so choose one that is compatible with your sliding glass door and provides the level of security you desire.
Cleaning And Removing Obstructions
Before you can install a doggie door in your sliding glass door, it’s important to ensure that the glass panels are clean and free from any obstructions. This will not only give you a clear view through the door but also make the installation process easier. In this section, we will discuss how to clean the glass panels, remove any existing weatherstripping or accessories, and clear the track of any debris or dirt.
Cleaning the Glass Panels
Start by preparing a mixture of warm water and mild detergent. Avoid using harsh chemicals or abrasive cleaners as they may damage the glass. With a soft cloth or sponge, gently scrub the glass panels using the soapy water solution. Be sure to pay extra attention to any dirt or smudges that are particularly stubborn. Rinse the glass with clean water and dry it thoroughly with a lint-free cloth. This will ensure that the glass is squeaky clean and ready for the doggie door installation.
Removing Any Existing Weatherstripping or Accessories
If your sliding glass door has any weatherstripping or accessories, such as blinds or curtains, you will need to remove them before proceeding with the installation. Carefully peel off the weatherstripping, starting from one end and moving to the other. If there are any adhesive residues left on the glass, you can use a gentle adhesive remover to clean it off. Similarly, remove any blinds or curtains by following the manufacturer’s instructions. Taking these steps will ensure a smooth and obstruction-free installation of the doggie door.
Clearing the Track of Any Debris or Dirt
The next step is to clear the track of your sliding glass door from any debris or dirt that may obstruct the movement of the door or interfere with the installation of the doggie door. Take a vacuum cleaner and use the hose attachment to remove any loose dirt, dust, or pet hair from the track. For more stubborn debris, you can use a small brush or toothbrush to loosen it and then vacuum it away. Once the track is clear and clean, your doggie door installation can proceed without any hindrances.
By taking the time to clean the glass panels, remove any existing weatherstripping or accessories, and clear the track of any debris or dirt, you are setting yourself up for a successful installation of a doggie door in your sliding glass door. With these obstructions removed, you can move on to the next step of the installation process confidently.
Determining The Appropriate Height For Your Dog
Installing a doggie door in your sliding glass door is a convenient way to give your furry friend the freedom to come and go as they please. One important aspect to consider when installing a doggie door is determining the appropriate height for your dog. This ensures that your dog will be able to comfortably use the door without any difficulties. So, how do you determine the right height for your dog? Let’s find out!
Measuring Your Dog’s Height from Shoulder to Paw
The first step in determining the appropriate height for your dog is to measure their height from shoulder to paw. This measurement will help you determine the height at which you should install the doggie door on your sliding glass door. To measure your dog’s height:
- Stand your dog on a level surface, such as the floor or ground.
- Place one end of a measuring tape or ruler at your dog’s shoulder and extend it down to their paw.
- Take note of the measurement in inches or centimeters.
This measurement will give you an idea of the minimum height your dog requires to comfortably use the doggie door. However, it’s important to consider a few additional factors to ensure maximum comfort for your furry friend.
Adding a Few Extra Inches for Comfort
While measuring your dog’s height is a good starting point, it’s also important to add a few extra inches for comfort. Dogs can have various body positions when passing through a doggie door, and adding a few extra inches to the installed height allows for flexibility and ease of use. In addition, some doggie doors have a rise or step at the bottom, which may require additional clearance.
It’s recommended to add at least 2-3 inches (5-8 centimeters) to your dog’s measured height when determining the appropriate height for your doggie door. With this extra clearance, your dog will have a comfortable and hassle-free experience when using the doggie door.
By following these simple steps and considering your dog’s height as well as adding a few extra inches for comfort, you can determine the appropriate height for your doggie door. This will ensure that your furry friend can enjoy the freedom of going in and out without any difficulty, while giving you peace of mind.
Marking The Placement On The Glass Door
When it comes to installing a doggie door in a sliding glass door, marking the placement is a crucial step that ensures a proper fit and functionality. By using a level and measuring tape, you can achieve accurate placement, allowing your furry friend to come and go without any hassle. In this section, we will guide you through the process of marking the outline of the doggie door, ensuring a seamless installation.
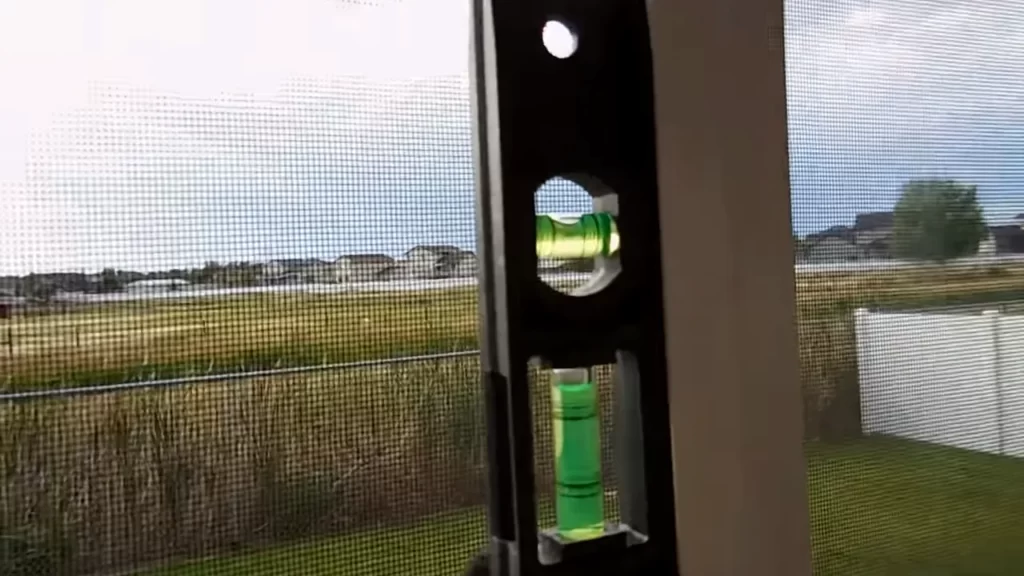
Using a Level
Before you begin marking the outline of the doggie door, it’s essential to use a level to ensure that the door is properly aligned. This will prevent any issues with the door closing or sealing correctly once the doggie door is installed. Here’s how you can use a level to achieve accurate placement:
- Start by placing the level vertically against the edge of the glass door where you intend to install the doggie door.
- Gently adjust the sliding glass door until the vial in the level is centered, indicating that it is perfectly vertical.
- Repeat this process on the opposite side of the glass door to ensure it remains level throughout.
By using a level, you can be confident that your doggie door will be installed in a straight and aligned position, ensuring optimal functionality and a visually appealing result.
Measuring Tape for Accurate Placement
Once you have confirmed that the glass door is level, it’s time to measure and mark the placement of the doggie door. This step is crucial for ensuring that your dog can comfortably enter and exit through the door. Here’s how you can accurately measure the placement:
- Measure the height of your dog from the floor to the top of its shoulders. This measurement will determine the appropriate height for the doggie door placement.
- Mark a spot on the glass door that aligns with the height you measured. This will serve as the top of the doggie door placement.
- Using the measuring tape, measure the width of your dog at its widest point, typically the shoulders. Add a few inches to this measurement to allow for ease of movement and comfort.
- Mark the width measurement on the glass door, ensuring it is centered between the vertical edges.
By using a measuring tape, you can accurately determine the placement of the doggie door, providing your furry friend with a spacious entry and exit point while maintaining the integrity of your glass door.
In conclusion, marking the placement on the glass door when installing a doggie door is a crucial step that ensures a proper fit and functionality. By using a level and measuring tape, you can achieve accurate placement, allowing your beloved pet to move freely in and out of the house. With these simple steps, your doggie door installation process will be smooth and successful.
Preparing The Glass Door For Cutting
Before you can install a doggie door in your sliding glass door, you’ll need to prepare the glass door for cutting. This crucial step ensures the safety of both the glass door and yourself throughout the installation process. In this post, we’ll walk you through the necessary steps to prepare the glass door, including applying masking tape to prevent glass shards.
Applying Masking Tape to Prevent Glass Shards
The first step in preparing your glass door for cutting is to apply masking tape to prevent glass shards. This simple yet effective technique helps protect both the glass door and yourself from potential injuries.
To apply masking tape:
- Starting from the top corner of the glass door, line the edge of the glass with a strip of masking tape. Press it firmly against the glass to ensure it adheres properly.
- Continue applying the tape in a straight line along the edge of the glass, carefully aligning it with the door frame.
- Make sure to overlap each strip of tape slightly to create a continuous barrier along the entire glass edge.
By applying masking tape, you create a protective barrier that helps prevent glass shards from scattering in case of any accidental breakage during the cutting process.
Note: It’s essential to be cautious and not apply excessive force or impact to the glass door while working with it, as this can increase the risk of breakage. Take your time and handle the glass door with care.
Cutting The Hole
One of the key steps in installing a doggie door in a sliding glass door is cutting the hole. This process requires precision and careful execution to ensure a proper fit for the door. In this section, we will walk you through the steps of cutting the hole using a drill and jigsaw, cutting along the marked outline, and ensuring smooth edges while removing any glass shards.
Using a Drill and Jigsaw to Make the Initial Hole
The first step in cutting the hole for a doggie door is making an initial hole using a drill and jigsaw. This allows you to create an entry point for the jigsaw blade and begin cutting along the marked outline. Here’s how you can do it:
- Measure and mark the desired location for the doggie door on your sliding glass door. Take into consideration the height of your dog and the height at which you want the door to be installed.
- Using a measuring tape and a pencil, mark the outline of the door on the glass. Make sure to double-check the measurements and markings for accuracy.
- Put on safety goggles and gloves to protect yourself during the cutting process.
- Attach a drill bit suitable for glass to your drill.
- Position the drill bit on one corner of the marked outline and start drilling slowly and steadily. Apply light pressure and maintain a consistent speed to prevent cracking or shattering of the glass.
- Repeat the drilling process on the remaining corners of the marked outline.
- Once the corner holes are drilled, switch to a jigsaw with a glass-cutting blade.
- Insert the jigsaw blade into one of the drilled corner holes and start cutting along the marked outline. Use a smooth, fluid motion and let the jigsaw’s blade do the work.
- Continue cutting along the marked outline until the initial hole is fully formed.
Cutting along the Marked Outline
Now that you have made the initial hole, it’s time to cut along the marked outline to create the hole for the doggie door. Follow these steps:
- Position the jigsaw blade in the initial hole you created.
- Turn on the jigsaw and start cutting along the marked outline. Again, use a smooth, fluid motion and let the jigsaw do the cutting for you.
- As you cut, guide the jigsaw along the marked outline, keeping a steady hand and maintaining the desired shape and size for the doggie door.
- Take breaks if needed to prevent overheating of the jigsaw or the glass. This will ensure clean and precise cuts.
- Continue cutting along the marked outline until the hole is fully formed, and you have a clear pathway for the doggie door.
Ensuring Smooth Edges and Removing any Glass Shards
After the hole is cut, it’s important to ensure that the edges are smooth and free from any sharp or jagged areas. Additionally, you need to remove any glass shards that may have been created during the cutting process. Follow these steps to complete the process:
- Put on safety goggles and gloves if you haven’t already done so.
- Inspect the edges of the cut hole for any rough or uneven areas. Use a fine-grit sandpaper to smooth out these edges, making sure to keep the glass surface level.
- Be gentle while sanding to avoid scratching the glass or causing any damage.
- After sanding, wipe away any dust or debris from the glass surface.
- Check the surrounding area for any glass shards that may have fallen during the cutting process. Use a vacuum cleaner or a damp cloth to remove these glass shards carefully.
- Ensure that the hole and the surrounding area are clean and free from any remaining glass shards before proceeding with the installation of the doggie door.
By following these steps, you can successfully cut the hole for a doggie door in your sliding glass door. Once the hole is prepared, you can proceed with the installation process, ensuring a safe and convenient access point for your furry friend.
Assembling The Doggie Door
Installing a doggie door in a sliding glass door can provide your furry friend with easy access to the outdoors while keeping your home secure. Assembling the doggie door involves following the manufacturer’s instructions, connecting the door frame and flaps, and attaching the locking mechanism if applicable. By carefully going through each step, you can ensure a successful installation that will benefit both you and your beloved pet.
Following the Manufacturer’s Instructions
Before you begin assembling the doggie door, it is crucial to carefully read and follow the manufacturer’s instructions. Each doggie door may have specific requirements and steps, so make sure to familiarize yourself with the provided guidelines. By adhering to the manufacturer’s instructions, you can ensure that your doggie door is properly assembled.
Connecting the Door Frame and Flaps
Once you have familiarized yourself with the manufacturer’s instructions, start assembling the doggie door by connecting the door frame and flaps. Below is a step-by-step guide to help you through the process:
- Prepare the door frame components according to the instructions, ensuring that each piece is aligned correctly.
- Securely attach the door frame to the sliding glass door, using the provided screws and any additional hardware as specified.
- Align the flaps with the door frame, making sure they are positioned correctly for your dog’s size and convenience.
- Connect the flaps to the door frame using the designated attachment points, following the manufacturer’s guidelines.
- Ensure that the flaps move freely and smoothly, allowing easy accessibility for your dog.
Attaching the Locking Mechanism (If Applicable)
If your doggie door comes with a locking mechanism, it is essential to attach it properly to ensure the security of your home. Here’s how you can do it:
- Identify the locking mechanism components and familiarize yourself with their functions.
- Position the locking mechanism in the designated area, ensuring it aligns correctly with the door frame.
- Securely attach the locking mechanism using the provided screws or other specified fasteners.
- Test the locking mechanism to ensure it functions properly, allowing you to lock and unlock the doggie door as needed.
Remember to refer to the manufacturer’s instructions throughout the assembly process. Following these steps will help you successfully assemble your doggie door and provide your furry friend with easy access to the outdoors. With a properly installed doggie door, your pet can enjoy the freedom to explore while you have peace of mind knowing that your home is secure.
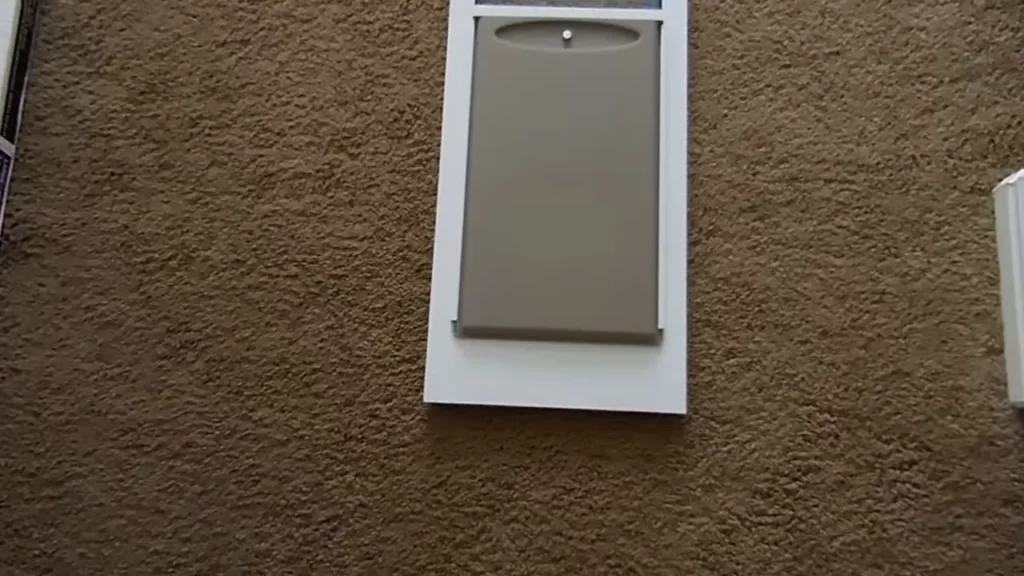
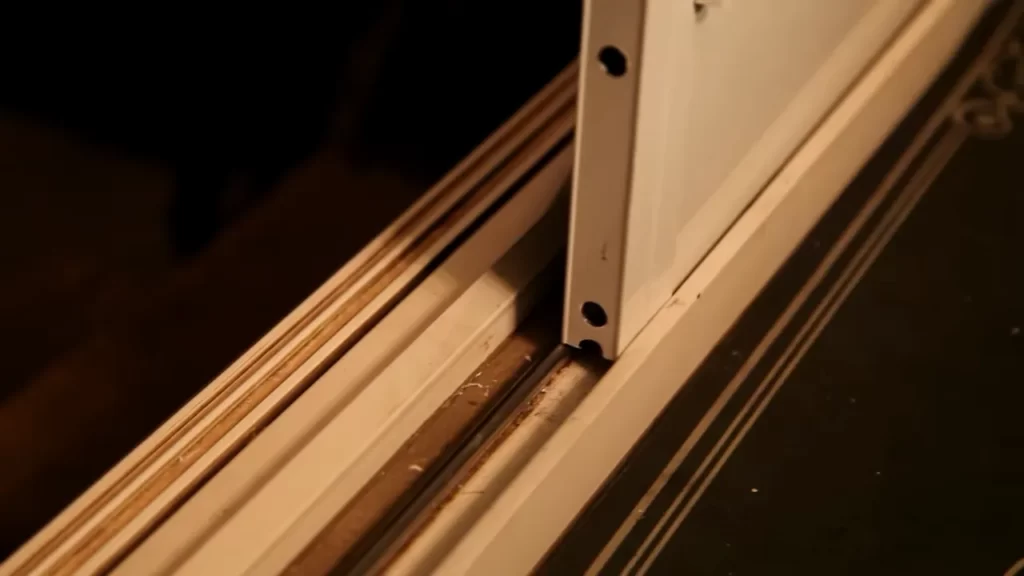
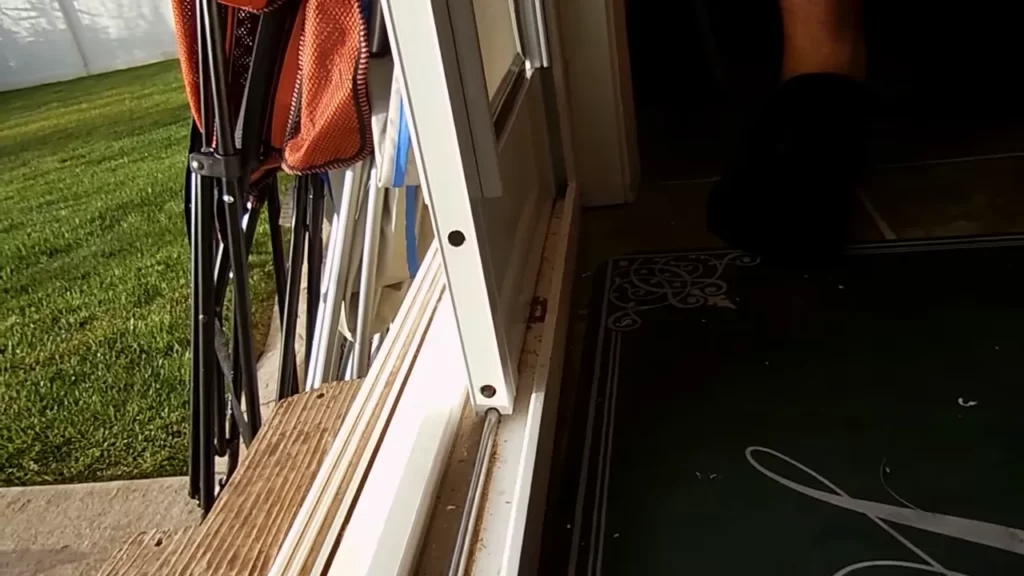
Attaching The Doggie Door To The Glass Door
Once you have successfully cut the hole in your sliding glass door for the doggie door, it is time to attach the door securely. This step requires careful alignment and proper securing to ensure the door stays in place and functions effectively. Let’s walk through the process below.
Aligning the Door with the Cut Hole
Before attaching the doggie door to the glass door, it is crucial to align it properly with the cut hole. This step ensures that the door fits snugly and prevents any gaps or misalignment that could compromise your home’s security or energy efficiency. Follow the steps below to align the door:
- Carefully place the doggie door in the cut hole, ensuring it fits perfectly and matches the shape and size of the opening.
- Use a level or a measuring tape to ensure that the door is aligned both vertically and horizontally. Adjust the position if needed.
- Once you are satisfied with the alignment, mark the door’s position on the glass door using a pencil or a marker. This will serve as a reference when securing the door.
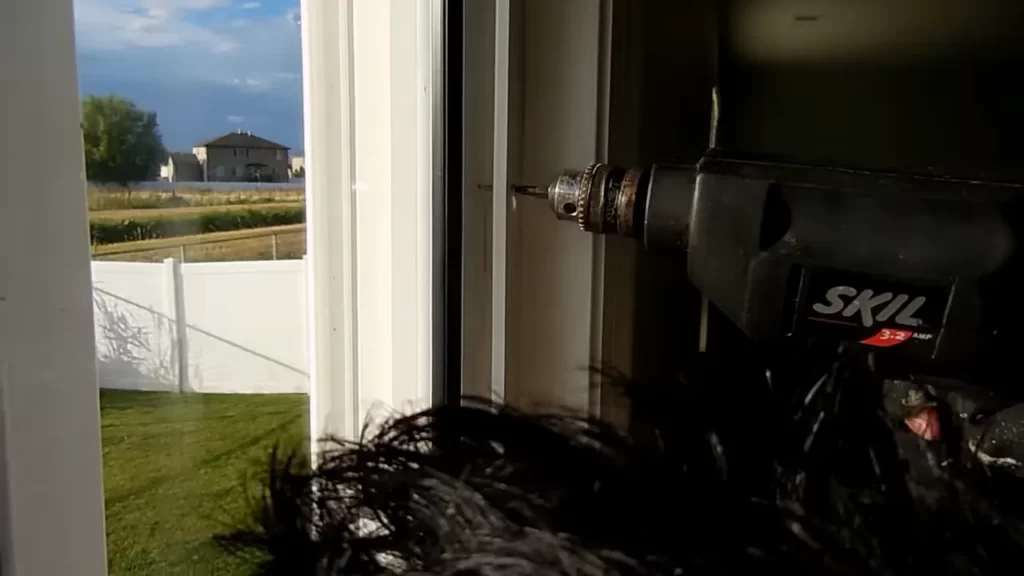
Securing the Door in Place with Screws
After aligning the doggie door with the cut hole, the next step is to secure it in place using screws. This ensures that the door remains firmly attached and provides a safe passage for your furry friend. Follow the steps below to secure the door:
- Using your marked reference points as a guide, drill small pilot holes on the glass door at the specified screw locations provided by the doggie door manufacturer.
- Insert screws through the screw holes on the doggie door, one at a time, and into the pilot holes on the glass door. Be careful not to overtighten the screws to avoid damaging the glass.
- Repeat this process for all the screw holes, ensuring that the door remains aligned and tight as you go.
- Once all the screws are securely fastened, ensure that the door opens and closes smoothly without any obstructions.
By carefully aligning the door and securing it firmly, you can ensure that your doggie door functions effectively while maintaining the integrity of your sliding glass door. Take your time during this installation process to avoid any damages or mishaps, and soon your four-legged friend will be enjoying unrestricted outdoor access while you enjoy the added convenience.
Installing Weatherstripping For Insulation And Security
Applying Weatherstripping along the Door Frame
When it comes to installing a doggie door in a sliding glass door, one essential step you cannot overlook is applying weatherstripping along the door frame. This not only helps with insulation but also ensures a tight seal to prevent drafts or leaks. Inadequate insulation can lead to heat loss during the winter and cold drafts during the summer, resulting in higher energy bills and discomfort for your furry friend.
To properly apply weatherstripping along the door frame, follow these steps:
- Clean the door frame thoroughly to ensure the weatherstripping adheres properly.
- Measure the length of the door frame and cut the weatherstripping material accordingly, allowing for a slight overlap at each end.
- Peel off the backing from the weatherstripping adhesive and carefully align it with the outer edges of the door frame.
- Press down firmly along the entire length of the weatherstripping to ensure a secure bond.
By applying weatherstripping along the door frame, you create a barrier against outside elements, making your home more energy-efficient and comfortable for both you and your furry companion.
Ensuring a Tight Seal to Prevent Drafts or Leaks
A tight seal is crucial in preventing drafts or leaks, as it helps maintain a consistent temperature inside your home and keeps unwanted moisture out. Here are some steps to ensure a tight seal when installing a doggie door:
- Inspect the installation area for any gaps or uneven surfaces.
- Place the doggie door securely in the sliding glass door, making sure it fits snugly.
- Adjust the height and width of the doggie door to eliminate any gaps.
- Tighten the screws or locking mechanisms provided, ensuring a secure fit.
Remember, a properly sealed doggie door not only prevents drafts and leaks but also enhances the overall security of your home. It reduces the risk of intruders gaining access through the sliding glass door and provides an additional layer of protection for your furry friend.
Checking The Door’S Functionality
When installing a doggie door in a sliding glass door, checking the door’s functionality is an essential step to ensure a smooth and successful installation process. By testing the flaps for smooth opening and closing and ensuring proper alignment with the glass door, you can ensure that your doggie door operates optimally, giving your furry friend the freedom they deserve.
Testing the Flaps for Smooth Opening and Closing
Before proceeding with the installation, you need to test the flaps of the doggie door to ensure smooth opening and closing. This step is crucial to ensure that your pet can use the door without any hindrance and that the flaps do not get stuck or jammed.
Here’s how you can test the flaps:
- Hold the doggie door flaps and gently open and close them a few times to check for any resistance.
- Verify that the flaps swing freely without getting stuck at any point.
- Observe the flaps to make sure they close tightly and seal properly when in the closed position.
Ensuring Proper Alignment with the Glass Door
Proper alignment of the doggie door with the sliding glass door is crucial for a secure and functional installation. An ill-aligned doggie door may result in air leaks or security issues. Follow these steps to ensure proper alignment:
Steps for ensuring alignment:
- Clean and prepare the surface area where the doggie door frame will be attached.
- Place the doggie door frame against the sliding glass door, aligning it with the top and bottom tracks.
- Use a level to ensure the frame is perfectly vertical.
- Make necessary adjustments to achieve proper alignment.
By testing the flaps for smooth opening and closing and ensuring proper alignment with the glass door, you can proceed with confidence to the next steps of your doggie door installation. This attention to detail will help provide a functional and secure doggie door for your furry friend.
Making Any Necessary Adjustments
After successfully installing a doggie door in your sliding glass door, it’s important to make any necessary adjustments to ensure that the door functions properly and provides a secure seal. This step involves tightening screws or bolts if the door feels loose and adding additional weatherstripping for a better seal. By paying attention to these details, you’ll ensure that your furry friend can come and go as they please while minimizing any drafts or security risks.
Tightening Screws or Bolts if the Door Feels Loose
If you notice any looseness in the doggie door or the sliding glass door itself, it’s crucial to tighten the screws or bolts that hold everything in place. This will prevent any unwanted movement or rattling when your pup goes through the door. Here’s how you can do it:
- Identify the screws or bolts that need tightening. These are typically located on the frame of the doggie door or the sliding glass door.
- Using a screwdriver or an appropriate wrench, carefully tighten each screw or bolt. Be sure not to overtighten, as this may strip the threads or damage the door.
- Test the door’s stability by gently pushing and pulling it. If it feels secure and doesn’t wobble, you’ve successfully tightened the screws or bolts.
By taking a few moments to tighten the necessary hardware, you’ll enhance the overall durability and functionality of your doggie door.
Adding Additional Weatherstripping for a Better Seal
Depending on the climate in your area, you might find that the existing weatherstripping isn’t providing a sufficient seal. This can lead to energy loss and drafts seeping into your home. To enhance the insulation and seal of the doggie door, consider adding additional weatherstripping by following these steps:
- Measure the length of the existing weatherstripping to determine the amount of new weatherstripping required.
- Choose a high-quality weatherstripping material that is suitable for sliding glass doors. Options include foam tape, V-strip, or adhesive weatherstripping.
- Clean the surface where the new weatherstripping will be applied by wiping away any dirt, dust, or debris.
- Peel off the backing of the new weatherstripping and carefully press it onto the designated areas of the doggie door frame. Ensure that the weatherstripping covers the gap between the door and the frame completely.
- Gently close and open the door a few times to check if the weatherstripping compresses enough to create a tight seal without interfering with the door’s movement.
By adding additional weatherstripping, you’ll improve the insulation of your home and keep the elements at bay, allowing your furry companion to enjoy the doggie door without any unwelcome drafts.
Familiarizing Your Dog With The Door
One of the most important aspects of installing a doggie door in a sliding glass door is familiarizing your dog with the new access point. This process helps your furry friend feel comfortable and confident when using the door.
Introducing the Doggie Door Slowly
When introducing your dog to the doggie door, it’s crucial to take things slow. Rushing the process can lead to fear and anxiety, which may discourage your dog from using the door altogether. Instead, follow these steps to ensure a smooth transition:
- Start by opening the sliding glass door slightly, keeping it secured with a temporary latch or block.
- Encourage your dog to approach the open space, allowing them to sniff and examine the area.
- Show enthusiasm and praise your dog when they show interest in the door.
- Gradually increase the size of the opening over several days, until your dog becomes comfortable with the fully opened door.
Using Treats or Toys to Encourage Exploration
Positive reinforcement is a powerful tool when it comes to training your dog. Using treats or toys can help encourage your furry friend to explore the doggie door. Here are some strategies you can use:
- Place treats or toys near the doggie door to create a positive association.
- Use treats to guide your dog through the door, rewarding them for even small steps of progress.
- Play with your dog near the door to create a positive and fun atmosphere.
- Consider using a treat-dispensing toy that can be placed on the other side of the doggie door, enticing your dog to pass through.
By taking the time to familiarize your dog with the doggie door and using positive reinforcement techniques, you can help them feel at ease and confident when using their new access point. Remember to be patient and consistent throughout the process, and soon enough, your four-legged friend will be enjoying their newfound freedom.
Encouraging Proper Use Of The Door
Welcome to this section where we will discuss the importance of using commands to guide your dog through the newly installed doggie door in your sliding glass door. Teaching your dog the right commands will help them understand how to properly use the door, ensuring a smooth and hassle-free experience for both you and your furry friend.
When it comes to teaching your dog how to use the doggie door with commands, consistency is key. Make sure everyone in your household uses the same set of commands, so your dog doesn’t get confused. Here are some tips to help you get started:
- Choose simple and clear commands to avoid any confusion.
- Use positive reinforcement by rewarding your dog when they respond correctly to the commands.
- Start by teaching your dog to approach the door on command.
- Example command: “Go to the door.”
- Once your dog is comfortable approaching the door, introduce the command to go through the door.
- Example command: “Go through the door.”
- Guide your dog through the door using hand gestures and treats as incentives.
- Repeat the process until your dog becomes familiar with the commands and successfully goes through the door on their own.
In this section, we’ll explore the importance of reinforcing positive behavior when teaching your dog to use the doggie door. By rewarding your dog for their correct actions, you can encourage them to continue using the door appropriately.
Here are a few tips for reinforcing positive behavior:
- Use treats: Reward your dog with treats immediately after they go through the door on command. This positive reinforcement will associate the action with a pleasant experience and encourage them to repeat it.
- Offer praise: Along with treats, provide verbal praise and gentle petting to let your dog know they did a good job. Dogs love to receive affection from their owners, and this positive reinforcement will further motivate them to use the door correctly.
- Be consistent: Ensure you consistently reward your dog every time they use the door correctly. Consistency is crucial for reinforcing positive behavior and establishing good habits.
- Gradually reduce treats: While initially, treats are an effective way to reinforce positive behavior, gradually reduce the frequency of treats over time. This will encourage your dog to rely more on verbal commands and less on treats.
Frequently Asked Questions Of How To Install A Doggie Door In A Sliding Glass Door
Can You Put A Doggie Door In An Existing Sliding Glass Door?
Yes, you can install a doggie door in an existing sliding glass door. It provides a convenient way for your dog to go in and out without the need to constantly open and close the door.
How Do You Secure A Doggy Door In A Sliding Door?
To secure a doggy door in a sliding door, use a door brace or a security bar that fits snugly against the sliding panel. This prevents access and ensures your pet’s safety. You can also consider using a sliding glass door insert specifically designed to secure the doggy door.
What Is The Most Secure Dog Door For A Sliding Glass Door?
The most secure dog door for a sliding glass door is one equipped with a lockable latch system to prevent unauthorized access and a sturdy frame that fits securely into the door opening. It should also have a durable construction and strong materials.
How Do You Put A Doggie Door In A Glass Door?
To install a doggie door in a glass door, first measure your dog’s height at the shoulder and width at the widest point. Purchase a doggie door suitable for your dog’s size. Then, contact a professional glazier who specializes in glass installations to cut a hole in the glass door and install the doggie door securely.
Can I Install A Doggie Door In A Sliding Glass Door?
Yes, you can install a doggie door in a sliding glass door by using a specially designed pet door insert.
Is It Easy To Install A Doggie Door In A Sliding Glass Door?
Installing a doggie door in a sliding glass door is relatively easy with the right tools and instructions.
Conclusion
To sum up, installing a doggie door in a sliding glass door can provide countless benefits for both you and your furry friend. With the right tools and following the step-by-step guide mentioned in this blog post, you can easily create a convenient access point for your dog.
Remember to measure carefully, secure the door, and provide adequate training. By taking these simple steps, you can enhance your dog’s freedom and enjoyment while ensuring the safety and security of your home. So, why wait? Get started on installing a doggie door today!