To install a door closer, begin by measuring and marking the desired location on the door and frame. Align the closer and mark the screw holes with a pencil.
Drill pilot holes at the marked spots and attach the closer using screws. Adjust the tension and speed settings according to your preference. Test the door to ensure it closes and latches properly. Introducing a door closer to your home or office can provide added convenience and security.
Whether you’re replacing an old door closer or installing a new one, the process can be straightforward if you follow the steps correctly. In this guide, we’ll walk you through the exact steps you need to take to install a door closer. From measuring and marking the location to adjusting the tension and speed settings, we’ll cover everything you need to know. So, let’s get started and make sure your door closes smoothly and securely every time.
What Is A Door Closer And Why Is It Important?
Definition and Purpose of a Door Closer
A door closer is a mechanical device installed on a door to automatically close it after it has been opened. Its main purpose is to provide convenience, security, and energy efficiency. The door closer mechanism is typically comprised of a hydraulic or pneumatic cylinder that controls the speed at which the door closes, as well as an arm that connects the cylinder to the door. This allows for a smooth and controlled closure of the door, preventing slamming and ensuring that the door is fully closed.
Importance of Installing a Door Closer
Installing a door closer has numerous benefits and is essential for any building, whether residential or commercial. Here are a few reasons why door closers are important:
- Security: A properly installed door closer ensures that the door is securely closed, reducing the risk of unauthorized access. It prevents the door from being left open, which can compromise the safety and security of the premises.
- Convenience: With a door closer, there is no need to worry about manually closing the door every time someone enters or exits. The door closer automatically takes care of closing the door behind you, making it more convenient for both residents and visitors.
- Energy Efficiency: Door closers help to improve energy efficiency by preventing drafts and air leakage. When a door is left open, conditioned air can escape and outside air can enter, resulting in increased energy consumption for heating or cooling. By ensuring that the door closes promptly, a door closer helps maintain a consistent indoor temperature and reduces energy waste.
- Noise Control: Slamming doors can create disruptive noise in a building, especially in busy areas. Door closers ensure that the door closes smoothly and quietly, minimizing disturbances for occupants.
Overall, a door closer is an indispensable component of any well-functioning door. Its installation provides security, convenience, energy efficiency, and noise control, making it an important consideration for both residential and commercial properties.
Different Types Of Door Closers And Their Features
When it comes to installing a door closer, it’s important to understand that there are various types available, each with its own features and benefits. Choosing the right door closer for your needs can make a big difference in terms of functionality and convenience. In this section, we will provide an overview of the different types of door closers and discuss their features and benefits to help you make an informed decision.
Overview of Various Types of Door Closers
Door closers come in different styles, including:
- Overhead door closers
- Concealed door closers
- Surface-mounted door closers
- Floor-spring door closers
To give you a better understanding of each type, let’s delve into the features and benefits they offer.
Overhead Door Closers
Overhead door closers are the most common type of door closer used in commercial buildings. They are typically mounted on the upper part of the door frame. These closers offer a variety of features, including:
- Adjustable closing and latching speeds
- Backcheck function to prevent the door from slamming
- Delayed action feature for easy accessibility
- Low noise levels for a quieter door closure
Concealed Door Closers
Concealed door closers are designed to be hidden within the door or frame, providing a sleek and streamlined appearance. They offer the following features:
- Enhanced aesthetics due to their hidden installation
- Smooth and controlled closing action
- Limited maintenance requirements
- Hydraulic operation for reliable performance
Surface-Mounted Door Closers
Surface-mounted door closers are attached to the surface of the door and frame. They are known for their durability and versatility, offering the following features:
- Easy installation without the need for special tools
- Highly adjustable closing and latching speeds
- Compatibility with a wide range of door sizes and weights
- Optional hold-open feature for added convenience
Floor-Spring Door Closers

Floor-spring door closers are installed into the floor beneath the door. They are commonly used for heavy or large doors and offer the following features:
- Efficient performance even with heavy doors
- Adjustable closing forces for precise control
- Non-handed design for flexibility in installation
- Resistance to harsh weather conditions
Now that you have an overview of the different types of door closers as well as their features and benefits, you can make a more informed decision when it comes to installing a door closer. Consider your specific requirements and choose the type that best suits your needs.
Factors To Consider Before Installing A Door Closer
Before installing a door closer, it is crucial to consider a few important factors. Taking these factors into account will ensure that the door closer you choose is suitable for your specific needs and meets all relevant regulations. In this article, we will discuss three key factors to consider: assessing the weight and size of the door, evaluating the door’s location and usage, and understanding building codes and regulations.
Assessing the Weight and Size of the Door
Choosing the right door closer begins with evaluating the weight and size of the door. This is crucial as it determines the kind of door closer you will need to ensure proper functionality. A door that is heavy or large may require a more robust and heavy-duty door closer, while a lighter or smaller door may only need a standard closer.
When assessing the weight and size of the door, there are a few key characteristics to consider:
- The weight of the door: To assess the weight of the door, you can use a scale or consult the manufacturer’s specifications.
- The width and height of the door: Measuring the dimensions of the door will help determine the appropriate size of the door closer.
- The swing of the door: Knowing if the door swings in or out is essential for selecting the correct type of door closer.
Evaluating the Door’s Location and Usage
Another crucial factor to consider before installing a door closer is the door’s location and how it will be used. Analyzing these aspects will help you choose a door closer that can withstand the demands of its environment and its expected usage.
Here are a few important considerations when evaluating the door’s location and usage:
- Interior or exterior location: Doors located outdoors will be exposed to the elements and may require a door closer that is weather-resistant and durable.
- Frequency of use: Doors that experience high foot traffic will need a door closer that can withstand frequent opening and closing without compromising its functionality or lifespan.
- Security requirements: If the door requires enhanced security, a door closer with specific features, such as delayed action or an adjustable closing force, might be necessary.
Understanding Building Codes and Regulations
Lastly, it is essential to have a good understanding of building codes and regulations before installing a door closer. These codes ensure the safety and accessibility of buildings and dictate specific requirements for the installation and operation of door closers.
Some important points to consider when it comes to building codes and regulations:
- Accessibility guidelines: Depending on the building’s purpose, certain door closers may be required to meet accessibility standards, such as those outlined in the Americans with Disabilities Act (ADA).
- Fire safety regulations: In buildings where fire safety is a concern, specific door closers may be required to comply with fire codes, helping to prevent the spread of smoke or flames in case of a fire.
- Local regulations: Different regions may have their own building codes and regulations, so it is important to familiarize yourself with the specific requirements of your local jurisdiction.
By considering these factors, you can ensure that the door closer you choose is suitable for your door and adheres to all necessary regulations and codes. Taking the time to assess the weight and size of the door, evaluate the door’s location and usage, and understand building codes and regulations will result in a safer and more efficient door closer installation.
Necessary Tools For Door Closer Installation
List of tools required for the installation process:
When it comes to installing a door closer, having the right tools is essential for a smooth and successful installation. Gathering the necessary tools beforehand can save you time and stress, ensuring that you have everything you need to complete the job. Here is a comprehensive list of tools that you will need:
| Tools | Purpose |
|---|---|
| Screwdriver | A screwdriver is required for removing and installing screws that hold the door closer in place. It helps in adjusting the tension of the closer and ensures that it operates smoothly. |
| Tape Measure | The tape measure is essential for accurately measuring the placement of the door closer. It ensures that the closer is installed at the correct height and alignment for optimal functionality. |
| Level | A level is used to ensure that the door closer is installed perfectly straight. It helps in maintaining the balance and alignment of the closer, preventing any issues with the door’s opening and closing. |
| Drill | A drill is necessary for creating holes in the door and frame to install the door closer. It makes the installation process faster and more efficient, ensuring a secure and stable attachment. |
| Hammer | A hammer is handy when dealing with any stubborn or tight parts during the installation process. It helps in adjusting the arm or bracket of the door closer to ensure a proper fit. |
| Torx Wrench or Hex Key | Depending on the type of door closer, you might need a Torx wrench or a hex key for adjusting the tension of the closer. These tools allow you to fine-tune the closing speed and control of the door. |
| Pliers | Pliers provide extra gripping power and are useful for securing nuts and bolts during the installation process. They help ensure that all components are tightly fastened and prevent any loose connections. |
Having these tools readily available will streamline the door closer installation process and ensure a job well done. Make sure to gather all the necessary tools before beginning the installation to minimize interruptions and complete the task efficiently.
Essential Materials Needed For Door Closer Installation
Installing a door closer can improve the functionality and security of your door. To ensure a successful installation, it’s important to have the right materials at hand. In this blog post, we’ll provide an overview of the essential materials you’ll need for a door closer installation.
Overview of the Materials Required
Before we delve into each material’s function, let’s take a quick look at the list of essential materials you’ll need:
- Door closer
- Screws and fasteners
- Drill
- Screwdriver
- Measuring tape
- Level
- Marker or pencil
Discussing the Function of Each Material
Now that we have an overview of the required materials, let’s discuss their individual functions:
| Material | Function |
|---|---|
| Door closer | The door closer is the main component responsible for controlling the closing speed and ensuring a smooth closing motion of the door. |
| Screws and fasteners | These are used to securely attach the door closer and other components to the door and door frame. It’s important to choose screws and fasteners that are suitable for the type of door and frame you have. |
| Drill | A drill is necessary for creating pilot holes in the door and frame, allowing you to easily insert screws and fasteners. |
| Screwdriver | A screwdriver is needed to tighten and adjust the screws and fasteners during the installation process. |
| Measuring tape | Accurate measurements are crucial for ensuring the door closer is installed at the proper location. A measuring tape will help you determine the correct placement. |
| Level | A level is used to ensure the door closer is installed horizontally, preventing any misalignment that could affect its performance. |
| Marker or pencil | You’ll need a marker or pencil to mark the locations for drilling holes, aligning the door closer, and making any necessary adjustments. |
Make sure to gather these materials before starting the door closer installation to ensure a smooth and efficient process. Having the right tools on hand will save you time and frustration, allowing you to enjoy the benefits of a properly functioning door closer.
Preparing The Door And Frame
Before installing a door closer, it is important to properly prepare the door and frame. This step will ensure that the installation goes smoothly and the door closer functions effectively. In this section, we will discuss two key aspects of preparing the door and frame: measuring and marking the door and frame for installation, and ensuring proper alignment and clearance.
Measuring and marking the door and frame for installation
Accurate measurements and precise markings are crucial for a successful door closer installation. Follow these steps to measure and mark the door and frame:
- Start by measuring the height of the door. Use a tape measure to measure from the top edge of the door to the floor. Write down the measurement.
- Next, measure the width of the door. Measure from one side of the door to the other, excluding the door frame. Note down the measurement.
- Now, measure the height of the door frame. Measure the distance from the top of the frame to the floor. Note this measurement as well.
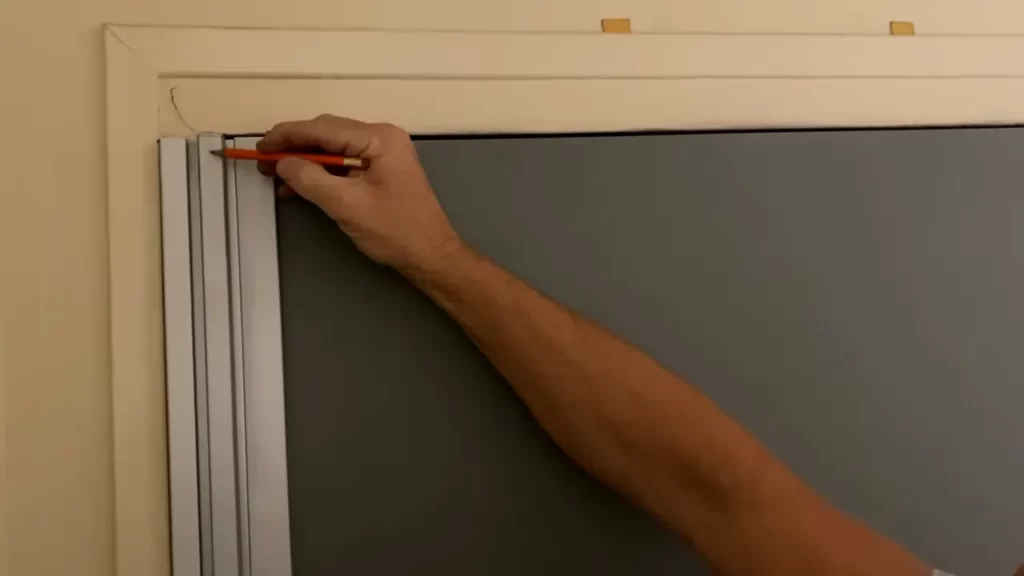
- After measuring, mark the spots on both the door and frame where the door closer will be installed. Use a pencil to make clear and visible markings. Ensure that the markings are aligned vertically for proper installation.
Ensuring proper alignment and clearance
Proper alignment and clearance play a crucial role in the effective functioning of a door closer. These steps will help you achieve the necessary alignment and clearance:
- Ensure that the door and frame are properly aligned. This can be done by checking if the markings made in the previous step are vertically aligned. Any misalignment should be corrected before proceeding.
- Check for any obstructions or obstacles around the door and frame, such as protruding hinges or uneven surfaces. These may prevent the door closer from operating smoothly. Make sure to remove or address any such obstructions.
- Test the opening and closing of the door several times to ensure proper clearance. The door should open and close without any resistance or interference from the door frame or any other surrounding elements.
- If there are any clearance issues or alignment problems, make the necessary adjustments to the door, frame, or door closer as needed. Expect some trial and error during this process, but patience and attention to detail will result in a properly functioning door closer.
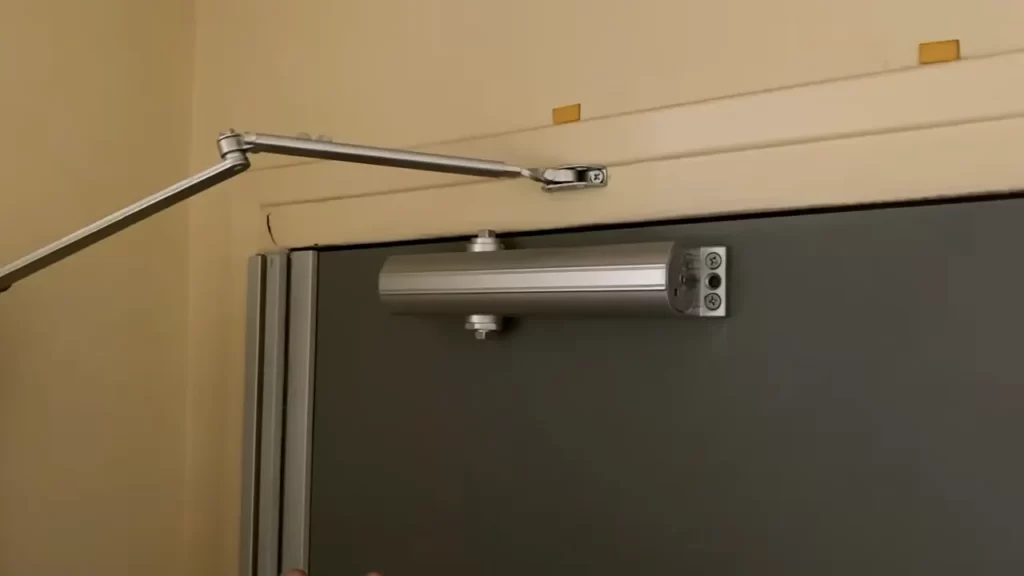
Installing The Door Closer Body
Installing a door closer is an essential step in ensuring the security and functionality of your door. The door closer body is a crucial component that controls the opening and closing speed of the door, providing you with convenience and peace of mind. In this section, we will guide you through the process of mounting the door closer body on the door frame and attaching the arm and arm shoe to the door.
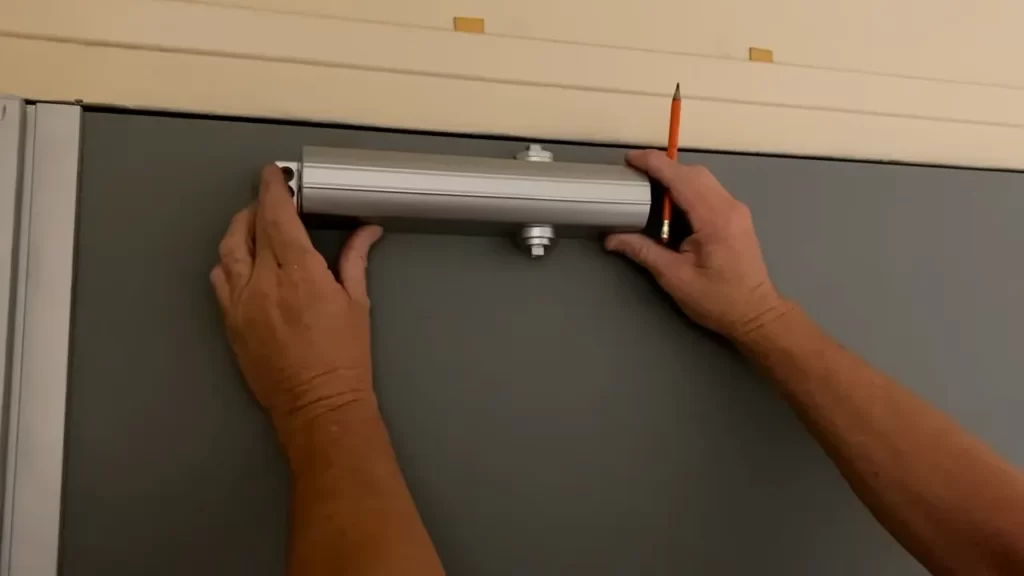
Mounting the Door Closer Body on the Door Frame
Mounting the door closer body on the door frame is the first step in installing the door closer. Follow these steps:
- Start by choosing the appropriate location for the door closer body on the door frame. Ideally, it should be positioned at the top of the door, centered between the jamb and the edge of the door.
- Using a pencil, mark the screw holes of the door closer body on the door frame. Ensure that the marks are accurate and aligned.
- Pre-drill the screw holes on the door frame, making sure to use an appropriate size drill bit. This will prevent any damage to the door frame and ensure a secure attachment.
- Align the holes of the door closer body with the pre-drilled holes on the door frame.
- Secure the door closer body to the door frame by inserting the screws through the holes and tightening them using a screwdriver. Ensure that the door closer body is firmly attached to the door frame.
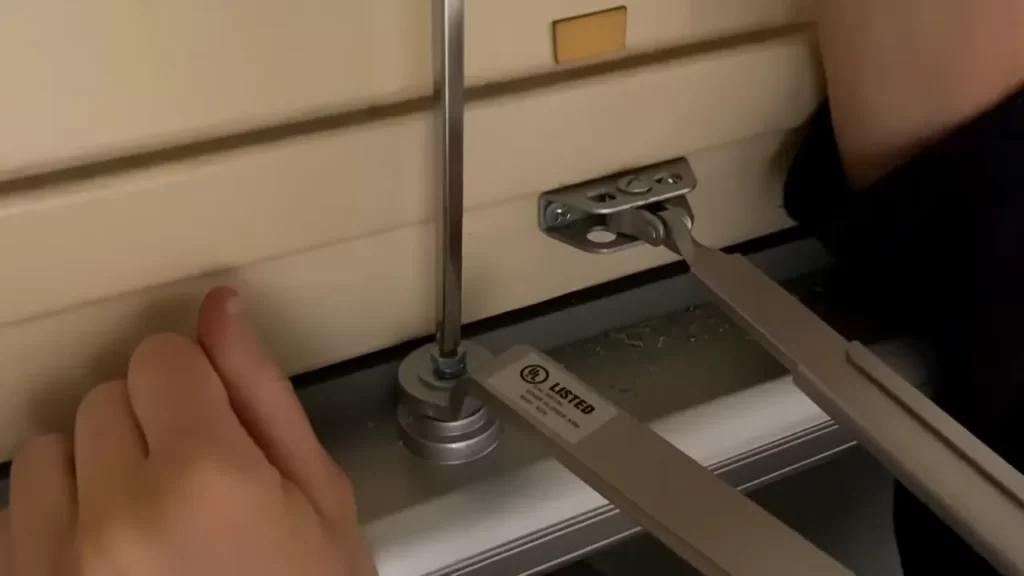
Attaching the Arm and Arm Shoe to the Door
Once the door closer body is securely mounted on the door frame, the next step is to attach the arm and arm shoe to the door. Follow these steps:
- Start by positioning the arm shoe on the top of the door, approximately 12 inches from the hinge side. The arm shoe should be centered on the top of the door.
- Using a pencil, mark the screw holes of the arm shoe on the top of the door. Ensure that the marks are accurate and aligned.
- Pre-drill the screw holes on the top of the door, making sure to use an appropriate size drill bit. This will prevent any damage to the door and ensure a secure attachment.
- Align the holes of the arm shoe with the pre-drilled holes on the top of the door.
- Secure the arm shoe to the top of the door by inserting the screws through the holes and tightening them using a screwdriver. Ensure that the arm shoe is firmly attached to the door.
- Attach the arm to the arm shoe by connecting the two using the provided screws or bolts. Make sure to tighten them securely.
By following these simple steps, you can successfully install the door closer body, allowing your door to function smoothly and securely. Now that the door closer body is installed, it’s time to move on to the next step – adjusting the door closer to meet your specific needs.
Adjusting And Testing The Door Closer
Adjusting and testing the door closer is an important step to ensure proper functionality and performance. By making adjustments to the tension and speed of the door closer, you can optimize its operation and enhance the overall experience of using the door. In this section, we will guide you through the process of adjusting and testing the door closer, ensuring that it meets your specific needs and requirements.
Adjusting the tension and speed of the door closer
One of the first steps in adjusting a door closer is to fine-tune the tension. The tension of the door closer determines how much force is required to open and close the door. To adjust the tension, locate the adjustment screw usually located on the end of the cylinder body.
Using a screwdriver, rotate the adjustment screw clockwise to increase the tension or counter-clockwise to decrease it. Start with small adjustments, testing the door after each one until you achieve the desired tension.
Testing the functionality and performance of the door closer
Once you have adjusted the tension, it is crucial to test the functionality and performance of the door closer. Doing so ensures that it operates smoothly and effectively.
Here are some steps to test the door closer:
- Stand inside the doorway and open the door to a 90-degree angle.
- Release the door and observe its movement. It should close smoothly and latch securely.
- If the door closes too quickly or slowly, adjust the speed accordingly. Locate the speed adjustment valve, typically found at the end of the door closer body.
- Using a screwdriver, turn the speed adjustment valve clockwise to slow down the closing speed or counter-clockwise to increase it. Make small adjustments and test the door after each one.
- Repeat the test until the door closes at a desirable speed.
In addition to adjusting the speed, it is important to make sure the door closer is properly lubricated. Apply a small amount of lubricant to the moving parts and hinges to ensure smooth operation.
Lastly, check the alignment of the door closer. Make sure it is installed correctly and securely.
By following these steps, you can adjust and test the door closer to ensure optimal performance. Remember to make small adjustments and test the door after each one to achieve the desired tension and speed. Regular maintenance and testing will help extend the lifespan of the door closer and maintain its functionality over time.
Door Not Closing Or Latching Properly
If you find that your door is not closing or latching properly, it can be not only inconvenient but also a security risk for your home or business. A door closer is an essential component to ensure that doors automatically close and latch securely. However, if your door closer is not functioning as it should, it’s important to identify the possible causes and troubleshoot the issue. In this article, we will explore some common reasons why doors may not be closing or latching properly and provide a step-by-step troubleshooting guide to help you fix the issue.
Possible causes of improper door closure
There are several potential causes for a door not closing or latching properly. By identifying the underlying issue, you can address it effectively and restore the functionality of your door closer. Here are some common causes to consider:
- Misalignment of the door: If the door is not aligned correctly with the frame, it can result in improper closure. Inspect the hinges and ensure they are securely attached and properly aligned.
- Incorrect tension settings: Door closers have adjustable tension settings to control the speed and force with which the door closes. If the tension settings are too loose or too tight, it can affect the door’s ability to close properly. Check the manufacturer’s instructions for your specific door closer to adjust the tension settings accordingly.
- Damaged or worn-out components: Over time, the various components of a door closer, such as springs, seals, or the piston, can become damaged or worn out. Inspect these components for any signs of wear or damage and replace them if necessary.
- Obstructions or debris: Objects or debris near the door or in the door closer mechanism can interfere with its proper functioning. Clear any obstructions and clean the door closer mechanism to ensure smooth operation.
Step-by-step troubleshooting guide to fix the issue
Now that we have identified some possible causes for your door not closing or latching properly, let’s go through a step-by-step troubleshooting guide to help you fix the issue:
- Inspect the door alignment: Check if the door is properly aligned with the frame. If it appears misaligned, adjust the hinges to ensure proper alignment.
- Adjust the tension settings: Refer to the manufacturer’s instructions for your door closer to locate the tension adjustment screws. Gradually tighten or loosen these screws to find the optimal tension for your door closer.
- Check for damaged components: Examine the various components of the door closer for any signs of wear or damage. Replace any damaged or worn-out parts with compatible replacements.
- Remove obstructions and clean: Clear any objects or debris near the door or in the door closer mechanism that may be hindering its proper operation. Clean the door closer mechanism using a soft brush and lubricate any moving parts as recommended by the manufacturer.
- Test the door closer: After making the necessary adjustments and repairs, test the door closer by opening and closing the door multiple times. Ensure that it closes smoothly and latches securely.
By following these troubleshooting steps, you should be able to address the issue of a door not closing or latching properly. However, if the problem persists or you are unsure about any step, it’s always recommended to consult a professional who can provide specialized assistance and ensure the proper functioning of your door closer.
Noisy Or Squeaky Door Closer
Identifying the source of the noise
If your door closer is making noise or squeaking, it can be quite bothersome. Identifying the source of the noise is the first step toward fixing the problem. Here are a few potential culprits to check:
- Loose screws: Inspect the screws that hold the door closer in place. If any appear loose, tighten them using a screwdriver.
- Lack of lubrication: Over time, the moving parts of a door closer can become dry and start to squeak. Check for any signs of dryness or friction.
- Damaged or worn-out components: Examine the door closer for any damages or signs of wear and tear. Pay attention to the arm, spring, and piston assembly.
- Misalignment: A misaligned door closer can also create noise. Check if the closer is properly aligned with the door and frame.
Solutions to eliminate the noise and ensure smooth operation
Once you’ve identified the source of the noise, it’s time to eliminate it and ensure smooth operation. Here are some solutions to help silence your noisy door closer:
- Lubrication: Apply a silicone-based lubricant to the moving parts of the door closer. This will help reduce friction and eliminate the noise. Be sure to follow the manufacturer’s instructions on how to properly lubricate the door closer.
- Tightening screws: If loose screws were the source of the noise, tighten them using a screwdriver. Ensure that all screws are securely fastened.
- Replacement of damaged components: If you noticed any damaged or worn-out components during the inspection, consider replacing them. Contact a professional if needed.
- Realigning the door closer: If misalignment was the issue, you’ll need to realign the door closer. Follow the manufacturer’s instructions or seek professional assistance to ensure proper alignment.
By addressing the source of the noise and implementing these solutions, you can eliminate the annoying squeaks and ensure that your door closer operates smoothly. Regular maintenance and inspections can help prevent future issues, keeping your door functioning properly for years to come.
Door Closer Maintenance And Care
Maintaining and caring for your door closer is essential to ensure its optimal performance and longevity. By following regular maintenance practices, cleaning, and lubrication, you can extend the lifespan of your door closer and avoid costly repairs or replacements in the future. In this section, we will explore various maintenance techniques to keep your door closer working smoothly.
Regular Maintenance Practices to Extend the Lifespan of the Door Closer
Regular maintenance practices are crucial for ensuring the longevity of your door closer. By incorporating these simple yet effective practices into your routine, you can prevent the need for premature repairs or replacements.
- Check for any loose or damaged screws or bolts. Tighten or replace them if necessary to ensure proper functioning.
- Inspect the door closer regularly for any signs of wear and tear, such as cracks or dents. If you notice any damage, consider replacing the door closer to avoid further complications.
- Test the door closer regularly by opening and closing the door. Ensure that it closes smoothly and securely without any resistance or slamming. If you notice any issues, such as the door closing too slowly or too quickly, it may require adjustment.
Cleaning and Lubricating the Components for Optimal Performance
To maintain optimal performance, it is crucial to clean and lubricate the components of your door closer regularly. This helps prevent the accumulation of dirt, dust, or debris, which can hinder its smooth operation.
- Start by cleaning the exterior of the door closer using a mild soap or detergent solution and a soft cloth. Gently remove any dirt or grime, ensuring not to use abrasive materials that can damage the surface.
- Next, focus on cleaning the internal components of the door closer. Carefully remove the cover or housing to access the mechanism. Use a brush or compressed air to remove any dust or debris that may have accumulated.
- After cleaning, apply a suitable lubricant to all moving parts as per the manufacturer’s recommendations. This will ensure smooth and effortless operation.
By performing regular maintenance and cleaning, as well as proper lubrication, you can keep your door closer in optimal condition and extend its lifespan. Incorporate these practices into your routine to enjoy a smoothly functioning door closer for years to come.
Recap Of The Installation Process And Key Points
Summarizing the step-by-step guide to installing a door closer
Installing a door closer is an essential step in ensuring the proper functioning and security of your doors. In this recap, we will go over the key points of the installation process to give you a clear understanding of how to install a door closer correctly.
- Gather the necessary tools: Before beginning the installation, make sure you have all the required tools including a drill, screwdriver, tape measure, and level.
- Prepare the door: Measure the height of the door and mark the appropriate location for the door closer. Use a level to ensure the marking is straight.
- Drill the holes: Using a drill, create holes at the specified locations for the door closer and mounting brackets. Make sure the holes are the appropriate size for the screws.
- Install the brackets: Attach the mounting brackets to the door frame using the screws provided. Ensure they are securely fastened.
- Attach the door closer: Align the door closer with the mounting brackets and secure it using the screws provided. Check that the closer is functioning properly.
- Adjust the tension: Use the adjustment screws on the door closer to fine-tune the tension and speed at which the door closes. Test the door to ensure it closes smoothly.
Highlighting the importance and benefits of proper door closer installation
Proper installation of a door closer is crucial for both security and convenience purposes. When a door closer is installed correctly, it offers the following benefits:
- Enhanced security: A properly installed door closer ensures that the door closes securely and locks properly, preventing unauthorized access.
- Safety: A door closer prevents doors from slamming shut, reducing the risk of finger injuries and damage to the door frame.
- Convenience: A door closer allows the door to close automatically, eliminating the need for manual closing and ensuring that the door is always closed when not in use.
- Energy efficiency: By ensuring that doors are closed tightly, a door closer helps to maintain the internal temperature of a room, resulting in energy savings and reduced heating or cooling costs.
- Longevity of the door: Properly installed door closers distribute the weight of the door evenly, preventing premature wear and tear on the hinges and other components.
By understanding and following the installation process and ensuring the proper installation of a door closer, you can reap these benefits and enjoy the convenience and security it provides.
Encouragement To Take Action And Install A Door Closer
If you’re looking to enhance the security and safety of your home or business, installing a door closer is a simple yet effective solution. Not only does a door closer provide a convenient and hands-free way of closing the door behind you, but it also adds an extra layer of protection against potential intruders. Additionally, a door closer ensures that your door functions smoothly and reduces the risk of damage from slamming or improperly closed doors.
Emphasizing the value of door closer installation for security and safety
Security and safety are paramount when it comes to your home or business. By installing a door closer, you are taking proactive measures to protect your property and the people within it. A door closer ensures that when the door is closed, it latches securely and eliminates any gaps that might allow unwanted access. This added security feature can deter intruders and give you peace of mind knowing that your property is more secure.
Moreover, a door closer helps prevent accidental injury by reducing the risk of doors slamming shut unexpectedly. This is particularly important in high-traffic areas or spaces where children or elderly individuals may be present. With a door closer, you can create a safe and welcoming environment for everyone.
Motivating readers to follow the provided guide and enhance their door functionality
If you’re looking to enhance the functionality of your doors, following a step-by-step guide to install a door closer is the way to go. Whether you’re a DIY enthusiast or simply looking to save money on professional installation, the process is straightforward and can be done with basic tools and minimal effort.
By installing a door closer, you’ll notice an immediate improvement in the smoothness and ease of opening and closing your doors. No more struggling with heavy doors or dealing with doors that swing shut too quickly. With a properly installed door closer, you can enjoy the convenience of hands-free operation and effortless door control.
So why wait? Take action today and install a door closer to enhance the security, safety, and functionality of your doors. Follow our guide below for a seamless installation process and experience the benefits firsthand.
Frequently Asked Questions Of How To Install A Door Closer
Are Door Closers Easy To Install?
Yes, door closers are easy to install.
What Is The Common Problem Of Door Closer?
The common problem of a door closer is it may not close fully or it might slam shut too quickly.
How Do You Install A Spring Door Closer?
To install a spring door closer: 1. Measure and mark the correct placement on the door and the frame. 2. Attach the closer bracket to the door with screws. 3. Attach the arm to the closer bracket and adjust the tension.
4. Secure the other end of the arm to the frame. 5. Test the door to ensure it closes smoothly. Remember to follow the manufacturer’s instructions for your specific door closer.
How Do You Install An Automatic Door Closer Hinge?
To install an automatic door closer hinge, follow these steps: 1. Choose a suitable hinge based on your door’s weight and size. 2. Mark the locations for screw holes on both the door and frame. 3. Attach the hinge to the door with screws.
4. Align the hinge with the frame and mark the screw holes. 5. Secure the hinge to the frame using screws. Adjust tension as needed.
Can I Install A Door Closer Myself?
Yes, you can easily install a door closer by following a few simple steps and using basic tools.
What Tools Do I Need To Install A Door Closer?
To install a door closer, you will need a drill, screws, screwdriver, measuring tape, and a pencil.
Conclusion
Installing a door closer doesn’t have to be a daunting task. By following these step-by-step instructions, you can easily ensure the safety and convenience of your door. Remember to choose the right type of door closer based on your needs.
With proper installation, you can enjoy a well-functioning door closer that adds value to your space. Ensure proper maintenance to prolong its lifespan and keep your door in tip-top condition.