o install a door frame in a stud wall, first measure and mark the location of the frame, cut out the necessary opening in the wall, position the frame in the opening, secure it to the studs using screws or nails, and finally, test the door to ensure proper functionality. Installing a door frame in a stud wall requires careful planning and execution.
Whether you’re replacing an existing frame or adding a new one, this process involves measuring, cutting, and securing the frame in place. By following the steps outlined above, you’ll be able to install a door frame in a stud wall with ease.
In this guide, we will provide detailed instructions on how to achieve this, ensuring a sturdy and functional door frame that enhances the aesthetics and functionality of your space.
Understanding The Different Types Of Door Frames
When installing a door in a stud wall, it’s important to choose the right door frame to ensure a sturdy and secure fit. Door frames come in various materials, each with its own advantages and considerations. In this article, we will explore the different types of door frames and their features, so you can make an informed decision for your installation project.
Solid Wood Frames
Solid wood frames are a traditional and popular choice for door installations. These frames offer durability, natural beauty, and a classic look that can enhance the overall aesthetics of your space. Wood frames can be stained or painted to match the door or existing decor, providing flexibility in customization.
One of the main advantages of solid wood frames is their strength and stability. They provide a solid foundation for the door, ensuring it won’t warp or become loose over time. Wood frames also offer excellent insulation properties, helping to reduce noise and maintain a comfortable indoor temperature.
However, it’s important to note that solid wood frames require regular maintenance to keep them in good condition. They may be susceptible to moisture damage if not properly sealed, and they can be prone to termite infestations if not treated or protected.
Metal Frames
Metal frames have gained popularity in modern construction for their strength, durability, and low maintenance requirements. These frames are often made from steel or aluminum, offering exceptional resistance to wear, tear, and impact. Metal frames are also highly fire resistant, making them suitable for applications that require enhanced safety measures.
Another advantage of metal frames is their slim profile, which can give a contemporary and minimalist look to your doors. They are also resistant to moisture, rot, and pests, making them a suitable choice for areas prone to high humidity or termites.
However, it’s important to consider that metal frames may not provide the same level of insulation as solid wood frames. They can conduct heat and cold, which may affect the overall energy efficiency of your space. Additionally, metal frames may require professional installation due to their heavy and precise nature.
Composite Frames
Composite frames offer a combination of materials, typically combining wood fibers or particles with resins or plastics. These frames are designed to provide the best characteristics of both wood and metal frames, offering strength, durability, and low maintenance.
One of the main advantages of composite frames is their resistance to moisture, rot, and insects. They are less prone to warping or swelling compared to solid wood frames, making them a suitable choice for areas with high humidity or temperature fluctuations.
Composite frames also offer versatility in terms of design and customization. They can be molded to different shapes and sizes, allowing for unique and tailored installations. Additionally, composite frames can have insulation properties that are comparable to or even better than solid wood frames.
However, it’s important to note that composite frames may have a higher upfront cost compared to other types of frames. They may also require special tools or techniques for installation, which may require professional assistance.
Evaluating Your Stud Wall For Installation
Before installing a door frame in a stud wall, it’s essential to evaluate the wall’s suitability for the installation. This step is crucial to ensure a stable and secure door frame that will last for years to come. In this section, we will discuss two important aspects of evaluating your stud wall: checking the wall’s stability and measuring the door opening.
Checking the Wall’s Stability
The stability of the stud wall is essential for the proper installation of a door frame. Before proceeding, it’s crucial to inspect the wall for any signs of damage, such as cracks, warping, or rot. Here’s how you can assess the stability of your wall:
- Visually inspect the wall for any visible signs of damage. Look for cracks, bulges, or any other irregularities that may affect the installation.
- Tap the wall with a hammer or your knuckles to listen for any hollow or unusual sounds. A solid and stable wall will produce a firm and consistent sound.
- Use a level to check if the wall is plumb and straight. Place the level against different sections of the wall, both vertically and horizontally, to ensure there are no significant deviations.
If you notice any severe structural issues or instability, it’s recommended to consult a professional before proceeding with the installation. Addressing any problems beforehand will save you time, money, and potential future issues.
Measuring the Door Opening
Accurate measurements are crucial when installing a door frame in a stud wall. Taking precise measurements will help you ensure that the door fits perfectly within the opening, allowing for smooth operation. Here’s a step-by-step guide on how to measure the door opening:
- Measure the width of the rough opening between the two vertical studs. Take three measurements: at the top, middle, and bottom of the opening. Use the smallest measurement to ensure a snug fit.
- Next, measure the height of the rough opening from the bottom of the sill to the top of the header. Again, take three measurements: on the left side, right side, and at the center. Use the smallest measurement to determine the correct door height.
- For added accuracy, consider deducting about 1/2 inch from the width and 1/4 inch from the height measurements. This slight adjustment allows for easier installation and ensures a proper fit.
Remember, accurate measurements are crucial for a seamless installation. Taking your time to measure correctly will prevent any potential issues down the line and guarantee a well-fitted door frame.
Removing The Existing Door Frame (If Applicable)
If you are replacing an old door or installing a new door in an existing stud wall, the first step is to remove the existing door frame. This process can be slightly challenging but with the right tools and a systematic approach, you can get the job done smoothly. In this section, we will guide you step by step on how to remove the existing door frame.
Tools and Equipment Needed
Before you begin the removal process, make sure you have the following tools and equipment:
- A claw hammer or pry bar
- A flathead screwdriver
- A utility knife
- A reciprocating saw
- Gloves and safety glasses
Step-by-Step Removal Process
- Start by removing the door itself. Open the door and locate the hinge pins. Place a screwdriver under the bottom of the hinge pin and tap it gently with a hammer to remove it. Repeat this process for all the hinge pins. Once the pins are removed, lift the door out of the frame and set it aside.
- Next, remove the door trim. Use a utility knife to cut through the paint or caulk between the trim and the wall. Insert a pry bar or flathead screwdriver between the trim and the wall, and gently pry the trim away from the wall. Work your way around the trim, gradually loosening it until it can be removed completely.
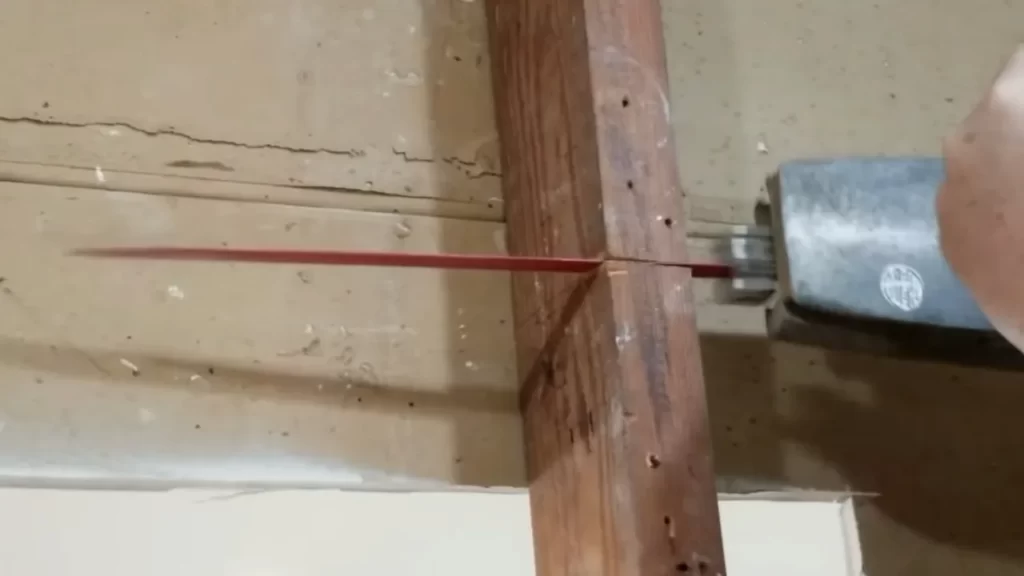
- After removing the trim, you will see the door frame attached to the rough opening. Use a reciprocating saw to cut through any nails or screws securing the frame to the studs. Start at the top of the frame and carefully cut through each attachment point, working your way down to the bottom. Take caution not to damage the surrounding wall or studs.
- Once all the attachments are cut, you can remove the door frame. Gently pull it away from the wall, ensuring that any nails or screws left in the studs are also taken out. Be careful not to damage the wall or surrounding area while removing the frame.
Marking The Door Opening On The Stud Wall
If you’re looking to install a door frame in a stud wall, one of the first steps is to mark the door opening on the wall. This is an important process that will ensure a proper and accurate installation. In this section, we’ll explore how to mark the door opening on the stud wall, with a focus on ensuring proper alignment and measurements. Let’s get started!
Ensuring Proper Alignment and Measurements
Before you begin marking the door opening on the stud wall, it’s important to ensure proper alignment and take accurate measurements. Here’s how you can do it:
Using a Level and Tape Measure
To ensure proper alignment, start by using a level and tape measure. This will help you create straight and level lines for your door opening. Here’s a step-by-step guide:
- Start by measuring the height of the door using a tape measure. Measure from the floor to the desired height of the door frame, and mark this measurement on both sides of the stud wall. Make sure the marks are level by using a level.
- Next, measure the width of the door frame using a tape measure. Measure from one side of the stud wall to the other, and mark this measurement at the top and bottom of the wall. Again, ensure the marks are level by using a level.
- Once you have marked the height and width of the door frame, you can connect the marks to create the outline of the door opening. Use a straight edge, such as a ruler or a piece of scrap wood, to connect the marks and create straight lines.
By using a level and tape measure, you can ensure that your door opening is properly aligned and accurately measured. This will help to ensure a smooth and successful installation of the door frame.
Gathering The Necessary Tools And Materials
Before you begin installing a door frame in a stud wall, it’s essential to gather all the necessary tools and materials. Having everything you need at the start will help you work efficiently and complete the job without any interruptions. In this section, we will provide you with a comprehensive list of tools and materials needed for a successful installation.
List of Tools Needed
Below is a list of tools that you will require for installing a door frame in a stud wall:
| Tool | Purpose |
|---|---|
| Measuring tape | To measure the dimensions accurately |
| Pencil | To mark the locations and measurements |
| Level | To ensure the door frame is straight and aligned correctly |
| Screwdriver | To tighten screws and fasteners |
| Hammer | To drive in nails or remove them if necessary |
| Chisel | To make adjustments and create a snug fit |
| Saw | To cut the door frame and trim it as needed |
| Drill | To create pilot holes and secure the frame |
Required Materials and Fasteners
In addition to the tools mentioned above, you will need several materials and fasteners for the installation. Here is a list of the essentials:
- Door frame kit
- 2×4 lumber for the wall studs
- Wood shims
- Finishing nails
- Screws
- Construction adhesive
- Wood putty
- Paint or stain
Make sure you have all the materials and fasteners ready so that you don’t have to pause midway through the installation process. With the necessary tools and materials at hand, you’ll be well-prepared to complete the project smoothly.
Now that you are equipped with the right tools and materials, let’s move on to the next section of this guide: Preparing the Stud Wall. Stay tuned!
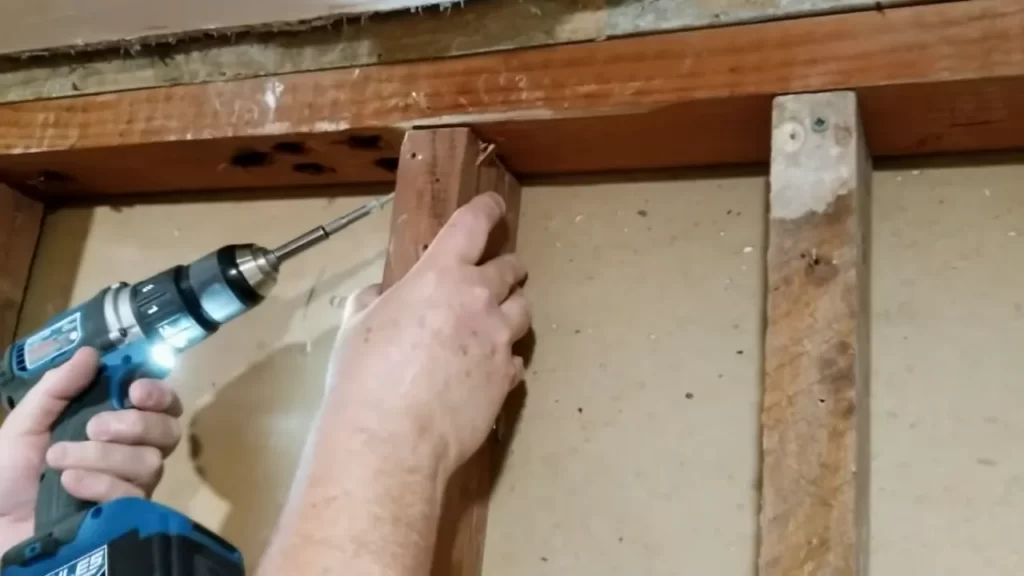
Attaching The Door Frame To The Stud Wall
Once you have positioned the door frame correctly in the stud wall, it’s time to secure it in place. This step is crucial to ensure that the door frame remains sturdy and properly aligned. When attaching the door frame, you have several options for fastening it to the studs, including using screws or nails. Let’s explore each option in detail:
Positioning the Frame
In order to properly attach the door frame to the stud wall, you need to make sure it is positioned correctly. Start by placing the frame in the rough opening, ensuring that it is plumb and level. Use a level to check both the vertical and horizontal alignment of the frame. Adjust the position of the frame as necessary until it is perfectly aligned. This will ensure that the door operates smoothly and closes securely.
Securing it with Screws or Nails
Once the door frame is properly positioned, you can secure it to the stud wall using either screws or nails. Both options have their advantages, so choose the one that you feel most comfortable working with or that best suits your specific project requirements. Here’s how to attach the door frame using each method:
Screws:
To attach the door frame using screws, start by pre-drilling pilot holes through the frame and into the studs. This will prevent the wood from splitting when you insert the screws. Next, using a drill or screwdriver, insert the screws through the pre-drilled holes and into the studs. Make sure to drive the screws in snugly, but be careful not to overtighten and strip the wood or damage the frame.
Nails:
If you prefer to use nails, you will need a hammer and nails that are long enough to securely penetrate the frame and studs. Position the frame and align it as mentioned earlier. With the frame in place, gently tap the nails into the frame and studs, ensuring a solid connection. Be mindful not to strike the nails too forcefully, as this can cause the wood to splinter or the frame to shift out of alignment.
Regardless of the method you choose, it’s important to evenly space out the screws or nails along the frame to ensure that it is securely attached to the stud wall. Additionally, check the alignment of the frame after each screw or nail is inserted to ensure it remains plumb and level.
Once all the screws or nails are in place, give the door frame a final inspection to make sure it is securely attached and properly aligned. Carefully test the door to ensure it opens and closes smoothly without any obstructions or misalignment.
That’s it! You have successfully attached the door frame to the stud wall. With the frame securely in place, you can proceed with installing the door and any additional finishing touches. Following these steps will help ensure a professional and long-lasting installation.
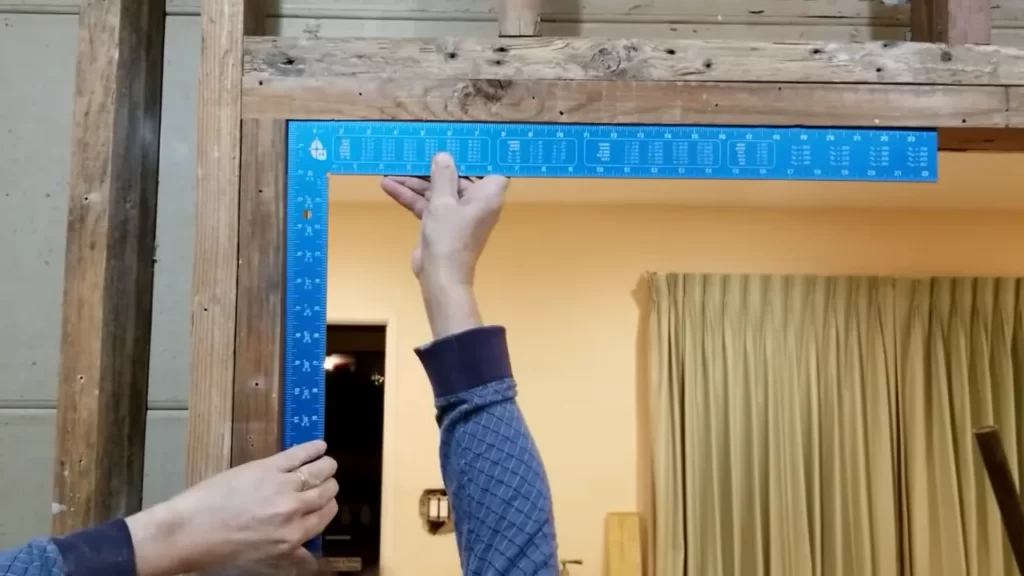
Ensuring Proper Alignment And Leveling
Proper alignment and leveling are crucial steps when installing a door frame in a stud wall. By ensuring that the frame is perfectly aligned and level, you can prevent issues such as door sticking or gaps between the frame and the wall. In this section, we will discuss two important aspects of ensuring proper alignment and leveling: using a level to check vertical and horizontal alignment, and making adjustments as needed.
Using a Level to Check Vertical and Horizontal Alignment
Before you start installing the door frame, it’s important to check both the vertical and horizontal alignment. This will ensure that the frame is straight and level, providing a solid foundation for the door. To check the vertical alignment, follow these steps:
- Place the level vertically against one side of the frame.
- Adjust the frame as necessary until the bubble in the level is centered.
- Move the level to the other side of the frame and repeat the process.
To check the horizontal alignment, follow these steps:
- Place the level horizontally on top of the frame.
- Adjust the frame as necessary until the bubble in the level is centered.
By using a level to check both the vertical and horizontal alignment, you can ensure that the door frame is straight and level, creating a properly functioning door.
Making Adjustments as Needed

After using a level to check the alignment of the door frame, you may need to make adjustments to ensure it is perfectly straight and level. Here are a few common adjustments you may need to make:
- If the frame is not vertically aligned, you can use shims to adjust it. Insert the shims between the frame and the studs to bring the frame into alignment.
- If the frame is not horizontally aligned, you may need to adjust the position of the frame using a pry bar or hammer. Carefully tap or pry the frame until it is level.
Remember to check the alignment with the level after each adjustment to ensure it is perfectly straight and level. Taking the time to make these adjustments will result in a door frame that functions properly and looks great.
Fill And Sand Any Gaps Or Holes In The Wood
Choosing the Right Filler Material
When installing a door frame in a stud wall, it is important to fill and sand any gaps or holes in the wood to ensure a seamless finish. The first step in this process is choosing the right filler material. There are several options available, each with its own advantages and disadvantages.
1. Wood Filler: Wood filler is a popular choice as it blends seamlessly with the surrounding wood. It can be sanded, painted, and stained to match the door frame. However, it is not as durable as some other filler materials and may shrink over time.
2. Spackle: Spackle is a lightweight filler that is easy to apply and dries quickly. It is ideal for filling small holes and cracks in the wood. However, it is not as strong as other fillers and may crack or crumble over time.
3. Epoxy Filler: Epoxy filler is a strong and durable option that can withstand heavy use. It is ideal for filling larger gaps and holes in the wood. However, it requires mixing and may be more difficult to work with than other fillers.
Sanding for a Smooth Finish
Once you have filled the gaps and holes in the wood, the next step is to sand the area for a smooth finish. Sanding not only removes any excess filler material but also helps to blend it with the surrounding wood. Here are some tips for sanding your door frame:
- Start with coarse sandpaper to remove any large bumps or uneven surfaces.
- Progress to finer grit sandpaper to achieve a smooth and even finish. Sand in the direction of the wood grain for the best results.
- Use a sanding block or a sanding sponge to evenly distribute the pressure and avoid creating low spots or grooves.
- Clean the sanded area with a damp cloth or vacuum to remove any dust or debris.
By following these steps, you can ensure that your door frame is properly filled and sanded, resulting in a seamless and professional-looking installation.
Installing The Door Into The Frame
After successfully installing the door frame into the stud wall, the next important step is to install the door itself into the frame. This step requires accuracy and precision to ensure a proper fit and functionality. In this section, we will guide you through the process of installing the door into the frame, including taking accurate measurements and hanging the door while adjusting for the proper swing.
Taking Accurate Measurements
Before installing the door, it is crucial to take accurate measurements to ensure a perfect fit. Here are the steps to follow:
- Measure the width and height of the door frame with a tape measure. Double-check the measurements to ensure accuracy.
- Subtract a small amount, typically 1/8 inch, from both the width and height measurements. This allows room for the door to swing freely without rubbing against the frame.
- Use a pencil to mark the measurements on the door itself, taking care to mark the hinge-side and top of the door correctly.
- Using a straightedge or level, draw lines connecting the marks on the door to create a guideline for cutting.
Hanging the Door and Adjusting for Proper Swing
Once the measurements have been taken and the door has been marked and cut to size, it is time to hang the door and adjust it for the proper swing. Follow these steps:
- With the help of a friend or a door installation kit, position the door in the frame with the hinge side against the frame.
- Insert the hinge pins into the hinge plates, securing the door to the frame. Ensure that the door swings freely without any obstructions.
- Check the door swing by opening and closing it. If the door swings properly and is aligned with the door frame, move on to the next step.
- Using shims, adjust the door until it is level and plumb. Place shims between the door frame and the stud wall as necessary, ensuring a balanced and straight installation.
- Secure the door frame to the stud wall using screws or nails, starting from the bottom and working your way up.
- Test the door swing one final time to ensure it opens and closes smoothly. Make any necessary adjustments to the hinges or shims if needed.
By following these steps, you can install a door into the frame of a stud wall with precision and accuracy. Proper measurements and adjustments are key to ensuring a functional and aesthetically pleasing door installation. Now that your door is securely in place, you can move on to finishing touches such as adding the hardware and applying a coat of paint or stain.
Testing And Adjusting The Door For Proper Functionality
Testing and adjusting the door for proper functionality is an essential step in the door frame installation process. Once the door frame is securely attached to the stud wall, it’s important to ensure that the door opens and closes smoothly, without any hitches or sticking points. In this section, we will explore how to check for a smooth opening and closing, as well as how to make necessary adjustments to the hinges or latch.
Checking for Smooth Opening and Closing
To begin, carefully open and close the door several times to determine if it moves smoothly within the door frame. Pay close attention to any resistance or dragging sensation that may indicate misalignment or an uneven fit. Here are some steps to consider:
- Start by standing in front of the doorway and gently push the door open. Observe if it swings freely without scraping against the floor or adjacent surfaces.
- If the door seems to bind or scrape against the floor, check if the hinge side of the door is plumb. Uneven gaps between the door and the frame can cause misalignment.
- Next, close the door and pay attention to how it engages with the latch. Does it latch easily and securely, or does it require excessive force? This will help determine if any adjustments need to be made to the latch.
Making Adjustments to the Hinges or Latch as Needed
If you encounter issues during the testing phase, such as uneven gaps, scraping, or difficulty latching the door, adjustments to the hinges or latch may be necessary. Here are some guidelines to follow:
- If the door scrapes against the floor or adjacent surfaces, check the hinges for alignment. Use a level to ensure the hinges are straight and adjust as needed to correct any misalignment.
- In some cases, shimming the hinges may be necessary to properly align the door within the frame. This can be done by adding thin wooden shims behind the hinge plates until the door moves smoothly without scraping.
- If the latch requires excessive force to engage or disengage, the latch plate may need adjustment. Loosen the screws holding the plate in place and slightly reposition it until the latch aligns with the strike plate.
- After making any adjustments to the hinges or latch, repeat the door testing process to ensure the issue has been resolved. Continue fine-tuning as necessary until the door opens and closes smoothly without any resistance.
By carefully testing and adjusting the door for proper functionality, you can ensure a seamless and functional door installation. Remember to check for a smooth opening and closing, making any necessary adjustments to the hinges or latch along the way.
Frequently Asked Questions Of How To Install A Door Frame In A Stud Wall
Can You Put A Door In A Stud Wall?
Yes, you can put a door in a stud wall. The studs provide structural support for the wall and allow for the installation of a door frame. A professional can help ensure that the door is properly installed and aligned within the stud wall.
How Do You Frame A Door Opening In The Wall?
To frame a door opening in a wall, you need to measure the desired width and height of the door. Then, using a stud finder, locate the studs on the wall where you want the door to be. Mark the outline of the door and remove the drywall within the marked area.
Install a door frame, ensuring it is level and plumb. Finally, hang the door on the frame and make any necessary adjustments for proper fit.
How Much Gap Do You Need For A Stud Wall Door?
You need a gap of about 2 inches (5 cm) for a stud wall door.
Can I Install A Door Without A Frame?
Yes, it is possible to install a door without a frame. However, it is recommended to have a frame to ensure proper installation, stability, and functionality of the door. Having a frame helps to secure the door and improves its overall performance.
How Do You Install A Door Frame In A Stud Wall?
To install a door frame in a stud wall, measure and mark the door opening, cut the studs to create the rough opening, install the header and cripple studs, insert the door frame, secure it with screws, and check for plumb and level.
What Tools Do You Need To Install A Door Frame In A Stud Wall?
To install a door frame in a stud wall, you will need a tape measure, stud finder, circular saw, reciprocating saw, hammer, chisel, screwdriver, level, drill, and screws.
Conclusion
Installing a door frame in a stud wall is a straightforward process that requires careful planning and precise measurements. By following the step-by-step instructions provided in this guide, you can successfully complete this task with ease. Remember to use the right tools, take your time, and pay attention to detail.
With a little patience and determination, you’ll have a perfectly installed door frame that adds functionality and aesthetics to your space. Happy building!