To install a door frame kit, first, measure and mark the desired height and width of the opening. Then, assemble the frame components according to the manufacturer’s instructions, secure it in place using screws or nails, and ensure it is level and plumb before attaching the door.
Factors To Consider Before Making A Purchase
When installing a door frame kit, there are several factors that you should consider before making a purchase. These factors can greatly impact the success and longevity of your installation. By carefully evaluating these aspects, you can ensure that you choose the right door frame kit for your needs. In this article, we will discuss three key factors that should be taken into consideration: measurements and compatibility, material and durability, and design and aesthetics.
Measurements and Compatibility
The first factor to consider before purchasing a door frame kit is the measurements and compatibility. It is crucial to measure the door opening accurately to ensure a proper fit. Taking incorrect measurements can result in a door frame kit that is either too big or too small for the opening. This can lead to difficulties during installation and may require additional modifications.
Another aspect of compatibility is the type of door that the frame kit is designed for. Different doors require different frame types, such as interior doors, exterior doors, or sliding doors. It is vital to choose a frame kit specifically designed for the type of door you are installing to ensure a secure and functional fit.
Material and Durability
The second factor to consider is the material and durability of the door frame kit. Door frame kits are available in various materials, including wood, metal, and composite materials. Each material has its own advantages and disadvantages, so it is important to choose one that suits your specific needs.
For example, wood frames offer a classic and natural look, but they may require more maintenance and can be susceptible to warping and rotting over time. On the other hand, metal frames are highly durable, but they may not be as aesthetically pleasing as wood frames.
Additionally, consider the durability of the frame in relation to its intended use. If you are installing a door in a high-traffic area or in an environment with harsh weather conditions, you will need a more robust and weather-resistant frame to ensure long-lasting performance.
Design and Aesthetics
The third factor to consider is the design and aesthetics of the door frame kit. The frame you choose should complement the overall style and architecture of your space. Whether you prefer a modern, minimalist look or a traditional, ornate design, there are door frame kits available in various styles to suit your aesthetic preferences.
Consider the finish options available for the frame kit as well. Some kits come unfinished, allowing you to customize the color or apply a specific stain or paint to match your interior or exterior decor. Others come pre-finished in a specific color or pattern, saving you time and effort in the finishing process.
Overall, by carefully considering the measurements and compatibility, material and durability, and design and aesthetics of a door frame kit, you can make an informed purchase decision. Taking the time to evaluate these factors will ensure a successful installation and a frame that meets your functional and aesthetic requirements.
Measuring And Marking The Door Opening
Tools You Will Need
Before you begin installing a door frame kit, make sure you have the necessary tools on hand. Here are the essential tools you will need:
- Measuring tape
- Pencil or marker
- Level
- Saw (if necessary)
- Screws or nails (depending on the kit)
- Power drill or screwdriver
- Hammer
- Chisel (if necessary)
Determining the Correct Door Frame Kit Size
Before you can start marking the door opening for installation, it is crucial to determine the correct size of the door frame kit you need. To do this, follow these steps:
- Measure the height and width of the current door opening using a measuring tape. Be precise and record the measurements in inches.
- Consider any adjustments you might need to make. For example, if the flooring is thicker or thinner than standard, you may need to adjust the height of the door frame kit.
- Choose a door frame kit that matches the measurements you have taken. It’s always better to choose a slightly larger kit that you can trim down than to have a kit that is too small.
Marking the Door Opening for Installation
Once you have determined the correct size of the door frame kit, it’s time to mark the door opening for installation. Follow these steps:
- Start by removing the existing door and any trim or molding around the door opening.
- Using a level, draw a plumb line on both sides of the doorway. This will ensure that the door frame is properly aligned.
- Measure the height of the door opening and mark this measurement on the door frame kit. Use a saw to trim the kit to the desired height, if necessary.
- Position the door frame kit in the door opening, making sure it is level and plumb. Use shims if necessary to achieve proper alignment.
- Secure the door frame kit by driving screws or nails through the pre-drilled holes in the frame and into the wall studs. Be sure to countersink the fasteners to create a flush surface.
- Check the door frame for any gaps or unevenness. If necessary, use a chisel to make adjustments.
- Once the door frame is securely in place, you can proceed with hanging the new door according to the manufacturer’s instructions.
By following these steps and using the right tools, you can successfully measure and mark the door opening for installation of a door frame kit. Take your time and double-check your measurements to ensure a proper fit. With a little patience and attention to detail, you’ll have a functional and attractive door frame in no time!
Preparing The Door Opening
Before installing a door frame kit, it’s important to properly prepare the door opening. This involves removing any obstructions and accessories, cleaning and leveling the surface, and making necessary repairs. By following these steps, you’ll ensure a smooth and successful installation.
Removing Obstructions and Accessories
Before you can begin installing a door frame kit, it’s important to clear the door opening of any obstructions or accessories that may obstruct the installation process. These can include old doors, door frames, trim, or any other objects that may be in the way. To remove these obstructions, follow these steps:
- Remove the old door by taking out the hinge pins or unscrewing the hinges. Set the door aside in a safe place.
- If there is an existing door frame, carefully remove it by prying it away from the wall using a pry bar or hammer. Be cautious when removing trim or molding around the frame.
- Inspect the area for any other accessories or obstructions, such as hooks, brackets, or nails. Remove them using appropriate tools, making sure not to damage the surrounding surface.
Cleaning and Leveling the Surface
Once the obstructions and accessories have been removed, it’s important to clean and level the surface of the door opening. This will ensure a proper fit and a smooth installation. Follow these steps to clean and level the surface:
- Start by sweeping or vacuuming the area to remove any dust, dirt, or debris.
- Use a mild detergent or cleaner to wash the surface, removing any grime or grease. Rinse with clean water and allow it to dry completely.
- Inspect the surface for any unevenness or imperfections. Use a level to check for any sloping or uneven areas. If necessary, use a sander or filler to correct any unevenness and create a smooth surface.
Making Necessary Repairs
Before installing the door frame kit, it’s important to make any necessary repairs to the door opening. This includes fixing any damaged or rotten wood, filling in cracks or holes, and ensuring the structural integrity of the surrounding area. Here are some steps to follow:
- Inspect the door opening for any signs of damage or decay. Pay special attention to the corners, bottom edges, and any areas prone to moisture.
- If you find any damaged or rotten wood, remove it using a chisel or saw. Replace it with new, sturdy wood of the same dimensions.
- Fill in any cracks or holes in the surrounding area using a suitable filler or wood putty. Sand the filled areas smooth once dry.
- Check the structural integrity of the door opening, ensuring that it is secure and stable. Reinforce weak areas as needed.
By following these steps to prepare the door opening, you’ll ensure a solid foundation for the door frame kit installation. With a clean, level, and repaired surface, your new door frame will fit perfectly and function properly for years to come.
Assembling The Door Frame Kit
Assembling the door frame kit is an essential step in the installation process that ensures a sturdy and secure structure for your door. This step-by-step guide will walk you through the process of assembling the door frame kit, starting with identifying different components, following the manufacturer’s instructions for assembly, and securing joints and connections.
<h3>Identifying Different Components</h3>
Before you begin assembling the door frame kit, it’s important to familiarize yourself with the various components included. This will make it easier to follow the instructions and ensure that everything is in order. Here are some of the main components you may find in a typical door frame kit:
- Header: The horizontal piece at the top of the door frame that provides structural support.
- Vertical jambs: These are the side pieces of the door frame that hold the door in place.
- Sill: The bottom part of the door frame that provides a solid base for the door.
- Hinges: Metal pieces that allow the door to swing open and closed.
- Weatherstripping: Rubber or foam strips that help create a seal to prevent drafts and moisture from entering.
- Screws or nails: These are used to secure the different components together.
By identifying and familiarizing yourself with the different components, you’ll be better prepared for the assembly process and avoid confusion.
<h3>Following Manufacturer’s Instructions for Assembly</h3>
When it comes to assembling the door frame kit, it is crucial to follow the manufacturer’s instructions provided in the packaging or manual. The instructions will outline the specific steps and considerations for your particular door frame kit model. Here are some general guidelines that can help:
- Prepare your workspace: Clear any debris or obstructions from the area where you will be assembling the door frame kit.
- Lay out the components: Organize the various pieces and make sure they are easily accessible.
- Refer to the instructions: Follow the step-by-step guide provided by the manufacturer, ensuring you understand each step before proceeding.
- Use the right tools: Depending on the instructions, you may need a hammer, screwdriver, level, or other tools to complete the assembly.
- Double-check measurements: Take accurate measurements to ensure the frame will fit perfectly before securing the joints.
Remember, each door frame kit may have its own specific instructions, so always refer to the manufacturer’s guidelines to ensure a successful assembly.
<h3>Securing Joints and Connections</h3>
Securing the joints and connections is vital to create a solid and stable door frame. Here are some tips to ensure the joints and connections are secure:
- Align the components: Make sure the vertical jambs are properly aligned with the header and sill before securing them.
- Use fasteners: Depending on the door frame kit, you may need to use screws or nails to secure the joints. Follow the manufacturer’s recommendations for fasteners and placement.
- Check for stability: Once the joints have been secured, ensure that the frame is stable and level. Use a level to check for any potential adjustments that need to be made.
- Fill any gaps: If there are any gaps between the components, use a filler material to ensure a tight and solid connection.
By properly securing the joints and connections, you will create a sturdy door frame that can withstand everyday use and provide a polished finish to your installation.
Installing The Door Frame
Installing a door frame is an essential step in the process of hanging a new door. The door frame provides structural support and serves as the foundation for the door. It is crucial to ensure that the door frame is installed correctly to prevent any future problems with the door’s operation. In this section, we will walk you through the steps of positioning the frame in the door opening, aligning and leveling it, and securing it with screws or nails. Let’s get started!
Positioning the Frame in the Door Opening
The first step in installing the door frame is to position it correctly in the door opening. Before you begin, make sure the opening is clean and free of any debris that could interfere with the installation process. Here’s how you can position the frame:
- Place the door frame kit in the opening, ensuring that it is centered and level with the floor and adjacent walls.
- Measure the width of the opening to ensure that it matches the dimensions of the door frame. Make any necessary adjustments by trimming the frame if needed.
- Use shims to hold the frame in place, ensuring that it is plumb and square.
Aligning and Leveling the Frame
Once the frame is positioned, the next step is to align and level it to ensure that the door operates smoothly. Follow these steps to align and level the frame:
- Using a level, check the vertical alignment of the frame on both sides. Adjust the shims as necessary to bring the frame into plumb.
- Check the horizontal alignment of the frame using a level, making sure it is level across the top and bottom. Adjust the shims as needed to create a level frame.
- Ensure that the frame has a consistent reveal, which refers to the space between the door and frame on all sides. Adjust shims as required to maintain the desired reveal.
Securing the Frame with Screws or Nails
Once the frame is positioned, aligned, and leveled, the final step is to secure it in place using screws or nails. Here’s how to do it:
- Begin by pre-drilling holes in the frame at strategic points, such as the top, bottom, and sides.
- Insert screws or nails into the holes, securing the frame to the surrounding structure.
- Make sure the screws or nails are long enough to penetrate the frame and anchor it securely.
- Ensure that the frame remains plumb, square, and level throughout the securing process.
With these steps, you can successfully install a door frame kit. Take your time, follow each step carefully, and double-check your work to ensure a proper installation. Once the frame is securely in place, you can move on to hanging the door and completing the installation process.
Installing The Door
Once you have properly prepared the door frame and gathered all the necessary tools and materials, it’s time to move on to the next step: installing the door. This crucial step will ensure that your door functions properly and fits securely within the frame. Follow these instructions for a successful door installation.
Preparing the Door for Installation
Before hanging the door on the frame, it’s essential to properly prepare it. This entails removing any packaging materials, stickers, or labels that may be attached to the door. Use a mild detergent and warm water to remove any adhesive residue.
- Remove packaging materials, stickers, and labels from the door.
- Clean the surface of the door using warm water and mild detergent.
- Inspect the door for any imperfections or damage.
After cleaning the door, take a moment to inspect it for any imperfections or damage. Look for cracks, dents, or uneven surfaces. If you notice any issues, address them before proceeding with the installation.
Hanging the Door on the Frame
Once the door is properly prepared, it’s time to hang it on the frame. Follow these steps for a seamless installation:
- Position the door within the door frame, making sure it is centered and level.
- Securely hold the door in place while inserting the hinge pins into the hinges.
- Test the door to ensure smooth opening and closing.
When positioning the door within the frame, ensure that it is centered and level. This will prevent any binding or sticking when opening and closing the door. Once in position, hold the door securely while inserting the hinge pins into the hinges. This will allow the door to swing freely.
Adjusting the Door for Proper Fit
After hanging the door, it’s essential to check the fit and make any necessary adjustments to ensure proper functionality.
- Check the clearance between the door and the frame.
- Adjust the hinges if the door is not aligning correctly.
- Test the door again to ensure smooth operation.
Check the clearance between the door and the frame on all sides. There should be a consistent gap to allow for smooth operation. If you notice any misalignment, adjust the hinges accordingly. Test the door again to ensure it opens and closes smoothly.With these steps, you can easily install a door using a door frame kit. By taking the time to properly prepare the door, hang it securely on the frame, and make necessary adjustments, you can ensure a functional and aesthetically pleasing addition to your space.
Installing The Door Frame Accessories
Once you have successfully installed the door frame kit, the next step is to focus on installing the door frame accessories. These accessories include hinges, strike plates, and other components that are essential for the proper functioning of the door. In this section, we will walk you through the step-by-step process of installing these accessories, ensuring that your door frame is sturdy and secure.
Installing Hinges and Strike Plates
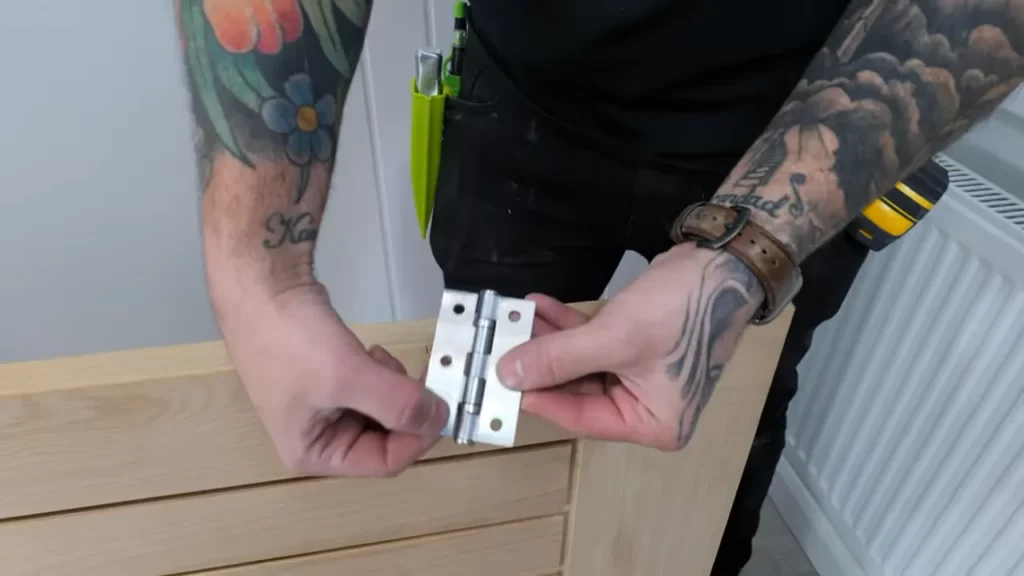
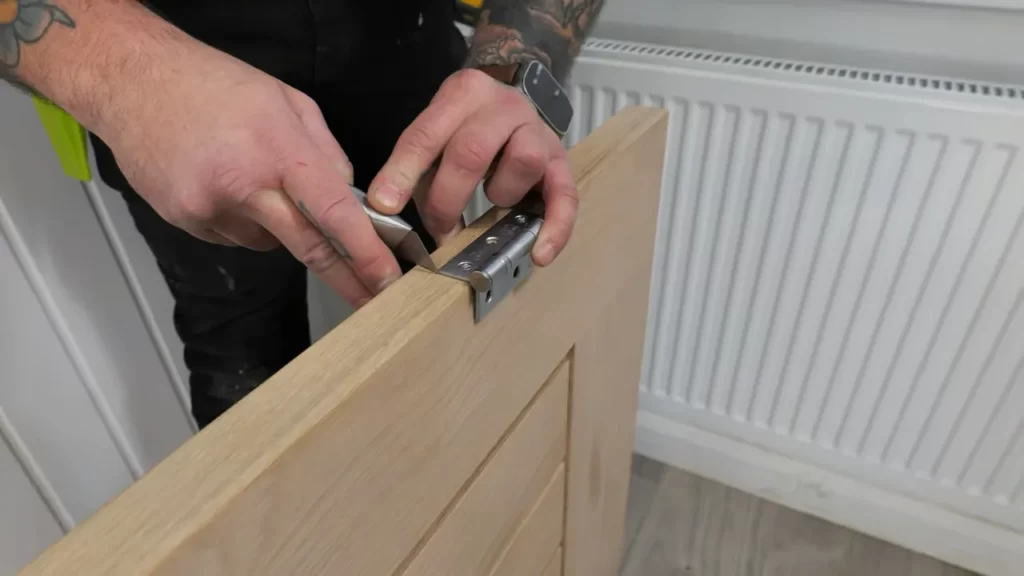
The first component you need to install is the hinges. Hinges play a crucial role in allowing the door to swing open and close smoothly. To install hinges, follow these simple steps:
- Place the door on a flat surface and mark the positions where the hinges will be attached.
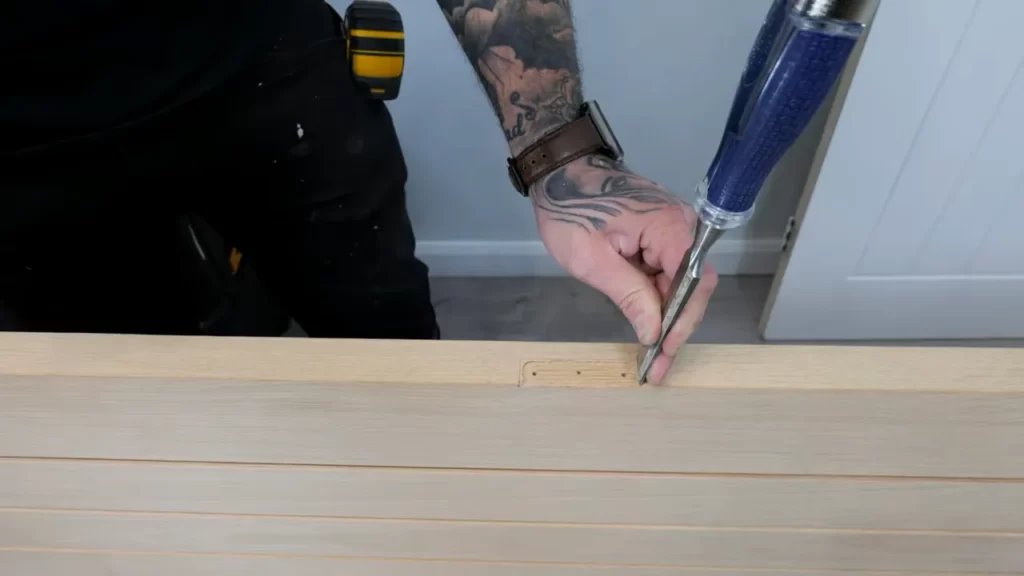
- Using a chisel, create shallow recesses at the marked positions.
- Secure the hinges in the recesses using screws, ensuring that they are flush with the door frame.
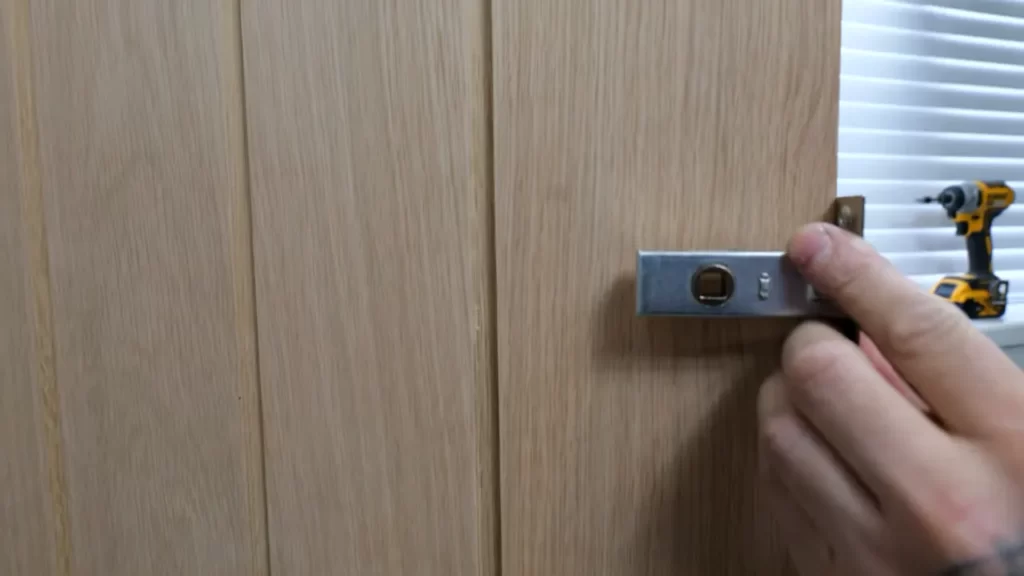
Next, you need to install the strike plates. These plates are responsible for the secure closure of the door. Here’s how you can install them:
- Position the strike plate on the door frame, aligning it with the door latch.
- Mark the screw holes and drill pilot holes at those markings.
- Secure the strike plate to the door frame using screws, ensuring a tight fit.
Adjusting and Aligning the Accessories
After installing the hinges and strike plates, it’s important to check their alignment and make necessary adjustments for optimal performance. Here are the steps to do so:
- Open and close the door multiple times to check if it swings smoothly without any obstruction.
- If you notice any sticking or resistance, carefully loosen the screws of the hinges and strike plates.
- Gradually adjust the position of the accessories until the door swings freely without any issues.
- Tighten the screws once you have achieved the desired alignment.
Testing the Door for Proper Functionality
Once you have installed and adjusted the door frame accessories, it’s crucial to test the door for proper functionality. Following these steps will help ensure that everything is working as intended:
- Close the door and check if it latches securely with the strike plate.
- Try opening and closing the door multiple times to ensure it operates smoothly.
- Check if the door is aligned properly with the door frame and there are no gaps.
- If you encounter any issues, make necessary adjustments until the door functions correctly.
By installing the hinges and strike plates correctly, adjusting and aligning the accessories, and testing the door for proper functionality, you can ensure a well-installed and functional door frame kit. Following these steps will not only enhance the appearance of your door but also provide you with security and peace of mind.
Filling Gaps And Sealing Gaps
One important step in installing a door frame kit is filling gaps and sealing gaps, which helps to ensure a tight and secure fit for the door. This not only improves the aesthetics but also helps to improve insulation and weatherproofing of the frame. In this section, we will discuss two effective methods for filling gaps and sealing gaps: using caulk or foam sealant, and ensuring proper insulation and weatherproofing.
Using Caulk or Foam Sealant
When it comes to filling gaps and sealing gaps around the door frame, caulk or foam sealant can be your best friends. These materials are versatile and easy to use, providing an effective barrier against air and moisture infiltration.
Here’s how you can use caulk or foam sealant to fill gaps and seal gaps:
- Clean the area: Before applying caulk or foam sealant, make sure the area around the gaps is clean and free from dust and debris. This will ensure better adhesion and a more secure bond.
- Choose the right caulk or foam sealant: There are different types of caulk and foam sealant available in the market. Choose the one that is suitable for your door frame material and the size of the gaps you need to fill.
- Apply caulk or foam sealant: Using a caulk gun or a foam dispenser, carefully apply caulk or foam sealant into the gaps around the door frame. Make sure to fill the gaps completely and evenly, without leaving any voids.
- Smooth the surface: After applying caulk or foam sealant, use a caulk smoothing tool or your finger (with a glove) to smooth the surface and remove any excess material.
- Allow it to cure: Follow the manufacturer’s instructions regarding the curing time of the caulk or foam sealant. Once cured, the material will provide a durable and long-lasting seal.
Ensuring Proper Insulation and Weatherproofing
In addition to using caulk or foam sealant, ensuring proper insulation and weatherproofing is essential for filling gaps and sealing gaps effectively. This helps to prevent drafts, reduce energy loss, and improve the overall comfort of your home.
Here are some tips to ensure proper insulation and weatherproofing:
- Check for gaps and cracks: Inspect the door frame carefully for any visible gaps or cracks that may compromise insulation and weatherproofing. These gaps can be filled with caulk or foam sealant as mentioned earlier.
- Install weatherstripping: Weatherstripping is a great way to seal any remaining gaps and cracks. Choose weatherstripping materials that are suitable for your door frame and provide a tight seal.
- Consider adding insulation: If the door frame lacks adequate insulation, you may want to consider adding insulation to improve energy efficiency. This can be done using foam insulation strips or expanding foam.
- Use door sweeps: Door sweeps are an effective way to seal the gap between the bottom of the door and the floor. Install them to prevent drafts and keep out insects and debris.
By following these steps and ensuring proper insulation and weatherproofing, you can fill gaps and seal gaps effectively, creating a well-insulated and weather-resistant door frame that will contribute to the overall comfort and energy efficiency of your home.
Painting Or Staining The Door Frame
Cleaning Up And Final Inspection
Removing Excess Material and Debris
Once you have successfully installed your door frame kit, it’s time to shift your focus to cleaning up the area and conducting a final inspection. This step is crucial as it ensures that your installation not only looks professional but also functions efficiently. The first task at hand is to remove any excess material and debris that may have accumulated during the installation process.
Start by checking for any loose nails, screws, or any other small particles that could hinder the proper functionality of your door frame. Using a broom or a vacuum cleaner, carefully sweep or suction away all the debris. Be thorough and make sure all corners and edges are cleaned.
Next, check for any excess material such as wood shavings, sawdust, or any other remnants that might be scattered around the installation area. Clear these away to ensure a clean and polished appearance. A clean installation not only enhances the visual appeal of your door frame kit but also reflects a high level of craftsmanship.
Checking for Proper Functionality and Appearance
With the area clean and free from debris, it’s time to move on to the next step – checking for proper functionality and appearance. This step is crucial as it ensures that your door frame kit is not only visually appealing but also serves its purpose effectively.
Start by standing back and visually inspecting the installation from various angles. Look for any visible signs of misalignment, gaps, or other imperfections. If you spot any issues, make a note of them to address them in the next step.
Next, carefully open and close the door several times, observing the movement and its alignment with the frame. Pay attention to any sticking points or resistance during the operation. A smoothly functioning door is crucial for a positive user experience.
Making Any Necessary Adjustments
After inspecting your door frame kit for functionality and appearance, it’s time to address any issues that may have arisen. These adjustments ensure that your installation not only looks perfect but also serves its intended purpose.
If you noticed any misalignment, gaps, or other imperfections during the visual inspection, take the necessary steps to correct them. This may involve sanding down rough edges, readjusting the frame, or adding additional support where needed. Be patient and meticulous in your adjustments to achieve optimal results.
Once you have made any necessary adjustments, it’s important to recheck the functionality and appearance to ensure that the changes have been effective. Repeat the process of opening and closing the door, observing any improvements or further adjustments needed. Taking the time to make these adjustments will ultimately result in a door frame kit that is not only visually appealing but also functions seamlessly for years to come.
Frequently Asked Questions Of How To Install A Door Frame Kit
How Do You Install A Door Jamb Kit?
To install a door jamb kit, start by removing the old door jamb. Next, measure and cut the new jamb to fit the door frame. Attach the top and side jambs using screws. Install the strike plate and hinges before hanging the door.
Finally, test the door to ensure proper functioning.
How Are Door Frames Attached?
Door frames are attached using screws or nails inserted into the pre-drilled holes in the frame and secured to the surrounding wall. The frame is leveled and shimmed to ensure proper alignment, then fixed in place with additional fasteners.
Is A Door Jamb The Same As A Door Frame?
Yes, a door jamb is the same as a door frame. They both refer to the vertical part of a door that holds it in place when closed.
Can You Replace A Door Frame Yourself?
Yes, you can replace a door frame yourself. Just follow step-by-step instructions and use proper tools.
How Much Does It Cost To Install A Door Frame Kit?
The cost of installing a door frame kit typically ranges from $100 to $300, depending on the complexity and materials used.
What Tools Do I Need To Install A Door Frame Kit?
To install a door frame kit, you will need basic tools such as a hammer, screwdriver, tape measure, level, chisel, and a drill.
Conclusion
Installing a door frame kit can seem daunting, but with the right tools and guidance, it can be a straightforward process. By following these step-by-step instructions, you can successfully install a door frame kit and enhance the appeal and functionality of any room.
Remember to measure accurately, secure the frame properly, and make any necessary adjustments. With patience and attention to detail, you’ll have a professionally installed door frame that will last for years to come.