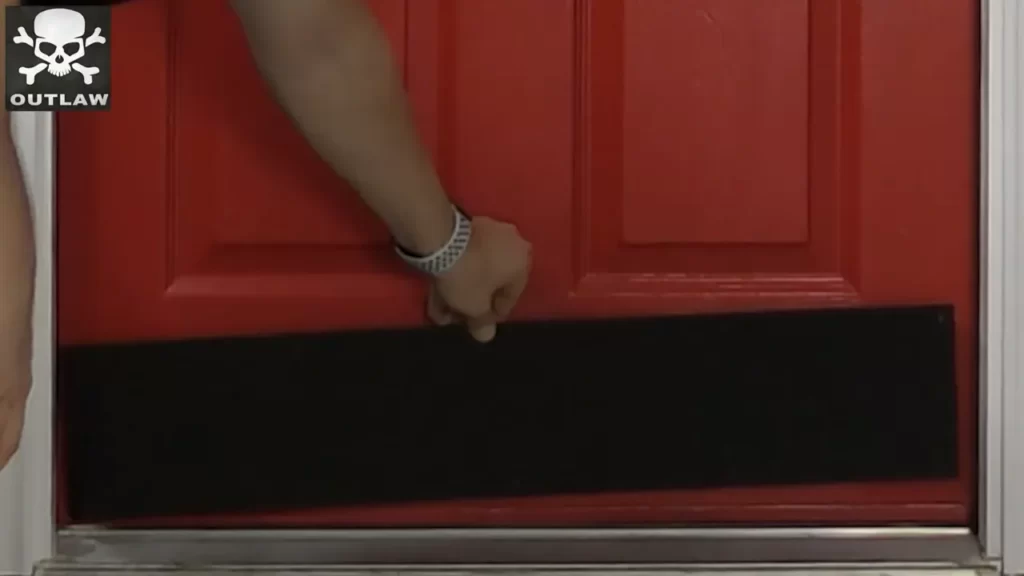
To install a door kick plate, measure the height and width of the door, align the kick plate at the bottom, mark the screw holes, drill pilot holes, and attach the kick plate using screws and a screwdriver. A door kick plate serves as a protective shield for the lower part of the door, preventing damage from daily foot traffic and adding a touch of style.
Installation is relatively straightforward and can be completed with a few basic tools. In this guide, we will walk you through the step-by-step process of installing a door kick plate, ensuring a secure and attractive addition to your door. Take note of the measurements, get your tools ready, and let’s get started on the installation of your door kick plate.
Factors To Consider Before Buying A Door Kick Plate
Installing a door kick plate not only enhances the appearance of your door but also provides protection against everyday wear and tear. However, before you make your purchase, there are a few important factors to consider to ensure you choose the right kick plate that suits your needs. These factors include the material and finish options, size and fit compatibility, as well as style and design considerations.
Material and Finish Options
The material and finish of your door kick plate are crucial aspects to consider, as they determine the durability, appearance, and overall functionality of the product. There are various options available, each with its own advantages. Some common materials for kick plates include:
- Stainless Steel: Known for its durability and resistance to corrosion, stainless steel kick plates are popular choices. They offer a sleek and modern look while providing excellent protection for your door.
- Brass: If you prefer a more traditional or antique look, brass kick plates are ideal. They have a warm, golden hue that adds a touch of elegance to your door.
- Aluminum: Lightweight and durable, aluminum kick plates are practical options. They are resistant to rust and scratches, making them suitable for high-traffic areas.
Additionally, consider the finish options available for each material, such as polished, brushed, or satin. The finish can significantly impact the overall aesthetics of your door kick plate.
Size and Fit Compatibility
Choosing the right size and fit for your door kick plate is essential to ensure proper installation and functionality. Measure the width and height of your door accurately, taking into account any existing hardware or trim. It’s recommended to select a kick plate that is slightly larger than the width of your door for optimal protection.
Moreover, consider the thickness of your door. Some kick plates are designed specifically for thicker doors, so it’s important to check the product specifications to ensure compatibility.
Style and Design Considerations
While the primary purpose of a door kick plate is to protect your door, it can also be a stylish addition to your overall door design. When choosing a kick plate, take into consideration the style and design of your door and surrounding decor. Here are a few design elements to consider:
- Pattern or Texture: Some kick plates come with patterns or textured surfaces that can add visual interest and uniqueness to your door.
- Engravings or Embossments: For a personalized touch, you can opt for engravings or embossments on your kick plate, such as your house number or a decorative motif.
- Matching Hardware: Coordinate your kick plate with other door hardware, such as doorknobs or hinges, to create a cohesive and visually pleasing look.
By considering these style and design aspects, you can ensure that your chosen kick plate complements your door and overall aesthetic vision.
Measuring And Determining The Correct Door Kick Plate Size
Installing a door kick plate not only adds a decorative touch to your door, but it also protects it from scuffs, scratches, and general wear and tear. However, to ensure a proper fit, it is essential to measure the width and height of your door accurately. In this section, we will guide you through the process of measuring and determining the correct door kick plate size.
Measuring the Width of the Door
Before selecting a kick plate for your door, it’s crucial to measure the width accurately. Follow these steps to get the correct measurement:
- Start by standing on the inside of your door.
- Using a measuring tape, measure the width of the door from one side to the other. Make sure to measure from the inner edge of the door frame.
- Round the measurement up to the nearest inch to ensure the kick plate covers the entire width of the door.
- Write down the width measurement for reference.
Measuring the Height of the Door
Next, let’s determine the height measurement of the door. Follow these steps:
- Stand on the inside of the door, just like before.
- Using the measuring tape, measure the height of the door from the top to the bottom. Make sure to measure from the inner edge of the door frame.
- Round the measurement up to the nearest inch to ensure the kick plate covers the full height of the door.
- Write down the height measurement for future use.
Choosing the Appropriate Kick Plate Size
Now that you have your measurements, it’s time to select the appropriate kick plate size. To do this, refer to the width and height measurements you took earlier.
Note: Kick plates are typically available in standard sizes, so you may need to adjust your measurements to find the closest match. It’s better to choose a kick plate that is slightly larger than your measurements to ensure full coverage.
If your door width measurement falls between two standard sizes, opt for the larger size to guarantee proper coverage. Similarly, if the height measurement is between two sizes, choose the taller option.
Remember, kick plates are meant to protect your door, so it’s better to have a slightly larger kick plate than one that leaves exposed areas vulnerable to damage.
By accurately measuring the width, height, and selecting the appropriate kick plate size, you can ensure a seamless installation that not only enhances the aesthetic appeal of your door but also provides the necessary protection for years to come.
Essential Tools For Installing A Door Kick Plate
When it comes to installing a door kick plate, having the right tools is essential. Not only will using the correct tools make the job easier, but it will also ensure that the kick plate is installed securely and properly. In this section, we will discuss the essential tools you will need before you begin the installation process.
Screwdriver
A screwdriver is one of the most basic tools that you will need for installing a door kick plate. It is used to tighten the screws that hold the kick plate in place. Make sure to choose a screwdriver that matches the size and type of screws you will be using. A Phillips screwdriver is the most common type, but you may also need a flat-head screwdriver depending on the screws used.
Tape Measure
A tape measure is necessary to measure the dimensions of your door accurately. This will ensure that you choose a kick plate that fits perfectly on your door. Measure the width and height of the door panel where the kick plate will be installed. Write down these measurements to refer to when purchasing the kick plate.
Pencil or Marker
A pencil or marker is needed to mark the positions where the kick plate will be attached to the door. Before drilling any holes, use the pencil or marker to make light marks on the door in the desired locations. These guidelines will help you align the kick plate correctly.
Drill and Drill Bits
A drill is necessary for making holes in your door that will accommodate the screws for the kick plate. Choose a drill that is suitable for the material of your door. A wood drill bit is typically used for wooden doors, while a masonry drill bit is used for metal or concrete doors. Additionally, it may be helpful to have a smaller drill bit for making pilot holes before drilling the larger holes for the screws.
Screws and Anchors
Screws and anchors are required to secure the kick plate to your door. The type and size of screws and anchors used will depend on the material of your door. Make sure to choose screws and anchors that are long enough to penetrate the door and hold the kick plate securely in place. It is recommended to consult the instructions provided with the kick plate or seek advice from a hardware store professional to ensure you choose the appropriate screws and anchors.
In conclusion, having the essential tools for installing a door kick plate is crucial to ensure a successful installation. These tools include a screwdriver, tape measure, pencil or marker, drill and drill bits, as well as screws and anchors. By using the right tools, you can ensure that your kick plate is installed securely and satisfactorily.
Additional Materials For Proper Installation
When it comes to installing a door kick plate, having the right tools and materials is essential for a proper installation. In addition to the kick plate itself, there are a few additional materials that you will need to ensure a successful and long-lasting installation. These materials include tape or masking tape, as well as a level to ensure the kick plate is installed evenly.
<h3>Door Kick Plate</h3>
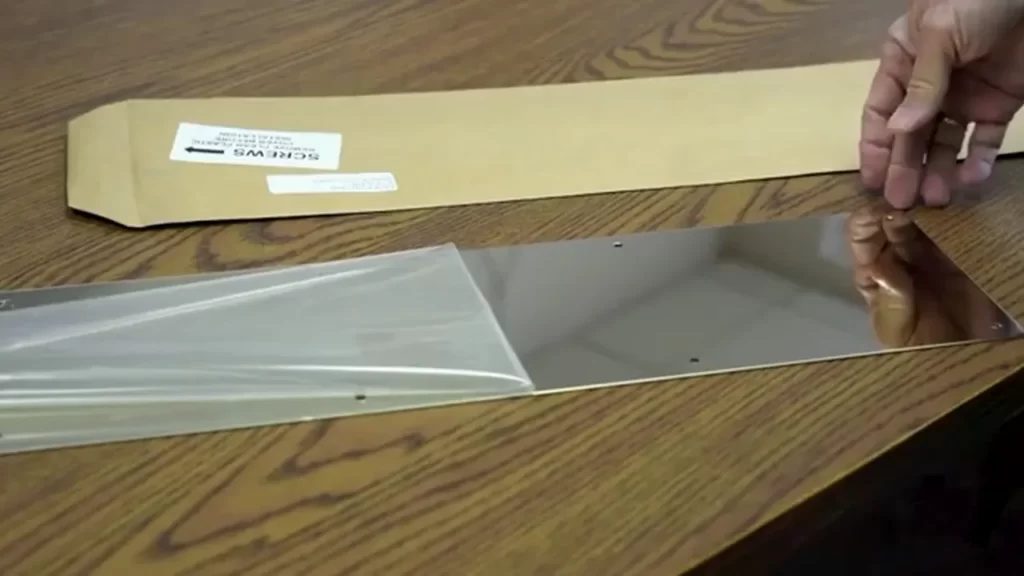
The door kick plate is the main material you will need for this installation. It is a metal or plastic plate that is attached to the bottom of a door to protect it from damage caused by shoes or other objects. Kick plates also add a decorative touch to the door, enhancing its overall appearance.
<h3>Tape or Masking Tape</h3>
Tape or masking tape is an important material to have on hand when installing a door kick plate. It can be used to mark the desired placement of the kick plate on the door. By using tape as a guide, you can ensure that the kick plate is aligned correctly before permanently securing it to the door.
<h3>Level</h3>
A level is an essential tool for any installation project, including installing a door kick plate. It helps ensure that the kick plate is installed evenly and straight. To use a level, simply place it on top of the kick plate and adjust the position until the bubble is centered between the lines. This will ensure that the kick plate is installed at the proper angle, preventing any potential damage to the door.
Preparation Steps Before Installation
Before installing a door kick plate, it’s important to properly prepare the door surface. This includes cleaning the door and removing any obstructions that could interfere with the installation. By taking these preparation steps, you’ll ensure a smooth and successful installation, and your kick plate will not only enhance the appearance of your door but also protect it from daily wear and tear. Let’s dive into the specific preparation steps.
Preparing the Door Surface
The first step in preparing the door surface is to ensure it is clean and free from any dust or debris. Use a mild detergent mixed with water to clean the surface thoroughly. Wipe it down with a clean cloth and allow it to dry completely before moving on to the next step.
Cleaning and Removing Any Obstructions
Next, carefully inspect the door for any obstacles that could hinder the installation of the kick plate. This may include existing hardware such as screws or nails, as well as any adhesive residue from previous attachments. Remove any nails or screws using a screwdriver or pliers, and use a scraper or adhesive remover to eliminate any sticky residue.
Marking the Position for the Kick Plate
Before installing the kick plate, it’s important to mark its position on the door. Measure the height at which you want the kick plate to be installed, typically about four to six inches from the bottom of the door. Use a pencil or marker to make a small mark at each end of the desired placement.
If your kick plate came with pre-drilled holes, align them with the marks on the door. If not, use a tape measure to ensure the height and width of the kick plate are centered and level. Make additional marks to indicate the placement of the screws or adhesive tape that will secure the kick plate to the door.
By properly preparing the door surface, cleaning any obstructions, and marking the position for the kick plate, you’ll be ready for the next step: actually installing the kick plate onto your door. These simple preparation steps will ensure a successful installation and the long-lasting durability of your door kick plate.
Installing The Kick Plate
Installing a kick plate is a simple yet effective way to protect your door from scratches and damage caused by daily wear and tear. Not only does it add a touch of style, but it also helps to extend the lifespan of your door. After selecting the right kick plate for your door, the next step is to install it securely. In this guide, we’ll walk you through the process of installing a kick plate on your door, ensuring that it stays in place for years to come.
Aligning the Kick Plate with the Door
Before you start installing the kick plate, it’s important to ensure that it is properly aligned with the door. Place the kick plate at the bottom of the door and make sure that it is centered both horizontally and vertically. Take a step back and double-check that it is straight and level. Adjust the position if necessary until you are satisfied with the alignment.
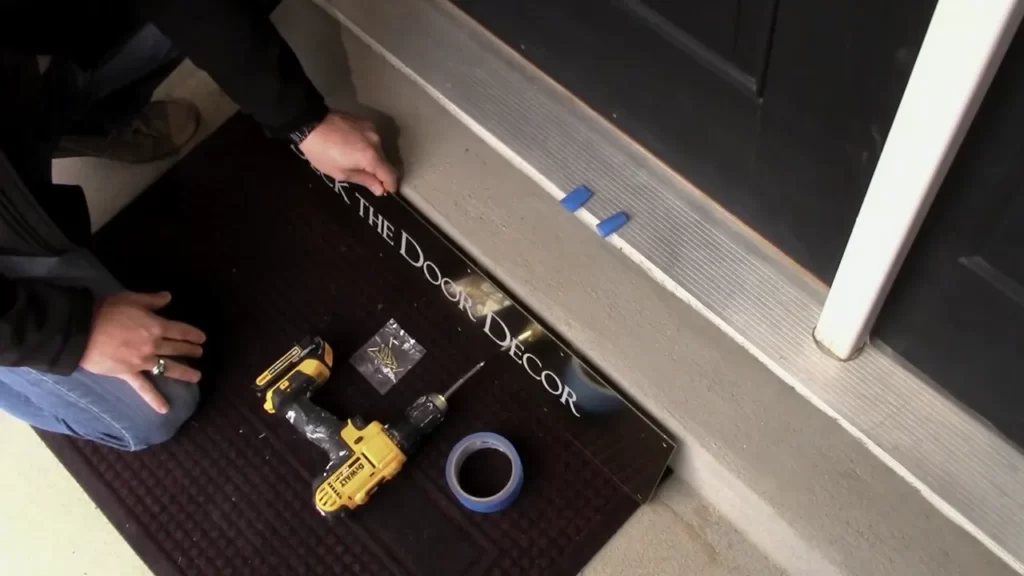
Marking the Screw Hole Positions
Once you have aligned the kick plate, it’s time to mark the positions for the screw holes. Using a pencil or a marker, carefully mark the locations where the screws will be inserted. It’s recommended to mark every few inches along the top and bottom edges of the kick plate, as well as the sides if necessary. This will ensure that the kick plate is securely attached to the door.
Drilling Pilot Holes
With the screw hole positions marked, it’s time to drill pilot holes. Using an electric screwdriver or a drill with a small drill bit, carefully drill into the marked positions. Make sure to use a drill bit that is slightly smaller than the screws you will be using. This will prevent the wood from splitting and ensure a secure attachment.
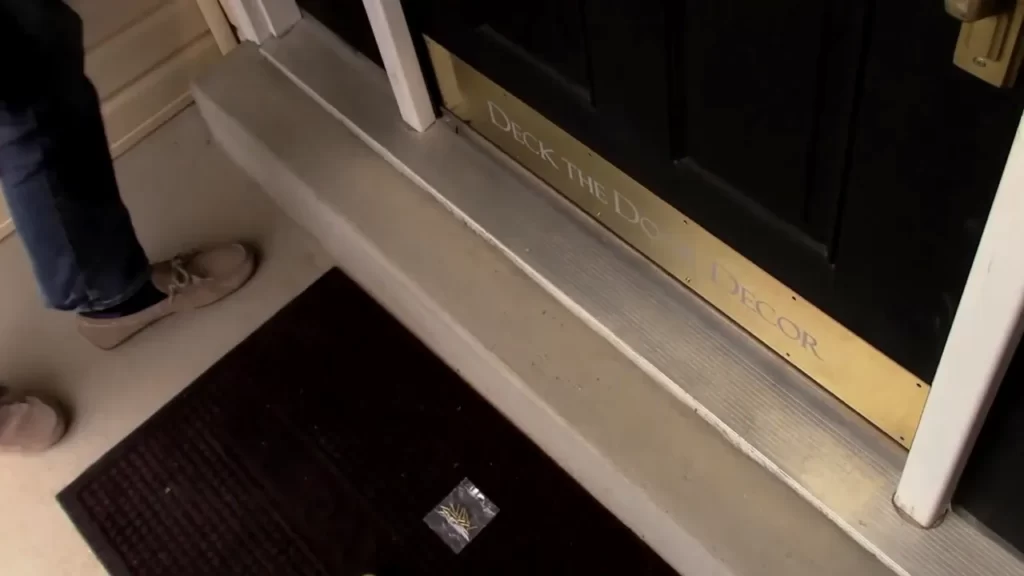
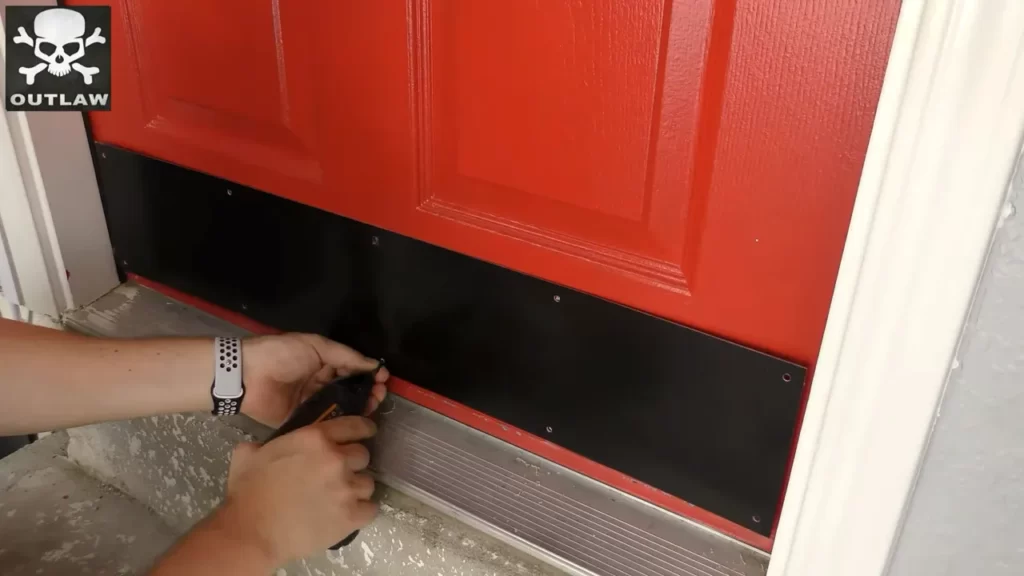
Attaching the Kick Plate with Screws
Now that you have drilled pilot holes, it’s time to attach the kick plate to the door using screws. Start by placing the kick plate back into position, aligning it with the screw holes. Take the screws and insert them into the pilot holes, using a screwdriver or a drill to tighten them. Make sure to tighten the screws firmly, but be careful not to overtighten and strip the holes.
To ensure a secure attachment, it’s recommended to use screws that are designed specifically for kick plates. These screws are usually shorter in length and have a wider diameter, providing a strong hold without damaging the door. Once all the screws are tightened, give the kick plate a gentle tug to ensure that it is securely attached to the door.
With that, you have successfully installed a kick plate on your door. Not only does it add a stylish touch, but it also provides protection against daily wear and tear. By following these simple steps and ensuring a proper alignment, marking the screw hole positions, drilling pilot holes, and attaching the kick plate securely with screws, you can enjoy a well-protected door for years to come.
Finishing Touches And Final Checks
After successfully installing the door kick plate, there are a few important finishing touches and final checks that will ensure its durability and enhance its aesthetic appeal. By paying attention to these details, you can ensure that your door kick plate not only serves its purpose but also adds a touch of style to your entryway.
Ensuring the Kick Plate is Level
One crucial step before completing the installation is to make sure that the kick plate is perfectly level. A slightly tilted or slanted kick plate can not only compromise the overall appearance but can also impact its functionality. To ensure that your kick plate is level:
- Use a level tool to check the horizontal alignment of the kick plate.
- Adjust the position of the kick plate if needed, making small adjustments until it is perfectly level.
- Double-check the levelness by re-measuring after making adjustments.
Taking the time to ensure that the kick plate is level will not only enhance its visual appeal but also ensure that it functions correctly and provides maximum protection against scuffs and scratches from everyday use.
Tightening Screws and Ensuring Stability
Once the kick plate is level, it is essential to tighten all screws securely to ensure its stability. This step will prevent the kick plate from becoming loose and potentially causing damage. Here’s how to ensure the kick plate is tightly secured:
- Check all the screws on the kick plate to make sure they are properly tightened.
- If any screws are loose, use a screwdriver to tighten them snugly.
- Verify the stability of the kick plate by gently pushing on it to ensure it doesn’t move or shake.
By double-checking the tightness of the screws and ensuring the kick plate’s stability, you can be confident that it will withstand regular use and remain securely in place for years to come.
Cleaning and Polishing the Kick Plate
Lastly, take a moment to clean and polish the kick plate, giving it a final touch of elegance and maintaining its appearance. Follow these steps to clean and polish your kick plate:
- Remove any dust or debris from the kick plate using a soft cloth or a gentle brush.
- Apply a mild cleaning solution to a clean cloth and wipe the kick plate thoroughly.
- Rinse the kick plate with a damp cloth to remove any residue from the cleaning solution.
- Dry the kick plate with a clean, lint-free cloth.
- For a polished look, you can apply a metal polish or a coat of wax to the kick plate using a soft cloth.
- Buff the kick plate gently to bring out its shine and leave a protective layer.
By routinely cleaning and polishing your kick plate, you can maintain its pristine appearance and ensure that it continues to enhance the overall look of your door.
Safety Considerations During Installation
When it comes to installing a door kick plate, it’s important to prioritize safety. By taking a few simple precautions, you can ensure a smooth and accident-free installation process. Below are key safety considerations to keep in mind:
Wearing Protective Gear
Before starting the installation, it’s crucial to wear the appropriate protective gear. This will help safeguard against potential injuries and accidents. Ensure you have the following protective gear:
- Safety goggles
- Work gloves
- Ear protection
- Steel-toed boots
Using Caution with Power Tools
Power tools can greatly assist in the installation process, but they can also pose hazards if not used with caution. Here are some guidelines to follow when using power tools:
- Read the manual and understand the proper operation of each power tool.
- Securely grip the tool and maintain a stable position while operating.
- Avoid loose clothing or jewelry that could get caught in the tool.
- Keep all body parts away from the tool’s moving parts.
- Disconnect the power source when not in use and during any adjustments.
Avoiding Damage to the Door
While installing a door kick plate, it’s crucial to prevent any damage to the door itself. Taking the following precautions will help preserve the integrity of the door:
- Place a protective cloth or cardboard beneath the work area to prevent scratches and scuffs.
- Use masking tape to protect the surface of the door around the installation area.
- Choose the right type and size of screws to avoid damaging the door.
- Utilize a level to ensure the kick plate is properly aligned before securing it.
- Consider using an adhesive alongside the screws to distribute the weight and minimize stress on the door.
By adhering to these safety considerations, you can install a door kick plate efficiently while reducing the risk of accidents, injuries, and damage to the door. Prioritizing safety during the installation process ensures a successful and worry-free project.
Tips For Maintaining And Cleaning A Door Kick Plate
Keeping your door kick plate clean and well-maintained not only enhances the appearance of your front entrance but also prolongs the lifespan of the kick plate. Regular cleaning and proper care can prevent scratches and damage, ensuring that your door kick plate stays looking as good as new. Here are some valuable tips for maintaining and cleaning a door kick plate:
Regular Cleaning Routine
Establishing a regular cleaning routine is essential to keep your door kick plate free from dirt, grime, and other debris. A quick wipe down once a week will help prevent the buildup of dirt and maintain the kick plate’s shine. Start by removing any loose dirt or dust particles with a soft cloth or brush.
Next, dampen a clean cloth with mild soap and water and gently scrub the kick plate in a circular motion. Be sure not to use any abrasive cleaners or scrub brushes as they can cause scratches or damage the surface. Rinse the kick plate with clean water and dry it thoroughly with a soft, lint-free cloth.
Using Appropriate Cleaners
Choosing the right cleaners for your door kick plate is crucial to prevent any potential damage. Avoid using harsh chemical cleaners, ammonia-based products, or abrasive solvents as they can strip the protective coating and leave marks on the kick plate.
Instead, opt for mild soap or a non-abrasive, multi-surface cleaner that is compatible with the material of your kick plate. Always follow the manufacturer’s instructions and test a small, inconspicuous area before applying the cleaner to the entire kick plate.
Avoiding Scratches and Damage
To maintain the pristine condition of your door kick plate, it’s essential to take precautions to avoid scratches and damage. Place a soft cloth or towel on the floor or ground in front of the kick plate before starting any cleaning process to prevent accidental scratches caused by dropped tools or abrasive debris.
When scrubbing the kick plate, use gentle pressure and avoid using abrasive materials such as steel wool or rough brushes. Instead, choose a soft cloth or sponge that won’t leave scratches or marks.
In addition, be mindful of any accessories or hardware near the kick plate, such as doorknobs or locks, and take care not to hit them accidentally with cleaning tools.
By following these simple tips, you can ensure that your door kick plate remains clean, shiny, and in excellent condition for years to come. Remember, a well-maintained kick plate adds a touch of elegance to your entrance, creating a lasting impression for anyone arriving at your doorstep.
Frequently Asked Questions For How To Install A Door Kick Plate
How Do You Attach A Kick Plate To A Door?
To attach a kick plate to a door, follow these steps: 1. Measure the door’s width and height. 2. Position the kick plate at the bottom of the door, ensuring it aligns with the door’s edges. 3. Mark the screw hole locations on the door.
4. Drill pilot holes at the marked spots. 5. Attach the kick plate using screws, making sure it’s firmly secured.
Do Kick Plates Go Inside Or Outside The Door?
Kick plates go on the outside of a door, protecting it from kicks and scuffs.
How High Should A Kick Plate Be From Bottom Of Door?
A kick plate should typically be installed about 6 to 10 inches from the bottom of the door. This placement helps protect the door from damage and scuff marks caused by kicks and impacts.
Should I Put A Kick Plate On A Door?
Yes, it is recommended to put a kick plate on a door. A kick plate can protect the bottom of the door from damage caused by kicks, scratches, and general wear. It adds durability and can enhance the overall appearance of the door.
How Do You Install A Door Kick Plate?
Installing a door kick plate is simple. Measure the height of your door, align the plate, and secure it with screws using a drill.
What Is The Purpose Of A Door Kick Plate?
A door kick plate not only adds a decorative touch to your door but also protects it from scratches, dents, and damage caused by foot traffic.
Conclusion
Installing a door kick plate is a simple and effective way to protect your door from damage. By following the steps outlined in this blog post, you can easily install a door kick plate on your own. Remember to measure accurately, choose the right materials, and use the proper tools for a successful installation.
With a little bit of time and effort, you can enhance the durability and aesthetic appeal of your door while also adding a touch of style. So go ahead and give it a try! Your door will thank you.