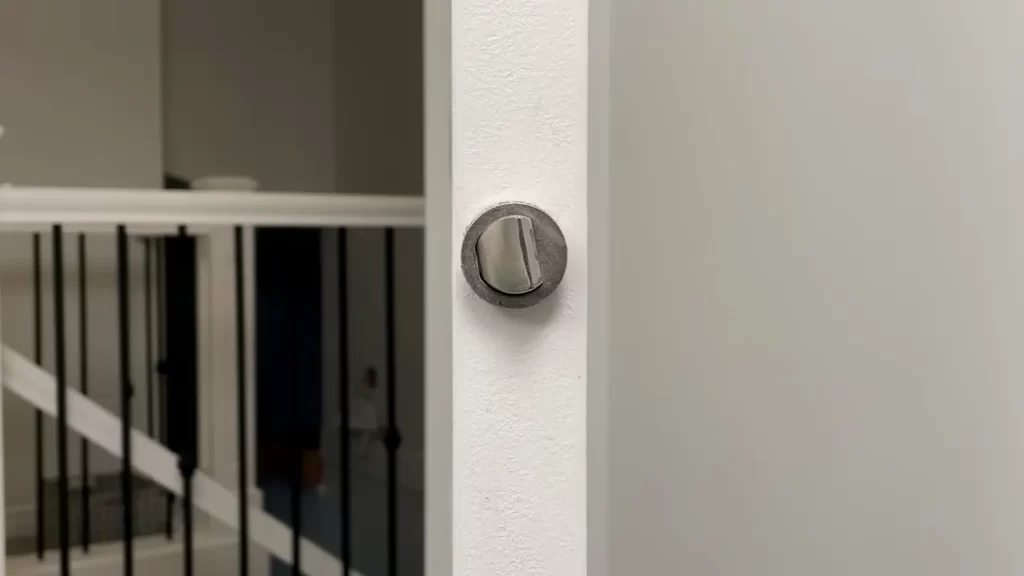
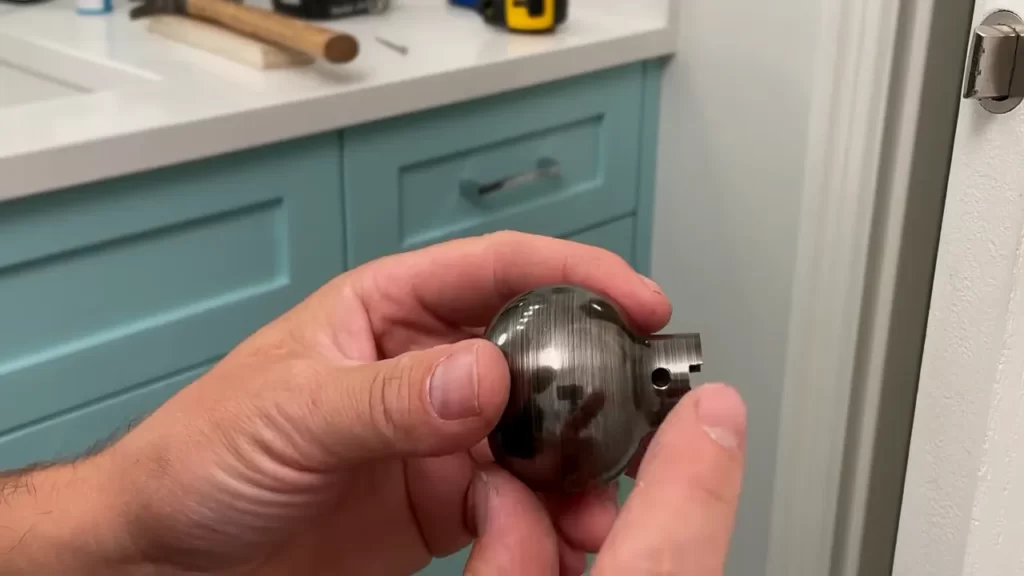
To install a door knob with hidden screws, simply locate the small hole on the rose plate, insert a screwdriver, and turn counterclockwise to release the knob. Then, insert the knob into the door hole, align the screw holes, and tighten the screws with a screwdriver.
That’s it! Doorknobs play a vital role in providing security and privacy to any door. While most door knobs have visible screws, some designs come with hidden screws for a sleeker appearance. If you’re wondering how to install a door knob with hidden screws, you’re in the right place.
In this guide, we’ll walk you through the quick and easy process of installing a door knob with hidden screws. So, let’s get started and transform the look of your door with this simple installation.
Understanding The Hidden Screw Mechanism
Explaining the concept of hidden screw door knobs
When it comes to installing door knobs, one popular option is the hidden screw door knob. As the name suggests, these knobs have a hidden mechanism that conceals the screws, creating a sleek and seamless appearance. Unlike traditional door knobs where the screws are visible on the front plate, hidden screw door knobs offer a more aesthetically pleasing and modern look for your doors.
So, how do hidden screw door knobs work? Instead of the screws being exposed on the front plate, they are positioned behind it. This mechanism allows for a cleaner and more streamlined look, without compromising on the functionality and security of the knob. The screws are securely hidden, providing a neat and polished finish to your door.
Highlighting the advantages of hidden screw door knobs
Hidden screw door knobs offer several advantages over their traditional counterparts. Understanding these benefits can help you make an informed decision when it comes to choosing the right door knob for your home. Here are some advantages of hidden screw door knobs:
- Improved aesthetics: By concealing the screws, hidden screw door knobs create a minimalist and modern appearance that can enhance the overall look of your door.
- Easy cleaning and maintenance: With no exposed screws, cleaning the door knob becomes easier and more convenient. There are no tight corners or small spaces where dirt and grime can accumulate.
- Added security: Hidden screw door knobs provide an extra layer of security as the screws are not easily accessible. This makes it more challenging for intruders to tamper with the door knob.
- Durability: The hidden screw mechanism contributes to the durability of the door knob. With the screws protected and shielded from external elements, they are less prone to rust and corrosion, ensuring a longer lifespan for the knob.
Overall, hidden screw door knobs offer a sleek and modern alternative to traditional door knobs. Their concealed screw mechanism not only enhances the aesthetics of your doors but also provides added security and durability. Consider opting for hidden screw door knobs to give your doors a stylish and functional upgrade.
Tools And Materials Required
When it comes to installing a door knob with hidden screws, having the right tools and materials is crucial for a successful installation. Each tool serves a unique purpose, ensuring that the door knob is securely and tightly installed. Additionally, certain materials are necessary to complete the installation. In this section, we will list the tools needed, explain their importance, and provide a list of the materials required for a smooth installation process.
Listing the tools needed for the installation
Below is a comprehensive list of the tools you will need for installing a door knob with hidden screws:
| Tool | Description |
|---|---|
| Screwdriver | The screwdriver is an essential tool for removing the existing door knob and installing the new one. It allows you to tighten the screws securely, ensuring that the door knob stays in place. |
| Drill | A drill is necessary for creating pilot holes, which will make it easier to insert the screws. This helps prevent any damage to the door and ensures a smooth and precise installation. |
| Tape Measure | Accurate measurements are crucial for a proper door knob installation. A tape measure will enable you to measure the diameter of the existing hole, ensuring that the new door knob fits perfectly. |
| Level | A level helps ensure that the door knob is installed straight and aligned. This prevents any issues with the functionality and aesthetics of the door knob. |
| Pencil | A pencil is handy for marking the exact locations where the pilot holes need to be drilled. It allows for precise placement of the screws and ensures a secure fit. |
Listing the materials required for the installation
In addition to the tools mentioned above, you will also need the following materials to complete the installation:
- Door Knob Set: This includes the door knob itself, the latch mechanism, strike plate, and any additional decorative components.
- Screws: Depending on the specific door knob set, you may need screws of different sizes and lengths. Make sure to check the manufacturer’s instructions or packaging for the correct screw specifications.
- Wood Filler or Putty: Sometimes, when removing the old door knob, you may be left with existing holes that are larger than the new door knob requires. Wood filler or putty can be used to fill these holes, providing a solid base for the new installation.
- Paint or Stain: If you are installing a new door knob on a freshly painted or stained door, you may need paint or stain to touch up any areas that were affected during the installation process.
By gathering the necessary tools and materials listed above, you will be well-prepared to install a door knob with hidden screws successfully. Investing time and effort in selecting the right tools and materials ensures a secure and aesthetically pleasing door knob installation, which will enhance the overall functionality and appearance of your door.
Preparing The Door
Before installing a door knob with hidden screws, it is essential to check the condition of the door to ensure a successful and secure installation. By carefully assessing the door, you can identify any existing issues and address them beforehand.
To begin, inspect the door for any structural damage, such as cracks or warping. A damaged door may not provide a solid foundation for the door knob, compromising its functionality and security. Additionally, check for any loose or protruding parts that may interfere with the installation process.
Examine the door’s surface for any dents, scratches, or unevenness. While these imperfections may not directly impact the installation, addressing them beforehand can help enhance the aesthetic appeal of the door knob and overall door appearance.
Once you have assessed the condition of the door and resolved any issues, it is time to prepare it for the installation of the door knob with hidden screws. This process involves a few simple steps that will ensure a smooth and secure fitting.
Step 1: Remove the existing hardware
If there is an existing door knob or hardware installed on the door, remove it carefully. Use a screwdriver to loosen the screws and detach the hardware from the door. Keep the screws and other components for reference or disposal.
Step 2: Clean the door surface
Next, thoroughly clean the door surface using a mild detergent or cleaner. Remove any dirt, dust, or residue that may have accumulated over time. Use a soft cloth or sponge for gentle cleaning, ensuring not to damage the door material.
Once cleaned, dry the surface completely before proceeding. This step will remove any particles that could potentially affect the adhesion of the door knob or compromise its long-term performance.
Step 3: Measure and mark the installation points
Using a measuring tape or ruler, determine the ideal position for installing the door knob. Ensure a comfortable height and a proper placement that aligns with your needs and preferences.
Mark the center of the latch hole and the screw holes on the door surface. These markings will serve as a guide for drilling and installing the door knob later on.
Step 4: Drill the necessary holes
Using a drill and appropriate drill bits, carefully create the necessary holes on the marked positions. Start with a smaller-sized pilot hole and gradually enlarge it to the recommended size for the door knob’s latch assembly.
Be cautious while drilling, ensuring not to damage the door surface or create any splintering. If necessary, use masking tape near the drilling area to prevent chipping or cracking.
Step 5: Test the fit and make adjustments
Before proceeding with the final installation, test the fit of the latch assembly in the drilled hole. Ensure that it sits flush with the door surface, allowing the door to open and close smoothly. Make any adjustments as necessary to achieve a perfect fit.
Once satisfied with the fit, proceed to the final step of installing the door knob, which involves securing it in place and concealing the screws for a sleek and seamless appearance.
Table: Common Tools and Materials
| Tools | Materials |
|---|---|
| Screwdriver | Door knob with hidden screws |
| Measuring tape or ruler | Mild detergent or cleaner |
| Drill | Masking tape |
| Drill bits |
Removing The Old Door Knob
Explaining the different types of door knob mechanisms
When it comes to door knobs, there are several different types of mechanisms that you need to be aware of. Understanding these mechanisms is essential for successfully removing the old door knob. Here are the three common types of door knob mechanisms that you need to know:
- Mechanical latch: This is the most basic type of door knob mechanism, which consists of a latch that is operated by turning the knob. It does not have any hidden screws and can be easily removed by following a set of simple steps.
- Detachable knob: Some door knobs have a detachable knob, which means that the knob can be unscrewed from the mounting plate. This type of door knob is relatively easy to remove.
- Hidden screw: As the name suggests, hidden screw door knobs have the screws concealed, making them more secure and aesthetically appealing. Removing this type of door knob requires additional steps, which we will discuss in detail.
Steps to remove a regular door knob
Removing a regular door knob is a straightforward process that involves a few simple steps. Follow these steps to safely remove a regular door knob:
- Locate the screws: Look for the screws on the interior side of the door knob. These screws usually hold the knob and the latch together.
- Loosen the screws: Use a screwdriver to loosen the screws. In most cases, you will need to turn the screws counterclockwise to loosen them.
- Remove the knob: Once the screws are loose, you can easily remove the knob by pulling it away from the door. Be gentle and avoid using excessive force to prevent any damage.
- Remove the mounting plate: After removing the knob, you will see the mounting plate attached to the door. Unscrew the mounting plate using a screwdriver.
- Remove the latch: Finally, you can remove the latch by unscrewing the screws that hold it in place.
Steps to remove a hidden screw door knob
Hidden screw door knobs are designed to be more secure, but they can be easily removed with the right approach. Follow these steps to remove a hidden screw door knob:
- Locate the trim ring: Look for a small trim ring around the base of the door knob. This trim ring covers the hidden screws.
- Remove the trim ring: Gently pry the trim ring off using a flathead screwdriver. Be careful not to cause any damage to the door or the trim ring.
- Expose the screws: After removing the trim ring, you will find the hidden screws. These screws are usually located at the bottom or behind the door knob.
- Loosen the screws: Use a screwdriver to loosen the screws. Again, turn them counterclockwise to loosen them.
- Remove the knob: Once the screws are loose, you can pull the knob away from the door, freeing it from the latch assembly.
- Remove the mounting plate: Similar to the regular door knob, unscrew the mounting plate using a screwdriver.
- Remove the latch: Lastly, unscrew the screws that hold the latch in place and remove it from the door.
Now that you know how to remove both regular door knobs and hidden screw door knobs, you are ready to move on to the next step of installing your new door knob. Stay tuned!
Preparing The New Door Knob
Installing a new door knob can not only enhance the aesthetics of your home but also improve the functionality of your doors. If you’re looking to replace your door knob with a hidden screw mechanism, it’s important to properly prepare the new door knob before proceeding with the installation. This step-by-step guide will help you unbox the new door knob, familiarize yourself with its components, and understand the hidden screw mechanism to ensure a hassle-free installation process.
<h3>Unboxing the new door knob</h3>
Now that you have purchased a new door knob with hidden screws, it’s time to unbox it and inspect the components. Begin by opening the packaging carefully, ensuring you don’t accidentally damage any parts. Once you have the door knob in your hands, take a moment to assess its design and features. Look out for any installation instructions or diagrams included in the packaging as they can provide valuable guidance throughout the process.
<h3>Familiarizing yourself with the components</h3>
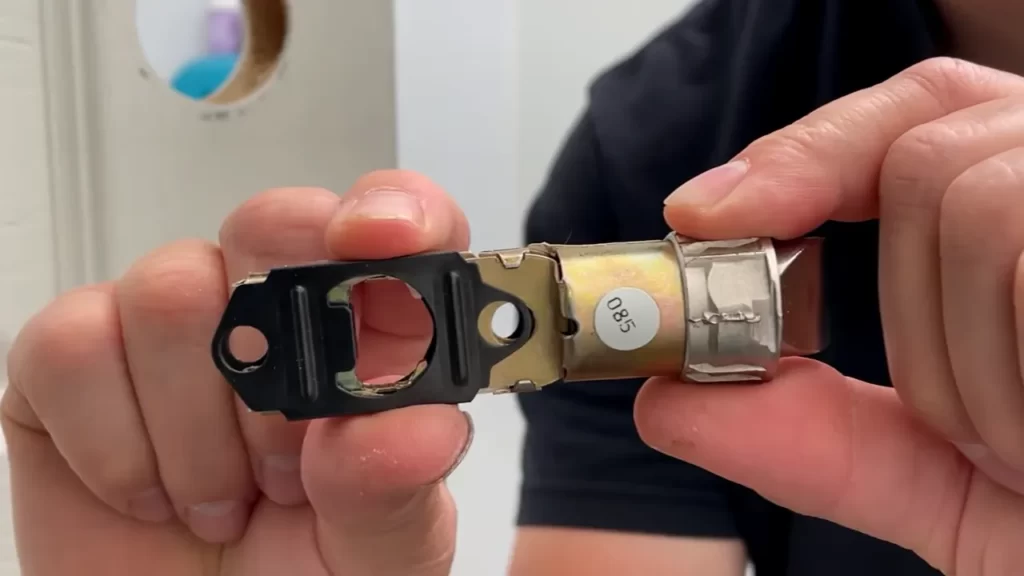
Before diving into the installation, it’s crucial to familiarize yourself with the various components of the new door knob. Typically, a door knob consists of the knob itself, a latch, strike plate, faceplate, screws, and other necessary accessories. Take a close look at each component and identify their respective functions. This will help you better understand how the door knob functions as a whole and ensure that you assemble it correctly during installation.
<h3>Understanding the hidden screw mechanism of the new door knob</h3>
One of the key features of the new door knob is its hidden screw mechanism. Unlike traditional door knobs with visible screws, the hidden screw mechanism lends a sleek and seamless appearance to your doors. To install the new door knob correctly, you must understand how the hidden screw mechanism works. Look for any instructions or illustrations provided by the manufacturer that explain the specific process for your door knob model. Familiarize yourself with the steps involved and ensure you have the necessary tools to carry out the installation effectively.
By following these steps to prepare the new door knob, you’ll be well-equipped to proceed with the installation process smoothly. Make sure you unbox the door knob carefully, familiarize yourself with its components, and understand the hidden screw mechanism before moving on to the next stage of the installation. Stay tuned for the next part of this installation guide, where we will walk you through the steps of removing the old door knob.
Installing The Door Knob
When it comes to upgrading your door hardware, installing a door knob with hidden screws can add a touch of elegance and security to any room. This sleek design not only enhances the aesthetics but also prevents potential tampering from intruders. In this guide, we will take you through the step-by-step process of installing a door knob with hidden screws.
Step 1: Preparing the latch plate
The first step in installing a door knob with hidden screws is to prepare the latch plate. Begin by gathering the necessary tools – a screwdriver, a chisel, and a hammer. Start by removing the existing door knob and latch plate if applicable.
Next, align the new latch plate template with the existing hole. Mark the position of the latch plate on the edge of the door using a pencil. To ensure a proper fit, use a chisel to create a recess for the latch plate. Be careful not to remove too much material, as it may affect the strength and stability of the door.
Step 2: Inserting the latch plate into the door
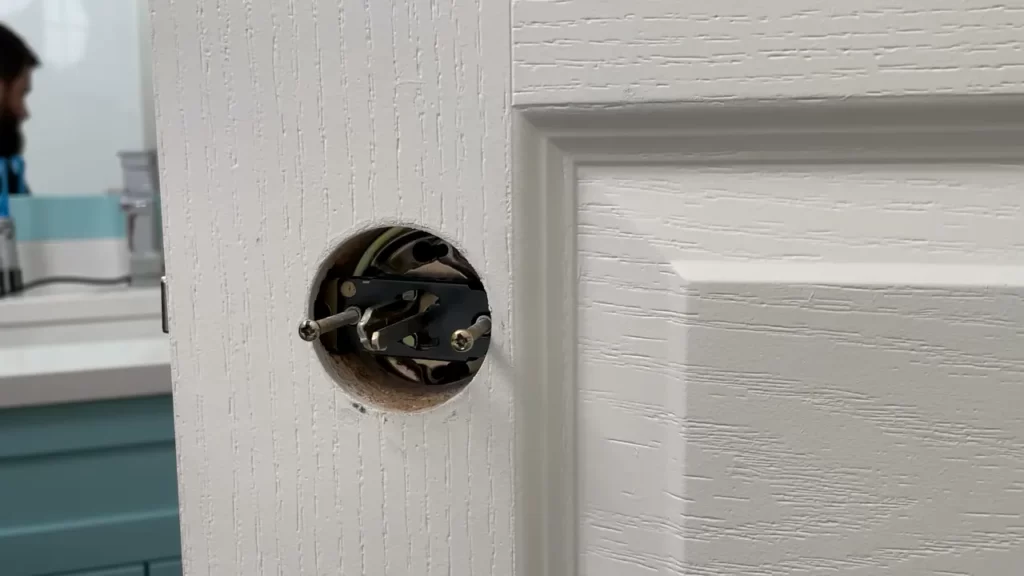
With the recess prepared, it’s time to insert the latch plate into the door. Start by placing the latch plate into the recess and ensure that it sits flush against the door surface. Use a screwdriver to secure the latch plate by tightening the screws provided.
Once the latch plate is securely in place, test the functionality by turning the knob to ensure smooth operation.
Step 3: Installing the outer knob
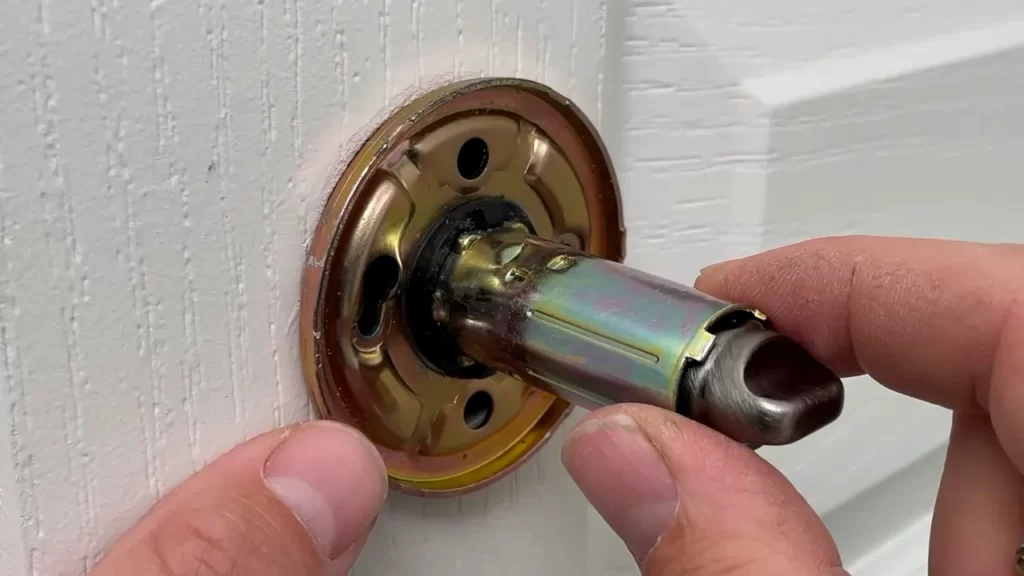
Now that the latch plate is installed, it’s time to install the outer knob. Begin by inserting the spindle through the latch plate, ensuring it goes through the center hole. Next, align the outer knob with the spindle and press it onto the door, guiding the spindle into the corresponding hole.
Once the knob is in position, tighten the setscrew located on the side of the knob using an Allen wrench. This will secure the knob in place and prevent it from spinning freely.
Step 4: Securing the hidden screws
To secure the hidden screws on your door knob, locate the small hole at the base of the outer knob near the spindle. Insert the Allen wrench into the hole and turn it clockwise until you feel resistance. This will tighten the hidden screws and ensure that the door knob is securely fastened to the door.
Step 5: Testing the door knob
Lastly, it’s important to test the door knob to ensure that it is functioning properly. Turn the knob to ensure that the latch retracts smoothly and the door opens and closes without any difficulties. Additionally, check that the door knob is aligned and centered correctly, and make any adjustments if necessary.
Congratulations! You have successfully installed a door knob with hidden screws. Now you can enjoy the added security and elegant design that this hardware upgrade provides.
Troubleshooting And Tips
Installing a door knob with hidden screws adds an element of sophistication and sleekness to any door. However, like any DIY project, there may be challenges along the way. In this section, we will address common issues that may arise during the installation process and provide useful tips to ensure a seamless experience.
Common issues faced during installation
When installing a door knob with hidden screws, it’s not uncommon to face some hurdles. Here are a few issues you may encounter:
- Mismatched screw threads: One common problem that arises is when the screws provided with the door knob do not match the threads in the door. This can make it difficult to securely fasten the knob in place. To overcome this issue, try using screws with the appropriate thread size or consult a hardware store expert for guidance.
- Uneven alignment: Another challenge you might face is getting the door knob to align properly. This issue can result in difficulty in opening or closing the door smoothly. To address this, ensure that the door and the door frame are properly aligned before proceeding with the installation. You may need to adjust the hinges or use shims to create an even surface.
- Loose screws: Over time, screws can become loose due to regular use or improper installation. If you notice that the door knob is becoming wobbly or sliding from side to side, it’s likely that the screws have become loose. To fix this, simply tighten the screws using a screwdriver or Allen wrench, depending on the type of screw used.
- Difficulty turning the knob: One of the most frustrating issues you may encounter is when the door knob becomes difficult to turn. This can be caused by a variety of factors, such as improper lubrication or a misaligned latch. To resolve this, try applying a small amount of lubricant to the internal components of the door knob. If the issue persists, consult a professional to ensure the latch is properly aligned.
Tips to ensure a seamless installation process
To make your installation process smooth and hassle-free, consider implementing the following tips:
- Read the instructions carefully: Before beginning the installation, carefully read the instructions provided with the door knob. Familiarize yourself with the specific requirements and steps involved in the installation process.
- Gather the necessary tools: To avoid unnecessary frustration, ensure you have all the necessary tools handy before starting the installation. This may include a screwdriver, Allen wrench, drill, and measuring tape, among others.
- Perform a dry fit: Before permanently attaching the door knob, perform a dry fit by inserting the latch into the door and checking that the knob fits snugly. This will allow you to make any necessary adjustments before securing the knob in place.
- Double-check measurements: Accurate measurements are crucial for a proper installation. Double-check the dimensions of the door knobs, latch, and strike plate to ensure they align properly and fit securely into the door.
- Test the functionality: After installing the door knob, test its functionality by turning the knob and ensuring it locks and unlocks smoothly. This will help identify any potential issues that may need further adjustment.
By addressing common installation issues and following these tips, you can ensure a successful and seamless installation of a door knob with hidden screws. Remember, patience and attention to detail are key to achieving a polished and professional end result.
Maintaining Your Door Knob
Proper maintenance of your door knob is essential in ensuring its longevity and smooth operation. By taking the necessary steps to keep your door knob clean and well-maintained, you can avoid issues such as squeaking, sticking, or loose fittings. In this section, we will discuss some essential tips and preventive measures to help you maintain your door knob.
Tips for cleaning and maintaining the door knob
- Regularly clean your door knob with a soft cloth and mild detergent. This will help remove any dirt, grime, or fingerprints that may have accumulated over time. Avoid using abrasive cleaners or harsh chemicals, as they can damage the finish of the door knob.
- Inspect the door knob’s moving parts, including the latch and spindle, for any signs of wear or damage. If you notice any issues, such as loose screws or a malfunctioning mechanism, tighten or repair them promptly to prevent further damage.
- Apply a lubricant, such as silicone spray or graphite powder, to the moving parts of the door knob to ensure smooth operation. This will help reduce friction and prevent unnecessary wear and tear.
- Regularly check the screws on the door knob for tightness. Over time, they may become loose due to constant use. If any screws are found to be loose, tighten them using a screwdriver. Be careful not to overtighten, as it may cause damage to the door knob.
- Consider using a door knob cover or protector to minimize scratches and dents caused by everyday use. These protective accessories are available in various styles and materials, allowing you to find one that suits your door knobs’ design.
Preventive measures to prolong the lifespan of the door knob
Taking preventive measures is crucial in ensuring that your door knob lasts longer and remains in optimal condition. Here are some preventive measures you can implement:
- Avoid using excessive force when operating the door knob. Gentle and controlled movements will help minimize strain on the mechanism and reduce the likelihood of damage.
- Regularly inspect the alignment of the door and frame. If the door is misaligned, it can put unnecessary pressure on the door knob, leading to premature wear and tear. Adjust the strike plate or hinges accordingly to ensure proper alignment.
- Consider installing a doorstop or door closer to prevent the door from swinging open forcefully, which can cause damage to the door knob and surrounding areas.
- Keep the area around the door knob clean and free from clutter. Objects banging into the door knob can cause it to become loose or damaged.
When to consider replacing the door knob
Despite proper maintenance, there may come a time when replacing your door knob becomes necessary. Here are some signs that indicate it may be time to consider a replacement:
- The door knob is damaged and cannot be repaired.
- The door knob is outdated or no longer matches your interior decor.
- You have upgraded your security measures and require a more robust and secure door knob.
- The door knob is constantly giving you problems, such as sticking, jamming, or becoming loose, even after maintenance efforts.
By following these tips for cleaning, performing regular maintenance, and implementing preventive measures, you can ensure that your door knob remains in excellent condition and serves you well for years to come.
Frequently Asked Questions Of How To Install A Door Knob With Hidden Screws
How Do You Tighten A Doorknob With Hidden Screws?
To tighten a doorknob with hidden screws, locate the small slot or hole on the side of the knob. Insert a small flathead screwdriver or Allen wrench into the slot/hole and turn it clockwise to tighten the knob securely.
How To Remove And Replace A Door Knob Without Visible Screws?
To remove and replace a door knob without visible screws, follow these steps: 1. Locate the small slot or hole on the side or bottom of the knob. 2. Insert a flathead screwdriver into the slot or hole and gently pry off the decorative plate.
3. Unscrew and remove the two screws beneath the plate to release the knob. 4. Install the new knob by reversing the process, ensuring the screws are tight. 5. Test the new knob to ensure it functions properly.
How Do You Install A Doorknob Screw?
To install a doorknob screw, follow these steps: 1. Begin by locating the screw hole on the door. 2. Insert the screw into the hole and tighten it securely with a screwdriver. 3. Ensure the screw is flush with the surface of the door.
4. Test the doorknob to ensure it is securely attached. 5. If needed, adjust the tightness of the screw for optimal functionality.
How Do You Bore A New Door Knob?
To bore a new door knob, follow these steps: 1. Measure and mark the spot for the hole. 2. Use a hole saw drill bit of the appropriate size. 3. Secure the door and drill a hole in the marked spot.
4. Test fit the knob and make any necessary adjustments. 5. Install the knob and tighten the screws.
Conclusion
To sum up, installing a door knob with hidden screws is a simple process that adds both aesthetic appeal and security to your doors. By following the step-by-step instructions outlined in this guide, you can easily upgrade your door’s appearance without compromising its functionality.
With a few basic tools and a little bit of patience, you’ll have your new door knob installed in no time. So go ahead, give your doors a stylish makeover and enjoy the enhanced privacy and convenience it brings.