To install a door stop, simply follow these steps: Measure and mark the desired location on the wall, align the door stop with the mark, and screw it securely into place. Ensure that the door stop is positioned at the appropriate height to prevent damage to the wall or door.
When it comes to installing a door stop, it is essential to consider the protection and functionality it offers. Door stops serve as a barrier between the door and the wall, preventing the door from swinging too far and causing damage.
They also help to hold the door open, allowing for easy access and reducing the risk of accidental closures. By following a few simple steps, you can install a door stop and enjoy its benefits in no time.
Factors To Consider When Selecting A Door Stop
When it comes to door stops, it’s essential to choose the right one that suits your needs. To ensure the door stop adequately performs its function, there are a few factors you need to consider before making a purchase. These factors include size and weight compatibility, material and durability, and the easy installation process. Let’s delve into each of these factors in detail:
Size and Weight Compatibility
One of the most crucial aspects to consider when selecting a door stop is its size and weight compatibility. It’s important to keep in mind the weight and thickness of the doors in your home or office. Different doors require different door stops. For instance, heavy-duty doors require door stops with a larger size and a stronger grip to hold them in place. On the other hand, lighter doors may only need a smaller and simpler door stop. To ensure you choose the right door stop with the appropriate size and weight compatibility, consider measuring the thickness and weight of your doors before making a decision.
Material and Durability
The material and durability of a door stop are vital factors to consider as they determine the longevity and effectiveness of the door stop. Door stops are available in a wide range of materials, including rubber, plastic, metal, and wood. Rubber door stops are a popular choice as they provide a firm grip and prevent damage to the door and the floor. Metal door stops are sturdy and durable, making them suitable for heavy-duty doors. Wood door stops, on the other hand, offer a classic and aesthetically pleasing option. Consider the material that best suits your door and the durability you desire before making a purchase.
Easy Installation Process
The ease of installation is another factor that should not be overlooked when selecting a door stop. Nobody wants to spend hours struggling to install a door stop, especially if you have multiple doors in your home or office. Look for door stops that come with a simple and straightforward installation process. Many quality door stops require minimal effort and can be easily installed with basic tools such as a screwdriver or adhesive. Ensure you select a door stop that you can easily install without any hassle.
Understanding Different Types Of Door Stops
When it comes to door hardware, door stops are often an overlooked but essential component. Door stops serve multiple purposes, from preventing damage to walls and furniture to providing security and convenience. Different types of door stops are available, each designed for specific functionalities and settings. In this article, we will discuss the four most common types of door stops: kickdown door stops, magnetic door stops, door stop wedges, and hinge pin door stops.
Kickdown door stops
Kickdown door stops are a popular choice for homes, offices, and public buildings. These door stops consist of a metal rod attached to a bracket, which is installed on the baseboard or floor. The kickdown feature allows the user to easily raise or lower the stopper with their foot. Kickdown door stops are ideal for areas where the door needs to remain open for extended periods, such as busy hallways or entrances.
Magnetic door stops
Magnetic door stops provide a discreet and effective way to hold doors open. These door stops have two parts – a magnet installed on the floor or baseboard and a metal plate fitted on the bottom of the door. When the door is opened and brought near the magnet, the magnetic force holds it securely in place. Magnetic door stops are particularly useful in areas where a kickdown style would be obtrusive or impractical, such as in a small and cluttered space.
Door stop wedges
Door stop wedges are simple yet versatile door stops that work by wedge friction. These door stops are typically made of rubber or plastic and are small in size, making them easy to store and transport. To use a door stop wedge, simply place it behind the door or in front of it, depending on your preference. Door stop wedges are commonly used in residential settings, offices, and hotels, as they are non-damaging and can be easily adjusted to accommodate different door heights.
Hinge pin door stops
Hinge pin door stops are unique door stops that are installed directly into the hinge of the door. These door stops are discreet and do not require any drilling or additional hardware. The hinge pin door stop consists of a pin that fits into the door’s hinge and a stopper that prevents the door from opening too far. This type of door stop is ideal for doors that swing both ways, as it offers protection for walls, furniture, and nearby items.
In conclusion, understanding the different types of door stops is crucial when it comes to choosing the right one for your needs. Whether you opt for kickdown door stops, magnetic door stops, door stop wedges, or hinge pin door stops, each type offers unique benefits that cater to various settings and preferences. By selecting the appropriate door stop, you can enhance the functionality and longevity of your doors while maintaining the aesthetics of your space.
Gathering The Required Tools And Materials
If you’re looking to install a door stop, it’s important to have the necessary tools and materials at hand. This will make the installation process much smoother and help ensure that the door stop is securely in place. Below, we’ll discuss the key items you’ll need:
Screwdriver
A screwdriver is an essential tool for installing a door stop. It is used to screw the door stop securely into place. Make sure to choose the appropriate type of screwdriver for the screws you’ll be using.
Drill
In some cases, you may need a drill to create pilot holes for the screws. This is especially true if you’re installing the door stop into a hard material such as concrete or metal. Additionally, a drill can also help you achieve a more precise installation.
Measuring Tape
Before installing the door stop, accurately measuring the desired placement is crucial. A measuring tape will help you determine the appropriate height and position for the door stop. Taking precise measurements ensures that the door stop is correctly aligned and effective in preventing damage to walls or furniture.
Door Stop
The door stop itself is, of course, a key component. Ensure that you have a high-quality door stop that is suitable for your specific needs. Door stops come in various types and materials, so choose one that matches your door and aesthetic preferences.
Screws
Finally, you’ll need screws to attach the door stop to the door and/or the wall. The length and thickness of the screws should be appropriate for the material and thickness of the door. It’s always a good idea to have extra screws on hand, just in case.
By gathering these tools and materials beforehand, you’ll have everything you need to install a door stop efficiently. Now that we have our tools ready, let’s dive into the step-by-step installation process in the next section.
Examining The Door And Floor Conditions
Before you begin installing a door stop, it’s crucial to examine the conditions of both the door and the floor. By doing so, you can ensure a successful installation that will keep your door protected and in proper working order for years to come. In this section, we will guide you through two key aspects: assessing the door material and thickness and checking the floor type and condition.
Assessing the Door Material and Thickness
First, take a moment to evaluate the material and thickness of your door. Different kinds of doors may require different installation techniques or door stops specifically designed for their characteristics. To determine the door material and thickness, follow these steps:
- Carefully examine the door’s surface. Is it made of solid wood, composite, metal, or another material?
- Measure the thickness of the door using a tape measure or calipers. This measurement will help you choose the right door stop size later on in the installation process.
Determining the Precise Location for Installation
Next, it’s essential to determine the precise location where you will install the door stop. Placing it in the right spot will maximize its effectiveness and prevent damage to both the door and the surrounding area. Follow these steps to find the optimal installation location:
- Open and close the door multiple times to observe its swing and the areas where it makes contact with the wall or adjacent surfaces.
- Identify the highest point of contact between the door and the wall or nearby structures.
- Ensure there is enough clearance for the door stop to fully extend, without obstructing the door’s movement.
Checking the Floor Type and Condition
The condition of your floor plays a crucial role in the installation process. An uneven or damaged floor can affect the stability and functionality of the door stop. Follow these steps to check the floor type and condition:
- Identify the material of your floor: hardwood, laminate, tile, carpet, or another type.
- Inspect the floor for any cracks, bumps, or unevenness that may interfere with the installation of the door stop.
- If necessary, address any floor issues before proceeding with installing the door stop.
By carefully examining the conditions of the door and the floor, you can ensure a smooth and successful installation of your door stop. Taking the time to evaluate the door material, determine the precise location, and check the floor condition will help you make informed choices throughout the process, ensuring the longevity and functionality of your door stop.
Marking The Installation Point
Marking the installation point is the crucial first step in installing a door stop. By properly marking the desired height on the door and ensuring proper alignment with the floor, you can achieve a smooth installation and prevent any accidents or damages in the long run. In this section, we will guide you through the process of measuring and marking the desired height on the door, as well as ensuring proper alignment with the floor.
Measuring and marking the desired height on the door
The first step in marking the installation point is to measure and mark the desired height on the door. This will ensure that the door stop is placed at the right position to effectively prevent the door from hitting the wall or other objects.
To measure the desired height, follow these simple steps:
- Take a measuring tape and place it vertically along the edge of the door.
- Starting from the floor, measure the desired height at which you want the door stop to be installed.
- Mark the measurement on the door using a pencil or a small piece of tape. Make sure the mark is clear and easily visible.
By measuring and marking the desired height on the door, you will have a reference point for the installation of the door stop. This will ensure that the door stop is installed at the correct height, providing maximum effectiveness and protection.
Ensuring proper alignment with the floor
In addition to measuring and marking the desired height, it is crucial to ensure proper alignment of the door stop with the floor. This will prevent any tripping hazards or uneven surfaces that can cause accidents.
Here are the steps to ensure proper alignment with the floor:
- Place a level vertically against the edge of the door, aligning it with the marked height for the door stop.
- Adjust the positioning of the door stop until the level shows that it is perfectly vertical.
- Once you have achieved proper alignment, mark the screw holes for the door stop on the door using a pencil or a small piece of tape.
By ensuring proper alignment with the floor, you can be confident that the door stop is positioned correctly to prevent the door from swinging too far open and causing damage or accidents.
Remember, marking the installation point accurately is crucial for a successful door stop installation. By following these steps to measure and mark the desired height on the door and ensuring proper alignment with the floor, you can achieve a safe and effective installation that will serve you well in the long run.
Drilling The Pilot Holes
Preparing the drill and suitable bit size
Before drilling the pilot holes for your door stop, it’s important to make sure you have everything you need. This includes a drill and a suitable bit size for the screws you’ll be using. The right bit size is crucial to ensure a secure and proper installation.
To determine the appropriate bit size, it’s recommended to check the instructions provided with your door stop. They usually specify the correct size to use. If you don’t have the instructions, you can measure the diameter of the screws yourself. Simply grab a caliper or a ruler and measure the width of the screw’s shaft. This will help you identify the right bit size to choose.
Creating pilot holes for the screws
Now that you have your drill and the correct bit size, it’s time to create pilot holes for the screws. Pilot holes are small guide holes that help prevent the wood from splitting when you insert the screws. They also make it easier to drive the screws in and ensure a secure fit.
To create the pilot holes, start by marking the locations where the door stop will be attached. Use a pencil or a marker to make small dots on the door frame or wall at the desired height. These markings will serve as a guide for drilling.
Next, align the drill bit with one of the markings and carefully position it at a 90-degree angle to the surface. Start drilling slowly, keeping the drill steady and applying gentle pressure. Remember to start with a low speed setting on your drill and gradually increase it as needed.
Once the pilot hole is created, remove any wood shavings or debris by blowing on it or using a brush. Repeat the process for the remaining markings, ensuring each hole is at the same depth and angle as the first one.
Creating pilot holes not only makes the installation process easier but also reduces the risk of damaging the door frame or wall. It’s a simple step that can save you from unnecessary repairs or replacements in the future.
Attaching The Door Stop To The Floor
Now that you have drilled the pilot holes, it’s time to attach the door stop to the floor. This step is crucial as it ensures the door stop remains securely in place. Follow these simple instructions to ensure a tight and reliable attachment.
Aligning the door stop with the pilot holes
Begin by aligning the door stop with the pilot holes you drilled earlier. Position the door stop in the desired location, making sure it is flush against the door jamb. Take a moment to double-check the alignment before proceeding to the next step. A properly aligned door stop will ensure effective protection for your walls and door.
Securing it to the floor using screws
Once aligned, it’s time to secure the door stop to the floor using screws. Choose screws that are appropriate for your floor type, such as wood or concrete screws. Using a screwdriver or drill, carefully insert the screws into the pilot holes, ensuring they are firmly attached. Be cautious not to overtighten the screws, as this could strip the holes or damage the door stop.
To ensure the door stop remains securely in place, it’s recommended to drive two screws into the floor. Place one screw near the top of the door stop and the other near the bottom, making sure they are evenly spaced. This will provide optimal support and stability for the door stop.
After securing the door stop, give it a gentle tug to test its strength. If it feels secure, then you have successfully attached the door stop to the floor. You can now enjoy the peace of mind that comes with knowing your walls and doors are protected from damage.
In conclusion, attaching a door stop to the floor is a simple process that can be done by anyone with the right tools and a little patience. By following these steps, you can ensure the door stop is securely attached, providing effective protection for your walls and doors. So go ahead and install a door stop in your home today!
Mounting The Door Stop Onto The Door
Aligning the Door Stop with the Corresponding Point on the Door
Before mounting the door stop onto the door, it is essential to ensure that it is aligned properly with the corresponding point on the door. Follow these simple steps to align the door stop correctly:
- Identify the correct location: Carefully examine the door and identify the spot where the door stop needs to be installed. This is usually the area where the door handle or knob comes into contact with the wall.
- Measure the distance: Use a measuring tape to measure the distance from the floor to the desired height where the door stop will be mounted. Ensure accuracy to achieve optimal functionality.
- Mark the spot: Now that you have determined the location and measured the distance, use a pencil or a marker to make a small mark on the door to indicate the precise spot where the door stop will be installed.
- Double-check the alignment: Before proceeding to the next step, take a moment to double-check the alignment of the door stop with the corresponding point on the door to ensure it is lined up correctly. This step is crucial for the door stop to function effectively.
Securing it in Place with Screws
Once you have aligned the door stop with the correct point on the door, it is time to secure it in place using screws. Follow these steps to ensure a secure installation:
- Pre-drill pilot holes: Using an appropriate drill bit, pre-drill pilot holes on the marked spot. This step will prevent the wood from splitting when you insert the screws and ensure a strong hold.
- Choose the right screws: Select screws that are suitable for the material of your door. Remember, different doors may require different sizes or types of screws. It’s essential to use the correct ones to guarantee a secure installation.
- Attach the door stop: Place the door stop over the pre-drilled pilot holes, aligning it with the marked spot. Insert the screws into the pilot holes and start tightening them using a screwdriver or a suitable tool until they are firmly secured.
- Test the stability: Give the installed door stop a gentle push to ensure it is firmly attached to the door. If there is any wobbling or instability, reinforce the screws by tightening them a bit more.
By aligning the door stop correctly with the corresponding point on the door and securing it in place with screws, you can ensure its effectiveness in preventing damage to your door and walls. Following these steps will result in a successful installation that will provide you with peace of mind.
Making Adjustments For A Proper Fit
Installing a door stop may seem like a simple task, but achieving a proper fit is essential for its effectiveness. Making adjustments to the height or position of the door stop ensures that it does its job effectively. In this section, we will guide you through the process of testing the door stop’s effectiveness and making necessary adjustments to achieve a proper fit.
Testing the door stop’s effectiveness
Before making any adjustments, it is crucial to test the door stop’s effectiveness. Place a piece of paper on the floor and close the door. Gently push the door against the paper as if it were closing, and observe if it stops the door from fully closing. If the door stop does not prevent the door from closing completely, adjustments are necessary.
Adjusting the height or position if necessary
Once you’ve determined that the door stop requires adjustments, you can proceed to adjust its height or position. Here are the steps to follow:
- Assess the door’s clearance: Examine the space between the bottom of the door and the floor. A typical door clearance is around 1 inch. If the clearance is significantly more or less than this, adjustments are needed.
- Adjusting the height: If the clearance is too small, the door stop may need to be raised. Unscrew the door stop from the base plate and adjust its height by screwing it up or down. Ensure that the door stop is positioned at a height that allows it to contact the door when it tries to close.
- Adjusting the position: If the clearance is too large, the door stop may need to be repositioned. Unscrew the door stop from its current position and move it closer to the door. Ensure that the door stop is positioned in a way that it will effectively stop the door from closing fully.
- Test the adjustments: After making the necessary adjustments, close the door again, pushing it against the piece of paper on the floor. Check if the door stop now prevents the door from fully closing. If it does, your adjustments were successful.
Making adjustments for a proper fit ensures that the door stop performs its function effectively. Testing its effectiveness, adjusting the height, and repositioning if needed are crucial steps in achieving the desired outcome.
Adding A Bumper For Noise Reduction
When installing a door stop, it is crucial to consider noise reduction as well. Adding a bumper can minimize the impact and prevent loud banging noises, especially in high-traffic areas. The good news is that installing a rubber or silicone bumper is a quick and simple process that anyone can do. Let’s take a closer look at how to install a bumper for noise reduction.
Installing a Rubber or Silicone Bumper
To effectively reduce noise when installing a door stop, consider using a rubber or silicone bumper. These materials are excellent choices as they absorb impact and provide a cushioning effect. Here are the steps to install a bumper:
- Begin by identifying the ideal location for the bumper. It should align with the door handle or knob at a sufficient distance from the wall.
- Once you have selected the desired location, use a pencil to mark the exact spot for the bumper.
- Prepare the area by cleaning it with a mild detergent and warm water. Ensure there are no dust or debris particles present as they can compromise the adhesive.
- Peel off the backing tape from the bumper to expose the adhesive side.
- Align the adhesive side of the bumper with the marked spot on the wall or door. Press firmly to ensure proper adhesion.
- Hold the bumper in place for a few seconds to allow the adhesive to bond securely.
- Repeat the process for any additional bumpers you wish to install.
By following these simple steps, you can add a rubber or silicone bumper to your door stop, reducing noise and preventing unnecessary disturbances. Not only will this be appreciated by those who value peace and quiet, but it can also help protect your door and walls from potential damage.
Preventing Damage to the Door and Wall
Aside from noise reduction, the addition of a bumper to your door stop can prevent damage to both the door and the wall. The cushioning effect provided by the bumper absorbs the impact and eliminates the risk of scratches, dents, or marks. With this proactive measure in place, you can ensure your door and wall remain in excellent condition for years to come.
Remember, the key to a successful installation is choosing high-quality bumpers and following the instructions meticulously. Take the time to clean the surface properly and make sure the adhesive has a strong bond. With these precautions, your door stop will not only function effectively but also provide the desired noise reduction and protection for your door and walls.
Regular Maintenance And Upkeep
Regular maintenance and upkeep of your door stop is essential to ensure its optimal functioning and longevity. By regularly cleaning, inspecting, and replacing any damaged or worn-out parts, you can ensure that your door stop continues to provide effective protection for your doors. In this section, we will discuss the steps you need to take to maintain and upkeep your door stop.
Cleaning and Inspecting the Door Stop Regularly
Regular cleaning and inspection of your door stop is crucial to keep it in good condition. Over time, dirt, dust, and debris can accumulate on the door stop, affecting its performance. To clean your door stop:
- Start by removing any visible dirt or debris with a soft, damp cloth.
- Use a mild detergent or soap solution to gently clean the surface of the door stop. Avoid using abrasive cleaners or harsh chemicals, as they can damage the finish.
- Rinse the door stop with clean water to remove any soap residue.
- Dry the door stop thoroughly with a soft cloth to prevent water spots or damage.
Once you have cleaned the door stop, it is important to inspect it for any signs of wear or damage. Check for any loose screws, cracks, or dents that may affect the door stop’s performance. If you notice any issues, it is best to address them promptly to prevent further damage.
Replacing Any Damaged or Worn-Out Parts
Over time, certain parts of your door stop may become damaged or worn out due to regular use. To ensure the door stop’s effectiveness, it is important to replace these parts as necessary. Here are the steps to follow:
- Start by identifying the damaged or worn-out part. This could include the rubber tip, spring, or mounting hardware.
- Remove the damaged part by unscrewing or detaching it from the door stop.
- Refer to the manufacturer’s instructions or consult a professional to ensure you purchase the correct replacement part.
- Install the new part by following the manufacturer’s instructions, ensuring it is securely attached to the door stop.
By regularly cleaning, inspecting, and replacing any damaged parts of your door stop, you can ensure its longevity and maintain its effectiveness in protecting your doors from damage. Incorporate these steps into your regular maintenance routine to keep your door stop in top condition.
Frequently Asked Questions On How To Install A Door Stop
Where Is The Best Place To Put A Door Stop In A Door?
The best place to put a door stop in a door is on the floor near the bottom edge of the door. This helps prevent the door from swinging too far or hitting the wall.
How Do You Install A Baseboard Door Stopper?
To install a baseboard door stopper, follow these steps: 1. Choose the location: Decide where you want the stopper. 2. Mark the spot: Measure and mark the height on the baseboard. 3. Drill pilot holes: Use a drill to create small holes at the marked spot.
4. Attach the stopper: Screw the stopper into the pilot holes securely. 5. Test it: Open and close the door to ensure the stopper functions properly.
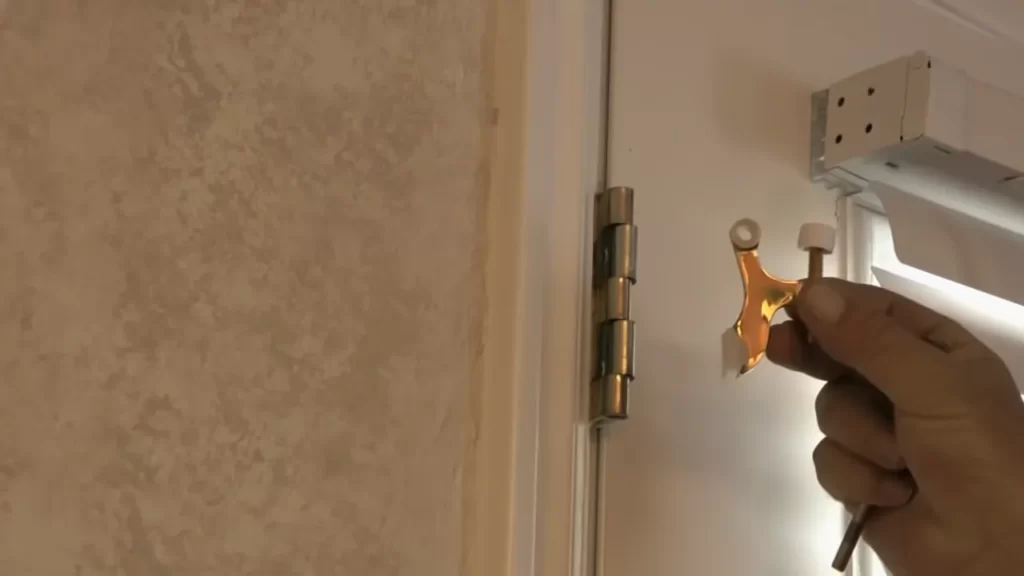
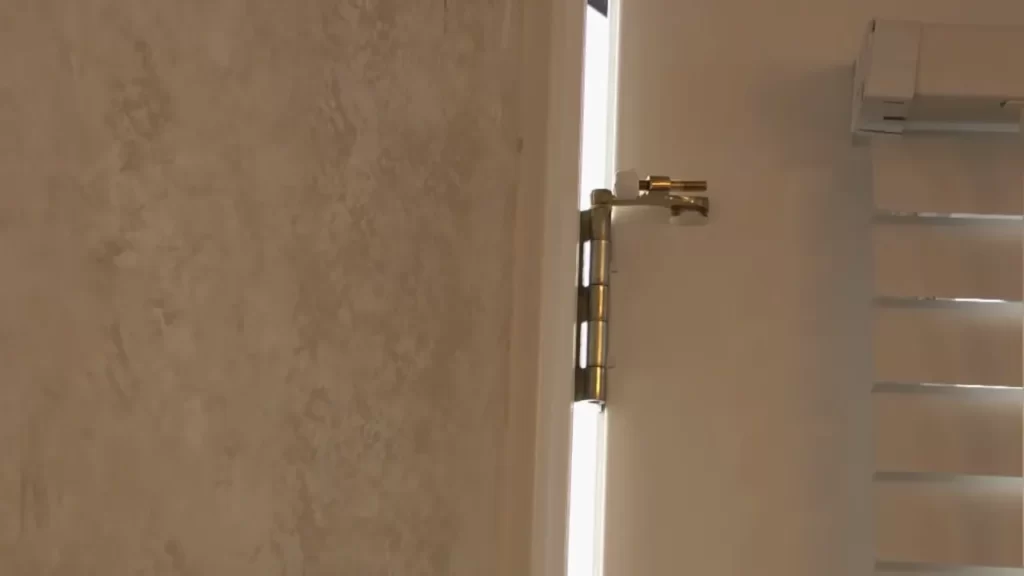
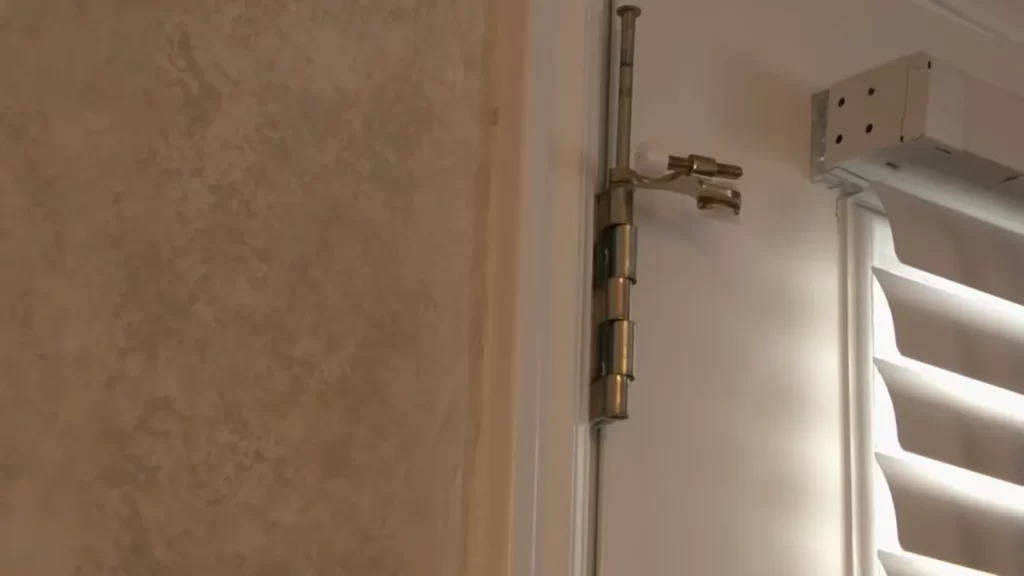
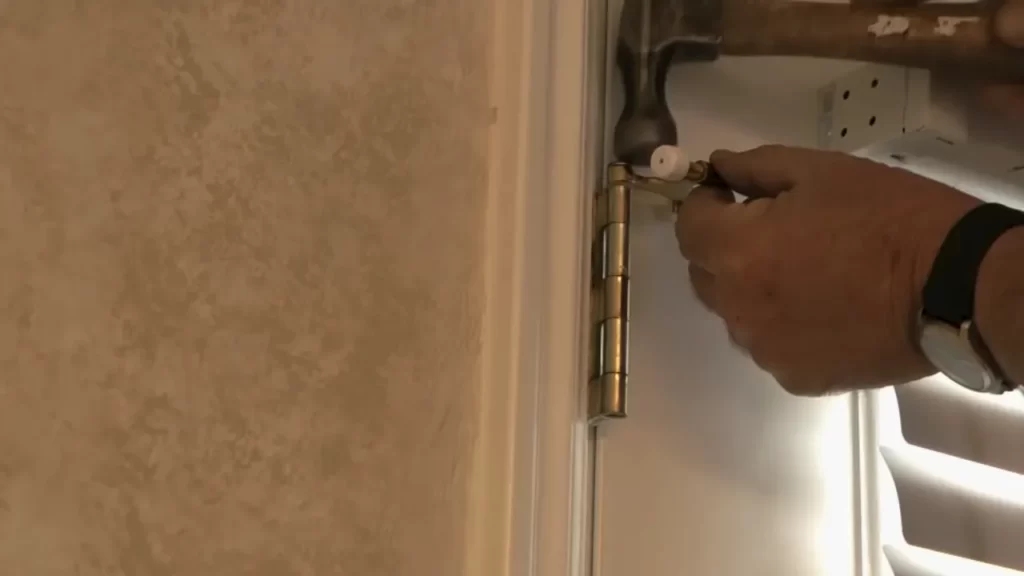
How Do You Install A Door Stop On A Hinge?
To install a door stop on a hinge, follow these steps: 1. Open the door and locate the hinge pin. 2. Place the door stop on the pin, ensuring it’s aligned with the door jamb. 3. Tap the bottom of the pin to secure the door stop in place.
4. Close the door to test if the stop is properly positioned. 5. Adjust if needed, and you’re done!
What Is An Alternative To A Door Stop?
An alternative to a door stop is a door wedge. It is a small device that prevents a door from closing by wedging it open. Door wedges are easy to use and can be made from various materials like rubber or wood.
How Do I Choose The Right Door Stop?
To choose the right door stop, consider the door type, floor material, and aesthetics of your space.
What Are The Different Types Of Door Stops?
The different types of door stops include hinge pin stops, baseboard stops, and floor-mounted stops.
Conclusion
Installing a door stop is a simple yet effective way to protect your walls and doors from damage. By following the step-by-step instructions provided in this blog post, you can easily complete the installation process. Remember to choose the right door stop for your needs and ensure it is securely attached to the floor or wall.
With a door stop in place, you can enjoy peace of mind knowing that your doors are protected and will last longer.