o install a mailbox, first, choose a suitable location for it. Then, dig a hole for the post, secure the post in the hole with concrete, and attach the mailbox to the post using the provided hardware.
Installing a mailbox is a simple and straightforward process that can be completed with just a few tools and materials. Whether you’re a homeowner looking to upgrade your mailbox or a new homeowner wanting to install one for the first time, this guide will provide you with the necessary steps to get the job done.
By following these instructions, you’ll have a sturdy and secure mailbox that will not only enhance the curb appeal of your home but also ensure the safe delivery of your mail. So, let’s dive in and learn how to install a mailbox.
Choosing The Right Mailbox: Factors To Consider
When it comes to installing a mailbox, choosing the right mailbox is an important decision. After all, it’s not just a simple receptacle for your mail – it’s an essential part of your home’s curb appeal. With so many options available, it can be overwhelming to decide which mailbox is best suited for your needs. To help you make an informed choice, here are some crucial factors to consider when selecting the right mailbox.
Size and Design
The size of your mailbox is an important consideration. It should be large enough to comfortably accommodate your daily mail and small packages without getting overcrowded. On the other hand, it shouldn’t be too large that it becomes an eyesore or obstructs the view from the road. Consider the volume of mail you receive and the dimensions of any packages you frequently receive to determine the appropriate size.
Design is another vital aspect. Your mailbox should complement the style of your home and the overall aesthetic of your neighborhood. Whether your home has a modern, traditional, or rustic appeal, there are countless mailbox designs available to suit your taste. Opt for a design that adds a touch of personality to your home while blending seamlessly with its surroundings.
Material and Durability
When it comes to the material of your mailbox, durability is key. You want a mailbox that can withstand the elements and stand the test of time. Common materials used for mailboxes include stainless steel, aluminum, and plastic. Stainless steel is known for its strength and resistance to rust, making it a popular choice. Aluminum is lightweight and corrosion-resistant, while plastic mailboxes offer affordability and low maintenance.
Consider the climate in your area when selecting the material. If you live in an area prone to harsh weather conditions such as heavy rain or extreme temperatures, you’ll want a mailbox that can withstand these challenges. Additionally, ensure that the material is treated or coated to provide extra protection against rust and corrosion.
Mounting Options
Mounting options are an essential factor to consider when choosing a mailbox. Depending on your preferences and the available space, you can opt for a post-mounted mailbox, a wall-mounted mailbox, or even a mailbox that attaches to your fence or gate. Each mounting option comes with its own advantages, so consider factors such as convenience, accessibility, and aesthetics when making your decision.
If you choose a post-mounted mailbox, ensure that it comes with a sturdy post that can be securely installed into the ground. A wall-mounted mailbox should have proper hardware for attaching to your wall or fence. Whichever option you choose, make sure it offers easy access for both mail delivery personnel and yourself.
By considering these factors – size and design, material and durability, and mounting options – you can confidently choose a mailbox that not only serves its purpose but also enhances the overall appeal of your home. Take your time, explore different options, and select a mailbox that reflects your style while ensuring functionality.
Step 1: Checking Regulations And Guidelines
Before you begin installing a mailbox, it is important to check the regulations and guidelines set by your local authorities. This step ensures that your mailbox installation complies with the specific rules and requirements of your area.
Research Local Regulations
The first thing you need to do is research your local regulations regarding mailbox installations. This can usually be done by visiting your city or county’s official website or contacting the local post office. Look for any specific guidelines, restrictions, or permits required for mailbox installations in your area.
Determine Eligible Locations
Once you are familiar with the regulations, it’s time to determine the eligible locations for your mailbox. Keep in mind that there may be restrictions on where you can install it for safety and accessibility reasons. Some common guidelines include keeping it a certain distance from the road, avoiding obstructing sidewalks or mail carrier routes, and ensuring it is easily visible and accessible.
Understand Height and Distance Requirements
In addition to eligible locations, you need to understand the height and distance requirements for your mailbox. This ensures that your mailbox is installed at the correct height and distance from the ground and the road. These requirements are usually specified in the regulations and can vary depending on your area.
To summarize, the first step in installing a mailbox is to check the regulations and guidelines provided by your local authorities. Research the local regulations, determine the eligible locations, and understand the height and distance requirements. By adhering to these guidelines, you can ensure a safe and compliant mailbox installation.
Step 2: Gathering The Required Materials And Tools
Before you start installing a mailbox, the first thing you need to do is gather all the necessary materials and tools. Having everything prepared in advance will make the installation process smoother and more efficient. Here are the essential items you’ll need:
Mailbox
The mailbox itself is, of course, the centerpiece of this installation. Ensure you have a sturdy mailbox that meets the necessary size and design requirements set by local regulations. It’s also important to choose a mailbox that suits your personal style and preferences.
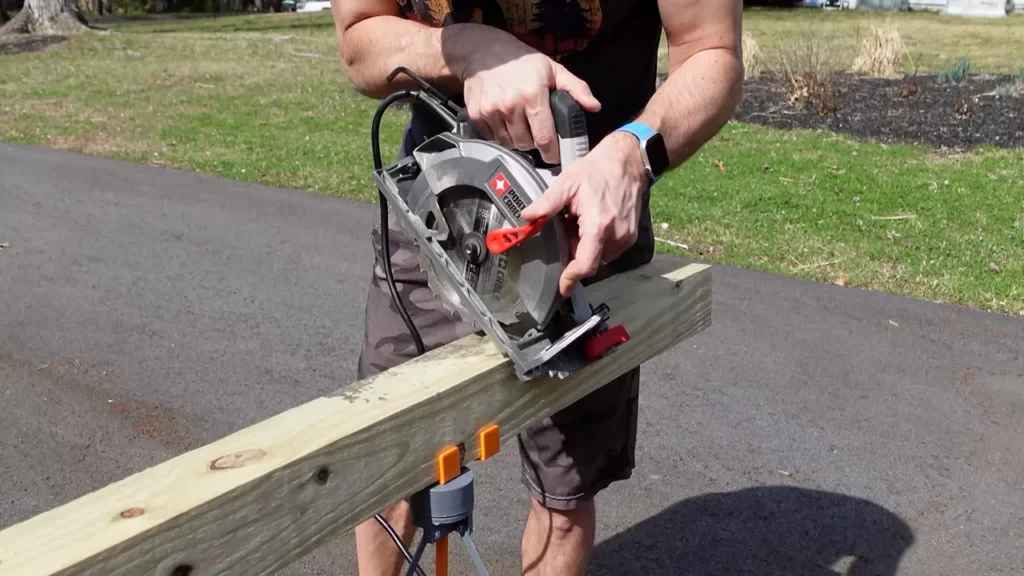
Post
A durable post is essential for providing stability and support to your mailbox. You can choose between different materials such as wood, metal, or PVC, depending on your needs and preferences. Make sure the post is long enough to extend below the frost line to prevent any potential damage during freezing temperatures.
Concrete mix
To securely anchor the post into the ground, you’ll need a bag of concrete mix. This will help ensure your mailbox remains upright and resistant to the elements. Choose a high-quality concrete mix formulated for outdoor use to ensure long-lasting durability.
Shovel
A sturdy shovel is indispensable for digging a hole deep enough to accommodate the post. Make sure to use a shovel with a sharp edge for easier and more efficient excavation.
Level
To ensure that your mailbox is perfectly straight and level, you’ll need a reliable leveling tool. A spirit level or a bubble level will help you achieve precise and balanced positioning for your mailbox.
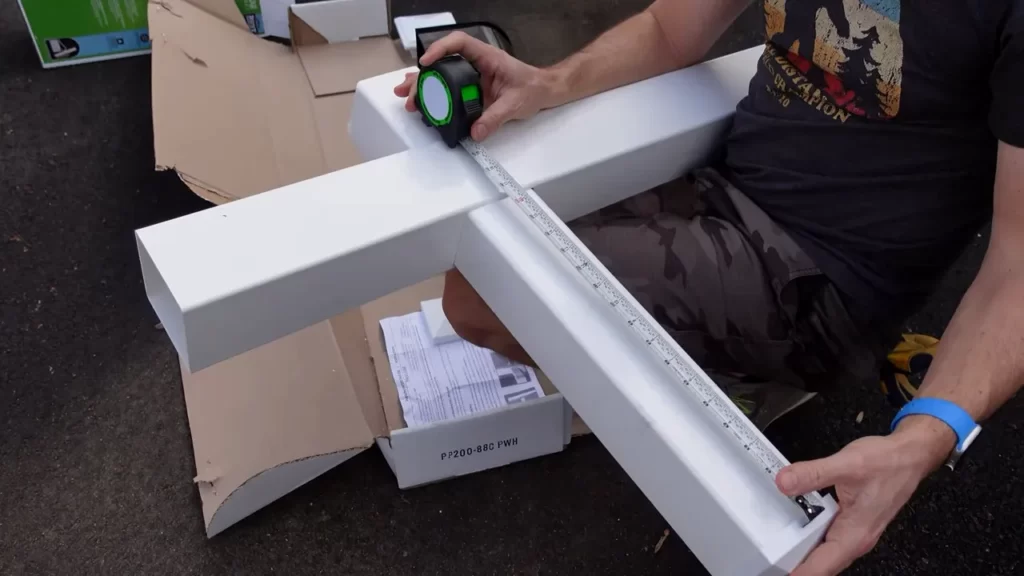
Tape measure
Accurate measurements are crucial for proper installation. A tape measure will enable you to determine the optimum height for your mailbox, as well as ensure proper distances from the curb and neighboring mailboxes.
Screwdriver
A screwdriver, particularly a Phillips head screwdriver, will come in handy for securing the mailbox to the post. Be sure to choose the appropriate size and type of screws that are compatible with your mailbox’s installation requirements.
Gathering the necessary materials and tools before you start installing your mailbox is a crucial step in ensuring a smooth and successful installation process. By having everything prepared, you can save time and effort, and increase the overall efficiency of the project. Now that you have all the essential items, you’re ready to move on to the next step: digging the hole for the post.
Step 3: Preparing The Installation Site
Marking the Location
Before digging the hole for your mailbox, it’s crucial to first mark the exact location where you want it to be installed. This will ensure that the mailbox is easily accessible for mail carriers and convenient for you to retrieve your delivered mail. To mark the location, follow these simple steps:
- Start by measuring the recommended distance from the edge of the road or sidewalk, as stated by your community regulations or local post office.
- Using a measuring tape, measure and mark the distance on the ground, ensuring the mark is easily visible to ensure accuracy.
- If your mailbox is intended to be attached to your house, measure and mark the appropriate height and distance from your front door or entrance.
Clearing the Area
Once the location is marked, it’s important to clear the area to ensure a clean and clutter-free space for your mailbox. This will not only enhance the aesthetics of your mailbox setup, but also make it easier for mail carriers to access it. Here’s how to clear the area:
- Remove any existing objects, such as plants, shrubs, or debris, from the marked location.
- Trim any tree branches or bushes that may hinder the visibility or obstruct the pathway to your mailbox.
- Ensure there is no overgrown grass or weeds around the area by mowing or using a trimmer.
Digging the Hole
Now that you have marked the location and cleared the area, it’s time to dig the hole for your mailbox. Digging the hole properly will ensure stability and durability of your mailbox installation. Follow these steps to dig the hole:
- Using a post hole digger, start digging a hole at the marked location. The hole should be deep enough to accommodate one-third of the mailbox post, plus an additional 6-8 inches for gravel or concrete.
- Make sure the hole is wide enough to allow for easy maneuvering of the post. A width of around 12-18 inches should suffice.
- Remove any excess dirt or debris from the hole, ensuring it is clean and ready for the next step.
By marking the location, clearing the area, and digging the hole, you are setting the foundation for a secure and properly installed mailbox. Proceed to the next step to complete the installation.
Step 4: Installing The Mailbox Post
Now that you have prepared the ground and gathered the necessary tools, it’s time to move on to the next step – installing the mailbox post. This step is crucial as it ensures the stability and durability of your mailbox. Follow the instructions below for a successful installation.
Positioning the Post
First, determine the optimal location for your mailbox post. Ideally, it should be easily accessible to your mail carrier and positioned away from any obstructions or overhanging branches. Dig a hole deep enough to hold the post securely, usually about 18 inches.
**Important Note:** Before positioning the post, it’s essential to check with your local postal service or homeowner’s association for any specific requirements or regulations.
Securing the Post with Concrete
Once you have determined the proper location, it’s time to secure the mailbox post. One of the most effective methods is to use concrete. Concrete provides stability and prevents the post from shifting over time. Follow these simple steps:
- Place the post into the hole, ensuring it stands straight and level.
- Mix the concrete according to the manufacturer’s instructions. Typically, a mixture of one part cement, two parts sand, and three parts gravel works well.
- Pour the concrete mixture around the post, filling the hole completely. Use a trowel or shovel to remove any air pockets and ensure an even and compacted surface.
- Double-check the post’s alignment and use a level to ensure it remains plumb while the concrete sets.
- Allow the concrete to cure for the recommended time, usually around 24 to 48 hours.
**Pro Tip:** To make the installation process easier, consider using a post hole digger or a mechanical auger to dig the hole, and use a levelizer tool to ensure the post is completely straight and level.
Checking for Levelness
After the concrete has fully cured, it’s important to check the levelness of the post. A tilted post not only looks unappealing but can also cause difficulties in opening and closing the mailbox door. Use a level to ensure the post is perfectly plumb in both directions – vertically and horizontally. Make any necessary adjustments by adding or removing soil or concrete as needed.
By following these steps, you’ll ensure a solid and sturdy installation of your mailbox post. A securely installed post not only enhances the overall appearance of your mailbox but also ensures a hassle-free experience for both you and your mail carrier.
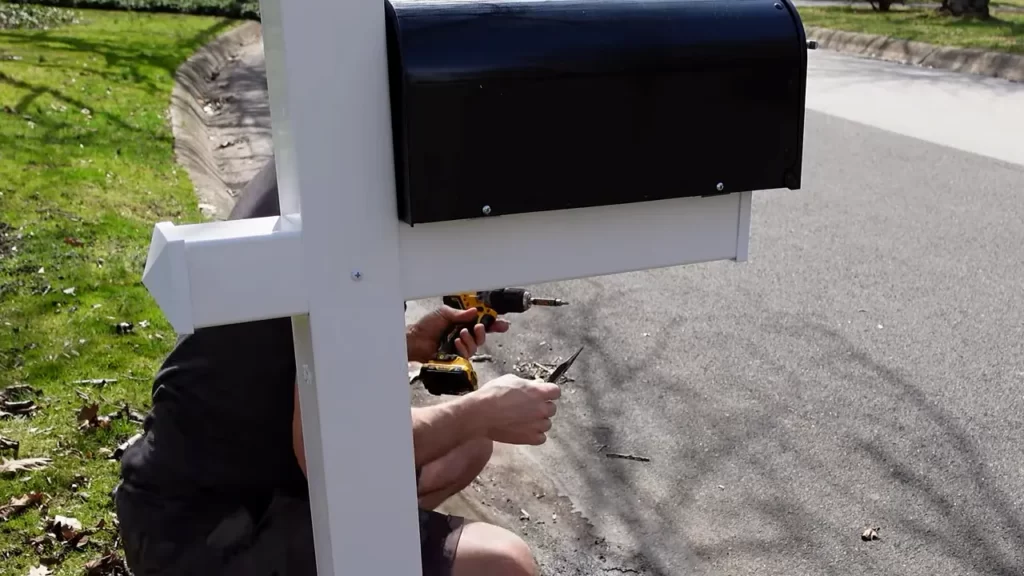
Step 5: Assembling The Mailbox
Once you have prepared the post and inserted the mounting board, it’s time to assemble the actual mailbox. Proper assembly ensures the mailbox is secure and functional, preventing any future mishaps. This step-by-step guide will help you assemble your mailbox correctly.
Follow Manufacturer’s Instructions
Before you start assembling the mailbox, it is essential to carefully read and follow the manufacturer’s instructions. These instructions provide specific guidance on how to assemble the mailbox and any additional components it may include, such as a flag or address plaque. Adhering to the manufacturer’s instructions ensures that you assemble the mailbox correctly and avoid any unnecessary damage or safety hazards.
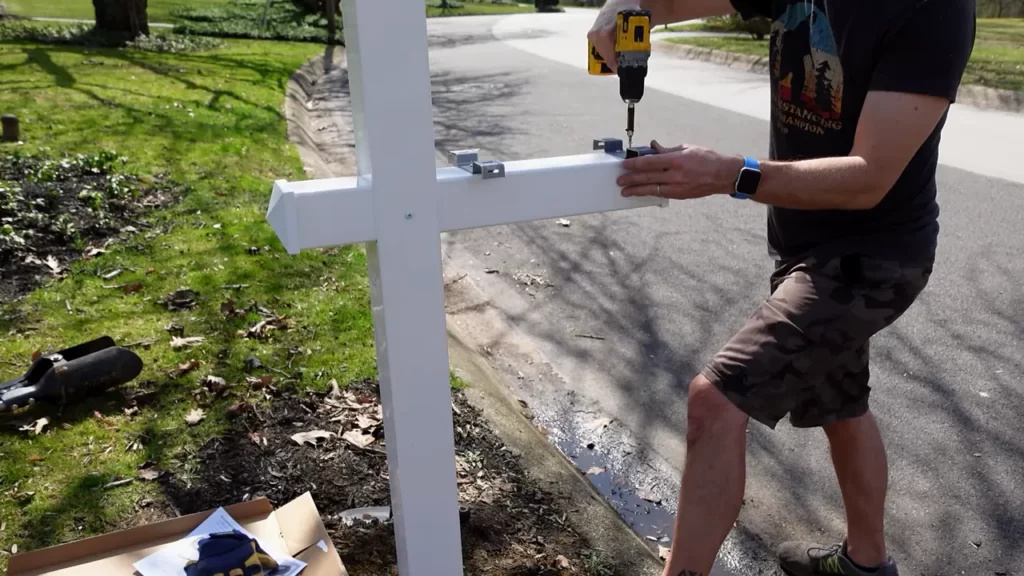
Place the Mailbox on the Post
Once you have all the pieces ready, it’s time to place the mailbox onto the post. Position the mailbox over the mounting board, aligning the holes on the bottom of the mailbox with the pre-drilled holes in the mounting board. Carefully lower the mailbox onto the board, making sure it is centered and level. Take a moment to double-check the alignment and adjust if necessary. Proper placement at this stage is vital to ensure stability and functionality later on.
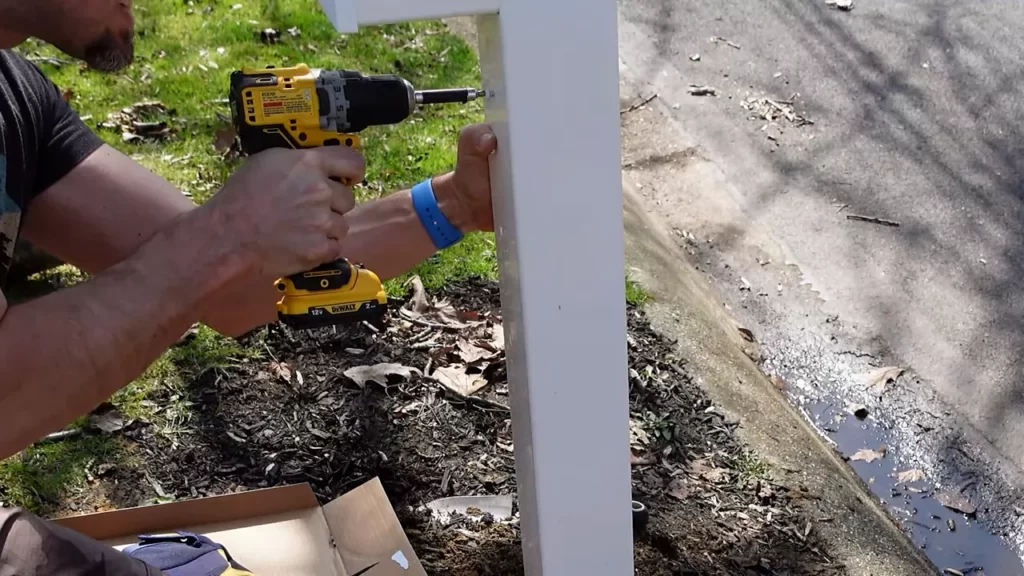
Fasten the Mailbox Securely
Now that the mailbox is in position, it’s time to secure it firmly to the post. Using the provided screws or bolts, attach the mailbox to the mounting board through the pre-drilled holes. Make sure to tighten the screws or bolts firmly, but be cautious not to overtighten as it may damage the mailbox or the post. Ensure that each screw or bolt is fastened securely, providing stability and longevity to your mailbox installation.
By following these steps and assembling your mailbox correctly, you can ensure that your mailbox is secure and ready to receive your mail. Taking the time to read and follow the manufacturer’s instructions, placing the mailbox properly on the post, and securely fastening it will contribute to a smooth installation process and a mailbox that stands the test of time.
Step 6: Testing The Stability Of The Installation
Once you have securely installed the mailbox post and attached the mailbox itself, it is important to test the stability of the installation. This step is crucial to ensure that your mailbox will remain secure and intact, even in adverse weather conditions. In Step 6, we will guide you through the process of testing the stability of your mailbox installation.
Check for Wobbling
The first thing you should do is check for any signs of wobbling or instability. Gently push the mailbox in different directions to see if it shifts or sways. If you notice any wobbling, it is important to address it immediately to prevent any further damage or potential accidents. To rectify this issue, you can reinforce the installation by adding additional support materials such as concrete or stabilizing brackets. This will provide extra stability and ensure that your mailbox remains in place even during strong winds or accidental bumps.
Ensure Proper Alignment
In addition to checking for wobbling, it is also important to ensure that your mailbox is properly aligned. Stand back a few feet and visually inspect the mailbox to see if it is level and aligned with the street. An improperly aligned mailbox not only looks unappealing, but it can also make it difficult for mail carriers to access and deliver your mail. Use a level tool to make any necessary adjustments and ensure that the mailbox is straight and aligned. You can gently tap the post to make minor adjustments until you achieve the desired alignment.
Verify Stability with Gentle Force
Lastly, apply some gentle force to the mailbox to verify its stability. Push and pull on the mailbox to see if it remains firmly in place. While doing so, remember not to use excessive force as it may cause damage to the mailbox or the installation. If the mailbox withstands the gentle force without any signs of instability or movement, then congratulations! Your mailbox installation is secure and stable. If you notice any issues during this stability test, go back and make the necessary adjustments to ensure a firm and stable installation. Remember, a stable mailbox not only ensures the safe delivery of your mail but also adds to the curb appeal of your property. Taking the time to properly test and reinforce the stability of your mailbox installation will provide peace of mind and help your mailbox withstand the test of time.
Step 7: Adding Finishing Touches
Now that you have successfully installed your mailbox, it’s time to add those final touches that will make it stand out and improve its functionality. This step involves two main tasks: decorating the area surrounding the mailbox and installing reflective numbers.
Decorating the Area Surrounding the Mailbox
Enhancing the area around your mailbox not only adds aesthetic value but also helps to protect it from potential damage. Here are a few tips on how to decorate the area surrounding your mailbox:
- Plant colorful flowers or shrubs nearby: Choose plants that are low maintenance and can withstand various weather conditions. This will add a pop of color and contribute to the overall appeal of your mailbox.
- Add a decorative border: Install a border made of stones, bricks, or decorative fencing around the mailbox. This will define the area and prevent accidental damage from lawnmowers or other equipment.
- Place a small garden statue or decorative mailbox post topper: A garden statue or a decorative mailbox post topper can personalize your mailbox and make it unique. Choose a design that matches your style and complements the surroundings.
Adjusting the Mailbox Flag
Properly adjusting your mailbox flag is essential to ensure that your mail carrier can easily identify outgoing mail. Follow these steps to adjust your mailbox flag:
- Locate the flag on the side of your mailbox.
- Gently lift the flag and rotate it downwards, creating a horizontal position.
- Push the flag slightly towards the mailbox to ensure it is securely in place.
By adjusting the mailbox flag correctly, you can avoid missed pickups or confusion for your mail carrier, ensuring that your outgoing mail is promptly collected.
Installing Reflective Numbers
Installing reflective numbers on your mailbox makes it easier for mail delivery and emergency services to locate your home. Here’s how you can install reflective numbers:
- Select reflective numbers that are clearly visible and weather-resistant.
- Clean the mailbox surface to ensure proper adhesion of the numbers.
- Peel off the backing of each number and stick it firmly to the mailbox surface.
- Press down on each number to ensure a secure bond.
Remember to position the reflective numbers at eye level and make sure they are visible from both directions of the road. This will aid in quick and accurate mail delivery, as well as help emergency services locate your home easily.
By paying attention to these final details, you can give your mailbox a polished and functional look that will impress visitors and provide convenience for mail delivery.
Maintenance Tips For Long-Lasting Mailbox Installation
Once you have successfully installed your mailbox, it’s important to maintain it properly to ensure its longevity. Regular maintenance will not only keep your mailbox looking great, but it will also prevent any potential damage that could hinder its functionality.
Regular Cleaning and Inspection
Regular cleaning is essential to keep your mailbox in good condition. Dust, dirt, and grime can accumulate over time, affecting the overall appearance of your mailbox. To clean your mailbox, simply use a mild soap and water solution, and gently scrub away any dirt using a soft brush or cloth. Rinse thoroughly and dry with a clean towel.
Along with regular cleaning, periodic inspection is crucial in identifying any signs of damage or wear. Inspect the mailbox for paint chips, rust, loose screws, or any other issues that may require attention. If you notice any damage, it’s best to address it promptly to prevent further deterioration.
Repairing or Replacing Damaged Parts
If your mailbox has any damaged parts, it’s important to repair or replace them promptly. This will not only maintain the overall appeal of your mailbox, but it will also ensure its functionality. Depending on the extent of the damage, simple repairs can often be done by yourself.
If your mailbox has a damaged flag, for example, you can easily replace it by unscrewing the old one and attaching a new flag. Similarly, if the mailbox door is loose, you can tighten the screws or replace them if necessary. For more extensive damage, such as a cracked mailbox post or significant rust, it may be advisable to seek professional help.
Seasonal Maintenance Guidelines
Seasonal maintenance is vital to keep your mailbox in optimal condition throughout the year. Different weather conditions can take a toll on your mailbox, so taking appropriate measures during each season is necessary.
For example, during the winter months, it’s important to clear snow and ice away from your mailbox. Use a snow shovel or a soft brush to avoid damaging it. In the fall, regularly remove fallen leaves and debris around your mailbox to prevent moisture buildup and potential damage. During the summer, check for any signs of fading or peeling paint, and touch up or repaint as needed.
Following these seasonal guidelines will help protect your mailbox from unnecessary wear and tear, ensuring its long-lasting durability.
Frequently Asked Questions Of How To Install A Mailbox
Can I Install A Mailbox Myself?
Yes, you can install a mailbox yourself. Ensure you follow the manufacturer’s instructions, have the necessary tools, and choose a suitable location. Dig a hole, place the post securely, and attach the mailbox. Make sure it meets local regulations and is easily accessible for mail carriers.
Should A Mailbox Post Be Set In Concrete?
Yes, a mailbox post should be set in concrete. This provides stability and helps prevent the post from leaning or falling over. Concrete ensures durability and strength for the post, keeping your mailbox secure and in place for a long time.
Are Mailboxes Easy To Install?
Yes, mailboxes are easy to install. The process is simple and straightforward, requiring basic tools and minimal time. You can easily install a mailbox yourself without the need for professional assistance.
How Do You Attach A Mailbox?
To attach a mailbox, follow these steps: 1. Choose a suitable location near the edge of your property. 2. Dig a hole for the post, ensuring it is secure and at the right height. 3. Insert the post into the hole and fill it with quick-setting concrete.
4. Allow the concrete to dry and set, ensuring a stable base. 5. Attach the mailbox securely to the post, following the manufacturer’s instructions.
Conclusion
Installing a mailbox may seem like a simple task, but it requires careful planning and execution. By following the step-by-step guide provided in this blog post, you can confidently install a mailbox that is both functional and aesthetically pleasing. Remember to choose a suitable location, gather the necessary materials, and adhere to local regulations.
With a little patience and attention to detail, you’ll have a mailbox that serves its purpose for years to come. Happy installing!