To install a Ring Doorbell wireless, first, download the Ring app and create an account. Then, follow the in-app instructions to connect the doorbell to your home Wi-Fi network.
**Step 1: Check Compatibility And Gather Tools**
Welcome to the first step in installing your Ring Doorbell Wireless! Before you start the installation, it’s important to check the compatibility of your existing doorbell system and gather all the necessary tools. This will ensure a smooth and successful installation process. Let’s dive in!
Determine the compatibility of your existing doorbell system
Before you begin the installation, it’s crucial to determine whether your existing doorbell system is compatible with the Ring Doorbell Wireless. Compatibility is essential to ensure that the doorbell functions properly and seamlessly integrates with your home security setup.
To determine compatibility, follow these steps:

- Start by identifying the power source of your existing doorbell. Is it wired or battery-powered? The Ring Doorbell Wireless requires a wired connection to function.
- Next, check if your existing doorbell operates at a voltage range of 16-24 volts. This voltage range is recommended for the smooth operation of the Ring Doorbell.
- If your existing doorbell meets these requirements, it is likely compatible with the Ring Doorbell Wireless. However, if you are unsure about the compatibility, it’s always best to consult the user manual or contact Ring support for further assistance.
Now that you’ve checked the compatibility of your existing doorbell system, it’s time to gather all the necessary tools for the installation. Having the right tools at hand will make the installation process much easier and hassle-free. Here is a list of the tools you’ll need:
| Tools | Description |
|---|---|
| Screwdriver | A screwdriver will be required to remove your existing doorbell and install the Ring Doorbell Wireless. |
| Power Drill | A power drill will help in drilling any necessary holes for mounting the Ring Doorbell and its accompanying bracket. |
| Level | A level will ensure that the Ring Doorbell is mounted straight and aligned correctly. |
| Tape Measure | Use a tape measure to accurately measure and mark the placement of the Ring Doorbell. |
| Pencil | A pencil will be handy for marking the drilling spots and making any necessary notes. |
These are the basic tools required for the installation process. However, it’s always a good idea to review the Ring Doorbell instruction manual to determine if any additional tools or materials are needed for your specific installation.
Now that you have determined the compatibility of your existing doorbell system and gathered the necessary tools, you are ready to proceed to the next step, which is preparing for the installation of your Ring Doorbell Wireless. Stay tuned!
Check The Compatibility Of Your Existing Doorbell System
Ensure that your doorbell system is compatible with the Ring Doorbell Wireless
Before you begin the installation process for your Ring Doorbell Wireless, it is important to check the compatibility of your existing doorbell system. This step is crucial to ensure that your Ring Doorbell will work seamlessly and provide you with the desired functionality. Here are a few key points to consider:
Check the voltage requirements
To ensure compatibility, the first aspect you need to check is the voltage requirements of your existing doorbell system. The Ring Doorbell Wireless typically requires a voltage range of 16-24 volts AC, which is standard for most doorbell systems. However, it is always a good idea to double-check the voltage of your current setup to avoid any potential issues.
Compatibility with your Wi-Fi network
In addition to the voltage requirements, you also need to ensure that your Wi-Fi network is compatible with the Ring Doorbell Wireless. The doorbell utilizes your home’s Wi-Fi network to connect and send notifications to your smartphone or other devices, so it is crucial to have a stable and reliable connection.
Here’s what you can do to determine compatibility:
- Check the Wi-Fi signal strength in the area where you plan to install the Ring Doorbell. Make sure the signal is strong enough to reach the doorbell location.
- Verify that your Wi-Fi network supports a frequency of 2.4GHz, as this is the frequency used by the Ring Doorbell Wireless. Some newer routers may only support 5GHz, which is not compatible.
- If you have a dual-band router that supports both 2.4GHz and 5GHz, ensure that the two frequencies have different network names (SSIDs). The Ring Doorbell will only connect to the 2.4GHz network.
- You may also need to adjust your router settings to allow the Ring Doorbell to connect. This could include disabling any MAC address filtering or enabling DHCP.
By ensuring your doorbell system is compatible with the Ring Doorbell Wireless, you can proceed with the installation process confidently.
Gather The Required Tools For The Installation Process
Before you start installing your Ring Doorbell Wireless, it’s essential to gather all the necessary tools. Having the right tools on hand will ensure a smooth and hassle-free installation process. By making a checklist and double-checking that you have everything you need, you can avoid any frustrating delays or interruptions. In this section, we will outline the tools required for a successful installation, so let’s get started!
Make a Checklist of the Tools Needed for a Successful Installation
Creating a checklist of the tools you’ll need before starting the installation process is a smart move. It allows you to confirm that you have all the necessary items and avoids the inconvenience of having to interrupt your progress to search for missing tools. Below, you’ll find a comprehensive list of the tools required for installing your Ring Doorbell Wireless:
| Required Tools: |
| 1. Screwdriver: A Phillips screwdriver is typically all you’ll need for installing your Ring Doorbell Wireless. Make sure you have the correct size that fits the screws provided. |
| 2. Drill: In case you need to drill holes for mounting the doorbell, having a power drill with the appropriate drill bit will be essential. |
| 3. Level: To ensure that your Ring Doorbell Wireless is properly aligned and straight, have a leveling tool on hand. This will help you achieve a professional-looking installation. |
| 4. Pencil: A pencil will allow you to mark the exact spots where you need to drill holes or make adjustments during the installation process. |
| 5. Spirit Level: In addition to a regular level, having a spirit level can further assist with aligning your doorbell perfectly. |
| 6. Power Drill Bits: Depending on the composition of your mounting surface, such as wood, concrete, or brick, ensure you have the appropriate drill bits for a secure installation. |
| 7. Wire Cutters: If you’ll be dealing with any wiring during the installation process, wire cutters will be necessary for trimming and stripping any excess or damaged wires. |
| 8. Tape Measure: Measuring accurately is crucial for positioning your Ring Doorbell Wireless correctly. A tape measure will help you achieve precise measurements. |
| 9. Screw Anchors: Depending on your mounting surface, you may need screw anchors to provide extra stability and support for your doorbell. |
| 10. Screws and Mounting Bracket: Ensure that you have the appropriate screws and a mounting bracket for your Ring Doorbell Wireless. These are usually included in the packaging. |
By checking off each item on your checklist, you can confirm that you have all the necessary tools for a successful installation. This level of preparedness will save you time and frustration throughout the process, allowing you to enjoy your new Ring Doorbell Wireless with ease and convenience.
**Step 2: Prepare For Installation**

Before you begin the installation process, it’s crucial to ensure that your Ring Doorbell Wireless is fully charged. While the device does come with a partial charge, it’s always a good idea to give it an extra boost before diving into the setup. By following these simple steps, you’ll make sure that your Ring Doorbell is ready to go:
- Locate the provided USB charging cable in the packaging.
- Connect one end of the cable to the Ring Doorbell’s charging port.
- Depending on your preferred charging method, connect the other end of the cable either to a USB port on your computer or to a wall adapter.
- Allow the Ring Doorbell to charge until the battery indicator on the device turns green, indicating a full charge.
Now that you’ve ensured your Ring Doorbell Wireless is fully charged, it’s time to get acquainted with the various components and their functions. By familiarizing yourself with these key elements beforehand, you’ll have a smoother installation experience. Let’s take a closer look:
| Component | Function |
|---|---|
| Video Doorbell | Camera-equipped device that captures video and audio footage of your front door area. |
| Mounting Bracket | Enables you to affix the Ring Doorbell to your preferred location. |
| Screws and Anchors | Used to securely attach the mounting bracket to the desired surface, ensuring stability. |
| Security Screw | A specially designed screw that helps prevent theft or tampering of the Ring Doorbell. |
| Screwdriver | A tool included in the packaging to assist with the installation process. |
| Chime Connector | Optional component used to link your existing doorbell chime with the Ring Doorbell. |
By understanding the role of each component, you’ll be able to assemble and install your Ring Doorbell Wireless with confidence. So, familiarize yourself with the components and their functions before moving on to the next step.
Charge The Ring Doorbell Wireless
The Ring Doorbell Wireless is a convenient and innovative device that provides enhanced security for your home. Before you start using your Ring Doorbell, it is essential to ensure that it has enough power to function properly. In this section, we will guide you through the process of charging your Ring Doorbell wireless so that you can enjoy its features without any interruptions.
Connect the doorbell to a power source and charge the battery fully
Your Ring Doorbell Wireless comes with a rechargeable battery, which means you don’t have to worry about constantly changing batteries. To charge the battery, you need to connect the doorbell to a power source. Here’s how you can do it:
- Locate the charging port on the back of your Ring Doorbell Wireless. It is usually located at the bottom.
- Use the included micro USB cable to connect the charging port of your Ring Doorbell to a power source, such as a wall outlet or a computer’s USB port.
- Once connected, the LED indicator on the front of the doorbell will start blinking, indicating that the device is charging.
- Leave the Ring Doorbell connected to the power source until the battery is fully charged. The time it takes to charge the battery will vary depending on the model and the existing charge level, so it is important to follow the manufacturer’s recommended charging time.
- Once the battery is fully charged, the LED indicator will stop blinking and remain solid. This indicates that the battery is ready to go.
It is worth noting that the Ring Doorbell Wireless can also be powered by existing doorbell wiring. This eliminates the need to charge the battery regularly. If you have the necessary wiring, you can connect the doorbell to it following the manufacturer’s instructions.
Now that you have successfully charged your Ring Doorbell Wireless, you can proceed to the next step of the installation process, which is setting up the doorbell and connecting it to your Wi-Fi network.
Familiarize Yourself With The Components And Their Functions
Before you begin the installation process for your Ring Doorbell Wireless, it’s essential to familiarize yourself with the different components and understand their functions. This will ensure a smooth installation and help you make the most out of your device. In this section, we will take a closer look at each component and provide an overview of its functions and features.
Understand the different parts of the Ring Doorbell Wireless
The Ring Doorbell Wireless consists of several components that work together to provide an enhanced home security experience. Each part plays a crucial role in the functionality of the device. Let’s explore them in detail:
1. Doorbell Button and Camera
The doorbell button is the main interactive element of the Ring Doorbell Wireless. It features a built-in camera that captures high-definition video footage and allows you to see who is at your door, whether you’re at home or away. The camera is equipped with night vision capability, offering clear visibility even in low-light conditions.
2. Motion Detector
The Ring Doorbell Wireless is equipped with a motion detector that enhances your home’s security by detecting any movement near the door. When the motion detector is triggered, you’ll receive an instant notification on your smartphone or tablet, allowing you to monitor the activity in real-time. This feature can also be customized to suit your preferences, offering adjustable sensitivity settings.
3. Two-Way Audio
The two-way audio feature of the Ring Doorbell Wireless enables you to communicate with visitors at your door without having to open it. This means you can have a conversation, provide instructions, or even warn off potential intruders, all from the convenience of your smartphone or tablet. The audio quality is crystal clear, ensuring that communication is smooth and effective.
4. Ring App
To fully utilize the functionalities of the Ring Doorbell Wireless, you will need to download the Ring app on your device. The app acts as a central hub to control and monitor your Ring device. It allows you to receive notifications, view live video feeds, and customize settings according to your preferences. The user-friendly interface makes it easy to navigate and manage your device effortlessly.
Now that you have a better understanding of the different components and features of the Ring Doorbell Wireless, you’re ready to proceed with the installation process. In the next section, we will guide you step by step on how to install your Ring Doorbell Wireless and ensure it is set up correctly for optimal performance.
**Step 3: Install The Ring Doorbell Wireless**

Now that you have removed your existing doorbell and wiring (if applicable), it’s time to move on to the installation of the Ring Doorbell Wireless. This step is crucial as it ensures a seamless integration of the device into your home security system. Follow the instructions below to install the Ring Doorbell Wireless and establish a secure connection with your Wi-Fi network.
If you already have a traditional doorbell installed, it’s important to remove it before proceeding with the installation of the Ring Doorbell Wireless. This will allow you to replace it with the wireless model and benefit from its advanced features. Here’s how you can remove your existing doorbell:
- Turn off the power to your doorbell system by flipping the corresponding circuit breaker switch in your electrical panel.
- Locate the screws or mounting brackets that hold your current doorbell in place.
- Use a screwdriver to remove these screws or brackets and gently detach the doorbell from the wall.
- If your existing doorbell is wired, carefully disconnect the wiring from the terminals using a pair of pliers.
- Store your old doorbell and any accompanying wiring in a safe place, as you may need them if you decide to revert to a traditional doorbell in the future.
After removing your previous doorbell, it’s time to mount the Ring Doorbell Wireless and establish a connection with your Wi-Fi network. Follow these steps to ensure a secure and stable installation:
- Use the mounting bracket provided with the Ring Doorbell Wireless to affix it to the desired location on your front door. Ensure that it is level and secure.
- Attach the wires from your previous doorbell (if applicable) to the appropriate terminals on the back of the Ring Doorbell Wireless. If you don’t have existing wiring, the Ring Doorbell Wireless can operate on its built-in battery pack.
- Once the doorbell is properly mounted, download the Ring app on your mobile device and create an account if you haven’t already done so.
- Open the Ring app and follow the on-screen instructions to connect your Ring Doorbell Wireless to your Wi-Fi network. Make sure you enter the correct Wi-Fi password when prompted.
- Wait for the Ring Doorbell Wireless to establish a connection with your Wi-Fi network. This may take a few moments, so be patient.
Now that your Ring Doorbell Wireless is successfully connected to your Wi-Fi network, it’s time to perform the initial setup and customize the device according to your preferences. Follow these steps to ensure your Ring Doorbell Wireless is optimized for your home security needs:
- Open the Ring app on your mobile device and select your Ring Doorbell Wireless from the list of registered devices.
- Follow the on-screen instructions to customize your settings, including motion detection sensitivity, notification preferences, and privacy settings.
- Test the functionality of your Ring Doorbell Wireless by pressing the doorbell button or simulating motion in front of the device.
- Ensure that you receive real-time alerts and can view the live feed from your Ring Doorbell Wireless on your mobile device.
- Once you are satisfied with your settings, place the cover on the front of your Ring Doorbell Wireless to protect it from the elements.
By following these steps, you can successfully install the Ring Doorbell Wireless and enjoy its advanced features, providing you with peace of mind and enhanced home security. Ensure that each step is carefully executed to guarantee a seamless installation process.
Remove Your Existing Doorbell And Wiring (If Applicable)
Before you can begin installing your Ring Doorbell Wireless, you’ll need to remove your existing doorbell and any wiring that may be present. This step is important to ensure a clean and seamless installation process. Follow the steps below to safely disconnect and remove your existing doorbell system, if necessary.
Disconnect and remove your existing doorbell system, if necessary
If you already have a traditional wired doorbell in place, you’ll need to remove it before installing your Ring Doorbell Wireless. This involves disconnecting the existing doorbell system and any associated wiring. Follow these steps:
- Locate the circuit breaker that controls the power to your doorbell. This is typically labeled clearly on your breaker box. Flip the corresponding switch to cut off power to the doorbell.
- Once power is disconnected, carefully remove the cover of your existing doorbell. This may involve unscrewing or unclipping the cover.
- Next, take note of the wiring configuration. Most traditional doorbell systems have two wires – one connected to the front door button and one connected to the transformer. It’s important to remember how these wires are connected for reinstallation later.
- Using a screwdriver, carefully unscrew and disconnect the wires from the terminals. Take care to keep the wires separated and prevent them from touching each other or any other metal surfaces.
- With the wires disconnected, remove your existing doorbell from the wall or doorframe. You may need to unscrew it or use a pry tool to gently remove it.
Safely disconnect the wiring and ensure it does not interfere with the installation process
Once your existing doorbell and wiring are removed, it’s important to ensure that the wiring does not interfere with the installation process of your Ring Doorbell Wireless. Follow these steps to safely manage the wiring:
- If the wiring is loose or hanging, use cable clips or electrical tape to secure it to the wall or doorframe. This will prevent the wires from getting in the way during installation.
- If the wiring is no longer needed or too damaged, you may choose to remove it entirely. This can be done by carefully cutting the wires near the transformer or inside the wall.
- Before proceeding with the installation, double-check that the wiring is completely disconnected from any power source. This will ensure your safety during the installation process.
By following these steps to remove your existing doorbell and wiring (if applicable), you’ll be ready to move on to the next stage of installing your Ring Doorbell Wireless. Stay tuned for our upcoming blog post on the installation process!
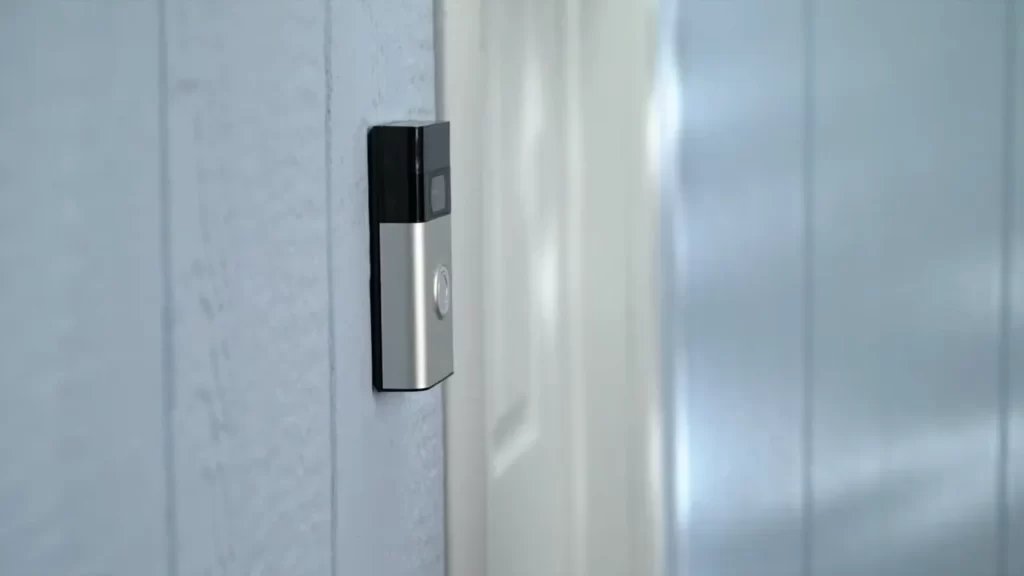
Mount The Ring Doorbell Wireless And Connect It To Your Wi-Fi Network
When it comes to home security, having a reliable doorbell system is essential. The Ring Doorbell Wireless is a popular choice, as it offers convenience and peace of mind. In this blog post, we will show you how to mount the Ring Doorbell Wireless and connect it to your Wi-Fi network, ensuring your home is well-protected. Follow these steps to get started.
Choose a suitable location for mounting the doorbell
Before mounting the Ring Doorbell Wireless, it’s important to choose a suitable location that provides a clear view of your front door. This will ensure that the device captures accurate video footage and detects any activity promptly. Consider the following factors when selecting the ideal spot:
- Make sure there is a sturdy surface, such as the wall adjacent to your front door, where you can mount the doorbell.
- Ensure that the location is within the range of your Wi-Fi network so that the device can connect seamlessly.
- Position the doorbell at a height where it is easily accessible, yet out of reach of potential tampering.
- Avoid placing the doorbell in areas that are exposed to direct sunlight or extreme weather conditions, as this may affect its performance.
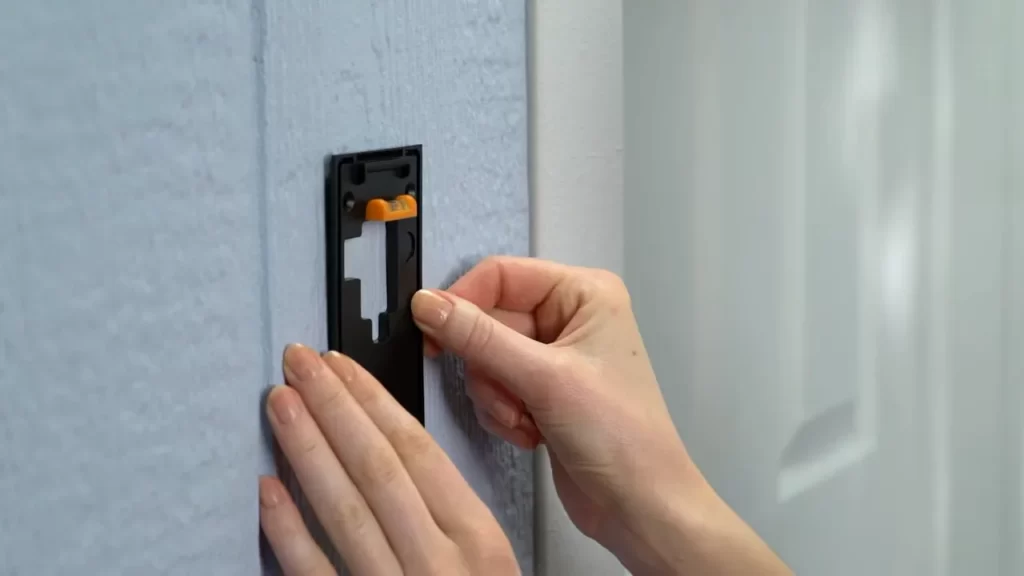
Follow the provided instructions to securely mount the Ring Doorbell Wireless
Now that you have chosen the perfect location, it’s time to securely mount the Ring Doorbell Wireless. Follow these steps to ensure a proper installation:
- Start by attaching the mounting bracket to the desired location using the provided screws and a screwdriver.
- Gently slide the Ring Doorbell Wireless onto the mounting bracket until it clicks into place.
- Use the level tool included in the package to make sure the doorbell is perfectly straight.
- Tighten the security screw at the bottom of the doorbell to secure it in place.
Connect the device to your Wi-Fi network using the Ring app
Once the Ring Doorbell Wireless is securely mounted, the next step is to connect it to your Wi-Fi network using the Ring app. Follow these instructions to complete the setup:
- Download and install the Ring app from the App Store or Google Play Store on your smartphone.
- Open the app and create a Ring account if you haven’t done so already.
- Follow the on-screen instructions to add a new device and select the Ring Doorbell Wireless.
- Enter your Wi-Fi network credentials when prompted and wait for the app to establish a connection.
- Once the device is connected, you can customize the settings, such as motion detection sensitivity and notification preferences, according to your preferences.
By following these steps, you can easily mount the Ring Doorbell Wireless and connect it to your Wi-Fi network, ensuring that your home is safeguarded against potential intruders. Say goodbye to traditional doorbell systems and embrace the convenience of smart home security with the Ring Doorbell Wireless.
Perform Initial Setup And Customize The Settings
Welcome to our step-by-step guide on how to install a Ring Doorbell Wireless. In this section, we will walk you through the process of performing the initial setup and customizing the settings according to your preferences. Let’s get started!
Follow the on-screen prompts to complete the initial setup process
To begin, make sure you have downloaded the Ring app on your smartphone or tablet. Once the app is installed, open it and follow these simple steps:
- Tap on the “Set Up a Device” option in the app’s menu.
- Select “Doorbells” from the list of available devices.
- Scan the QR code located on the back of your Ring Doorbell Wireless. If you cannot find a QR code, select the “Continue without Scanning” option.
- Choose your home Wi-Fi network and enter your password when prompted.
- Wait for the app to connect your Ring Doorbell to your Wi-Fi network. This may take a few moments.
- Once the setup is complete, you can give your Ring Doorbell a name and adjust any additional settings, such as motion detection sensitivity and zones.
By following these on-screen prompts, you will have successfully completed the initial setup process for your Ring Doorbell Wireless.
Customize the settings according to your preferences
After completing the initial setup, it’s time to customize the settings of your Ring Doorbell to suit your specific needs. Here are a few options you can explore:
- Motion Detection: Adjust the sensitivity and range of the motion detection feature to ensure you receive relevant alerts.
- Notification Preferences: Choose to receive notifications on your smartphone, tablet, or email, depending on what works best for you.
- Video Quality: Set the video quality of your Ring Doorbell to optimize the viewing experience.
- Two-Way Audio: Enable or disable the two-way audio feature, allowing you to communicate with visitors remotely.
- Sharing Options: Decide whether you want to share access to your Ring Doorbell with family members or neighbors.
Remember, these settings can be adjusted at any time through the Ring app, allowing you to cater the features of your Ring Doorbell Wireless to your preferences.
Test the functionality of the Ring Doorbell Wireless
Before considering the installation complete, it is crucial to test the functionality of your Ring Doorbell Wireless to ensure everything is working properly. Here are a few steps to follow:
- Press the doorbell button or trigger the motion sensor to see if the Ring Doorbell sends you an alert on your device.
- Check the live video feed through the app to confirm that the camera captures a clear view of your front door.
- Try using the two-way audio feature to communicate with someone at your doorstep.
- Make sure the night vision feature is working by testing it in low-light conditions.
By performing these tests, you can be confident that your Ring Doorbell Wireless is functioning as expected.
Now that you have completed the initial setup, customized the settings, and tested the functionality of your Ring Doorbell Wireless, you are ready to enjoy the enhanced security and convenience it provides. Keep in mind that you can always refer back to the Ring app for any future adjustments.
**Step 4: Troubleshooting And Tips**
Troubleshoot Common Installation Issues
If you encounter any issues during the installation of your Ring Doorbell Wireless, don’t worry! We have some troubleshooting tips to help you sort things out. From connectivity problems to mounting difficulties, we’ve got you covered. Here are some common issues you might encounter and how to overcome them:
1. Connectivity Issues
One of the most common issues with any wireless device is connectivity. If you’re experiencing poor connection or your Ring Doorbell isn’t connecting to the app, try the following steps:
- Make sure your Wi-Fi network is functioning properly and you have a stable internet connection.
- Check the Wi-Fi signal strength near the installation location. If the signal is weak, consider installing a Wi-Fi extender or moving your router closer to the Ring Doorbell.
- Reboot your Ring Doorbell by disconnecting and reconnecting its power source.
- Update the Ring app to the latest version, as it might contain bug fixes and improvements.
2. Mounting Difficulties
Mounting your Ring Doorbell properly is essential for optimal performance. If you’re having trouble with the mounting process, follow these steps:
- Ensure you have the correct tools and mounting brackets provided with your Ring Doorbell.
- Refer to the installation guide for the correct positioning and angles for mounting.
- If you’re unable to drill into a suitable surface, consider using adhesive options provided by Ring.
- Double-check that the mounting screws are securely fastened to prevent any potential loosening.
Optimize the Performance of Your Ring Doorbell Wireless
To ensure your Ring Doorbell Wireless functions at its best, consider these optimization tips:
1. Wi-Fi Signal Strength
A strong Wi-Fi signal is crucial for seamless operation. Here’s how you can optimize your Wi-Fi signal strength:
- Place your Wi-Fi router in a central location, away from any obstructions.
- Keep your Ring Doorbell within a reasonable range of the router to maintain a strong connection.
- If your Wi-Fi signal doesn’t reach your Ring Doorbell, install a Wi-Fi extender to improve coverage.
2. Motion Detection Settings
Adjusting the motion detection settings of your Ring Doorbell can help optimize its performance. Here’s what you can do:
- Open the Ring app and access the “Motion Settings” for your device.
- Customize the motion zones according to your preference to eliminate unnecessary motion alerts.
- Experiment with different motion sensitivity levels to find the balance between accurate detection and minimizing false notifications.
Remember, troubleshooting and optimizing your Ring Doorbell Wireless is an ongoing process. Don’t be afraid to explore the settings and reach out to Ring’s support if you encounter persistent issues. With these tips, you’ll be able to enjoy the full potential of your Ring Doorbell and enhance your home security.
Troubleshoot Common Installation Issues
Installing a Ring Doorbell Wireless can greatly enhance the security of your home and provide you with peace of mind. However, like any technology, you may encounter some common installation issues along the way. It’s important to know how to troubleshoot these issues so that you can quickly get your Ring Doorbell up and running smoothly. In this section, we will explore some common installation issues you may encounter and provide solutions to resolve them.
Resolve common problems such as connectivity issues
One of the most common installation issues is experiencing connectivity problems with your Ring Doorbell. If you find that your device is not connecting to your Wi-Fi network, there are a few steps you can take to resolve this:
- Make sure that your Wi-Fi network is properly set up and functioning correctly. Check that other devices can connect to your network without any issues.
- Verify that your Ring Doorbell is within range of your Wi-Fi router. If it is too far away, you may need to move your router closer to the doorbell or consider using a Wi-Fi range extender.
- Restart your Wi-Fi router and your Ring Doorbell. Sometimes a simple restart can fix connectivity problems.
- Double-check that you have entered the correct Wi-Fi network name (SSID) and password when setting up your Ring Doorbell. A simple error in entering this information can cause connectivity problems.
If you have tried these troubleshooting steps and are still experiencing connectivity issues, you can consult the troubleshooting guides provided by Ring for further assistance. They offer comprehensive solutions to common problems and can guide you through the process of resolving any connectivity issues you may be facing.
Resolve common problems such as power supply problems
Another common issue during installation is experiencing power supply problems. If your Ring Doorbell is not receiving power, here are a few steps to troubleshoot this problem:
- Check that the wiring connections between your Ring Doorbell and your existing doorbell are secure and properly installed. Loose or incorrect wiring can cause power supply issues.
- Verify that your existing doorbell’s transformer is compatible with the Ring Doorbell’s power requirements. Insufficient power supply can prevent the doorbell from functioning correctly.
- If you are using a battery-powered Ring Doorbell, ensure that the battery is fully charged. If the battery is low, it may not provide enough power for the doorbell.
- Contact a qualified electrician to assess your electrical system and verify if any issues, such as a faulty transformer, may be causing the power supply problem.
Resolve common problems such as video/audio quality concerns
Video and audio quality issues can sometimes arise after installing a Ring Doorbell. If you are experiencing problems with the video or audio, you can try the following troubleshooting steps:
- Check that your internet connection speed is adequate. Slow internet speeds can lead to poor video and audio quality.
- Ensure that your Ring Doorbell is within range of your Wi-Fi router. If it is too far away, it may experience a weak signal, resulting in video and audio issues.
- Clean the camera lens of your Ring Doorbell, as dirt or smudges can affect the quality of the video footage.
- Make sure that the microphone and speaker on your Ring Doorbell are not obstructed. Clear any debris or obstructions that may interfere with the audio quality.
- If these steps do not resolve the issues, you can reach out to Ring’s technical support team for further assistance. They have knowledgeable staff who can guide you through more advanced troubleshooting measures and help you achieve optimal video and audio quality.
By following these troubleshooting tips and utilizing the resources available, you can overcome common installation issues and ensure that your Ring Doorbell Wireless is functioning at its best.
Optimize The Performance Of Your Ring Doorbell Wireless
Installing a Ring Doorbell Wireless can greatly enhance the security of your home, but to make the most out of this smart device, optimization is key. By exploring additional features and settings, as well as following maintenance tips, you can ensure the longevity and efficiency of your doorbell.
Explore Additional Features and Settings to Enhance Your Experience
To truly optimize your Ring Doorbell Wireless, it’s important to take advantage of the additional features and settings it offers. By customizing these settings, you can tailor the device to meet your specific needs and preferences.
One feature worth exploring is the motion detection settings. Adjusting the sensitivity level allows you to fine-tune the device’s ability to detect motion, reducing false alarms and ensuring that you are only alerted when it matters most. Additionally, you can define the areas you want the device to monitor and receive notifications for, ensuring you have complete control over its coverage.
Another useful setting to consider is the night vision mode. By enabling this feature, your Ring Doorbell Wireless can capture clear footage even in low-light conditions, providing you with enhanced security 24/7. Take advantage of this feature to have peace of mind knowing that your home is protected day and night.
Follow Maintenance Tips to Ensure the Longevity and Efficiency of Your Doorbell
To keep your Ring Doorbell Wireless functioning optimally, it’s important to follow some simple maintenance tips. By investing a little time into regular upkeep, you can extend the longevity of your device and ensure it continues to perform at its best.
First, regularly clean both the camera lens and the surrounding area. Dust, dirt, and accumulated debris can obstruct the view, affecting the device’s performance. Use a soft, microfiber cloth to gently wipe away any buildup, keeping the lens clear and ensuring crystal-clear video footage.
Second, check the battery status periodically. The Ring Doorbell Wireless relies on battery power, and it’s crucial to ensure it’s sufficiently charged. Monitor the battery level through the Ring mobile app and recharge it as needed to avoid any disruptions in functionality.
Lastly, keep the firmware of your Ring Doorbell Wireless up to date. The manufacturer regularly releases firmware updates to enhance device performance and address any vulnerabilities. By applying these updates, you can benefit from the latest features and improvements, keeping your doorbell optimized and secure.
**Step 5: Conclusion**
Step 5: Conclusion
Congratulations on successfully installing your Ring Doorbell Wireless! You can now enjoy the convenience and peace of mind that this smart security device offers. Recap the installation process and key points to ensure that you make the most of your new doorbell.
Recap the Installation Process and Key Points
Let’s quickly recap the installation process to refresh your memory:
- Start by charging the Ring Doorbell Wireless using the provided USB cable.
- Download the Ring app on your smartphone and create a Ring account if you haven’t already.
- Follow the in-app instructions to set up your doorbell and connect it to your home Wi-Fi network.
- Securely mount the doorbell on your front door using the provided tools and screws.
- Adjust the angle of the camera to optimize the view of your doorstep.
- Configure the settings in the Ring app to personalize your security preferences.
- Test the doorbell to ensure it is functioning properly.
Keep the following key points in mind:
- Make sure your Wi-Fi signal is strong near the doorbell to ensure reliable performance.
- Regularly check the battery level of your Ring Doorbell Wireless and recharge it as needed.
- Take advantage of the additional features offered by the Ring app, such as motion detection and two-way audio communication.
- Consider subscribing to a Ring Protect Plan for access to advanced features like cloud storage for recorded videos.
With these steps and key points in mind, you are well-equipped to make the most of your Ring Doorbell Wireless and enjoy the convenience and security it brings to your home.
Frequently Asked Questions For How To Install A Ring Doorbell Wireless
Is Ring Wireless Doorbell Easy To Install?
Yes, the Ring Wireless Doorbell is easy to install. It is a user-friendly, DIY setup that does not require professional assistance. Once connected to your home’s Wi-Fi, you can easily follow the step-by-step instructions provided in the manual or the Ring app.
Can You Install Ring Doorbell Without Wires?
Yes, it is possible to install a ring doorbell without wires. The ring doorbell can be powered by a rechargeable battery, allowing for wire-free installation. This provides flexibility in placing the doorbell wherever you need it without the hassle of wiring.
How Do You Install A Ring Doorbell Wireless Without Drilling?
To install a wireless ring doorbell without drilling, follow these steps: 1. Attach the mounting bracket to the wall using adhesive tape or screws. 2. Connect the doorbell to the bracket. 3. Download and set up the Ring app on your smartphone.
4. Follow the app instructions to connect the doorbell to your Wi-Fi network. 5. Test the doorbell and adjust its settings as needed.
How Do You Install A Ring Doorbell By Yourself?
To install a Ring doorbell by yourself, follow these simple steps: 1. Start by downloading the Ring app on your smartphone. 2. Choose a suitable location near your door, ensuring a strong Wi-Fi connection. 3. Use the provided drill bit to create holes for mounting the doorbell bracket.
4. Attach the bracket to the wall and connect the doorbell to the bracket. 5. Lastly, follow the in-app instructions to connect the doorbell to your Wi-Fi network. Enjoy your new Ring doorbell!
Conclusion
Installing a Ring Doorbell Wireless is a simple and convenient way to enhance the security of your home. With the step-by-step guide provided in this blog post, you can easily set it up and enjoy the benefits of real-time video monitoring and motion detection.
Don’t compromise on your home’s safety – follow these instructions and start protecting your property today. Experience the peace of mind that comes with having a Ring Doorbell Wireless installed.