To install a single bifold door, start by measuring and marking the desired height and width, then attach the track and pivot brackets before hanging the door and adjusting the height and alignment as needed. Installing a single bifold door involves measuring, attaching brackets and the track, and properly aligning and adjusting the door for smooth operation.
Gather The Necessary Tools And Materials
Before you begin installing a single bifold door, it’s essential to have all the required tools and materials readily available. By gathering everything you need in advance, you can ensure a smoother and more efficient installation process. Ensuring you have the right equipment will save you time and frustration down the line. Here are the key tools and materials you’ll need:
Measure Tape
A measure tape is a crucial tool for any DIY project, including installing a single bifold door. It allows you to accurately determine the dimensions of the door opening so that you can select the correct size door for your space. Measure twice, cut once, they say! Make sure your measure tape is in good working condition.
Screwdriver
A screwdriver is another essential tool you’ll need during the installation process. It is crucial for securing the door hinges and fastening the screws. Ensure you have the appropriate screwdriver head that matches the screws included in your bifold door kit. This will help prevent any damage to the screws and ensure a tight fit.
Level
A level is used to ensure that your bifold door is installed perfectly straight and plumb. It helps prevent any unwanted gaps or misalignment. Place the level on the top edge of the door frame to check for levelness before securing the door in its final position. This will help ensure smooth operation and a professional-looking finish.
Drill
A drill is necessary for creating pilot holes for screws and drilling into the wall to secure the brackets or tracks. Ensure you have the appropriate drill bits for the material you’ll be drilling into, such as wood or drywall. This will make it easier to install the bifold door and prevent any damage to the surrounding area.
Bifold Door Kit
A bifold door kit typically includes all the necessary components, such as door panels, hinges, screws, tracks, and brackets. Make sure you have the complete kit, as specified in the manufacturer’s instructions. Having all the components in one package simplifies the installation process and ensures you have everything you need in one place.
By gathering these important tools and materials beforehand, you’ll be well-prepared to begin the installation of your single bifold door. With everything at your fingertips, you can proceed with confidence, knowing that you have everything you need for a successful and hassle-free installation.
Measure And Prepare The Opening
Before installing a single bifold door, it is essential to measure and prepare the opening properly. This will ensure a seamless and accurate installation, resulting in a professionally finished look. In this section, we will discuss the necessary steps to measure the width and height of the opening, remove any existing door or trim, and ensure the opening is clean and free from any debris or obstructions.
Measure the width and height of the opening
One of the first steps in installing a single bifold door is to accurately measure the width and height of the opening. This will help determine the appropriate size of the door to be installed. To measure the width, use a tape measure to get the distance between the two sides of the opening. Ensure that the tape measure is level and note down the measurement in inches. Similarly, measure the height of the opening from the top to the bottom. Having precise measurements will ensure that the door fits perfectly.
Remove any existing door or trim
Prior to installing the single bifold door, it is essential to remove any existing door or trim that may be in place. This will allow for a clean and unobstructed installation. Pay attention to any screws or nails that hold the door or trim in place and remove them carefully. Use a pry bar or a hammer to gently pry off the trim from the surrounding area. By removing any existing components, you are creating a blank canvas for the new bifold door installation.
Ensure the opening is clean and free from any debris or obstructions
Next, it is important to ensure that the opening where the single bifold door will be installed is clean and free from any debris or obstructions. Take a moment to inspect the area and remove any loose dirt, dust, or other particles that may have accumulated. Use a broom or a vacuum cleaner to thoroughly clean the opening. This will provide a smooth surface for the door installation and prevent any hindrances or obstructions during the process.
By measuring the width and height of the opening accurately, removing any existing door or trim, and ensuring the opening is clean and free from debris or obstructions, you are laying the foundation for a successful installation of a single bifold door. These initial steps are vital in achieving a professional and seamless end result.
Install The Track And Pivot Brackets
When it comes to installing a single bifold door, one of the key steps is to install the track and pivot brackets. This is an essential part of the process, as it allows the door to slide smoothly and securely. In this step, we will walk you through the process of attaching the track to the top of the opening and positioning and securing the pivot brackets on the floor. Follow these instructions carefully to ensure a successful installation. Let’s get started!
Attach the track to the top of the opening
The first step in installing the track and pivot brackets is to attach the track to the top of the opening. The track is the metal rail that the door will slide along. To attach the track, follow these steps:
- Measure the width of the opening and mark the center point.
- Position the track on top of the opening, aligning it with the center point.
- Using a pencil or a marker, mark the screw holes on the track.
- Pre-drill the screw holes to make it easier to insert the screws.
- Secure the track to the top of the opening using screws and a screwdriver.
It is important to ensure that the track is level and aligned with the center point of the opening. This will ensure that the bifold door operates smoothly and without any issues. Once the track is securely attached, move on to the next step.
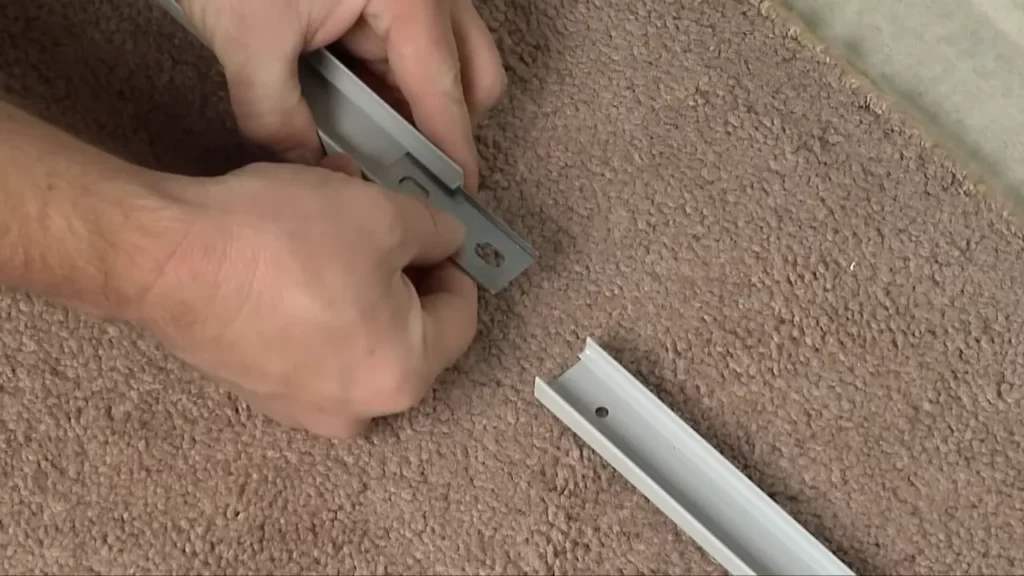
Position and secure the pivot brackets on the floor
The next step in installing the track and pivot brackets is to position and secure the pivot brackets on the floor. The pivot brackets are the metal brackets that hold the bottom of the bifold door in place. To position and secure the pivot brackets, follow these steps:
- Measure the distance from the center point of the opening to the floor.
- Mark the position of the pivot brackets on the floor using a pencil or a marker.
- Place the pivot brackets on the marked positions.
- Using a drill and screws, secure the pivot brackets to the floor.
As with the track, it is important to ensure that the pivot brackets are level and aligned with the center point of the opening. This will ensure that the bifold door operates smoothly and without any issues. Double-check the alignment and make any necessary adjustments before moving on to the next step.
Congratulations! You have successfully installed the track and pivot brackets for your single bifold door. The next step in the installation process is to hang the door panels on the track and adjust them for smooth operation. Stay tuned for the next part of this series, where we will walk you through this final step.
Attach The Bifold Door Panels
When it comes to installing a single bifold door, one of the crucial steps is attaching the door panels. This step involves inserting the top pivot pin into the top bracket, inserting the bottom pivot pin into the bottom bracket, and positioning and aligning the door panels with the track and pivot brackets. Once properly positioned, you will need to secure the door panels to the track using the provided hardware. Following these steps will ensure a smooth and functional installation of your bifold door.
Insert the top pivot pin into the top bracket
To begin attaching the bifold door panels, insert the top pivot pin into the top bracket. The top pivot pin is typically located on the top edge of the door panel. Insert it into the corresponding hole of the top bracket, making sure it fits snugly. This pivot pin allows the door panel to pivot smoothly, enabling the door to open and close seamlessly. Ensure that the pivot pin is securely in place before proceeding to the next step.
Insert the bottom pivot pin into the bottom bracket
In addition to the top pivot pin, the bottom pivot pin is just as important for the overall stability and functionality of the bifold door. Locate the bottom pivot pin on the bottom edge of the door panel and insert it into the corresponding hole of the bottom bracket. As with the top pivot pin, ensure that the bottom pivot pin fits securely and is properly aligned with the bracket. This will ensure smooth operation of the bifold door.
Position and align the door panels with the track and pivot brackets
With the pivot pins securely inserted into their respective brackets, it’s time to position and align the door panels with the track and pivot brackets. Begin by positioning the door panels in the opening, ensuring that they are aligned with the track and pivot brackets. Take your time to make any necessary adjustments to ensure a proper fit. It’s important to align the door panels accurately to prevent any binding or misalignment during operation.
Attach the door panels to the track using the provided hardware
Once the door panels are properly aligned, it’s time to attach them to the track using the provided hardware. This hardware typically includes screws or bolts that will secure the door panels to the track. Refer to the manufacturer’s instructions for the specific type of hardware required and the appropriate installation method. Ensure that the door panels are securely attached to the track, as this will provide stability and a smooth sliding motion when opening or closing the bifold door. In conclusion, attaching the bifold door panels is an important step in the installation process. By following these steps—inserting the top pivot pin into the top bracket, inserting the bottom pivot pin into the bottom bracket, positioning and aligning the door panels with the track and pivot brackets, and attaching the door panels to the track using the provided hardware—you can successfully install a single bifold door that functions smoothly and enhances the aesthetics of your space.
Adjust And Align The Doors
When it comes to installing a single bifold door, one crucial step is to adjust and align the doors properly. This ensures that the doors open and close smoothly, providing optimal functionality and preventing any unnecessary wear and tear. In this section, we will discuss the steps to adjust and align the doors for the best results.
Close the doors and check for proper alignment and operation
Before making any adjustments, it is important to close the doors and check for their alignment and operation. This involves examining if the doors are level, plumb, and properly aligned when closed. Take note of any gaps, sticking or rubbing, as these can indicate the need for adjustments.
Adjust the top pivot pin to ensure the doors open and close smoothly
One common cause of bifold door issues is misalignment at the top pivot pin. To ensure smooth operation, it is essential to adjust this pivot pin. Start by locating the adjustment screw on the top pivot bracket. Use a screwdriver to turn the screw clockwise to lower the pin or counterclockwise to raise it. Make small adjustments and test the doors’ operation until they open and close smoothly without rubbing or sticking.
Use shims to adjust the height and plumbness of the doors, if necessary
If the doors are not level, plumb, or in the right height, shimming may be necessary. Shims are thin wedges that can be inserted behind the pivot brackets to adjust the door’s position. To begin, remove the pivot bracket screws and place shims of appropriate thickness behind the brackets. Reattach the brackets and test the doors’ operation. Continue adding or removing shims until the doors are level, plumb, and at the desired height.
By following these steps, you can adjust and align your bifold doors properly, ensuring smooth operation and prolonged durability. It is important to take the time to check for proper alignment and make necessary adjustments to enjoy the full benefits of your new single bifold door.
Secure The Doors And Hardware
Secure the Doors and Hardware
Once you have properly aligned and leveled your bifold doors, it’s time to secure them in place. This step is crucial to ensure their stability and functionality. Follow the instructions below to secure the doors and hardware effectively.
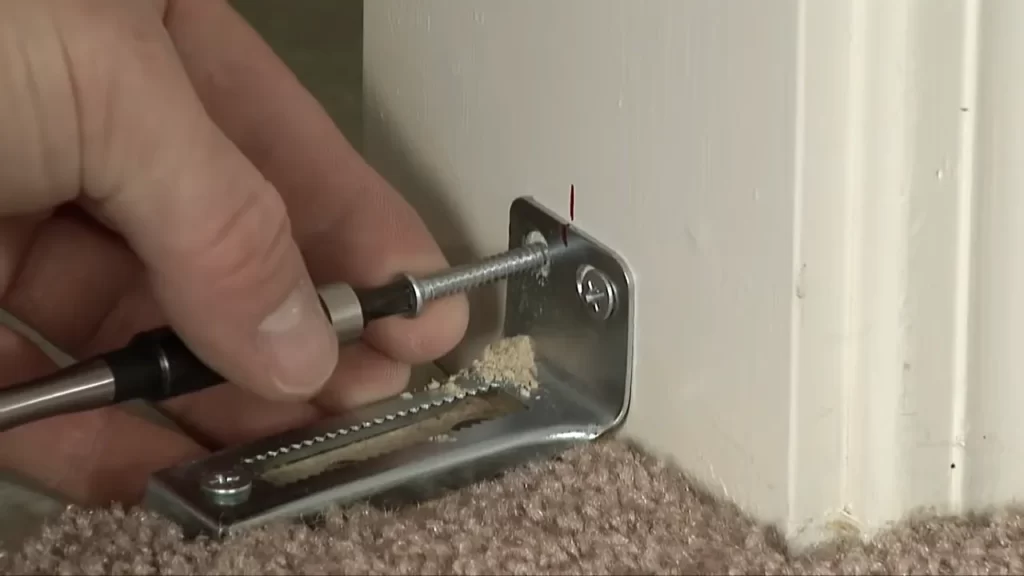
Attach the bottom pivot bracket to the floor using screws or anchors
Start by attaching the bottom pivot bracket to the floor. Place the bracket in the desired location and mark the holes for the screws or anchors. Pre-drill the holes if necessary, ensuring they are slightly smaller in diameter than the screws or anchors you’ll be using. This will provide a snug and secure fit.
Once the holes are prepared, align the bracket with the marks and drive the screws into the floor or insert the anchors. Make sure the bracket is level and tightly secured, as this will bear the weight of the doors when opening and closing.
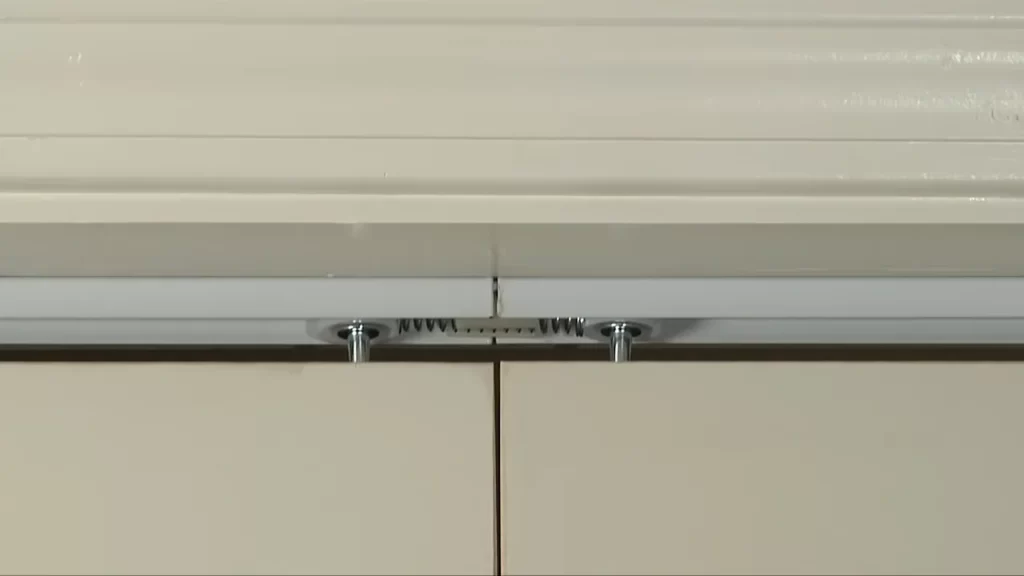
Secure the track to the opening using screws or anchors
Next, it’s time to secure the track to the opening. This is the upper guiding mechanism that allows the doors to smoothly slide open and closed. The track should be centered and aligned with the opening to ensure proper door operation.
Again, mark the holes for the screws or anchors on the top of the opening. Pre-drill if necessary, and then proceed to attach the track using the appropriate hardware. Ensure the track is level, secure, and aligned with the bottom pivot bracket.
Check that all screws and hardware are tight and secure
Lastly, take the time to check that all screws and hardware are tight and secure. This includes the hinges, pivot brackets, and any additional hardware provided with your bifold doors. Loose screws or hardware can lead to misalignment, sagging, or even complete failure of the doors.
Go through each component and gently tighten any loose screws, ensuring they are snug but not over-tightened. This will guarantee the doors operate smoothly and securely.
By following these steps, you will successfully secure your bifold doors and hardware. Remember to take your time and double-check each step to ensure a long-lasting installation that provides both functionality and aesthetics to your space.
Test And Finishing Touches
Once you have successfully installed your single bifold door, it’s time to test its smooth operation and add the finishing touches to give it a professional and polished look. Testing the door’s functionality ensures that it will open and close effortlessly, while adjusting any hardware or alignment issues will guarantee a proper fit. Lastly, installing trim or molding around the opening will provide a neat and refined appearance. Let’s dive into the final steps of this installation process.
Open and close the doors several times to ensure smooth operation
After completing the installation, it is vital to test the door’s movement to ensure it operates smoothly. Open and close the bifold doors multiple times to check for any obstructions, sticking points, or unevenness. Pay attention to how easily the doors glide along the track and if there are any unnecessary noises or resistance. If you notice any issues during this test, it is crucial to address them promptly to avoid further complications.
Adjust any hardware or alignment as needed

During the testing process, if you encounter any problems such as doors not aligning correctly, rubbing against the frame, or having difficulty closing or opening smoothly, it is essential to make necessary adjustments. Start by examining the hinges and tracks for any loose screws or misaligned components. Tighten all screws securely and ensure that the track and hinges are properly aligned. Sometimes, you may need to slightly adjust the position of the brackets or trim to achieve optimal alignment. By fixing these issues, you will greatly improve the overall functionality and longevity of your bifold door.
Install any trim or molding around the opening for a finished look
Adding trim or molding around the opening of your bifold door not only enhances its appearance but also conceals any gaps or rough edges. Begin by measuring and cutting the trim to fit precisely around the door frame. Secure it in place using adhesive or finishing nails, making sure to follow the manufacturer’s recommendations. You can choose from a variety of molding options, such as baseboard molding or decorative trim, to match your home’s aesthetics. Applying a fresh coat of paint or stain to the trim will provide a seamless and polished finish, completing the installation of your single bifold door.
Maintenance And Troubleshooting Tips
Keeping your single bifold door in good working condition is essential for its longevity and smooth operation. Regular maintenance and troubleshooting can help prevent common issues such as sticking or misaligned doors. In this section, we will discuss some important tips to help you maintain and troubleshoot your single bifold door.
Keep the track clean and free from debris
One of the key maintenance tasks for a single bifold door is to keep the track clean and free from any debris that may hinder its operation. Over time, dust, dirt, and other particles can accumulate in the track, causing the door to stick or move unevenly. To prevent this, it is important to periodically clean the track.
To clean the track, follow these simple steps:
- Open the bifold door fully.
- Use a soft brush or cloth to remove any loose dirt or debris from the track.
- Wipe the track with a damp cloth to remove any stubborn dirt or residue.
- Dry the track thoroughly before closing the door.
By keeping the track clean, you can ensure smooth and effortless operation of your single bifold door.
Lubricate moving parts regularly for smooth operation
In addition to keeping the track clean, lubricating the moving parts of your single bifold door is another crucial maintenance task. Regular lubrication helps reduce friction and wear, ensuring smooth and quiet operation.
To lubricate the moving parts, follow these steps:
- Use a silicone-based lubricant or a door-specific lubricant.
- Apply a small amount of lubricant to the hinges, rollers, and other moving parts.
- Move the door back and forth a few times to distribute the lubricant evenly.
Remember to wipe off any excess lubricant to prevent it from attracting dirt or dust. Regularly lubricating your single bifold door will keep it running smoothly for years to come.
Check for any loose or damaged hardware and replace as needed
Another important aspect of maintaining your single bifold door is to regularly inspect and check for any loose or damaged hardware. Loose screws or damaged hinges can cause the door to malfunction or become misaligned. It is important to address these issues promptly to prevent further damage.

To check for loose or damaged hardware, follow these steps:
- Inspect each hinge, roller, and other hardware components.
- Tighten any loose screws or bolts using a screwdriver or wrench.
- Replace any damaged or worn-out hardware.
By regularly checking and maintaining the hardware of your single bifold door, you can ensure its stability and smooth operation.
Troubleshoot common issues such as sticking or misaligned
doors
Despite regular maintenance, you may occasionally encounter common issues with your single bifold door, such as sticking or misaligned doors. Knowing how to troubleshoot these problems can help you resolve them quickly.
Here are some troubleshooting tips for common issues:
| Issue | Troubleshooting Tip |
|---|---|
| Sticking door | Check the track for any debris and clean it. Lubricate the moving parts. |
| Misaligned door | Adjust the hinges to align the door properly. Inspect the rollers and replace if necessary. |
By following these troubleshooting tips, you can effectively address common issues and ensure the smooth operation of your single bifold door.
Maintaining and troubleshooting your single bifold door doesn’t have to be a daunting task. With regular maintenance, lubrication, and checking for loose or damaged hardware, you can keep your door in excellent condition. By being proactive in addressing common issues, you can enjoy the convenience and functionality of your single bifold door for years to come.
Frequently Asked Questions For How To Install A Single Bifold Door
Can You Install Bifold Doors Without Bottom Track?
Yes, it is possible to install bifold doors without a bottom track. This can be done by using top-hung hardware that allows the doors to slide along a track at the top of the opening. This creates a seamless and modern look without the need for a bottom track.
How Do You Install A Bifold Door On Track?
To install a bifold door on a track, follow these steps: 1. Measure the opening and pick the right size door. 2. Attach the track to the top of the opening. 3. Hang the door panels on the track, making sure they align properly.
4. Install the guide at the bottom to keep the panels in place. 5. Test the door to ensure smooth operation.
What Is The Rough Opening For A Single Bifold Door?
The rough opening for a single bifold door is typically twice the width of the door panel. For example, if the door panel is 24 inches wide, the rough opening would be approximately 48 inches wide.
Can You Install Bifold Doors Yourself?
Yes, it is possible to install bifold doors yourself. However, it’s important to follow the installation instructions carefully and have the necessary tools and skills. If you’re unsure, it’s recommended to hire a professional for proper installation.
Conclusion
Installing a single bifold door doesn’t have to be a daunting task. By following the step-by-step instructions outlined in this blog post, you’ll be well-equipped to tackle the project with confidence. Remember to prepare the necessary tools and materials, measure accurately, and carefully align the door.
With a little patience and attention to detail, you’ll have a functional and visually appealing bifold door in no time. Happy installing!