nstalling a vinyl screen door involves measuring the door frame, assembling the door, attaching it to the frame, and making necessary adjustments for a proper fit.
Gather The Necessary Tools And Materials
When it comes to installing a vinyl screen door, gathering the necessary tools and materials is an important first step. Having the right tools on hand will make the installation process much smoother and efficient. Below, we’ve outlined the essential tools and materials you will need to install a vinyl screen door.
<h3> Measure tape </h3>
One of the most crucial tools you’ll need is a measure tape. This will help you accurately measure the dimensions of the doorway and determine the correct size for your vinyl screen door. Make sure to measure both the height and width of the doorway to ensure a proper fit.
<h3> Screwdriver </h3>
A screwdriver is another essential tool for installing a vinyl screen door. It will be used to secure the door frame and hinges in place. Depending on the specific model of the vinyl screen door, you may need a Phillips or flathead screwdriver. Ensure you have the appropriate type and size of screwdriver for your project.
<h3> Level </h3>
Having a level is crucial to ensure that your vinyl screen door is properly aligned and balanced. It will help you determine if the door frame is straight and plumb, preventing any potential issues with the installation. Make sure to use the level at various points along the door frame for accurate results.
<h3> Vinyl screen door kit </h3>
Last but not least, you’ll need a vinyl screen door kit. This kit will typically include all the necessary components, such as the door frame, hinges, latch, and screen material. It’s important to make sure you have a complete kit before starting the installation process.
With these tools and materials gathered, you’ll be well-prepared to begin the installation process of your vinyl screen door. Remember to read the manufacturer’s instructions carefully and take your time to ensure a successful installation.
Remove The Existing Door And Prep The Doorway
Remove the existing door and prep the doorway
If you’re looking to update the look of your home while improving its functionality, installing a vinyl screen door is a great choice. Not only does a screen door allow fresh air to flow into your home, but it also keeps out bugs and provides an extra layer of security. In this guide, we will walk you through the process of removing the old door and hardware and prepping the doorway for your new vinyl screen door.
Remove the old door and hardware
Before you can install your new vinyl screen door, it’s essential to remove the existing door and its hardware. Follow these simple steps to ensure a smooth removal process:
- Step 1: Gather your tools
- Step 2: Remove the door hardware
- Step 3: Take out the old door
Inspect and repair any damage to the door frame
After removing the old door, it’s important to inspect the door frame for any damage that may need to be repaired before installing the vinyl screen door. Follow these steps to ensure your door frame is in good condition:
- Step 1: Check for rot or decay
- Step 2: Repair any damage
- Step 3: Level the door frame
Measure And Trim The Vinyl Screen Door
Installing a vinyl screen door can be a great way to enjoy fresh air while keeping bugs out of your home. Once you have chosen the perfect door for your needs, the next step is to measure and trim it to ensure a proper fit. In this section, we will discuss how to measure the doorway height and width, as well as how to trim the vinyl door using a hacksaw.
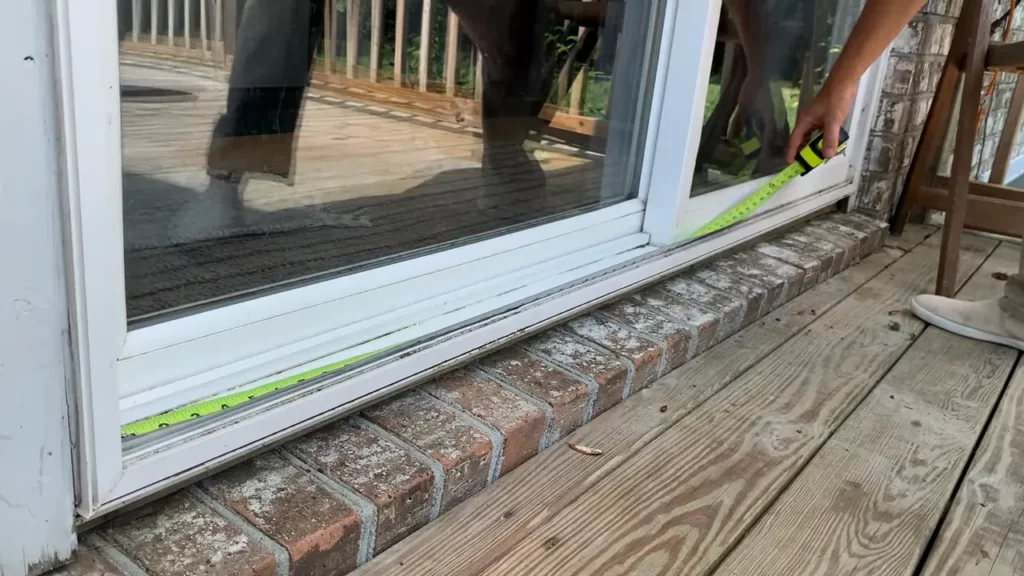
Measure the Doorway Height and Width
To begin, you will need to accurately measure the height and width of your doorway. This will ensure that the vinyl screen door fits properly and functions correctly. Here’s how to do it:
- Grab a measuring tape or a ruler that provides accurate measurements.
- For the doorway height, measure from the top of the door frame to the bottom.
- Write down this measurement. It will be useful when trimming the vinyl door later.
- Next, measure the doorway width by measuring from one side of the frame to the other.
- Again, write down this measurement as it will be needed for trimming the door.
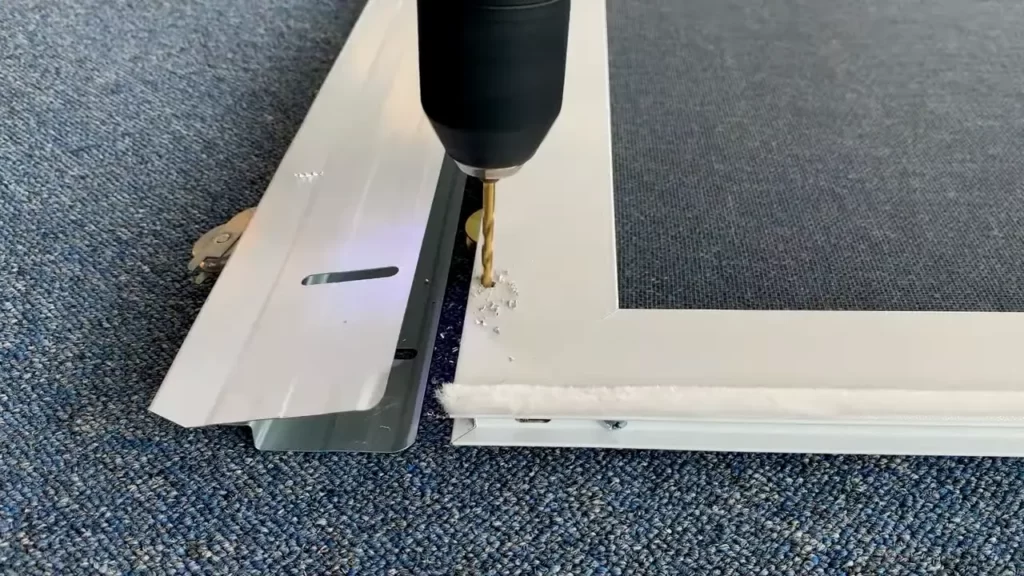
Trim the Vinyl Door to Fit Using a Hacksaw
Now that you have the measurements, it’s time to trim the vinyl door to fit your doorway. Follow these steps:
- Place the vinyl screen door on a sturdy work surface, making sure it is secure and won’t move during the cutting process.
- Using a hacksaw, carefully cut the excess length or width from the door.
- Remember to cut slowly and steadily to ensure a clean and precise cut.
- As you cut, periodically check the measurements to avoid removing too much material.
- Once you have trimmed the door to the desired size, use a file or sandpaper to smooth any rough edges.
By following these steps, you can successfully measure and trim your vinyl screen door to fit your doorway accurately. Taking the time to ensure proper measurements and a clean cut will result in a professional-looking installation that will provide years of use and enjoyment.
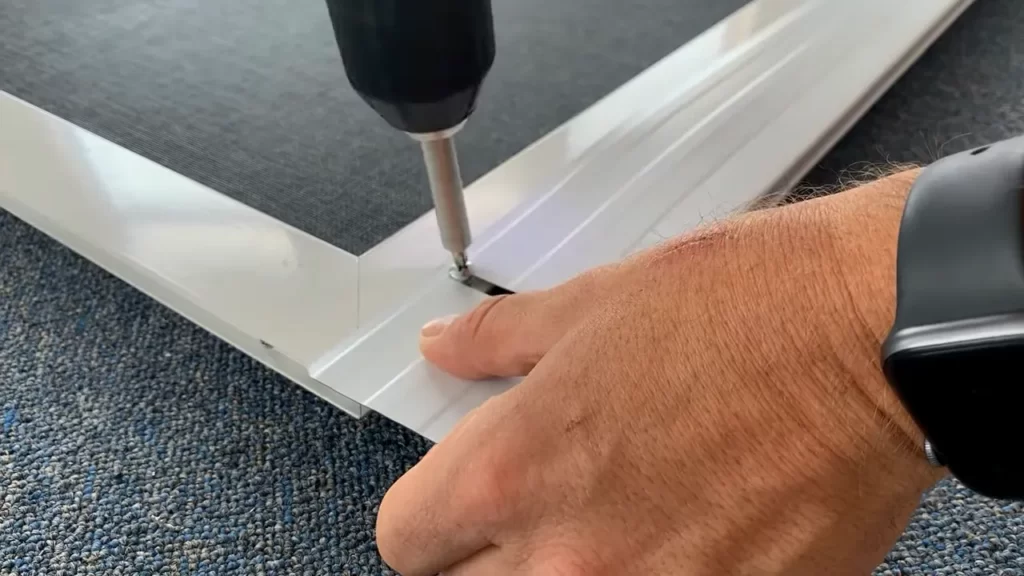
Install The Door Frame And Hinges
Position the door frame in the doorway
First, ensure that you have measured the doorway correctly and purchased a vinyl screen door that fits your frame. Begin by positioning the door frame in the doorway. Make sure the frame is level and plumb. This can be done using a level and a plumb line. Adjust the position of the frame if needed, so that it fits snugly in the doorway.
Secure the door frame using screws
Now that the door frame is in the correct position, it’s time to secure it using screws. Place the provided screws at the designated holes on the door frame and drive them into the door jamb with a screwdriver or a drill. Ensure that the screws are firmly tightened, but be careful not to overtighten them as it may damage the door frame or the doorway.
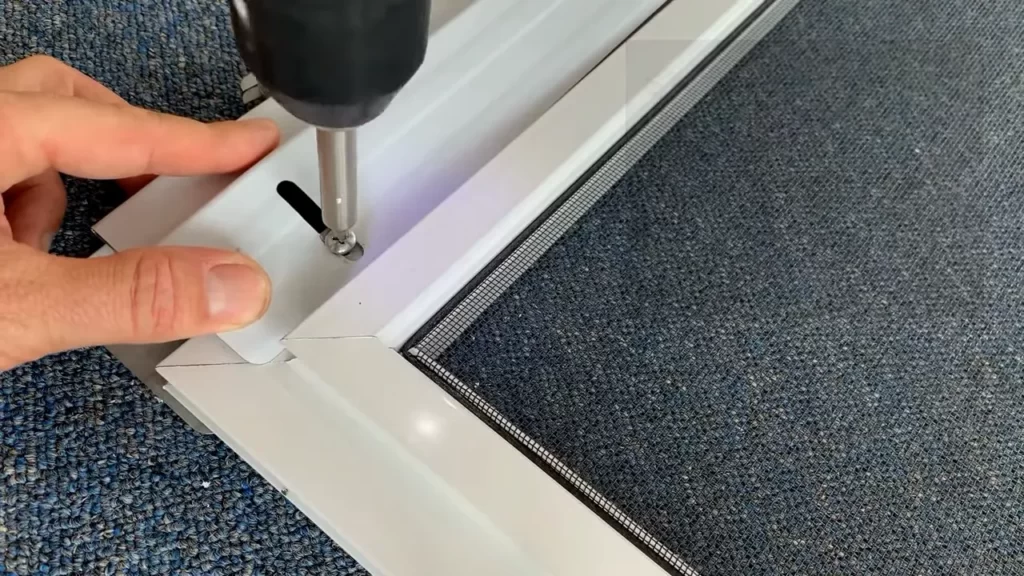
Attach the hinges to the door frame
Next, you will need to attach the hinges to the door frame. Take one hinge and position it on the jamb side of the door frame. Align the holes of the hinge with the pre-drilled holes on the door frame. Insert screws into the holes and tighten them using a screwdriver or a drill. Repeat the process for the remaining hinges, making sure that they are evenly spaced along the vertical edge of the door frame. This will ensure that the door opens and closes smoothly.
Attach The Door Handle And Latch
Installing the door handle and latch is the final step in ensuring your vinyl screen door is fully functional. These components play a crucial role in providing security and ease of use. In this section, we will guide you through the process of attaching the door handle on the outside of the door frame and securing the latch mechanism on the inside.
Install the door handle on the outside of the door frame
To install the door handle, follow these simple steps:
- Locate the designated area on the outside of the door frame where the handle is to be attached.
- Place the handle against the door frame, ensuring it is centered and aligned correctly.
- Using the provided screws, attach the handle securely to the door frame. Make sure to tighten the screws firmly, but avoid over-tightening to prevent damage to the vinyl surface.
By installing the door handle on the outside of the door frame, you will have a convenient grip to open and close your vinyl screen door effortlessly.
Attach the latch mechanism on the inside of the door frame
The latch mechanism is responsible for securing your screen door in a closed position. Follow these steps to attach it correctly:
- Identify the spot on the inside of the door frame where the latch mechanism should be installed.
- Hold the latch against the door frame, ensuring it is aligned with the corresponding part on the door itself.
- Secure the latch mechanism by tightening the provided screws into the pre-drilled holes. Take care not to over-tighten as it may cause misalignment or damage.
Once the latch mechanism is securely attached, it will provide a reliable locking system, keeping your vinyl screen door closed and protected. In conclusion, attaching the door handle and latch completes the installation of your vinyl screen door. Following these instructions will result in a secure and fully functional screen door, providing you with convenience and peace of mind. Enjoy the benefits of a stylish and durable vinyl screen door while keeping your home well-ventilated and protected.
Hang The Vinyl Screen Door
Installing a vinyl screen door is a simple and effective way to enhance the functionality and appeal of your home’s entryway. Once you have gathered the necessary tools and materials, you are ready to hang the vinyl screen door. This step-by-step guide will walk you through the process, ensuring a seamless installation. Remember to take your time and follow each step carefully for best results.
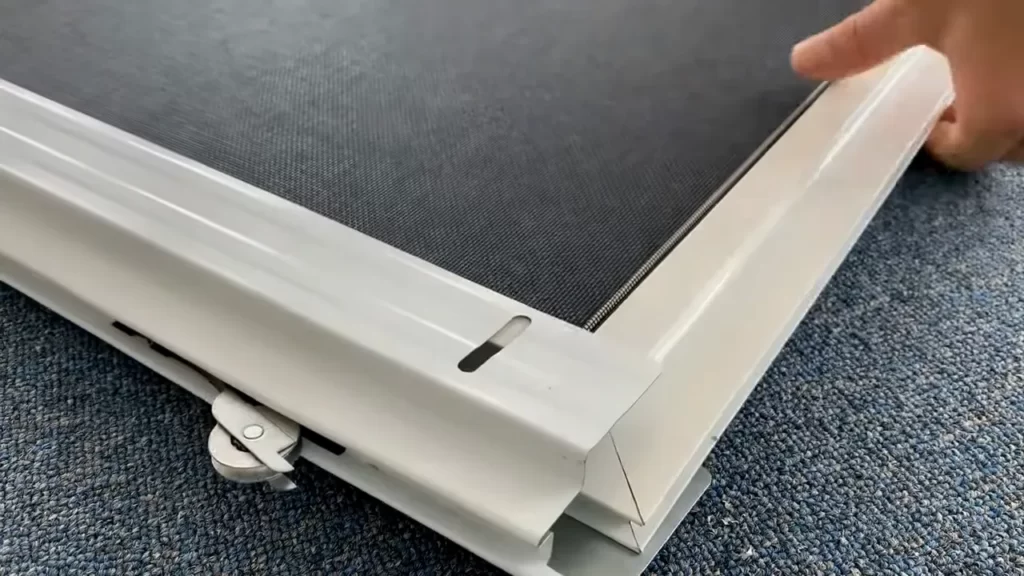
Align the hinges on the door with the hinges on the frame
The first step in hanging your vinyl screen door is to align the hinges on the door with the hinges on the frame. This ensures that the door will open and close smoothly. Begin by carefully positioning the door in the frame, making sure it is level and centered. Once in position, locate the hinges on both the door and the frame.
Using a tape measure or ruler, ensure that the hinges are properly aligned. Measure the distance between each hinge and adjust as necessary to achieve an even and symmetrical fit. This attention to detail will ensure a proper installation and prevent any issues with the door’s operation.
Secure the hinges using screws
Once the hinges are aligned, it’s time to secure them in place using screws. Make sure to select screws that are appropriate for the material of your door and frame. Vinyl doors typically require screws designed for use with this material.
Using a screwdriver or drill, insert the screws through the pre-drilled holes in the hinges and into the corresponding holes in the frame. Be careful not to overtighten the screws, as this can strip the holes or damage the vinyl. Tighten the screws just enough to securely hold the hinges in place.
Test the door for smooth opening and closing
With the hinges secured, it’s time to test the door for smooth opening and closing. Gently open and close the door several times to ensure it operates correctly. Pay attention to any sticking points or areas where the door feels uneven.
Make any necessary adjustments to the hinges or the positioning of the door within the frame to correct any issues. It’s important to address these concerns as early as possible to prevent any long-term damage to the door or frame.
By following these steps to hang your vinyl screen door, you can enjoy a functional and beautiful addition to your home. Take your time and pay attention to detail throughout the installation process for the best results.
Keep The Vinyl Screen Door Clean
Regularly wipe down the door with a mild detergent and water
To keep your vinyl screen door looking its best, regular cleaning is essential. Start by wiping down the door with a gentle solution of mild detergent and water. This will help remove any dirt, dust, or grime that may have accumulated on the surface. Avoid using harsh chemicals or abrasives, as these can damage the vinyl and cause it to deteriorate over time. Instead, opt for a non-abrasive cleaner that is safe for use on vinyl materials. Dilute the detergent with water according to the manufacturer’s instructions and use a soft cloth or sponge to clean the door.
Avoid using harsh chemicals or abrasives that can damage the vinyl
While it may be tempting to use stronger cleaning agents to tackle tough stains or marks on the vinyl screen door, it’s important to avoid doing so. Harsh chemicals and abrasives can cause irreversible damage to the vinyl surface, leading to discoloration, cracking, or peeling. These types of cleaners can also strip away the protective coating on the vinyl, leaving it vulnerable to the elements. Stick to milder cleaning solutions and gentle techniques to preserve the integrity of your vinyl screen door for years to come.
Inspect And Repair Any Damages
Check the screen for tears or holes
One of the first steps in installing a vinyl screen door is to thoroughly inspect the screen for any tears or holes. This is important because even the smallest tear or hole can allow insects or other pests to enter your home. To complete this step, follow these instructions:
- Begin by carefully examining the screen from top to bottom, paying close attention to the corners and edges.
- Use your fingers to feel for any areas that seem weakened or damaged.
- If you notice any tears or holes, mark their locations with a small piece of tape or a marker for easy reference when it comes time to repair them.
Patch any damages using a vinyl repair kit
Once you have identified any tears or holes in the screen, it’s time to patch them up. Fortunately, repairing vinyl screen door damages is a relatively simple task that can be accomplished with a vinyl repair kit. To patch the damages, follow these steps:
- Start by cleaning the area around the tear or hole with a mild soap and water solution, ensuring that it is free from any dirt or debris. Allow the area to dry completely.
- Next, cut a piece of repair material from the vinyl repair kit that is slightly larger than the damaged area.
- Carefully remove the backing from the repair material, then position it over the tear or hole, ensuring that it fully covers the damaged area.
- Using a heat gun or hairdryer set on low heat, apply gentle heat to the repair material. This will cause the vinyl to soften and adhere to the screen, creating a tight seal.
- Once the repair material has been heated, use a cloth or your fingers to firmly press it down, ensuring that it is securely attached to the screen.
- Allow the repaired area to cool and set according to the instructions provided with your vinyl repair kit.
By following these steps to inspect and repair any damages in your vinyl screen door, you can ensure that it is in optimal condition before proceeding with the installation process. Taking the time to check for tears or holes and patching them up will not only improve the appearance of your screen door but also provide a more efficient barrier against pests and debris.
Lubricate Moving Parts
Apply a silicone-based lubricant to the hinges and latch mechanism
One crucial step in installing a vinyl screen door is to properly lubricate the moving parts. By applying a silicone-based lubricant to the hinges and latch mechanism, you ensure smooth operation and prevent corrosion. This not only makes it easier to open and close the screen door but also extends its lifespan. Below, we’ll guide you through the process of lubricating the hinges and latch mechanism, ensuring your vinyl screen door stays in excellent condition for years to come.
How to lubricate the hinges and latch mechanism
To lubricate the hinges and latch mechanism of your vinyl screen door, follow these simple steps:
- Start by gathering your materials. You will need a silicone-based lubricant, which can be easily found at most hardware stores.
- Open the vinyl screen door and locate the hinges. These are the metal pieces that connect the door frame to the actual door. Apply a small amount of silicone-based lubricant to each hinge, focusing on the areas where metal parts come into contact with each other.
- Use a clean cloth or a small brush to spread the lubricant evenly across the hinges. Be sure to remove any excess lubricant to avoid buildup.
- Next, find the latch mechanism on the vinyl screen door. This is the part that allows you to lock and unlock the door. Apply a small amount of the silicone-based lubricant to the latch mechanism, ensuring all moving parts are covered.
- Gently move the door back and forth a few times to distribute the lubricant evenly and ensure smooth operation.
Lubricating the hinges and latch mechanism of your vinyl screen door should be done regularly to keep them in optimum condition. By taking this simple step, you can prevent rust, minimize squeaking, and ensure effortless operation.
Enhance And Personalize Your Door
Enhancing and personalizing your vinyl screen door is a great way to add character and style to your home. By customizing the door with decorative accessories and adding features like a retractable screen or pet-friendly elements, you can make your door unique and functional. In this section, we will explore how to enhance and personalize your vinyl screen door to suit your specific needs.
Customize the door with decorative accessories
Adding decorative accessories is an excellent way to make your vinyl screen door stand out. By incorporating decorative elements like door handles, knockers, or decorative plates, you can instantly enhance the appearance of the door. These accessories come in various styles and finishes, allowing you to find the perfect match for your home’s aesthetic.
Consider selecting accessories that complement the overall style of your home or add a pop of color to create a focal point. Whether you prefer a classic and elegant look or a more whimsical and playful design, there are accessories available to suit every taste and preference.
Add a retractable screen or pet-friendly features if desired
If you want to make your vinyl screen door more functional, consider adding a retractable screen or pet-friendly features. A retractable screen provides the convenience of being able to enjoy fresh air while keeping insects out. It can easily be pulled down when needed and hidden away when not in use, maintaining the sleek appearance of the door.
For pet owners, there are options available to make the door more accommodating for your furry friends. You can choose a vinyl screen door with a pet door already integrated or add a separate pet door attachment. This allows your pets to go in and out freely without compromising the security of your home.
Remember to consider the size and needs of your pets when selecting a pet-friendly feature. Ensure the door is easy for them to access and consider any additional security measures that may be required.
Enhancing and personalizing your vinyl screen door not only adds aesthetic appeal to your home but also enhances its functionality. By customizing the door with decorative accessories and adding features like a retractable screen or pet-friendly elements, you can create a door that is unique to your home’s style and meets your specific needs.
Practice Proper Safety Precautions
When it comes to installing a vinyl screen door, it is essential to practice proper safety precautions to ensure a secure and accident-free installation. By following these guidelines, you can protect yourself and others while working with the door. In this blog post, we will discuss different safety measures that you should take to achieve a successful installation.
Keep children away from the door when operating
One of the most important safety precautions is to ensure that children are kept away from the door when it is being operated. Vinyl screen doors can be heavy and have moving parts, which may pose a risk to children who are unaware of the potential dangers. To prevent any accidents or injuries, it is crucial to supervise children and keep them at a safe distance from the installation area.
Ensure the door is properly secured when not in use
When the vinyl screen door is not in use, taking the necessary steps to secure it is essential. This not only prevents accidents but also ensures the longevity of the door. Make sure that the door is securely closed and locked to avoid it swinging open unexpectedly or being blown by strong winds. Additionally, consider installing a latch or hook to further secure the door in place, providing peace of mind that it will not cause harm even when unattended.
By practicing proper safety precautions when installing a vinyl screen door, you can minimize the risk of accidents and ensure a safe environment for everyone. Keep children away from the door when operating to avoid any potential injuries. Also, make sure the door is properly secured when not in use, taking measures to prevent it from swinging open unexpectedly or being blown by strong winds. Following these guidelines will not only protect your loved ones but also help maintain the integrity of the door for years to come.
Frequently Asked Questions For How To Install A Vinyl Screen Door
How Do You Install A Vinyl Hinged Screen Door?
To install a vinyl hinged screen door, start by measuring the opening and trimming the door accordingly. Then, attach the hinges to the door frame using screws. Line up the door with the frame and secure it in place. Finally, check for proper alignment and adjust as needed.
Enjoy your newly installed screen door!
Can I Cut A Vinyl Screen Door?
Yes, you can cut a vinyl screen door. Just make sure to use the proper tools and follow instructions carefully for a clean and precise cut.
Do Vinyl Screen Doors Sag?
Yes, vinyl screen doors can sag over time due to usage and exposure to weather conditions. Regular maintenance and proper installation can help prevent sagging, ensuring the longevity and functioning of the vinyl screen door.
What Is The Easiest Screen Door To Install?
The easiest screen door to install is a retractable screen door. Its simple design allows for easy installation without the need for extensive tools or skills. With its user-friendly features, anyone can install a retractable screen door quickly and hassle-free.
How Do You Install A Vinyl Screen Door?
To install a vinyl screen door, first measure the door frame, then align the door with the frame, attach the hinges, and secure the door in place with screws.
What Tools Do I Need To Install A Vinyl Screen Door?
To install a vinyl screen door, you will need a tape measure, a level, a screwdriver, screws, a hammer, a rubber mallet, and a drill.
Conclusion
Installing a vinyl screen door can be a simple and rewarding DIY project that adds convenience and style to your home. By following the step-by-step guide outlined in this blog post, you can successfully install a vinyl screen door with ease.
Remember to measure accurately, choose the right tools, and take your time during the installation process. With a little effort and a few hours of your time, you can enjoy the benefits of a beautiful and functional vinyl screen door for years to come.