install a window in a door, you need to measure and mark the location, remove the necessary panels, cut the opening, install the window, and secure it with screws or adhesive. This process allows you to enhance the aesthetics of your door and bring in more natural light to your space.
By following these steps, you can easily integrate a window into your door for a beautiful and functional upgrade.
1. Tools And Materials Needed

Installing a window in a door can be a great way to add natural light and aesthetic appeal to your home. With a few tools and materials, you can easily complete this DIY project. Before you begin, it’s important to gather everything you need to ensure a smooth installation process. In this post, we will walk you through the required tools and materials for installing a window in a door.
Required Tools
Before getting started, make sure you have the following tools:
- Measuring tape
- Utility knife
- Hammer
- Chisel
- Power drill
- Screwdriver
- Safety goggles
- Gloves
- Caulking gun
These tools will help you accurately measure, cut, and install the window in your door.
Required Materials
In addition to the tools mentioned above, you will also need the following materials:
| Materials | |
|---|---|
| Glass window pane | Enough to fit the size of the door opening |
| Window frame | Choose a frame material that matches your door |
| Weatherstripping | To provide insulation and prevent drafts |
| Screws | For securing the window frame |
| Caulk | For sealing and waterproofing |
Make sure you have all the necessary materials on hand before starting the installation process. This will save you time and ensure a smoother workflow.
Now that you are well-equipped with the required tools and materials, you are ready to move on to the next step – preparing the door for the window installation. Stay tuned for our next blog post in this series, where we will guide you through the process of preparing your door for installing a window.
2. Preparing The Door
Before you can install a window in your door, you need to ensure that the door is properly prepared. This involves assessing the door for suitability and taking accurate measurements, removing the existing door panel if necessary, and preparing the door frame for the window installation.
Assessing the door for suitability and measurements
To assess whether your door is suitable for a window installation, you need to consider its material, thickness, and overall condition. Check if your door is made of a material that can accommodate a window, such as wood or fiberglass. Additionally, ensure that the door is thick enough to accommodate the window frame without compromising its stability.
To take accurate measurements for the window, measure the width and height of the door opening. Measure both the width and height at multiple points to account for any irregularities. It’s crucial to have precise measurements to ensure the window fits perfectly in the door.
Removing the existing door panel if necessary
If your door already has a panel in the location where you want to install the window, you’ll need to remove it. Start by unscrewing any screws or removing any nails that secure the panel to the door frame. Use a pry bar or a chisel to gently separate the panel from the frame, being careful not to damage the surrounding wood.
Once the panel is removed, clean the area thoroughly, removing any adhesive or debris that may hinder the installation of the window. It’s important to ensure that the surface is smooth and free from any obstructions.
Preparing the door frame for the window installation
Prior to installing the window, you need to prepare the door frame to provide proper support and secure the window firmly in place. If the door frame has any rough spots or irregularities, use sandpaper to smooth them out.
Apply a layer of primer or paint to the frame to protect it from moisture and other environmental factors. This step will also enhance the overall appearance of the door.
Inspect the frame for any cracks or damage, and make any necessary repairs before proceeding with the window installation. It’s crucial to have a sturdy door frame to ensure the window’s long-term stability and performance.
By properly preparing the door, you can ensure a successful and smooth window installation. Assessing the door for suitability, taking accurate measurements, removing the existing panel (if required), and preparing the door frame will set the foundation for a secure and aesthetically pleasing window in your door.
3. Choosing The Right Window
When installing a window in a door, choosing the right window is essential to ensure both functionality and aesthetics. There are several factors to consider when selecting a window for your door, including understanding different types of windows suitable for doors, selecting the appropriate size and style, and considering energy efficiency and security features.
Understanding different types of windows suitable for doors
Before making a decision, it’s important to have an understanding of the different types of windows suitable for doors. Here are some common options:
- Awning Windows: These windows are hinged at the top and open outward, allowing for great ventilation while offering protection from rain.
- Casement Windows: Casement windows are hinged at the side and open outward. They provide excellent natural light and good airflow.
- Sliding Windows: Sliding windows feature panels that glide horizontally. They are easy to operate and offer a contemporary look.
- Double-Hung Windows: Double-hung windows have two sashes that can move up and down independently. They are classic in design and allow for better control over airflow.
Considering the architectural style of your home and your personal preferences can help you determine the most suitable window type for your door.
Selecting the appropriate size and style
Choosing the right size and style of window for your door is crucial for a harmonious and visually appealing look. Measure the dimensions of the door opening accurately and select a window that fits perfectly. You may also want to consider the style of your door and choose a window that complements its design. For example, if you have a traditional style door, a window with decorative grilles might be the perfect choice.
Considering energy efficiency and security features
When choosing a window for your door, it’s important to consider both energy efficiency and security features. Look for windows with high energy efficiency ratings, which can help you save on heating and cooling costs while ensuring a comfortable indoor environment. Additionally, opt for windows that offer strong security features, such as multiple locking points and reinforced glass, to enhance the safety of your home.
By selecting a window that aligns with your needs and preferences, you can enhance the functionality, aesthetics, and security of your door.
4. Marking And Cutting The Opening
Installing a window in a door not only enhances the aesthetic appeal of your home but also allows natural light to flood into the room. Once you have gathered all the necessary materials and tools, it’s time to mark and cut the opening for the window. This crucial step requires precision and careful attention to detail. In this section, we will guide you through the process, starting with marking the position of the window on the door, followed by making precise measurements for the opening, and finally using the proper tools to cut the opening.
Marking the position of the window on the door
Before you begin cutting the opening, it is essential to mark the position of the window on the door accurately. This ensures that the window is centered and aligned correctly. Here are the steps to mark the position of the window:
- Identify the desired height for the window placement and measure it from the bottom of the door.
- Using a measuring tape, mark this measurement on both sides of the door, ensuring the marks are parallel and level.
- Next, measure the desired width for the window opening and mark the measurements on the top and bottom of the door, again ensuring the marks are parallel and level.
- Double-check the accuracy of the marks to avoid any mistakes during the cutting process.
Making precise measurements for the opening
Once you have marked the position of the window, it’s time to make precise measurements for the opening. This step is crucial as it ensures the window fits perfectly into the door. Follow these steps:
- Measure the dimensions of the window frame you are using.
- Starting from the top left corner of the marked window position, measure vertically and horizontally to determine the exact opening size.
- Take into account any necessary spacing, such as clearance for the window frame or allowances for expansion and contraction.
- Double-check your measurements to ensure accuracy before proceeding to the next step.
Using proper tools to cut the opening
Once you have marked and measured the opening, it’s time to cut it. Using the proper tools for cutting ensures a clean and precise window opening. Here are the tools you will need:
| Tools | Description |
|---|---|
| Circular Saw | A circular saw equipped with a fine-toothed blade will provide a clean cut through the door. |
| Pilot Drill Bits | Pilot drill bits are essential for creating starter holes and guiding the saw blade through the door. |
| Jigsaw | A jigsaw can be used to make any curved or intricate cuts according to the design of the window frame. |
| Chisel | A chisel helps in cleaning up any rough edges or corners after cutting the opening. |
| Tape Measure | A tape measure is necessary for precise measurements before cutting. |
| Pencil | A pencil is used to mark the dimensions and lines on the door. |
Ensure your safety by wearing goggles, gloves, and ear protection before you begin cutting. Follow the manufacturer’s instructions for each tool and make careful, controlled cuts. Take your time and work in a methodical manner to avoid any errors or damage to the door. Once you have successfully cut the opening, use a chisel to clean up any rough edges and ensure a smooth finish. By following these steps and using the proper tools, you can confidently mark and cut the opening for your window in a door. This important step brings you one step closer to completing the installation and enjoying the benefits of natural light flooding into your space.
5. Installing The Window
Now that you have prepared the door and created the opening for the window, it’s time to move on to the exciting step of actually installing the window. This is a crucial part of the process, as it determines the functionality and overall performance of your door.
Applying caulking or insulation around the opening
Before placing the window into the opening, it’s essential to ensure a proper seal by applying caulking or insulation around the edges. This step is crucial for preventing drafts, water leaks, and maintaining energy efficiency. Start by using a silicone-based caulk or a weatherstripping insulation tape specially designed for windows and doors. Apply a continuous bead of caulk or adhere the insulation tape to the outer edge of the opening, making sure it is fully covered.
Placing the window into the opening and securing it
With the caulking or insulation in place, carefully position the window into the opening. Make sure it fits snugly and aligns properly. To secure the window, use galvanized screws or nails through the pre-drilled holes in the window frame. Place the screws or nails at regular intervals along the frame, ensuring that they are long enough to penetrate the door and provide a secure hold. Be sure to countersink the fasteners slightly so they are flush with the surface.
Ensuring proper alignment and levelness
Once the window is secured, it’s critical to ensure it is properly aligned and level. A misaligned or uneven window can cause issues with functionality and aesthetics. To check the alignment, use a level on both the vertical and horizontal planes. Make any necessary adjustments by slightly loosening the screws or nails and repositioning as needed. Once the window is level and aligned, tighten the fasteners until they are secure.
Proper alignment and levelness are essential for the smooth operation of the window and a professional-looking finish. Take your time with this step to avoid any future issues or frustrations.
Finally, give the window a test run by opening and closing it. Ensure that it operates smoothly and seals tightly. If you notice any problems or gaps, make any necessary adjustments and retest until you achieve the desired results.
Congratulations! You have successfully installed a window in your door. You can now enjoy the benefits of improved natural light, ventilation, and a more aesthetically pleasing entrance.
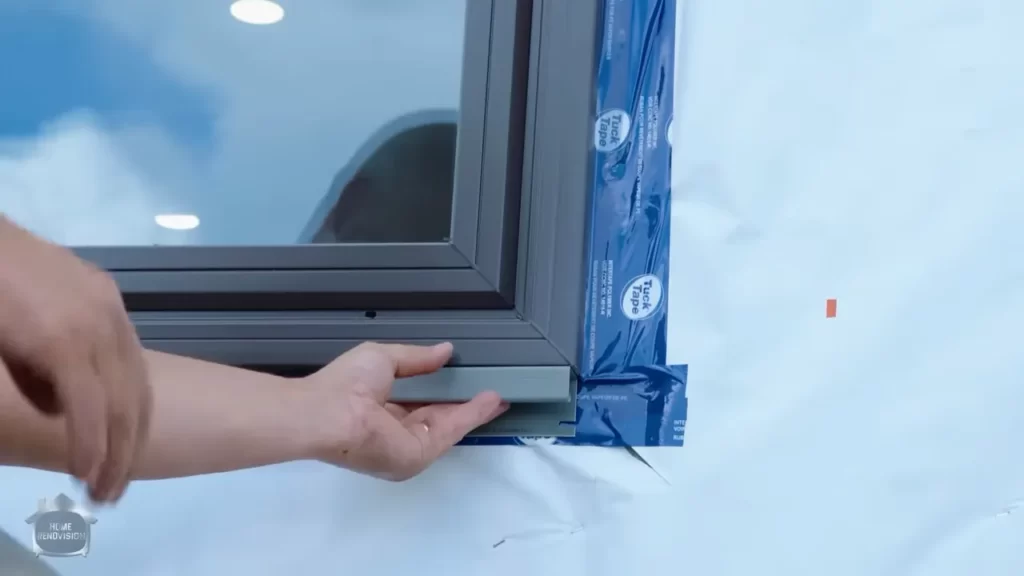
5.1. Attaching The Window Frame
When it comes to enhancing the aesthetics and functionality of your door, adding a window can make a world of difference. In this section, we will focus on the crucial step of attaching the window frame to the door. By following these instructions, you will be on your way to successfully installing a window in your door.
Once you have carefully measured and cut an opening for your window, it’s time to secure the window frame to the door. There are two common methods you can use: using screws or nails. Let’s explore each of these options.
Using screws to secure the window frame to the door
Using screws provides a sturdy and reliable way to attach the window frame to the door. Follow these steps for successful installation:
- Position the window frame on the door, ensuring it lines up with the opening.
- Using a drill or screwdriver, insert screws into the pre-drilled holes in the window frame and drive them into the door, making sure they are secure.
- Repeat this step for all sides of the window frame, ensuring that the frame is tightly attached to the door.
By using screws, you can ensure that the window frame remains securely in place, even with regular use.
Using nails to secure the window frame to the door
If you prefer using nails instead of screws, here is how you can attach the window frame:
- Position the window frame on the door, aligning it with the opening.
- Using a hammer, carefully drive nails through the pre-drilled holes in the frame and into the door, ensuring that they are firmly in place.
- Repeat this process for all sides of the window frame, making sure that the frame is securely attached.
Choosing the nail method provides a simpler alternative to screws, but it is important to ensure that the nails are driven in firmly so that the frame remains in position.
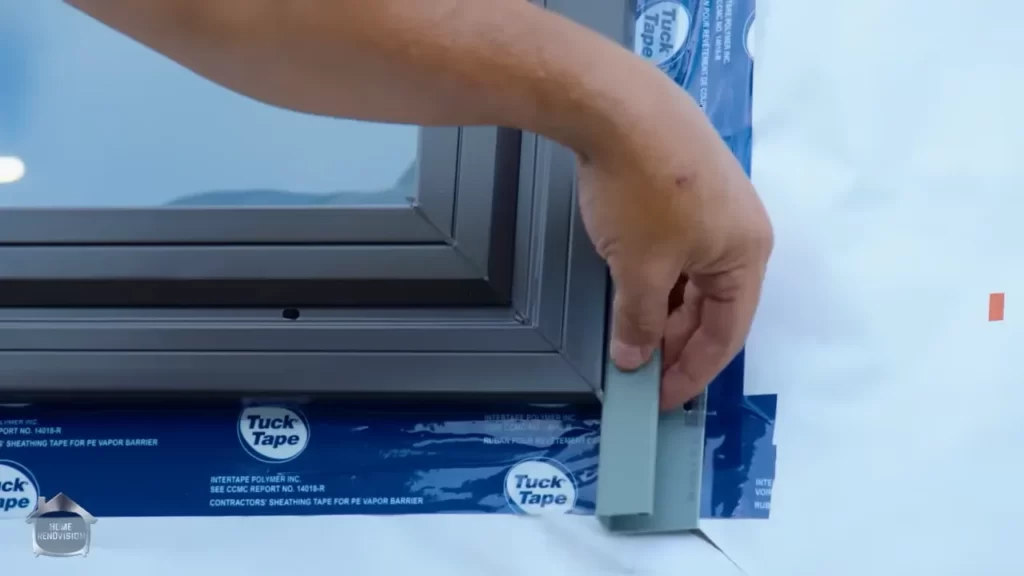
Checking for any gaps and making necessary adjustments
Once the window frame is securely attached, it is essential to check for any gaps between the frame and the door. Gaps can impact the insulation and security of the window. Follow these steps to ensure a tight fit:
- Inspect all sides of the window frame carefully, looking for any visible gaps.
- If there are gaps, use a caulk gun and apply a bead of caulk along the edges of the frame where the gaps are present.
- Smooth the caulk with a caulk-smoothing tool or your finger for a clean and seamless finish.
By carefully checking for gaps and making the necessary adjustments with caulk, you can ensure that your newly installed window is weatherproof and aesthetically pleasing.
Now that you have successfully attached the window frame to your door and made any necessary adjustments, you are one step closer to completing the installation process. Stay tuned for the next section, where we will discuss the final steps to complete your window installation.
5.2. Insulating And Sealing
Once you have successfully installed your window in the door frame, it is important to properly insulate and seal to prevent any drafts or air leakage. This step is crucial to ensure energy efficiency and maintain a comfortable indoor environment. In this section, we will explore two effective methods for insulating and sealing your newly installed window: applying weatherstripping or insulation to prevent drafts, and sealing any gaps or cracks with caulk or foam.
Applying weatherstripping or insulation to prevent drafts
One of the most common causes of energy loss and drafts around windows is improper sealing. To prevent this and enhance insulation, applying weatherstripping or insulation to the window frame is essential. Here are the steps to follow:
- Measure the dimensions of the window frame to determine the length of weatherstripping or insulation required.
- Cut the weatherstripping or insulation material to the appropriate length.
- Clean the window frame surface to ensure proper adhesion.
- Apply a thin bead of adhesive along the edges of the window frame.
- Press the weatherstripping or insulation firmly into place, making sure it adheres securely.
- Repeat the process for all sides of the window frame.
- Inspect the installed weatherstripping or insulation for any gaps or loose sections, and make any necessary adjustments to ensure a tight seal.
This method effectively prevents drafts and enhances the energy efficiency of your door with a window.
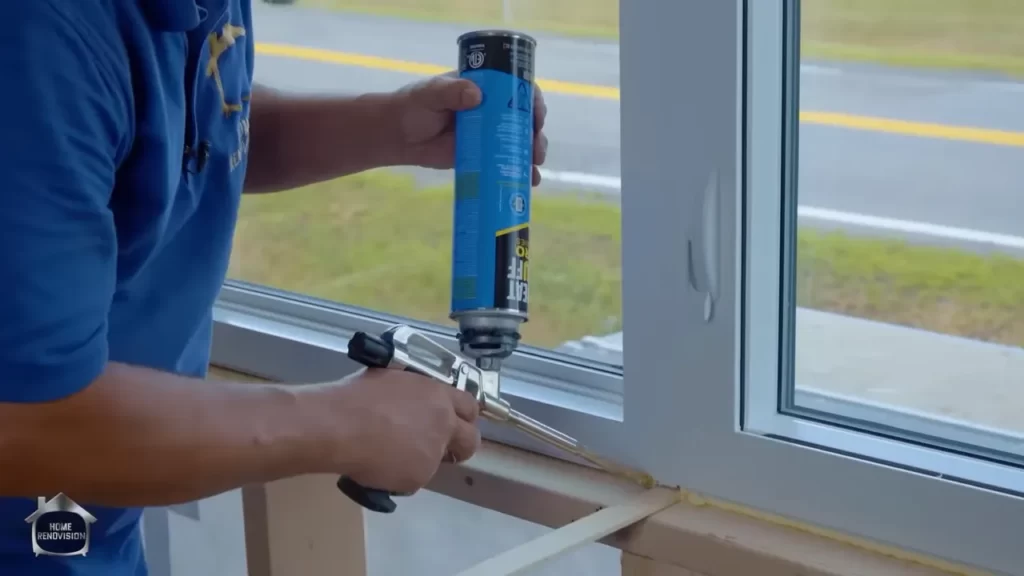
Sealing any gaps or cracks with caulk or foam

Another crucial step in insulating and sealing your window in the door is sealing any gaps or cracks that may exist. These gaps can allow air leakage and compromise the effectiveness of the installation. Here’s how to seal them:
- Inspect the window frame for any visible gaps or cracks.
- If the gaps or cracks are small, use caulk to seal them. Apply a thin bead of caulk along the opening, ensuring complete coverage.
- If the gaps or cracks are larger, expandable foam can be used. Fill the gaps with foam, allowing it to expand and fill the entire space adequately.
- Use a putty knife or any suitable tool to level the caulk or remove excess foam.
- Allow the caulk or foam to dry according to the manufacturer’s instructions.
- Inspect the sealed gaps or cracks to ensure a complete seal and make any necessary touch-ups.
Sealing the gaps and cracks around the window provides an additional layer of protection against drafts and enhances the overall insulation of your door window.
By following these insulating and sealing techniques, you can ensure that your newly installed window in the door provides excellent energy efficiency, drafts prevention, and a comfortable indoor environment.
5.3. Testing And Adjusting
After successfully installing the window in your door, it is crucial to thoroughly test and adjust it to ensure its proper functionality. This step is essential to guarantee that the window operates smoothly and provides the desired level of performance.
Checking the functionality of the window
To begin, carefully inspect the window to identify any potential issues or areas that require adjustment. Look for gaps, misalignments, or any signs of resistance during operation. The goal is to make sure the window opens, closes, and locks effortlessly.
- Open and close the window multiple times to test its functionality. Take note of any difficulties encountered during the process.
- Ensure that the window remains firmly in place both when closed and open.
- Check the seals around the window for any gaps or leaks that may compromise energy efficiency or allow moisture to enter.
Making any necessary adjustments for proper operation
If you notice any issues during the functionality check, it’s important to make the necessary adjustments to ensure proper operation. Here are some key steps to follow:
- Inspect the hinges: If the window is not opening or closing smoothly, check the hinges. They may need to be adjusted or lubricated for improved performance.
- Examine the locking mechanism: If the window doesn’t lock securely, check the alignment of the locking mechanism. You may need to make minor adjustments, such as tightening or realigning the bolts.
- Assess the weatherstripping: If there are gaps or leaks around the window, it may indicate issues with the weatherstripping. Apply new weatherstripping or make adjustments to existing ones to create a tight seal.
- Consider the balance: If the window doesn’t stay open or closed on its own, it may need adjustment to its balance mechanism. Consult the manufacturer’s instructions or seek professional help if necessary.
- Test the window for air and water leaks: To ensure optimal energy efficiency and weather resistance, carefully inspect the window for any air or water leaks. If any are detected, seal them using suitable caulking or other appropriate methods.
Remember that proper testing and adjusting is critical to the longevity and functionality of your newly installed window. By taking the time to thoroughly examine and address any issues, you can ensure that your window operates smoothly, enhances your door’s aesthetics, and enhances your overall satisfaction with the installation process. As a responsible homeowner, it’s always wise to refer to the manufacturer’s instructions as the primary guide for testing and adjusting specific window models.
6. Finishing Touches
6. Finishing Touches
After successfully installing a window in your door, it’s time to add those finishing touches that will enhance the overall look and functionality of your newly upgraded door. This final stage involves two main steps: adding trim or molding around the window and painting or staining the door and window frame. Additionally, you’ll want to tidy up the work area and remove any debris to ensure a clean, professional finish. Let’s dive into each step and explore how to complete these finishing touches with ease.
<h3>Adding Trim or Molding around the Window</h3>
Adding trim or molding around the window not only provides a decorative element but also helps seal any gaps and provides a clean transition between the window and the door frame. Here’s a step-by-step guide:
- Measure and cut the trim or molding pieces to fit around the window.
- Hold the pieces in place around the window to ensure they align correctly.
- Apply a bead of weather-resistant adhesive to the back of each trim or molding piece.
- Press the pieces firmly onto the door, aligning them with the edges of the window.
- Use finishing nails or brad nails to secure the trim or molding in place.
- Fill any nail holes and gaps with wood filler.
- Allow the adhesive and wood filler to dry completely.
- Sand the trim or molding until smooth using fine-grit sandpaper.
<h3>Painting or Staining the Door and Window Frame</h3>
Once the trim or molding is in place, you can proceed with painting or staining the door and window frame to achieve the desired aesthetic. Follow these steps:
- Choose a high-quality paint or stain that is suitable for exterior use.
- Clean the door and window frame thoroughly to remove any dust or debris.
- Apply a coat of primer to the entire surface, allowing it to dry completely.
- Using a high-quality paintbrush or roller, apply an even coat of paint or stain to the door and window frame.
- Allow the first coat to dry according to the manufacturer’s instructions.
- If necessary, apply a second coat for better coverage.
- Let the final coat dry completely before touching or closing the door.
Remember, if you choose to stain the door and window frame, make sure to follow the staining instructions provided by the manufacturer for the best results.
<h3>Cleaning up the Work Area and Removing Any
Debris</h3>
Now that the installation and finishing touches are complete, it’s important to clean up the work area and remove any leftover debris. This ensures a tidy and professional-looking result. Here’s what you need to do:
- Gather all tools, materials, and debris, placing them in a safe and designated area.
- Sweep or vacuum the work area to remove any loose dirt or dust.
- Wipe down the door, window frame, and trim/molding to remove any fingerprints or smudges.
- Dispose of any waste materials properly, following local regulations.
- Take a step back and admire the transformation!
By following these steps, you can successfully complete the finishing touches of window installation in your door. The added trim or molding, along with a fresh coat of paint or stain, will elevate the appearance of your door and provide a seamless integration between the window and door frame. Don’t forget to maintain your newly installed window periodically to ensure it remains in top-notch condition for years to come.
If you have any questions or need further assistance, don’t hesitate to reach out to a professional or consult relevant online resources.
7. Maintenance And Care
Maintenance and care are essential for ensuring the longevity and optimal functionality of your newly installed window in a door. By giving regular attention to your window and door, you can prevent potential issues and keep them in top-notch condition. In this section, we will discuss some key tips for maintaining the window and door, cleaning and lubricating the window mechanism, and checking for any signs of damage or wear.
Tips for maintaining the window and door
Maintaining your window and door goes a long way in preserving their beauty and functionality. Here are some expert tips to help you keep them in great shape:
- Regularly inspect the window frame, hinges, and handles for any signs of wear or damage. If you notice any issues, address them promptly to avoid further damage.
- Keep the window tracks clean and free from dirt, debris, and any other obstructions. This ensures smooth operation when opening and closing the window.
- Apply a fresh coat of paint or varnish when needed to protect the window and door from weather elements and maintain their aesthetic appeal.
- Check the weatherstripping around the window for any signs of wear or deterioration. Replace it if necessary to maintain proper insulation and energy efficiency.
Cleaning and lubricating the window mechanism
To ensure your window operates smoothly, it is important to clean and lubricate the window mechanism regularly. Follow these steps:
- Use a mild detergent and water solution to clean the window frame, glass, and other parts. Avoid using abrasive cleaners that may damage the materials.
- After cleaning, dry the window thoroughly with a soft, lint-free cloth to prevent water spots and streaks.
- Apply a silicone-based lubricant to the hinges, locks, and other moving parts of the window. This helps reduce friction and ensures smooth operation.
Checking for any signs of damage or wear
Regularly inspecting your window and door for signs of damage or wear is crucial to catch any issues early on. Here’s what you should look for:
- Check the glass for cracks, chips, or any other damage. Damaged glass compromises both the aesthetics and structural integrity of the window.
- Inspect the caulking or sealant around the window frame. If you notice any gaps or deterioration, reapply or replace it to maintain proper insulation.
- Test the window’s operation by opening and closing it multiple times. Ensure it moves smoothly without any sticking or difficulty.
- Examine the window hardware, such as handles and locks, for any signs of rust, loose screws, or other damage. Tighten or replace as needed.
By following these maintenance and care guidelines, you can extend the life of your window in a door and enjoy its benefits for years to come.
Frequently Asked Questions For How To Install A Window In A Door
How Do You Put A Window In An Old Door?
To put a window in an old door, measure the door’s dimensions and purchase a corresponding window. Cut a hole in the door and install the window frame securely. Apply caulk or sealant around the edges and add trim if desired.
Finish by painting or staining the door.
How Do You Install Glass In An Interior Door?
To install glass in an interior door, start by removing the existing door from its hinges. Measure the dimensions of the door panel and the glass you want to install. Use a glass cutter or a professional glass cutting service to cut the glass to the correct size.
Apply a bead of caulk around the edge of the glass panel and carefully place it into the door opening. Secure the glass in place by installing glass clips or using clear silicone adhesive. Finally, rehang the door on its hinges.
Can I Put A Window In A Hollow Core Door?
Yes, you can install a window in a hollow core door. However, it’s important to note that this will require some modification and may affect the integrity of the door. It’s recommended to consult a professional to ensure proper installation and to choose a window that is suitable for a hollow core door.
What Is A Window In A Door Called?
The window in a door is commonly known as a door window. It provides light and visibility while maintaining security and privacy.
How Do You Install A Window In A Door?
To install a window in a door, measure and mark the desired location, cut the opening, insert the window, secure it with screws and caulk around the edges.
What Tools Do You Need To Install A Window In A Door?
You will need a measuring tape, pencil, circular saw, jigsaw, drill, screwdriver, caulking gun, and a level.
Conclusion
Installing a window in a door may seem like a challenging task, but with the right tools and a step-by-step approach, it can be easily accomplished. By following the guidelines and tips outlined in this blog post, you can confidently undertake this project and enhance the functionality and aesthetics of your door.
Remember to take proper measurements, use quality materials, and follow safety precautions throughout the process. Enjoy the benefits of increased natural light and improved ventilation that a window in your door can bring. Happy installing!