To install an adjustable exterior door threshold, first, remove the existing threshold. Then, place the new threshold in position and secure it with screws.
Understanding The Purpose And Benefits Of An Adjustable Exterior Door Threshold
An exterior door threshold serves as a crucial component of any entryway, providing a barrier against the elements while maintaining energy efficiency within your home. With the ability to adjust its height, an adjustable exterior door threshold offers several advantages that make it a valuable addition to your doorway. In this section, we will explore how this type of door threshold enhances energy efficiency and the importance of proper installation for weatherproofing.
How an Adjustable Door Threshold Enhances Energy Efficiency
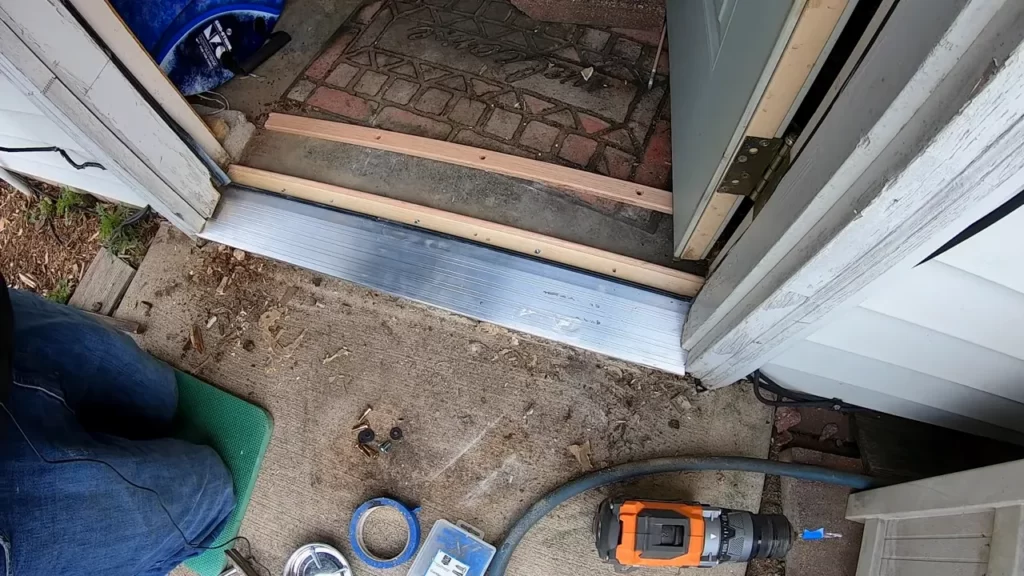
One of the primary benefits of an adjustable door threshold lies in its ability to enhance energy efficiency in your home. By creating a tight seal between the bottom of the door and the floor, an adjustable threshold prevents drafts, cold air, and moisture ingress, thereby reducing energy wastage and promoting a comfortable indoor environment.
An adjustable threshold ensures a proper fit regardless of the door’s weight, size, or height. This adaptability allows for a customized seal that effectively prevents energy loss and minimizes the workload on your heating or cooling system. As a result, you can enjoy increased energy savings and lower utility bills, making an adjustable door threshold an excellent investment for the long run.
The Importance of a Properly Installed Door Threshold for Weatherproofing
In addition to boosting energy efficiency, a properly installed exterior door threshold plays a critical role in weatherproofing your home. It acts as a barrier against rainwater, snow, and other unwanted outdoor elements, preventing them from seeping into your living space and potentially causing damage.
Installing an adjustable exterior door threshold requires careful attention to detail to ensure an airtight seal and effective weatherproofing. Proper alignment and sealing of the threshold with the door and the floor are essential to prevent water infiltration and maintain the overall integrity of your home. Failing to install the threshold correctly can result in water damage, mold growth, and compromised structural stability.
By taking the time to install an adjustable door threshold correctly, you are safeguarding your home from potential water-related issues and ensuring its long-term durability. It is always recommended to follow manufacturer instructions and seek professional assistance if needed to guarantee a proper installation that meets the highest standards.
In conclusion, an adjustable exterior door threshold offers valuable benefits that contribute to energy efficiency and weatherproofing. Its ability to create a tight seal and adapt to various door sizes and weights makes it an excellent choice for any homeowner looking to enhance their home’s comfort, reduce energy consumption, and protect against the elements.
Preparing For Installation: Gathering Tools And Materials
Before you begin the installation process for an adjustable exterior door threshold, it’s crucial to make sure you have all the necessary tools and materials on hand. By gathering everything you need in advance, you can stay organized and make the installation process smooth and efficient. Here, we’ll outline the essential tools and materials required for a successful installation.
Essential tools needed for the installation process
Having the right tools can make all the difference when it comes to installing an adjustable exterior door threshold. Here are the essential tools you will need:
- Screwdriver (Phillips or flathead) – A reliable screwdriver is necessary for removing the existing threshold and installing the new one.
- Tape measure – Accurate measurements are crucial for ensuring a proper fit. A tape measure will help you measure the width and length of the door threshold.
- Hacksaw – In some cases, you may need to trim the door threshold to fit properly. A hacksaw will come in handy for this task.
- Drill – If your door threshold requires drilling for screws or anchors, make sure to have a drill and appropriate drill bits ready.
- Pencil – Having a pencil handy will allow you to mark measurements and reference points on the threshold.
- Level – To ensure your door threshold is installed correctly and level, a level tool is essential.
Materials required for an effective installation
In addition to the necessary tools, there are a few key materials you’ll need to ensure a successful installation:
| Material | Description |
|---|---|
| Adjustable exterior door threshold | The main component of the installation, the adjustable exterior door threshold, ensures a tight seal and smooth transition between the interior and exterior of your home. |
| Screws or anchors | Depending on the type of adjustable door threshold you have chosen, you may need screws or anchors to secure it in place. |
| Weatherstripping | A vital component for energy efficiency and preventing drafts, weatherstripping helps seal gaps between the door and threshold. |
| Silicone adhesive | To provide additional stability and enhance the seal, you may need silicone adhesive to secure the adjustable exterior door threshold. |
By ensuring you have all the essential tools and materials ready beforehand, you’ll be well-prepared to tackle the installation process with ease. So, gather your tools, double-check your materials, and get ready to install your new adjustable exterior door threshold.
Step 1: Removing The Old Door Threshold
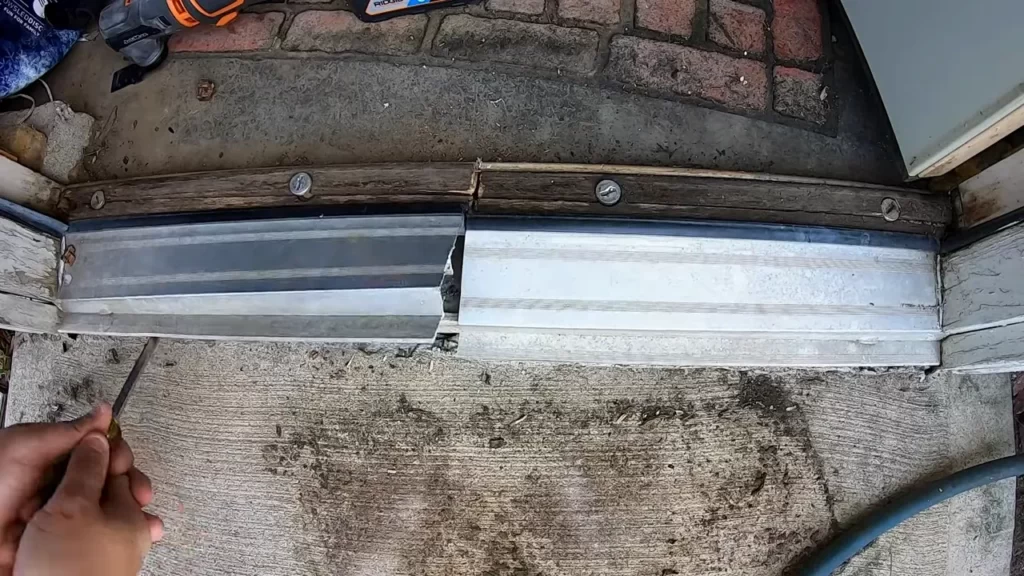
Before you can install a new adjustable exterior door threshold, the first step is to remove the old one. This task might seem daunting at first, but with the right approach, you’ll have the old threshold removed in no time. Follow these steps to safely remove the existing door threshold.
Safety precautions
Before you begin removing the old door threshold, it’s essential to prioritize safety. Here are a few safety precautions to keep in mind:
- Wear protective gloves to prevent any injuries
- Use a face mask to avoid inhaling any dust or debris
- Ensure the area around the threshold is clear of any obstacles
Tools you’ll need
Here’s a list of tools that will come in handy while removing the door threshold:
| Tools | Usage |
|---|---|
| Screwdriver | For removing screws or fasteners |
| Pry bar | To carefully pry away the old threshold |
| Utility knife | To cut through any caulking or adhesive |
Step-by-step process
Follow these steps to effectively remove the existing exterior door threshold:
- Start by inspecting the threshold to identify any screws or fasteners holding it in place. Use a screwdriver to remove them.
- Once the screws or fasteners are removed, insert a pry bar between the old threshold and the door frame. Gently pry the old threshold away from the frame.
- If there is any caulking or adhesive holding the threshold in place, use a utility knife to cut through it. This will make it easier to remove the threshold without causing any damage.
- Continue prying and cutting until the old threshold is completely detached from the door frame. Be careful not to force or exert excessive pressure to avoid damaging the surrounding structure.
- Once the old threshold is removed, inspect the door frame for any residual caulking or adhesive. Use the utility knife to carefully remove any remaining traces.
Common challenges faced during removal and how to overcome them
Removing an old door threshold can sometimes present challenges. Here are a few common obstacles you may encounter and how to overcome them:
- Rusted screws: If the screws are rusted and difficult to remove, apply a penetrative oil, such as WD-40, and allow it to sit for a few minutes. This will help loosen the rust and make it easier to unscrew.
- Stubborn adhesive: If the threshold is secured with stubborn adhesive that won’t easily loosen, use a heat gun or hairdryer to apply heat to the adhesive. The heat will soften the adhesive, allowing you to pry the threshold away more easily.
- Warped or damaged threshold: In some cases, the old threshold may be warped or damaged, making it harder to remove. Use caution and take extra care not to cause any further damage. If necessary, make small cuts along the edges of the threshold to ease removal.
By following these steps and tips, you’ll successfully remove the existing exterior door threshold, making way for the installation of a new adjustable threshold.
Step 2: Measuring And Preparing The Doorway
Taking accurate measurements for a perfect fit
Before you begin installing an adjustable exterior door threshold, it is crucial to take precise measurements to ensure a perfect fit. By accurately measuring your doorway, you can avoid any unnecessary gaps or unevenness once the threshold is installed.
To get started, gather the following tools:
- Tape measure
- Pencil or marker
- Straight-edge or level
Follow these steps to take accurate measurements:
- Start by measuring the width of the doorway. Place the tape measure at one side of the doorway and extend it to the other side, ensuring you measure the width at the bottom where the threshold will be installed. Take note of this measurement.
- Next, measure the height of the door opening. Place the tape measure at the bottom of the doorway and extend it to the top, again measuring where the threshold will be positioned. Record this measurement as well.
- If your doorway has an irregular shape, it’s important to measure any protrusions or recesses that may affect the threshold installation. Use the tape measure to determine the depth and width of these irregularities, and note down these measurements as necessary.
By measuring the width, height, and any irregularities of your doorway accurately, you can be confident that the adjustable exterior door threshold you choose will fit perfectly.
Preparing the doorway for the new threshold installation
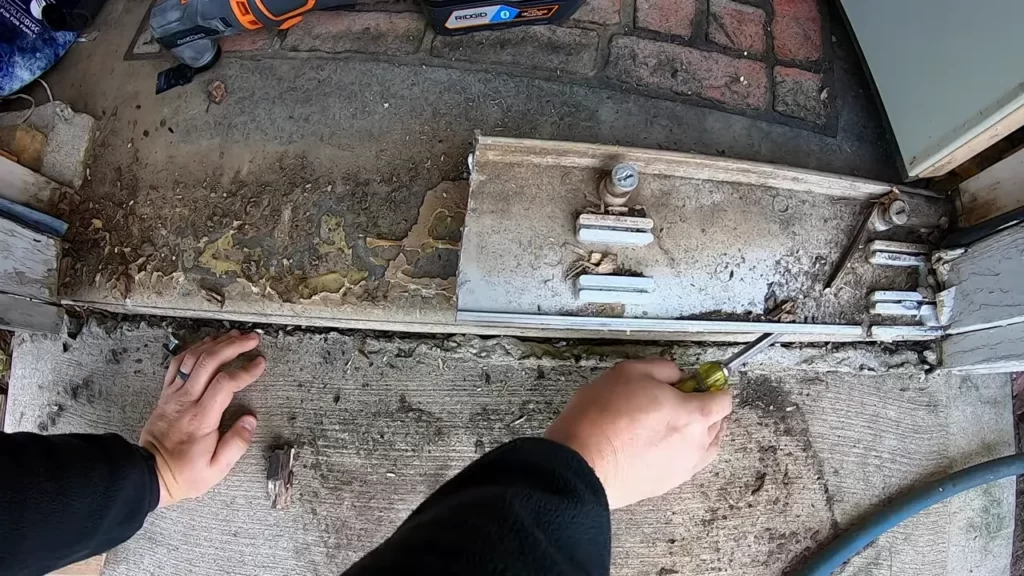
Once you have taken the necessary measurements, it’s time to prepare the doorway for the new threshold installation. This step ensures that your doorway is clean, level, and ready to receive the threshold.
Follow these easy steps to prepare the doorway:
- Clean the doorway thoroughly to remove any dirt, dust, or debris that may interfere with the installation. Use a broom or vacuum to sweep away loose particles, and a damp cloth to wipe down the surface.
- Inspect the door sill for any signs of damage or rot. If you notice any issues, now is the time to address them before proceeding with the installation. Replace any damaged areas or repair them as necessary.
- Ensure that the doorway is level. Use a straight-edge or level to check the horizontal alignment of the floor surface where the threshold will be placed. If it is not level, use shims or other leveling materials to even out the surface.
Preparing the doorway properly will help ensure a smooth and successful adjustable exterior door threshold installation. By following these simple steps, you can create a solid and stable foundation for your new threshold, enhancing the functionality and aesthetics of your entryway.
Step 3: Choosing The Right Adjustable Exterior Door Threshold
Factors to Consider When Selecting the Right Threshold
When it comes to choosing the right adjustable exterior door threshold, there are several important factors you need to consider. After all, the threshold not only helps to seal and protect your home from elements such as drafts, moisture, and insects, but it also plays a significant role in maintaining the overall energy efficiency of your space. Here are some key factors you should take into account:
- Material: The material of the door threshold will greatly impact its durability, appearance, and effectiveness. Different materials such as aluminum, wood, or vinyl offer distinct advantages and disadvantages.
- Height Adjustment Range: One crucial feature of adjustable thresholds is the ability to adapt to different door heights. Make sure to choose a threshold that offers sufficient height adjustment range to suit your specific needs.
- Weather Resistance: The threshold should be able to withstand various weather conditions, be it intense sunlight, heavy rain, or extreme cold. Look for thresholds that are specifically designed to be weather-resistant.
- Installation Difficulty: Consider your own DIY skills and the complexity of the installation process. Some thresholds may require professional assistance, while others can be easily installed with basic tools.
- Aesthetics: Take into account the visual appeal of the threshold and how well it complements the style of your home’s exterior. You wouldn’t want a mismatched or unsightly threshold that detracts from your overall curb appeal.
Different Types of Adjustable Exterior Door Thresholds Available in the Market
Now that you are aware of the key factors to consider when selecting an adjustable exterior door threshold, let’s explore the different types available in the market. By understanding the unique features and benefits of each type, you can make an informed decision that best suits your specific requirements. Here are three common types of adjustable exterior door thresholds:
| Type | Description |
|---|---|
| Aluminum Thresholds | Constructed from lightweight, durable aluminum, these thresholds are known for their excellent weather resistance and versatility. They can be easily adjusted to accommodate different door heights and are often a popular choice for their affordability. |
| Vinyl Thresholds | Offering exceptional durability and low maintenance, vinyl thresholds are resistant to rot, corrosion, and warping. They are well-suited for high-moisture environments and are available in various styles and colors to match your aesthetics. |
| Wooden Thresholds | Known for their classic and natural appearance, wooden thresholds provide a timeless charm to your entryway. They offer good insulation properties and can be customized to match your door and surroundings. |
By understanding the different types of adjustable exterior door thresholds available, you can make a more informed decision based on your preferences and the unique needs of your home. Remember to consider the factors mentioned earlier to ensure you choose a threshold that not only enhances the functionality but also enhances the beauty of your exterior door.
Step 4: Installing The New Adjustable Exterior Door Threshold
Detailed instructions for installing the new threshold
Now that you have removed the old exterior door threshold and prepared the doorway for the new installation, it’s time to move on to Step 4: Installing the New Adjustable Exterior Door Threshold. Follow the detailed instructions below to ensure a smooth installation process:
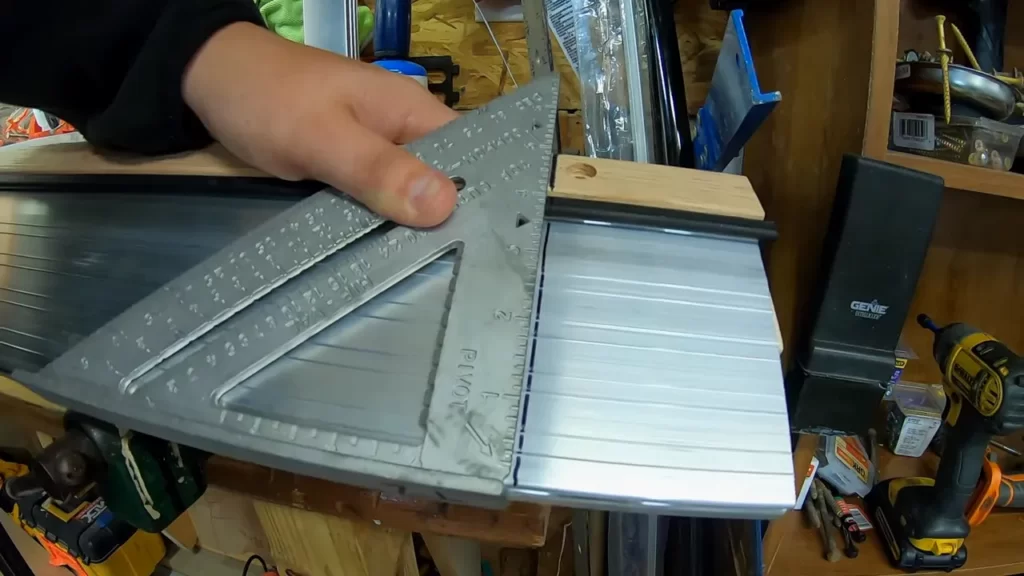
- Measure and cut the new threshold: Before cutting the new threshold, take precise measurements of the doorway width using a tape measure. Transfer these measurements onto the new threshold, marking the areas to be cut. Use a saw or a threshold cutter to make the necessary cuts. Ensure the threshold fits perfectly into the doorway.
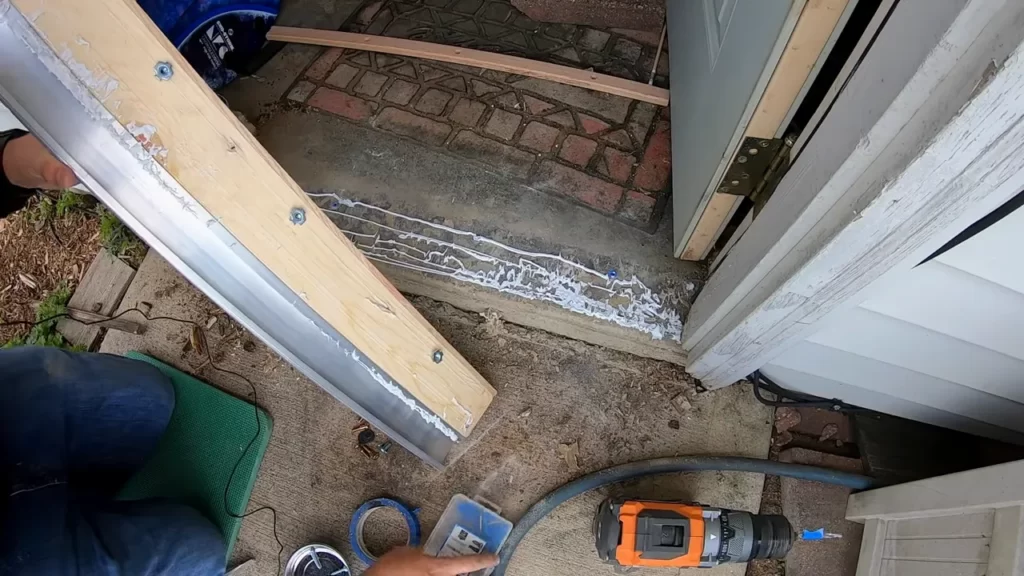
- Apply adhesive: Apply a generous amount of adhesive on the bottom of the new threshold. This adhesive will help secure the threshold in place and prevent any movement or shifting once installed.
- Position the threshold: Carefully position the threshold into the doorway, ensuring it aligns evenly with the edges. Press it firmly onto the floor surface, making sure it adheres well to the adhesive. Use a rubber mallet to gently tap the edges and corners, ensuring a tight fit.
- Secure the threshold: Depending on the design of the threshold, you may need to use screws or nails to secure it further. Refer to the manufacturer’s instructions to determine the appropriate fastening method. Make sure to drive the fasteners into the pre-drilled holes, ensuring they are flush with the surface of the threshold to avoid any tripping hazards.
- Test the door: Once the threshold is securely in place, test the door by opening and closing it multiple times. This will ensure there is no interference or obstruction caused by the new threshold. Make any necessary adjustments if the door is rubbing against the threshold.
Tips and tricks for ensuring a secure and durable installation
For a secure and durable installation of your new adjustable exterior door threshold, keep the following tips and tricks in mind:
- Double-check measurements: Accuracy is key when measuring and cutting the new threshold. Take your time to ensure the measurements are correct, and double-check before making any cuts. This will help avoid any issues or gaps during installation.
- Use a high-quality adhesive: Investing in a high-quality adhesive is essential for a strong and long-lasting installation. Choose an adhesive that is specifically designed for exterior door thresholds and follow the manufacturer’s instructions for application.
- Follow the manufacturer’s instructions: Each adjustable exterior door threshold may have specific installation steps and requirements. Refer to the manufacturer’s instructions that come with the threshold to ensure you are following the correct procedure for your particular threshold.
- Consider weatherproofing: To further enhance the durability of your threshold, consider applying a weatherproofing sealant or caulk around the edges. This will help prevent moisture from seeping in and protect the threshold from potential damage.
- Maintain regular maintenance: To keep your adjustable exterior door threshold in optimal condition, perform regular maintenance checks, such as cleaning any debris or dirt that may accumulate on the surface. This will help extend its lifespan and ensure its functionality.
Step 5: Testing And Adjusting The Door Threshold
Congratulations! You have successfully installed an adjustable exterior door threshold, bringing you one step closer to enhancing the energy efficiency and security of your home. However, before considering the job complete, it is essential to test and adjust the door threshold to ensure optimal performance. In this step, we will guide you through the process of properly testing the newly installed threshold for functionality and making necessary adjustments.
Properly testing the newly installed threshold for functionality
Now that the door threshold is in place, it’s crucial to test its functionality to ensure a proper fit and seal. Follow these steps:
- Open and close the door: Begin by opening and closing the door multiple times to assess how smoothly it operates. Pay attention to any friction or resistance you may encounter. If the door is not swinging freely, it may indicate an alignment issue that needs to be addressed.
- Check for gaps: Inspect the entire perimeter of the door to detect any visible gaps between the threshold and the door sweep. Ideally, the threshold should create a tight seal to prevent drafts, water leaks, and unwanted pests from entering your home.
- Test for air leaks: To test for air leaks, close the door and run your hand along the edges. If you can feel a noticeable draft, it suggests that the threshold is not creating an airtight seal. Pay close attention to the bottom edge, where most air leaks tend to occur.
- Inspect for water infiltration: While the door is closed, visually inspect the bottom edge for any signs of water infiltration. Look for water stains or damage that may indicate a faulty installation or misalignment.
- Assess security: Lastly, evaluate the security of the threshold by attempting to push the door open from the outside. If it feels loose or unstable, adjustments may be necessary to ensure a secure entryway.
Adjusting the threshold to achieve optimal performance
If any issues were identified during testing, it’s time to make necessary adjustments to achieve optimal performance:
- Tightening or loosening the screws: If the threshold doesn’t create a tight seal, try adjusting the screws that secure it to the door frame. Loosen the screws slightly, reposition the threshold, and then tighten them back. This slight repositioning can sometimes help achieve a better fit.
- Adding weatherstripping: If gaps or air leaks persist, consider adding weatherstripping to the door bottom. Weatherstripping is an adhesive-backed strip that helps to establish a tight seal. Simply cut it to the appropriate length and attach it to the underside of the door.
- Repositioning or replacing the door sweep: A door sweep is a strip of material mounted on the door’s bottom edge to fill the gap between the threshold and the door. If it is not sealing tightly against the threshold, it may need to be adjusted or replaced with a better-fitting sweep.
- Consulting a professional: In some cases, complex alignment issues or damaged thresholds may require the expertise of a professional. If you have exhausted all other options and are still experiencing problems, it’s advisable to seek the assistance of a qualified technician.
By testing and adjusting the door threshold, you are ensuring that it functions properly, providing you with a secure and energy-efficient entryway. Take the time to complete this step diligently, as it will contribute to the long-lasting performance of your newly installed adjustable exterior door threshold.
Maintenance And Care For An Adjustable Exterior Door Threshold
An adjustable exterior door threshold not only enhances the aesthetic appeal of your entrance but also serves as a vital component for energy efficiency and weather resistance. To ensure its longevity and optimal functionality, regular maintenance practices are essential. By following these simple maintenance tips and troubleshooting common issues, you can keep your adjustable exterior door threshold in top-notch condition.
Regular maintenance practices to prolong the lifespan of the threshold
Keeping your adjustable exterior door threshold well-maintained requires a few regular practices. By undertaking these simple steps, you can extend its lifespan and ensure optimal performance for years to come:
- Periodic cleaning: Regular cleaning is crucial to prevent the buildup of dirt, debris, and other substances that can hinder the threshold’s adjustability. Use a mild household cleaner or warm soapy water to gently clean the surface, removing any accumulated grime. Avoid using abrasive cleaners or tools that can damage the threshold’s finish.
- Inspecting for damage: Regularly inspect your adjustable exterior door threshold for signs of wear and tear. Look for cracks, dents, or rust that may compromise its performance. If any damage is detected, it should be addressed promptly to prevent further deterioration.
- Lubrication: Proper lubrication ensures smooth adjustment and operation of the threshold. Apply a silicone-based lubricant to the moving parts, such as hinges and adjustable screws, to facilitate easy movement and minimize friction.
- Sealing gaps and leaks: Over time, gaps and leaks may develop between the threshold and the door frame. These gaps can allow air and moisture infiltration, reducing energy efficiency and potentially leading to additional damage. Use weatherstripping or caulk to seal any gaps, ensuring a tight seal and preventing drafts.
Common issues that may arise and their troubleshooting
solutions
Despite regular maintenance, issues might arise with an adjustable exterior door threshold. Understanding these common problems and implementing the following troubleshooting solutions can help you overcome them:
| Problem | Troubleshooting Solution |
|---|---|
| The threshold is not adjusting properly. | Check if: – There is any debris or obstruction blocking the adjustment mechanism. – The screws or fasteners are tightened appropriately. Solution: Clean the mechanism and adjust the screws to ensure smooth movement. |
| The threshold is squeaking or making noise. | Check if: – The moving parts are adequately lubricated. Solution: Apply lubricant to the hinges, adjustable screws, or any other moving parts to eliminate noise. |
| The threshold is damaged or cracked. | Solution: Depending on the severity of the damage, repair or replace the threshold. Minor cracks can often be fixed with epoxy adhesive or sealant, while significant damage may require professional assistance. |
| There are gaps or leaks around the threshold. | Solution: Apply weatherstripping or caulk to seal the gaps, ensuring a tight seal and preventing air and moisture infiltration. |
By staying proactive with regular maintenance and promptly addressing any issues that arise, you can ensure the longevity and optimal performance of your adjustable exterior door threshold. With these simple practices and troubleshooting solutions, you can enjoy a secure, energy-efficient, and visually appealing entrance year-round.
Frequently Asked Questions On How To Install An Adjustable Exterior Door Threshold
Are Exterior Door Thresholds Adjustable?
Yes, exterior door thresholds are adjustable. They can be raised or lowered to fit different types of flooring or to accommodate changes in weather conditions.
How Do You Replace An Adjustable Sill Cap?
To replace an adjustable sill cap, follow these steps: 1. Remove the old sill cap carefully. 2. Measure the dimensions of the opening. 3. Purchase a new adjustable sill cap of the appropriate size. 4. Install the new sill cap, ensuring it is securely fitted.
5. Test the functionality and adjust as needed.
What Is The Difference Between A Door Sill And Threshold?
A door sill is the bottom part of a door frame that protrudes slightly, while a threshold is the strip of material at the bottom of a door frame that creates a transition between two different floor surfaces.
How Do You Secure An Exterior Door Threshold?
To secure an exterior door threshold, follow these steps: 1. Ensure the threshold is properly aligned and level with the door. 2. Use screws to attach the threshold securely to the subfloor or floor joists. 3. Apply adhesive sealant or caulk between the threshold and the door frame to prevent water infiltration.
4. Install weatherstripping to seal any gaps around the threshold. 5. Regularly inspect and maintain the threshold to ensure its continued security.
Can I Install An Adjustable Exterior Door Threshold Myself?
Yes, installing an adjustable exterior door threshold is a relatively simple DIY project that you can do yourself.
What Tools Do I Need To Install An Adjustable Exterior Door Threshold?
To install an adjustable exterior door threshold, you will need a screwdriver, measuring tape, drill, hacksaw, and caulk gun.
Conclusion
To sum up, installing an adjustable exterior door threshold is a simple and effective way to enhance the energy efficiency and durability of your home. By following these step-by-step instructions, you can successfully replace or adjust your door threshold without any professional help.
Remember to thoroughly measure, choose the right threshold, and use the proper tools. With your new adjustable threshold in place, you’ll enjoy improved insulation and protection against drafts and moisture penetration. Make sure to conduct regular maintenance to extend its lifespan and keep your home comfortable year-round.
