To install an exterior door jamb, start by measuring the dimensions of the doorway and cutting the jamb to the correct length. Then, attach the jamb to the framing using screws and shims for stability.
Finally, install the door into the jamb using hinges and a latch mechanism. Installing an exterior door jamb is an essential part of any home improvement project that involves replacing or installing a new exterior door. The door jamb serves as the frame for the door, providing stability, security, and insulation.
Whether you are a seasoned DIY enthusiast or a beginner, learning how to install an exterior door jamb can be a valuable skill to have. By following a step-by-step process and using the right tools, you can successfully install a door jamb and enhance the aesthetic appeal and functionality of your entryway. In this guide, we will walk you through the steps necessary to install an exterior door jamb, ensuring a seamless and sturdy door installation.
Factors To Consider For A Proper Fit
Installing an exterior door jamb requires careful consideration and attention to detail to ensure a proper fit. There are several factors that need to be taken into account before you begin the installation process. By considering these factors, you can ensure that your exterior door jamb fits perfectly and provides optimal functionality.
Measurements and Sizing
When it comes to installing an exterior door jamb, accurate measurements and proper sizing are crucial. Before purchasing a door jamb, it’s important to measure the opening where the door will be installed. Take measurements of the height, width, and depth of the opening. Additionally, consider the thickness of the door itself.
After obtaining these measurements, ensure that the door jamb you choose matches the size requirements. This will help prevent any gaps or misalignment once the installation is complete. It’s worth mentioning that door jamb sizes can vary, so taking precise measurements is essential for a proper fit.
Material Options
Material options for exterior door jambs include wood, steel, fiberglass, and composite materials. Each material has its own set of advantages and considerations. When selecting a material, consider factors such as durability, maintenance requirements, and overall aesthetics.
Wooden exterior door jambs are a popular choice due to their natural beauty and versatility. They can be painted or stained to match your desired aesthetic. However, wood can be prone to warping and require regular maintenance.
Steel door jambs offer exceptional durability and security. They are resistant to rot, splitting, and pests, making them a good choice for areas prone to harsh weather conditions. However, steel door jambs may lack the natural warmth and aesthetic appeal of wood.
Fiberglass door jambs are known for their low maintenance requirements and excellent energy efficiency. They are resistant to moisture and don’t warp like wood. Fiberglass also offers good insulation, which can help reduce energy costs. However, fiberglass door jambs may have limited design options compared to wood or steel.
Composite materials, such as PVC or vinyl, are also viable options. They offer durability, moisture resistance, and low maintenance. Composite door jambs can be a cost-effective alternative to wood or steel, depending on your budget and preferences.
When choosing the material for your exterior door jamb, consider your specific needs, budget, and the overall style of your home’s exterior.
Tools And Materials Required
Installing an exterior door jamb requires the use of specific tools and materials to ensure a successful and long-lasting installation. Having the right equipment at hand will not only make the process easier but also help you achieve professional-looking results. In this section, we will discuss the essential tools and materials you will need for this project.
List of Tools
Before you begin, gather the following tools:
- A tape measure
- A level
- A carpenter’s square
- A hammer
- A utility knife
- A chisel
- A power drill
- A jigsaw
- A screwdriver
- An adjustable wrench
- A pry bar
- A caulk gun
- A foam insulation gun
Make sure your tools are in good working condition before you start the installation process to avoid any disruptions or accidents.
List of Materials
In addition to the tools, you will need the following materials:
- An exterior door jamb kit
- Screws and nails
- Weatherstripping
- Exterior caulking
- Insulation foam
The exterior door jamb kit will typically include the necessary components for the installation, such as the jamb itself and the doorstop. It is important to choose a high-quality kit that is suitable for your specific door size and style.
Screws and nails will be used to secure the door jamb to the framing and ensure its stability. Weatherstripping is essential for preventing drafts and improving energy efficiency. Exterior caulking is used to seal any gaps between the door jamb and the surrounding structure, providing further insulation and weather resistance. Lastly, insulation foam will help fill any gaps and provide additional insulation.
By having all the required tools and materials ready, you will be well-prepared to proceed with the installation of your exterior door jamb. Remember to follow the manufacturer’s instructions and take your time to ensure a precise and secure installation.
Removing The Old Door Jamb
Removing the old door jamb is the first step towards installing a new exterior door jamb. This process may seem daunting, but with the right tools and a little patience, you can easily tackle this project. In this section, we will break down the process into three steps: assessing the condition, removing the door and trim. Let’s dive in!
Assessing the Condition
Before you begin removing the old door jamb, it’s essential to assess its condition. This step will help you determine the extent of the work required and any additional materials you may need. Here are a few key factors to consider:
- Inspect the door frame: Check for any signs of rot, warping, or damage. Pay close attention to the bottom of the frame, as this area is often susceptible to water damage.
- Evaluate the seals: Look for any gaps or cracks around the door frame and weatherstripping. These can cause drafts and energy loss, so it’s important to address them.
- Measure the dimensions: Take accurate measurements of the door frame to ensure you select the right replacement materials. Measure the width, height, and thickness.
Removing the Door and Trim
Once you have assessed the condition of the old door jamb, it’s time to remove the door and trim. Follow these steps to complete this phase of the project:
Step 1: Remove the Door
The first step is to remove the door from its hinges. This can be done by unscrewing the hinges from the jamb using a screwdriver or power drill. Remember to have a helper hold the door while you remove the screws to prevent it from falling.
Step 2: Take off the Trim
Next, carefully remove the trim surrounding the door frame. Start by using a pry bar to loosen the trim from the wall. Take extra caution not to damage the surrounding wall or trim pieces.
Step 3: Detach the Jamb
Once the trim is removed, you can start detaching the old door jamb. Use a reciprocating saw or a chisel to cut through any nails or screws securing the jamb to the wall. Take your time and work carefully to avoid any damage to the surrounding structure.
Removing the old door jamb may take some effort, but it’s a crucial step in the door installation process. By assessing the condition and methodically removing the door and trim, you’ll be on your way to installing a new exterior door jamb in no time!
Step 1: Ensuring A Level Foundation
When it comes to installing an exterior door jamb, one of the most crucial steps is ensuring a level foundation. Without a level surface to work with, you might end up with a door that doesn’t properly close or open, causing various issues in the long run. Therefore, it’s essential to carefully check the floor and wall before proceeding with the installation. In this article, we will guide you through the process of checking the floor and wall, as well as adjusting them as needed.
Checking the Floor and Wall
The first step in ensuring a level foundation is to thoroughly examine the condition of both the floor and the wall. Use a level tool to determine if the floor is even, checking for any bumps or dips that might affect the door’s functionality. Pay attention to any irregularities that could potentially cause the door to hang unevenly or not fit properly within the frame.
Next, inspect the wall surrounding the door area. Look for any signs of structural damage, such as cracks or gaps, as these issues can also impact the installation process and the overall performance of the door. If necessary, consult a professional to assess the condition of the wall and make any required repairs before proceeding.
Adjusting as Needed
If you identify any problems during the floor and wall inspection, it’s crucial to address them before installing the door jamb. Here are a few methods to adjust and level the foundation:
- Repairing the floor: If you discover any bumps or dips, you can use a floor leveling compound to rectify the issue. Follow the manufacturer’s instructions to apply the compound and ensure a smooth, even surface for the door jamb.
- Fixing wall gaps: If there are gaps in the wall, you can use a caulk gun and an appropriate caulk to seal them. This will not only provide a more secure installation but also help improve energy efficiency by preventing drafts.
- Addressing structural damage: In the case of significant structural damage, it’s important to contact a professional contractor who specializes in wall repairs. They will be able to assess the extent of the damage and take the necessary steps to restore the wall’s stability.
By ensuring a level foundation, you are setting the stage for a successful exterior door jamb installation. Taking the time to carefully check the floor and wall, as well as making any necessary adjustments, will result in a door that functions properly and provides optimal security and insulation for your home.
Step 2: Attaching The Hinges And Preparing The Door
In this step, we will outline how to properly attach the hinges and prepare the door for installation. By following these instructions, you can ensure that your exterior door jamb is secure and functions smoothly.
Marking Hinge Locations
The first step in attaching the hinges is to mark their locations on the door jamb and the edge of the door. This will ensure that the door swings open and closes smoothly without any hitches. Here’s how you can do it:
- Place the door on a stable surface, preferably with its back facing up.
- Measure and mark the desired hinge position on the door edge. Ensure that the marks are evenly spaced and at suitable heights.
- Next, hold the door against the door jamb and align it properly. Carefully transfer the hinge marks from the door edge to the door jamb. Ensure the alignment is perfect to avoid any difficulties during installation.
Drilling Pilot Holes
Now that the hinge locations are marked, it’s time to drill the pilot holes. These holes will make it easier to screw in the hinges securely. Follow these steps to drill the pilot holes:
- Choose a drill bit that matches the size of the hinge screws. This will prevent the screws from splitting the wood.
- While the door is still in place, drill pilot holes through the marked hinge locations on the door jamb. Make sure to drill straight into the wood to ensure a secure hinge attachment.
- Repeat the process on the marked hinge locations on the door edge. Take extra care to match the drill angle and depth with those on the door jamb, ensuring the hinges align perfectly.
Aligning the Hinges
Now that you have marked the hinge locations and drilled the pilot holes, it’s time to attach and align the hinges. Proper alignment is crucial for the door to operate smoothly. Here are the steps to ensure proper alignment:
- Position the hinges in their designated locations on the door jamb. Insert the screws into the pilot holes, but do not tighten them completely just yet.
- Place the door on top of the hinges, aligning them with the pre-drilled pilot holes in the door edge.
- Using a screwdriver or drill, tighten the screws in the hinges, securing the door to the jamb. Take care not to overtighten as it may distort the alignment.
- Gently swing the door open and closed to test its movement. If you notice any sticking or misalignment, adjust the hinges by slightly loosening the screws.
By following these steps, you can successfully attach the hinges and prepare the door for installation. Take your time to ensure proper alignment, as it will directly impact the functionality and longevity of your exterior door jamb.
Step 3: Securing The Door In The Opening
After inserting shims and checking for even gaps, the next crucial step in installing an exterior door jamb is securing the door. This step ensures that the door is properly aligned and will function smoothly. Let’s dive into the details of this step:
Inserting Shims
Before securing the door, it’s important to ensure that it is level and plumb. To do this, you’ll need to insert shims, which are thin pieces of material, between the door jamb and the rough opening. Shims help to create a snug and stable fit.
To begin, insert the shims at several points along the hinge side of the door jamb. Placing the shims at the hinge location will help prevent any sagging or misalignment over time. Use a level to check that the shims are positioned correctly and adjust as needed to ensure the door is plumb.
Checking for Even Gaps
Once the shims are in place, it’s important to check for even gaps around the door. Properly aligned gaps ensure that the door will open and close smoothly. Use a tape measure or a gap gauge to measure the distance between the door slab and the door jamb at several points along the door’s perimeter.
Pay close attention to any areas where the gaps are not consistent. If you notice any variations, gently tap the shims to adjust their position and ensure even spacing. Remember, a well-aligned door with even gaps will help to keep out drafts and improve energy efficiency.
Fastening the Door
Now that the shims are in place and the gaps are even, it’s time to fasten the door securely. This step will ensure that the door remains stable and functions properly. Begin by driving screws into the hinge-side jamb through the shims. Be sure to use the appropriate length of screws to ensure a secure installation.
Next, move to the latch-side jamb and repeat the process, inserting screws through the shims into the rough opening. By fastening both sides of the door jamb, you’ll create a solid connection and ensure that the door is securely in place.
Finally, check the operation of the door to ensure it opens and closes smoothly. Test the latch and hinges to make sure they are functioning properly. If necessary, make any adjustments to the shims or screws until the door operates smoothly and securely.
By following these steps to secure the door in the opening, you’ll ensure a properly installed exterior door jamb that not only enhances the appearance of your home but also provides security and energy efficiency.
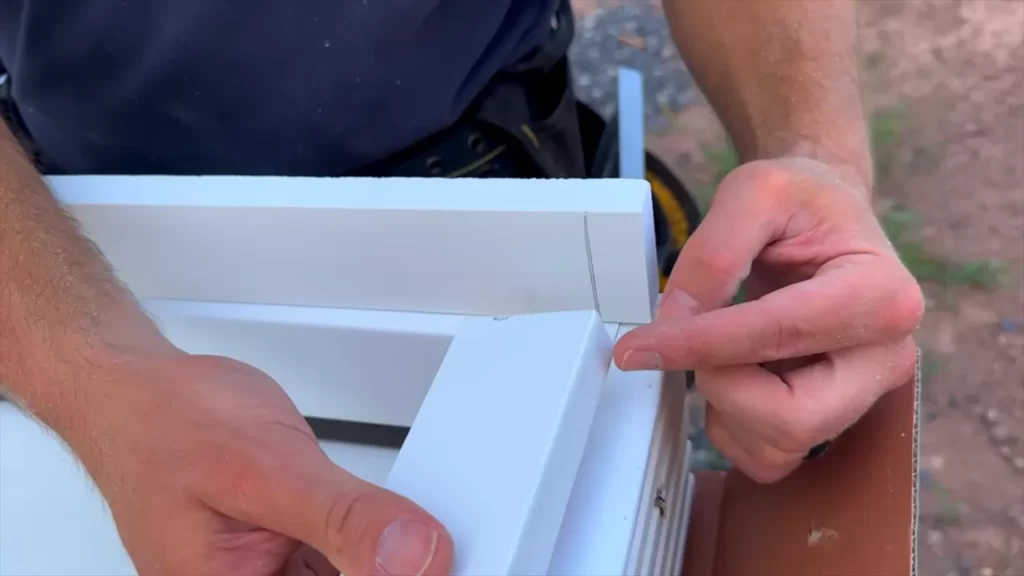
Step 4: Installing The Side Jambs And Header
Now that you have prepared the opening and installed the threshold, it’s time to move on to installing the side jambs and header. This step is crucial to ensure that your exterior door is properly sealed and secure. In this section, we will walk you through the process of measuring and cutting the jambs, securing them in place, and finally installing the header.
Measuring and Cutting the Jambs
To start, measure the height and width of the door opening. It is important to take precise measurements to ensure a proper fit. Once you have the measurements, use a miter saw to cut the side jambs accordingly. Remember to cut the jambs at a degree that matches the slope of the floor or sill.
Once the jambs are cut to the correct dimensions, align them with the door opening. Ensure that the jamb on the hinge side overlaps the threshold, while the jamb on the opposite side aligns flush with the edge of the rough opening. Use a level to make sure the jambs are plumb and straight before proceeding to the next step.
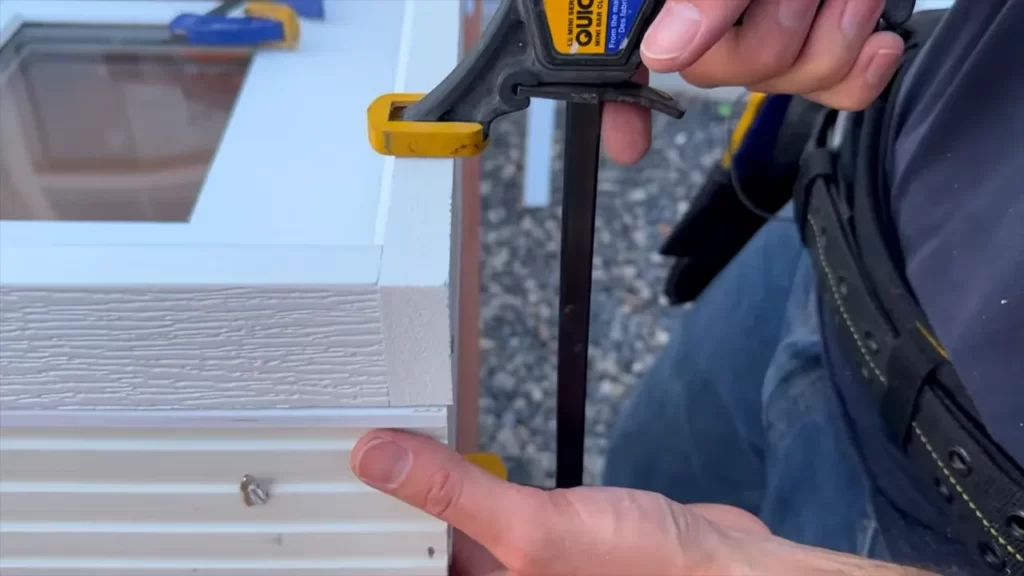
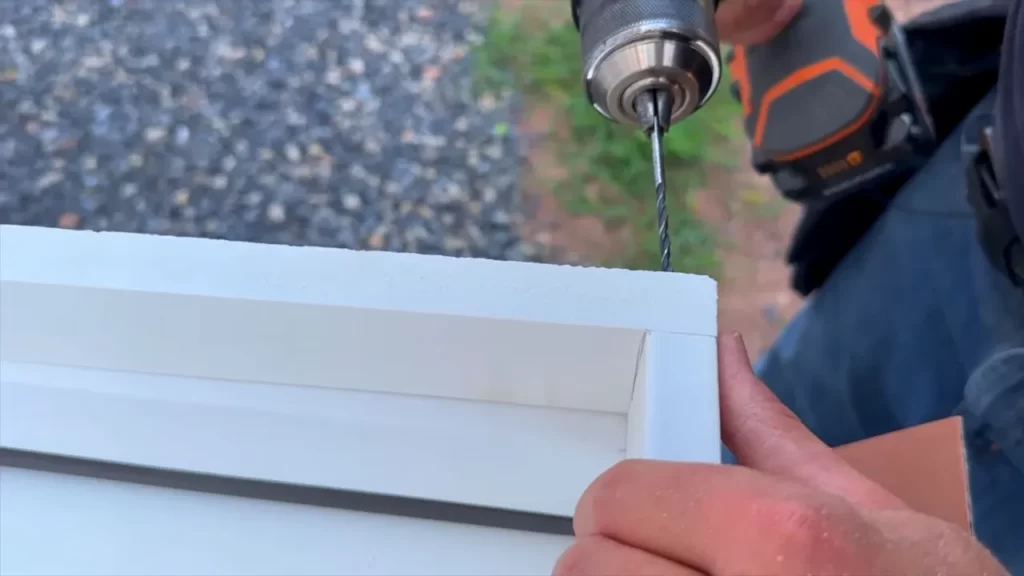
Securing the Jambs in Place
With the jambs aligned properly, secure them in place by driving screws through the jamb and into the framing. Make sure to choose screws that are long enough to penetrate the jamb and anchor securely into the framing. Start with the hinge side jamb and work your way towards the opposite side. Be sure to check the level again to ensure the jambs are still plumb as you go.
Once the side jambs are securely fastened, reinforce the installation by adding shims behind each screw. This will provide extra stability and support, ensuring that the jambs are tightly secured to the framing.
Installing the Header
Now it’s time to install the header, which provides additional support across the top of the door opening. Begin by measuring the width of the rough opening and cut the header to the necessary size. Align the header with the top of the side jambs and secure it in place by driving screws through the header and into the framing above.
Once the header is installed, double-check that the door opening is still square and level. Make any necessary adjustments by shimming between the header and the framing. This will ensure that the door operates smoothly and without any sagging.
With the side jambs and header installed, you have now completed the fourth step in the process of installing an exterior door jamb. The next step will be the exciting one – hanging the door itself.
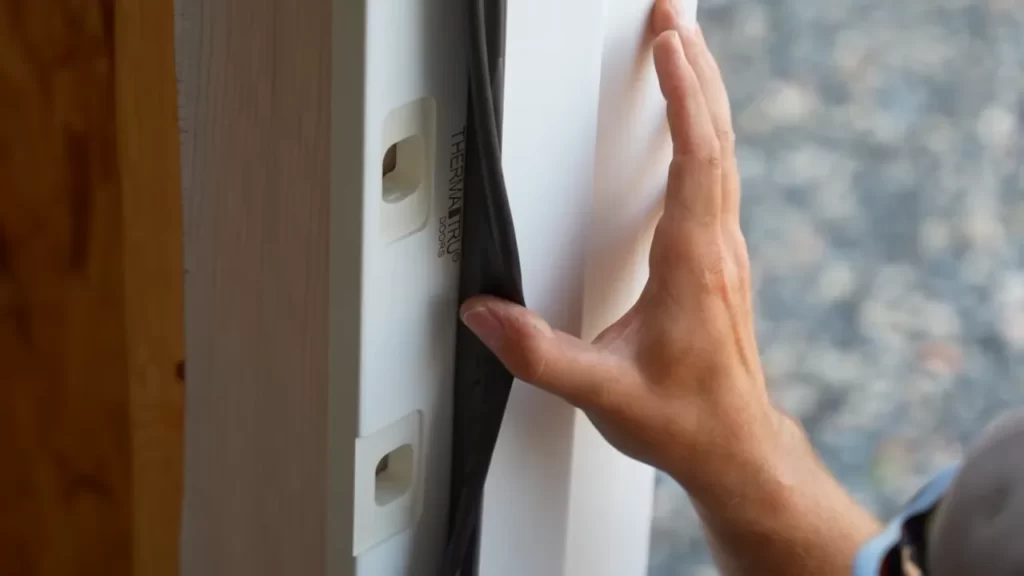
Step 5: Adding Weatherproofing And Insulation
Once you have successfully installed the exterior door jamb, you can now proceed with weatherproofing and insulation to ensure a more secure and energy-efficient door. This step plays a crucial role in keeping out drafts, moisture, and unwanted pests from entering your home. Follow the steps below to complete your door installation.
Applying Weatherstripping
Weatherstripping is essential for sealing any gaps between the door jamb and the door itself. It helps prevent air leaks and improves the overall insulation of your door. To apply weatherstripping, follow these steps:
- Measure the length and width of the door, and cut the weatherstripping material accordingly.
- Attach the weatherstripping to the inner side of the door jamb, ensuring it covers the entire length and width.
- Use a staple gun or adhesive to secure the weatherstripping in place.
- Ensure the weatherstripping forms a tight seal when the door is closed.
Sealing Gaps with Caulk

Caulk is an excellent solution for sealing any gaps or cracks between the door jamb and the wall. It helps prevent air infiltration and moisture from seeping into your home. Follow these steps to properly seal gaps with caulk:
- Inspect the door jamb and surrounding areas for any noticeable gaps or cracks.
- Choose a high-quality caulk that is suitable for exterior use.
- Load the caulk into a caulk gun and cut the tip at a slight angle.
- Apply a steady bead of caulk along the gaps or cracks, ensuring full coverage.
- Smooth the caulk using a caulk smoothing tool or your finger for a clean finish.
- Allow the caulk to dry completely before moving on to the next step.
Installing Insulation
Insulation is crucial for maintaining a comfortable temperature inside your home and reducing your energy bills. Follow these steps to install insulation in the door jamb:
- Select the appropriate insulation type for your door jamb. Common options include foam insulation, fiberglass insulation, or rubber strips.
- Measure the dimensions of the door jamb, and cut the insulation material accordingly.
- Insert the insulation into the gaps around the door jamb, ensuring a snug fit.
- Use a putty knife or your fingers to press the insulation firmly in place.
- Ensure there are no gaps or loose areas in the insulation for optimal performance.
By following these steps to add weatherproofing and insulation to your exterior door jamb, you can enhance the security, energy efficiency, and overall comfort of your home. Taking the time to properly weatherproof and insulate your door will pay off in the long run with reduced energy costs and increased comfort year-round.
Step 6: Installing The Exterior Trim
After successfully installing the door jamb, the next step is to install the exterior trim. This is an important step that not only adds a polished look to your door but also provides a protective barrier against the elements. Follow these steps to ensure a professional-looking installation of your exterior trim.
Measuring and Cutting the Trim
The first step in installing the exterior trim is to accurately measure and cut the pieces to the appropriate size. To do this, follow these instructions:
- Measure the length of the vertical sides of the door jamb using a tape measure. Be sure to account for any extra space needed for the trim to overlap the jamb.
- Using a miter saw or a circular saw, carefully cut the trim to the measured length. Make sure to cut each end at a 45-degree angle for a clean and professional look.
- Repeat the measuring and cutting process for the top horizontal piece and the bottom horizontal piece of the trim.
Attaching the Trim to the Jambs
Once you have cut the trim to the appropriate size, it’s time to attach it to the door jambs. Follow these steps:
- Apply a bead of construction adhesive to the back of the vertical trim pieces and the top horizontal trim piece.
- Align the trim pieces with the edges of the door jamb and press firmly against the jamb to secure them in place.
- Use finish nails or a brad nailer to further secure the trim to the door jamb. Insert the nails at regular intervals along the length of the trim.
- Repeat the process for the bottom horizontal trim piece, making sure it is aligned and secured with adhesive and nails.
Caulking and Finishing Touches
After the trim pieces are attached, it’s time to apply a bead of caulk to the edges of the trim where it meets the jamb and the siding. This will create a tight seal and prevent water infiltration. Follow these steps:
- Using a caulk gun, apply a bead of caulk along the edges of the trim, smoothing it out with your finger or a caulk tool.
- Wipe away any excess caulk with a damp cloth to ensure a clean and neat finish.
- Allow the caulk to dry completely before proceeding.
- Finally, inspect the installation for any gaps or imperfections. Fill in any gaps with wood filler and sand the surface if necessary.
With the exterior trim properly installed, your door jamb is now complete and ready to provide both functionality and aesthetic appeal to your home’s exterior.
Step 7: Testing The Door And Adjustments
After successfully installing the exterior door jamb, it’s crucial to test the door and make any necessary adjustments for optimal performance. This final step ensures that the door functions smoothly and provides proper security. In this section, we’ll cover two important aspects: checking for smooth operation and making necessary adjustments. Let’s dive in!
Checking for Smooth Operation
The first thing to do is to check if the door swings freely and opens and closes smoothly. To do this, follow these steps:
- Open the door slowly while observing its movement. Make sure it doesn’t stick or bind at any point.
- If you notice any resistance or scraping, examine the areas where the door interacts with the jamb. Look for any signs of rubbing or misalignment.
- Perform a simple test by closing the door and checking for gaps around the edges. Ideally, there should be uniform spacing.
If you encounter any issues during this inspection, don’t worry. The next section will guide you through the necessary adjustments to address these problems.
Making Necessary Adjustments
It’s normal to encounter minor issues that may require adjustments to ensure a proper fit. Here’s what you need to do:
- If the door sticks or binds, it’s possible that the jamb wasn’t installed evenly. Use a level to check the vertical and horizontal alignment of the jamb. Make adjustments by shimming or sanding as needed.
- In case the door doesn’t close tightly or there are gaps around the edges, you can adjust the strike plate. Unscrew the strike plate from the jamb, reposition it slightly, and tighten the screws back in place.
- If the door doesn’t latch properly, you may need to adjust the strike plate or the door latch. Refer to the manufacturer’s instructions to ensure you make the correct adjustments.
Remember, it’s essential to test the door after each adjustment to verify its smooth operation. Repeat the steps until you achieve the desired result.
Voila! Your exterior door jamb is now properly installed, and the door is functioning smoothly. It’s time to enjoy the improved security and aesthetics of your home’s entryway.
Step 8: Finishing And Sealing The Door Jamb
Once you have successfully installed the exterior door jamb, it’s time to focus on finishing and sealing the door jamb. This step is crucial as it not only enhances the overall appearance of your door but also protects it from weather elements, ensuring its longevity. In this section, we will guide you through the process of sanding and priming the door jamb, applying paint or stain, and adding a protective sealant for a flawless finish.
Sanding and Priming
To achieve a smooth and flawless surface, start by sanding the door jamb using a fine-grit sandpaper. This will help remove any imperfections, rough edges, or uneven spots. Remember to sand both the exterior and interior portions of the jamb.
Once you have completed sanding, it’s time to apply a primer. A primer acts as a foundation for the paint or stain, ensuring better adhesion and a long-lasting finish. Before applying the primer, make sure the door jamb is clean and free from any dust or debris. Use a brush or roller to evenly apply the primer, following the manufacturer’s instructions. Allow the primer to dry completely before moving on to the next step.
Applying Paint or Stain
Now that the door jamb is properly sanded and primed, it’s time to apply the desired paint or stain. Whether you choose paint for a solid color or stain for a natural wood look, make sure to select a high-quality product that is specifically formulated for exterior use.
| For Paint: | – Stir the paint thoroughly before applying – Use a high-quality brush or roller for smooth application – Apply thin and even coats, allowing each coat to dry before applying the next – Pay attention to any drips or runs and smooth them out immediately – Consider applying a second or third coat for better coverage and durability |
| For Stain: | – Stir the stain thoroughly before applying – Use a brush, sponge, or cloth to apply the stain, following the wood grain – Wipe off any excess stain to achieve the desired color intensity – Allow the stain to dry completely and consider applying a second coat for a deeper color – Finish with a clear exterior varnish or polyurethane for added protection |
Adding a Protective Sealant
To ensure long-lasting protection against moisture, UV rays, and other environmental factors, adding a protective sealant is essential. This final step adds an extra layer of defense to your door jamb, preserving its beauty and integrity for years to come.
When selecting a sealant, opt for a high-quality exterior sealant that is designed for your specific door material, whether it’s wood, fiberglass, or metal. Follow the manufacturer’s instructions carefully, and apply the sealant using a brush or roller. Make sure to cover all exposed surfaces, including the top and bottom edges of the door jamb. Allow the sealant to dry completely, and your exterior door jamb will be ready to withstand the elements.
By following these steps and paying attention to the finishing touches, you can ensure a professionally installed exterior door jamb that not only looks stunning but also provides the necessary protection for your entryway.
Common Mistakes To Avoid
When it comes to installing an exterior door jamb, it’s important to do it right the first time. Avoiding common mistakes can save you time, money, and frustration down the line. In this section, we will discuss a few key areas where homeowners often go wrong, and how to avoid those pitfalls. Let’s get started!
Improper Measurements and Fit
One of the most common mistakes when installing an exterior door jamb is improper measurements and fit. Neglecting to accurately measure the door opening can result in an ill-fitting jamb, which can lead to air leaks, water infiltration, and decreased energy efficiency. To avoid this mistake, follow these key steps:
- Measure Twice, Cut Once: Before purchasing a new door jamb, measure the height, width, and depth of your door opening. Be sure to take precise measurements and double-check your work to ensure accuracy. This will help ensure a proper fit.
- Consider Shimming: Shimming is the process of using thin wedges to adjust the jamb for a perfect fit. If your measurements indicate that the door jamb is slightly too big or too small, shimming can help you achieve the right fit. Use shims at the top, middle, and bottom of the jamb as needed.
- Test the Fit: Before fully securing the door jamb, test the fit by closing the door. Ensure it opens and closes smoothly, without any gaps or excessive force. Make any necessary adjustments before proceeding with the installation.
Neglecting Weatherproofing
Another common mistake homeowners make when installing an exterior door jamb is neglecting proper weatherproofing. Failing to weatherproof the door jamb can leave it vulnerable to moisture damage, drafts, and energy loss. To avoid this mistake, follow these important steps:
- Apply Waterproofing Membrane: Before installing the door jamb, apply a waterproofing membrane to the exterior side of the rough opening. This will create a barrier against moisture infiltration, protecting the jamb and surrounding areas.
- Seal Gaps and Cracks: After installing the door jamb, carefully inspect the perimeter for any gaps or cracks. Use caulk or weatherstripping to seal these areas, preventing air and water from entering your home.
- Add Weatherstripping: Weatherstripping is a crucial component of weatherproofing your exterior door jamb. Install weatherstripping around the entire door jamb to create a tight seal and improve energy efficiency.
Rushing the Installation Process
One more mistake to avoid when installing an exterior door jamb is rushing through the installation process. Taking the time to properly install the jamb can ensure its longevity, functionality, and aesthetic appeal. Follow these tips to avoid rushing:
- Prepare the Door Opening: Before installing the jamb, carefully inspect and prepare the door opening. Remove any debris, old caulking, or rotting materials. A clean and solid surface will promote proper adhesion and ensure a secure installation.
- Follow Manufacturer’s Instructions: Every exterior door jamb installation may have unique considerations depending on the specific brand or style. Take the time to carefully read and follow the manufacturer’s instructions to ensure a successful installation.
- Double-Check Your Work: Before considering the installation complete, double-check all connections, measurements, and finishes. A thorough inspection can catch any potential issues and allow you to address them before they become major problems.
By avoiding these common mistakes during the installation process, you can ensure a smooth and successful installation of your exterior door jamb. Take the time to measure accurately, weatherproof properly, and avoid rushing the process. Your efforts will pay off in the form of a secure, efficient, and visually appealing exterior door.
Frequently Asked Questions Of How To Install An Exterior Door Jamb
How Do You Attach A Door Jamb?
To attach a door jamb, follow these steps: 1. Measure and cut the jamb to fit the door frame. 2. Align the jamb with the frame and secure it with screws or nails. 3. Install hinges on the jamb and door.
4. Attach the door to the jamb by inserting the hinge pins. 5. Test the door to ensure it opens and closes smoothly.
How Do You Seal An Exterior Door Jamb?
To seal an exterior door jamb, follow these steps: 1. Clean the area thoroughly. 2. Apply weatherstripping tape or adhesive. 3. Use a caulk gun to seal any gaps or cracks. 4. Install a door sweep at the bottom of the door.
5. Check for any additional leaks and address them accordingly.
How Much Gap Between Exterior Door And Jamb?
The gap between the exterior door and jamb should be around 1/8 to 3/16 of an inch.
How Do You Install An Exterior Door Threshold?
To install an exterior door threshold, follow these steps: prepare the area, remove the old threshold, measure and cut the new threshold to fit, secure it in place with screws, and seal any gaps. Detailed instructions are available in the installation guide provided with the threshold.
Conclusion
Installing an exterior door jamb can greatly enhance the security and curb appeal of your home. With the right tools and a step-by-step approach, you can easily tackle this project on your own. By following this guide, you have gained valuable insights into the process, from measuring and cutting the jamb to securing it into place.
Now, armed with this knowledge, you can confidently take on the installation of an exterior door jamb and enjoy the benefits it brings to your home. Happy DIY-ing!