o install an Andersen Storm Door Closer, follow these steps: Adjust the door closer tension, position and attach the jamb bracket, attach the jamb bracket arm to the door bracket, and test the door closer. Installing an Andersen Storm Door Closer is a simple process that can be done with a few basic tools.
In this guide, we will provide step-by-step instructions on how to install an Andersen Storm Door Closer. By following these instructions, you’ll be able to securely and efficiently install the door closer on your storm door. So, let’s get started with the installation process!
Gather The Necessary Tools
Before you begin installing your Andersen storm door closer, it’s essential to gather all the necessary tools. Having the right tools at hand will make the installation process much easier and ensure a successful outcome. Here is a list of tools you will need:

List of tools needed for installation
| Screwdriver | A screwdriver is a versatile tool that you’ll need to remove the existing closer and install the new one. Make sure to use the appropriate screwdriver head that matches the screws on your door closer. |
| Measuring tape | Accurate measurements are vital to ensure that your storm door closer is installed properly. Use a measuring tape to measure the distance between the mounting holes on both the door and jamb. |
| Level | It’s crucial to ensure that your storm door closer is installed perfectly level. A level will help you determine if the door is plumb and prevent any issues with the door closing or latching correctly. |
| Pencil | A pencil will come in handy for marking the mounting hole locations on both the door and the jamb. This ensures accuracy and precision during the installation process. |
| Drill | If your storm door closer requires additional screw holes, you’ll need a drill to create them. Choose a drill bit that matches the size of the screws provided with your door closer. |
| Safety glasses | Safety should always be a top priority when working with tools. Protect your eyes with a pair of safety glasses to prevent any potential injury from flying debris or particles. |
| Gloves | Wearing gloves can offer protection and ensure a better grip when handling tools or parts during the installation process. |
By gathering these essential tools beforehand, you’ll be well-prepared to install your Andersen storm door closer with ease and efficiency. Now that you have everything you need, let’s move on to the next step of the installation process.
Read The Andersen Storm Door Closer Manual
When it comes to installing an Andersen storm door closer, it is important to first read the manual. The manual provides detailed instructions and guidelines on how to properly install the closer, ensuring a safe and efficient installation. By taking the time to read and understand the manual, you can avoid common mistakes and potentially damaging your door or closer.
Importance of reading the manual before installation
Reading the manual before installation is essential for several reasons. First and foremost, it provides you with important safety information. The manual will typically include warnings, precautions, and guidelines that help ensure you install the closer correctly and avoid accidents or injuries. By familiarizing yourself with these safety instructions, you can protect yourself and others.
Furthermore, the manual contains step-by-step instructions specifically tailored to the Andersen storm door closer. These instructions are designed to help you navigate the installation process smoothly and successfully. Understanding the specific requirements and nuances of the closer will help you avoid installation mistakes and achieve optimal results.
Steps for understanding the instructions
To ensure you fully understand the instructions provided in the manual, follow these steps:
- Begin by reading the manual from start to finish. Take note of any warnings, precautions, or important notes mentioned.
- As you read through the instructions, make sure to visualize each step in your mind. This can help you anticipate any potential challenges or areas where you might need extra assistance.
- If there are any technical terms or unfamiliar jargon, refer to the manual’s glossary or online resources for clarification. It is crucial to have a clear understanding of all the terms used in the manual to avoid misunderstandings or confusion during installation.
- Take your time to comprehend each step before moving on to the next. If needed, re-read a section or consult additional resources to ensure you have a firm grasp of the instructions.
- Consider highlighting or taking notes on important points or steps that require extra attention. This can serve as a helpful reference as you proceed with the installation.
- If you encounter any difficulties or have questions, reach out to Andersen customer support or consult online forums for assistance. It is better to seek guidance early on rather than attempting to guess or make assumptions.
Remember, the manual is there to guide you through the installation process and ensure a successful outcome. By carefully reading and understanding the instructions, you can confidently install your Andersen storm door closer without complications or issues.
Assessing The Condition Of The Old Closer
Before you start the installation process, it’s important to assess the condition of the old closer on your Andersen storm door. Over time, the closer can become worn out or damaged, impacting its effectiveness in closing and securing the door. In this section, we will explore the signs of wear and tear to look for when evaluating the condition of the old closer, as well as indications that it may need to be replaced.
Signs of wear and tear to look for
To accurately assess the condition of your old closer, keep an eye out for the following signs of wear and tear:
- Visible cracks or damage to the body of the closer
- Excessive rust or corrosion
- Loose or wobbly arm
- Noticeable decrease in its ability to close the door smoothly
- Squeaking or grinding noises when operating the door
- Leaking hydraulic fluid
If you observe any of these signs, it’s likely that your old closer has reached the end of its lifespan and should be replaced for optimal performance and security.
Indications that the closer needs to be replaced
Now that you know what to look for in terms of wear and tear, let’s discuss the indications that may suggest a replacement is necessary:
- The door doesn’t close properly: If you find that your storm door does not close fully or consistently, even with adjustments to the closing speed and latch, it could be an indication that the closer is no longer functioning effectively.
- Increased energy costs: A worn-out door closer can result in drafts and air leaks, leading to higher energy bills. If you notice a sudden increase in your energy costs, it may be time to replace the closer.
- Safety concerns: A damaged or malfunctioning closer can compromise the security of your home, as it may not fully close or lock the door. This poses a potential safety risk, making replacement crucial.
By assessing the condition of your old closer and being aware of these indications for replacement, you can determine whether it’s time to install a new Andersen storm door closer. In the next section, we will guide you through the installation process, ensuring your storm door operates smoothly and securely.
Removing The Old Closer
Before you can install a new Andersen storm door closer, it’s essential to remove the old closer safely and properly. In this section, we will provide you with step-by-step instructions to guide you through the process, as well as important safety precautions to follow during the removal.
Step-by-step instructions for removing the old closer
- First, locate the screws that hold the closer in place. In most cases, there will be two screws that attach the closer to the door frame.
- Using a suitable screwdriver, start by loosening and removing the screws. Make sure to keep them in a safe place, as you will need them when installing the new closer later.
- Once you have removed the screws, gently pull the old closer away from the door frame. Take your time and be cautious to avoid any potential damage to the door or the closer mechanism.
- Inspect the area where the old closer was attached for any signs of wear or damage. It’s essential to address any issues before installing the new closer.
- After removing the old closer, take a moment to wipe down the door frame and clean any dirt or debris that may have accumulated in the area.
Safety precautions to follow during removal
Your safety is of utmost importance while removing the old closer. To ensure a safe process, remember to follow these precautions:
- Wear protective gloves to prevent any injuries while handling tools or removing the old closer.
- If you come across any rusted or damaged screws, consider using penetrating oil to loosen them before attempting to remove them.
- Avoid using excessive force when removing the old closer. If it seems stuck or difficult to remove, stop and assess the situation. Applying too much force can cause damage to the door frame or the closer itself.
- Always be mindful of the sharp edges of the door or closer components. Take caution to prevent any accidental cuts or injuries.
- If you encounter any difficulties during the removal process, it’s advisable to consult the manufacturer’s instructions or seek professional assistance.
By following these step-by-step instructions for removing the old closer and adhering to the recommended safety precautions, you will ensure a smooth and safe transition to installing the new Andersen storm door closer.
Understanding The Components Of The Closer
Understanding the Components of the Closer An Andersen storm door closer is an essential component that ensures the smooth and controlled closing of your storm door. To successfully install the closer, it’s important to have a good understanding of its different components and how they work together. In this section, we will explore the various parts of the door closer and discuss their individual contributions to the functionality of the closer.
Overview of the different parts of the door closer
The door closer consists of several key components, each playing a vital role in its operation. By familiarizing yourself with these parts, you will gain a better understanding of how the closer functions. Let’s take a closer look at each component: 1. Cylinder: The cylinder is the main body of the door closer and houses the hydraulic mechanism that controls the door’s closing speed and latch speed. It is typically made of durable and rust-resistant materials to ensure longevity. 2. Arm: The arm is a crucial component that connects the door closer to the door frame and door panel. It serves as the link between the automatic closer and the door, allowing for controlled movement during opening and closing. 3. Jamb bracket: The jamb bracket is attached to the door frame and acts as a support for the door closer arm. This component provides stability and ensures proper alignment of the door closer, enabling it to function accurately. 4. Track: The track is a channel-shaped component that guides the arm of the door closer as it moves along the door frame. This track plays a significant role in ensuring smooth and controlled door closure.
How each component contributes to the functionality
Every component of the door closer contributes to its overall functionality, ensuring a secure and efficient closing mechanism. Let’s examine the role of each component: – The cylinder houses the hydraulic mechanism, which regulates the speed of the door’s closing and latching. This allows for easy adjustment to suit individual preferences and ensures a smooth and controlled closing motion. – The arm connects the closer to the door, facilitating its movement during operation. It enables the door to open and close smoothly while providing the necessary force to control the speed at which the door closes. – The jamb bracket acts as a support for the arm, ensuring stability and proper alignment. Without it, the door closer may become loose or misaligned, compromising its functionality and effectiveness. – The track guides the arm as it moves along the door frame, assisting in maintaining a straight and controlled pathway. This component ensures that the door closes evenly and avoids any potential jamming or misalignment. By understanding the components of an Andersen storm door closer and their respective contributions to its functionality, you can ensure a seamless installation process and enjoy the benefits of a properly functioning door closer.
Measuring And Marking The Installation Points
Installing an Andersen storm door closer is a straightforward process that can be done with just a few basic tools. Before you start the installation, it’s important to measure and mark the correct placement points. This will ensure that the closer operates effectively and provides the desired functionality. In this section, we will guide you through the steps of determining the correct placement of the closer and marking the points for installation accurately.
Determining the correct placement of the closer
The first step in installing an Andersen storm door closer is to determine the correct placement for optimal functionality. Follow these steps:
- Begin by closing the storm door and standing on the inside.
- Next, locate the top corner of the door jamb where the hinge is attached.
- Measure 9 inches down from the top corner of the door jamb and mark this spot. This will be the top hole for the closer.
- Then, measure 1/2 inch up from the bottom of the door. Mark this spot as the bottom hole for the closer.
- Lastly, measure the distance between the top and bottom holes to ensure it matches the length of the closer arm. If needed, adjust the measurement accordingly.
Marking the points for installation accurately
Accurate marking of the installation points is crucial to ensure a secure and functional installation of the Andersen storm door closer. Here’s how to mark the points accurately:
- Using a tape measure, measure the distance from the corner of the hinge side of the storm door to the center of the top hole you marked earlier. This will determine the horizontal placement of the closer.
- Transfer this measurement to the hinge side of the storm door.
- Using a level, ensure that the mark is perfectly vertical. Make any necessary adjustments to ensure accuracy.
- Repeat the previous two steps to mark the position for the bottom hole.
- Double-check the accuracy of the marks before proceeding with the installation.
Once you have completed these steps, you are ready to move on to the next stage of the installation process. Measuring and marking the installation points correctly is essential to ensure a smooth and secure installation of your Andersen storm door closer. Take your time and double-check your measurements and marks to ensure accuracy. By following these guidelines, you will be well on your way to successfully installing your storm door closer.
Attaching The Bracket And Connecting The Arm
Installing an Andersen storm door closer is a straightforward process that can be completed with just a few tools and a little bit of patience. Attaching the bracket and connecting the arm are crucial steps in ensuring that your storm door operates smoothly and securely. By following these step-by-step instructions, you’ll be able to attach the bracket and connect the arm securely, allowing your storm door to function as intended.
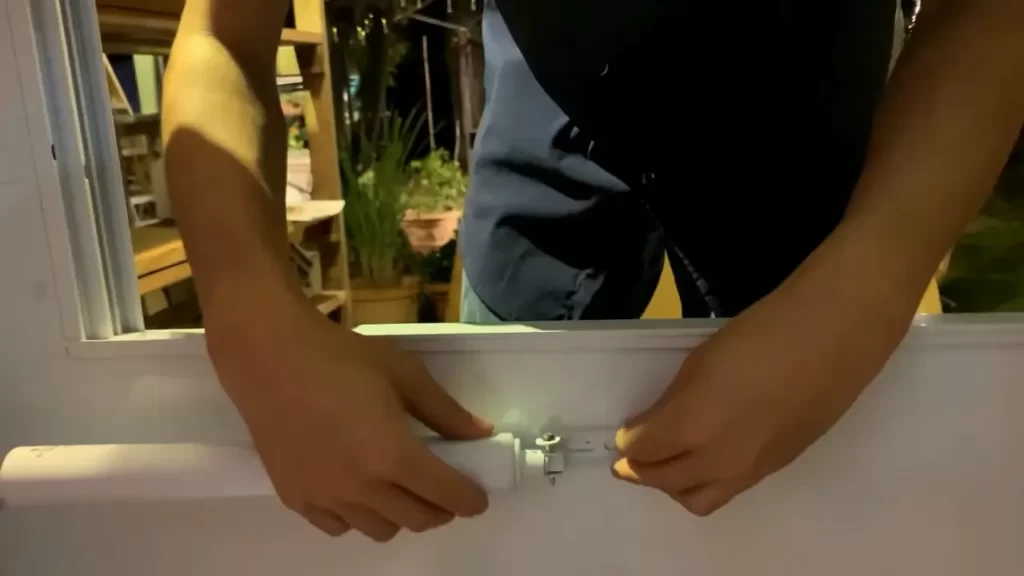
Step-by-step instructions for attaching the bracket:
- Start by identifying the location on the door frame where the bracket will be attached. This is typically located on the side of the door opposite the hinge.
- Using a tape measure, measure the recommended distance from the top of the door frame to ensure proper placement of the bracket. This information can usually be found in the installation instructions provided with your storm door closer.
- Once you have determined the correct placement, use a pencil or marker to mark the position of the screw holes on the door frame.
- Next, drill pilot holes into the marked positions on the door frame. Make sure to use a drill bit that is slightly smaller than the diameter of the screws provided with the storm door closer.
- Position the bracket over the pilot holes and align it with the markings on the door frame.
- Secure the bracket to the door frame by inserting and tightening the screws. Be careful not to overtighten, as this may cause the bracket to become misaligned or damaged.
- Double-check the alignment of the bracket and ensure that it is securely attached to the door frame.
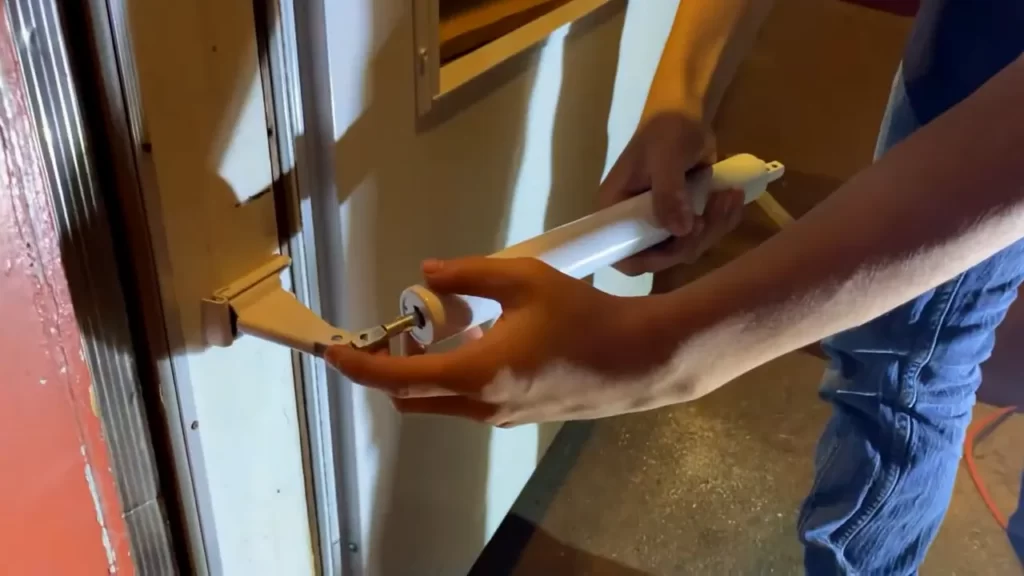
Connecting the arm to the bracket securely:
- Locate the arm that is designed to connect the closer mechanism to the bracket.
- Position the arm onto the bracket in the designated slot or opening.
- Ensure that the arm is securely and firmly attached to the bracket. You may need to use a screwdriver or other tool provided with the storm door closer to tighten any screws or fasteners that secure the arm in place.
- Gently test the movement of the arm by opening and closing the storm door. The arm should move freely without any resistance or binding.
- If the arm moves smoothly and the storm door operates properly, you have successfully attached the bracket and connected the arm.
By properly attaching the bracket and connecting the arm, you can ensure that your Andersen storm door closer operates smoothly and securely. Following these step-by-step instructions will help you complete the installation process with ease. Remember to refer to the manufacturer’s instructions provided with your storm door closer for any specific guidance or recommendations.
Adjusting The Tension And Speed Settings
Importance of adjusting the tension and speed for proper operation
Adjusting the tension and speed settings on your Andersen Storm Door Closer is crucial for ensuring its proper operation. The tension determines how much force is required to open and close the door, while the speed controls the rate at which the door closes. Properly adjusting these settings not only improves the performance of your storm door but also helps prolong its lifespan.
How to adjust the tension and speed settings correctly
Adjusting the tension and speed settings of your Andersen Storm Door Closer may seem like a daunting task, but with the right guidance, it can be a straightforward process. Here’s a step-by-step guide to help you get it right:
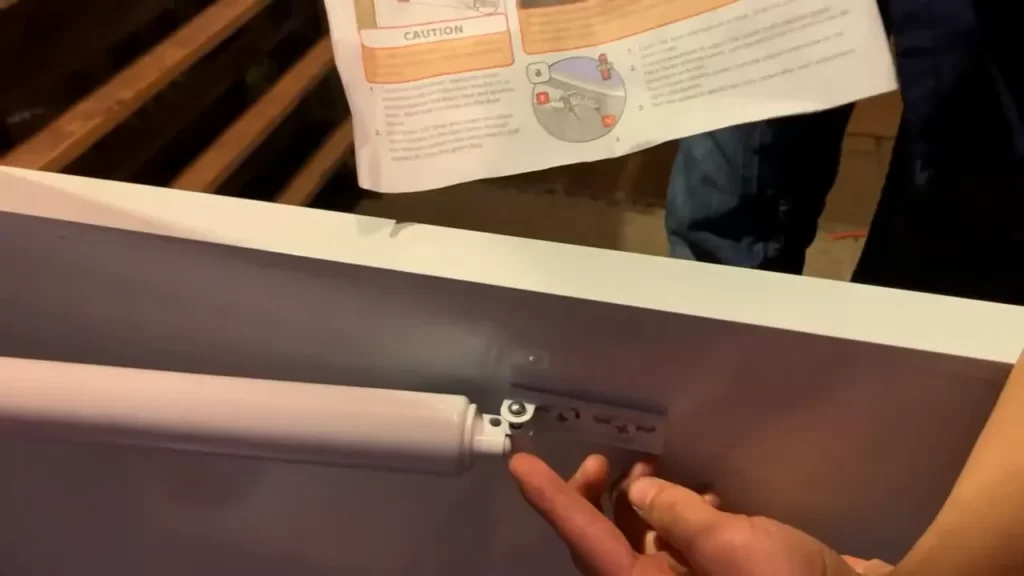
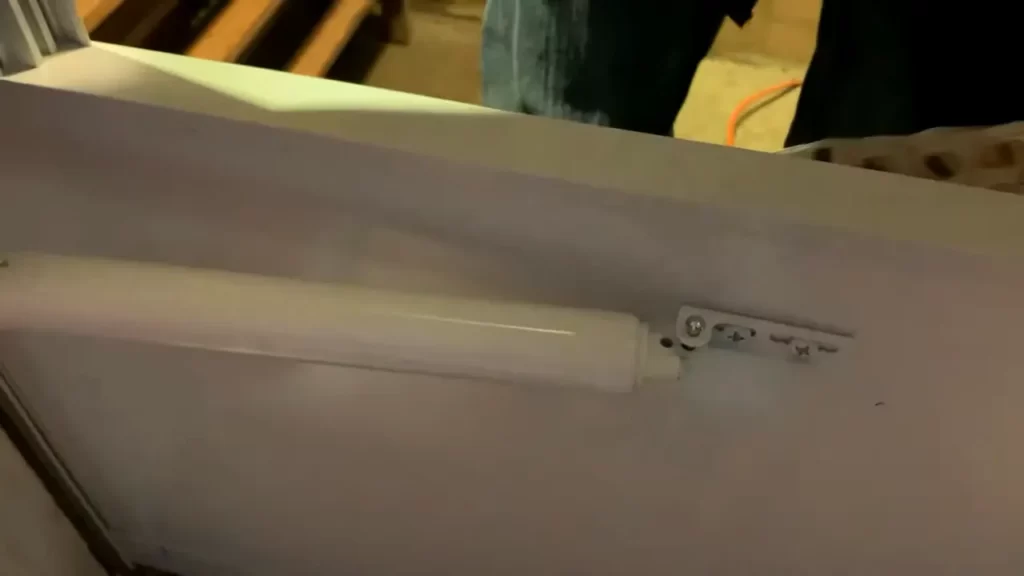
Step 1: Locate the adjustment screws
Start by locating the adjustment screws on your Andersen Storm Door Closer. These screws are typically located on the end of the closer cylinder or on its top. Refer to the instruction manual provided by Andersen for the specific location of these screws.
Step 2: Adjusting the tension
To adjust the tension, use a screwdriver and turn the tension adjustment screw clockwise to increase the tension or counterclockwise to decrease it. It’s important to make small adjustments and test the door after each adjustment to achieve the desired level of tension.
Step 3: Adjusting the speed
For adjusting the speed, locate the speed adjustment screw and turn it clockwise to slow down the closing speed or counterclockwise to speed it up. Again, make small adjustments and test the door’s closing speed after each change until you find the optimal speed.
Step 4: Test the door
Once you’ve made the necessary adjustments, test the door’s operation. Make sure it closes smoothly and securely without slamming shut or closing too slowly. It’s essential to find the right balance between the tension and speed settings for optimal performance.
By following these steps, you can adjust the tension and speed settings of your Andersen Storm Door Closer correctly, ensuring it operates smoothly and efficiently. Regularly checking and adjusting these settings will help keep your storm door functioning properly and extend its lifespan.
Testing And Troubleshooting
Once you have successfully installed your Andersen storm door closer, it is essential to test its functionality to ensure that it operates smoothly. In this section, we will guide you through the process of checking the door closer for smooth operation and address common troubleshooting tips and solutions for any issues that may arise.
Checking the door closer for smooth operation
Before proceeding with the testing process, it is important to familiarize yourself with the different components of the door closer and how they should function. The door closer typically consists of the closer body, cylinder, and arm. Follow these steps to check for smooth operation:
- Carefully observe the movement of the door closer as you open and close the storm door. Make sure that the door smoothly opens and closes without any dragging or resistance.
- Test the door closer at different positions to ensure that it is providing the appropriate amount of resistance throughout the door’s opening and closing motion. The door should not slam shut or remain open without resistance. Adjust the speed and closing tension if necessary.
- Check for any oil leaks or visible damage on the door closer components. If you notice any, it may indicate a need for replacement or repair.
Common troubleshooting tips and solutions for any issues
Despite proper installation and testing, there may be instances when you encounter issues with your Andersen storm door closer. Below are some common troubleshooting tips and their respective solutions:
| Issue | Solution |
|---|---|
| The door closes too slowly | Adjust the closing tension by turning the adjustment screw in a clockwise direction to increase the speed of the door closer. |
| The door slams shut | Decrease the closing tension by turning the adjustment screw in a counterclockwise direction to slow down the closing speed. |
| The door doesn’t close fully or remains open | Increase the closing tension by turning the adjustment screw in a clockwise direction to provide more force to close the door completely. |
| The door closer squeaks or makes noise | Apply a small amount of lubricating oil to the joints and moving parts to reduce friction and noise. Be careful not to over-oil and wipe away any excess. |
If you have followed these troubleshooting tips and the issue still persists, it is recommended to consult the product manual or seek assistance from Andersen customer support for further guidance.
Regular Cleaning And Lubrication
Importance of keeping the closer clean and well-lubricated
Regular cleaning and lubrication of your Andersen storm door closer are crucial for its proper functioning and longevity. Over time, dirt, dust, and debris can accumulate, hindering the closer’s performance and potentially causing it to seize up or not close smoothly. Additionally, lack of lubrication can lead to excessive friction, resulting in wear and tear on the closer’s components. By regularly cleaning and lubricating the closer, you can ensure that it operates smoothly and efficiently, extending its lifespan.
Recommended cleaning products and lubricants to use
When it comes to cleaning your Andersen storm door closer, it’s important to use the right products that effectively remove dirt and grime without causing any damage. Here are some recommended cleaning products and lubricants to use:
- Mild soap and water: Start by mixing a small amount of mild soap, such as dish soap, with warm water. Dampen a soft cloth or sponge in the soapy water and gently wipe down the closer, paying extra attention to the moving parts and any visible dirt or debris. Rinse the cloth or sponge with clean water and remove any soap residue.
- Silicone-based lubricant: After cleaning the closer, it’s important to lubricate its moving parts to ensure smooth operation. Silicone-based lubricants are recommended for Andersen storm door closers as they provide long-lasting lubrication without attracting dirt and dust. Apply a small amount of silicone-based lubricant to the closer’s hinges, springs, and other moving parts. Use a clean cloth to remove any excess lubricant.
Remember to avoid using abrasive cleaners or solvents, as they can damage the closer’s finish and internal components. Additionally, never use oil-based lubricants, as they can attract dirt and cause the closer to become clogged. Regular cleaning and lubrication of your Andersen storm door closer will help maintain its functionality and ensure smooth operation for years to come. By using the recommended cleaning products and lubricants, you can keep your closer in optimal condition and enjoy the benefits of a properly functioning storm door.
Inspecting For Wear And Tear
Before installing an Andersen storm door closer, it is crucial to inspect it for any signs of wear and tear. This simple step will help ensure that the closer functions properly and provides long-lasting performance. In this section, we will guide you on visually assessing the condition of the door closer and the signs of wear and tear to look out for.
How to visually assess the condition of the door closer
In order to visually assess the condition of the door closer, you can follow these steps:
- Step 1: Begin by conducting a visual inspection of the door closer. Look for any visible damage or loose parts.
- Step 2: Examine the screws and mounting hardware to ensure they are tight and secure. Loose screws can cause improper functioning of the door closer.
- Step 3: Check for any signs of rust or corrosion on the surface of the door closer. Rust can affect the smooth operation of the closer and should be addressed before installation.
- Step 4: Pay attention to the condition of the door closer’s arm. Look for any cracks, bends, or fractures that may impact its functionality.
Signs of wear and tear to look out for
While visually assessing the door closer, be on the lookout for these signs of wear and tear:
- Leaking fluid: If you notice any fluid leaking from the door closer, it is a clear indication that it needs to be replaced. Leaking fluid can affect the closer’s performance and compromise its ability to provide smooth closing and latching.
- Inconsistent closing: If the door closer fails to consistently close the door or if the door slams shut, it may indicate a worn-out or damaged closer. This can be dangerous and should be addressed promptly.
- Excessive noise: Unusual grinding or squeaking noises during operation can be a sign of wear and tear. Such noises may indicate the need for lubrication or replacement of the closer.
- Stiff movement: If you experience resistance or difficulty when operating the door closer, it could be due to worn-out internal components. This can impact the overall functionality of the closer.
- Visible damage: Cracks, chips, or dents on the surface of the door closer can be signs of wear and tear. These physical damages can affect the closer’s ability to function properly and should not be ignored.
By visually assessing the condition of the door closer and being aware of the signs of wear and tear, you can ensure that you install a reliable and durable Andersen storm door closer. This will not only enhance the functionality of your storm door but also provide you with peace of mind.
Replacing Worn Out Parts
Over time, storm door closers can experience wear and tear, causing them to function less efficiently. If you notice issues such as a door that doesn’t close properly or a closer that is no longer providing the desired resistance, it may be time to replace some parts. In this section, we will guide you through the steps for identifying and replacing worn-out parts of your Andersen storm door closer.
Steps for identifying and replacing worn out parts
If you’re unsure which parts of your Andersen storm door closer need replacement, follow these simple steps to identify and replace the worn-out components:
- Inspect the door closer: Start by examining the storm door closer to identify any visible signs of wear and tear. Check for any loose screws, damaged brackets, or signs of rust. Take note of any parts that appear worn or broken.
- Refer to the manual: Consult the user manual that came with your Andersen storm door closer. It will typically include a parts diagram, helping you identify specific components to replace. If you no longer have the manual, don’t worry. The next step will still provide you with the necessary information.
- Visit the official Andersen website: Head over to the official Andersen website and navigate to their storm door closer section. Look for the model number of your closer and click on it to access the parts list. Here, you will find a comprehensive list of all the available replacement parts.
- Identify the worn-out parts: Match the parts on your storm door closer to the list provided on the website. Identify the worn-out components that need replacement.
- Purchase the replacement parts: Once you have identified the specific parts you need to replace, it’s time to make your purchase. Andersen offers various options for purchasing replacement parts. You can order directly from their website, or you may choose to visit a local retailer that carries Andersen products.
- Install the new parts: Once the replacement parts arrive, carefully follow the instructions provided to install the new components on your Andersen storm door closer. Make sure to tighten all screws securely and test the functionality of the closer after installation.
Where to purchase replacement parts for the door closer
If you’re wondering where to purchase replacement parts for your Andersen storm door closer, you have a couple of options:
- Andersen official website: Visit the official Andersen website and navigate to the storm door closer section. Here, you will find a convenient option to order replacement parts directly from Andersen. Simply browse through the available options, add the desired parts to your cart, and proceed with the checkout process.
- Local retailers: Another option is to visit a local retailer that carries Andersen products. Use the “Store Locator” feature on the Andersen website to find nearby retailers. Once you find a suitable store, visit them and inquire about the availability of the specific replacement parts you need.
By following these steps and purchasing replacement parts from a trusted source, you can easily replace worn-out components of your Andersen storm door closer, restoring its functionality and ensuring smooth operation.
Frequently Asked Questions Of How To Install Andersen Storm Door Closer
How Do You Install A New Storm Door Closer?
To install a new storm door closer, follow these steps: 1. Start by removing the existing closer. 2. Attach the mounting bracket to the door frame. 3. Attach the closer arm to the bracket and adjust the tension. 4. Test the door to ensure it closes properly.
5. Make any necessary adjustments and tighten all the screws securely.
How Do You Adjust An Andersen Storm Door Closer?
To adjust an Andersen storm door closer, follow these steps: 1. Locate the adjusting screw on the door closer. 2. Use a screwdriver to turn the screw clockwise to increase the closing speed or counterclockwise to decrease it. 3. Test the door after each adjustment to ensure the desired closing speed is achieved.
How To Install Andersen Easy Install Storm Door?
To install an Andersen Easy Install storm door, follow these steps: 1. Measure the opening and select the right size door. 2. Prepare the doorframe by removing the old door and cleaning the area. 3. Attach the hinge rails to the door and then attach the door to the frame.
4. Adjust the door for proper alignment and install the handle and closer. 5. Test the door to ensure it opens and closes smoothly.
How Do You Install A New Door Closer?
To install a new door closer, follow these steps: 1. Choose a door closer that suits your needs. 2. Measure and mark the installation points on the door and frame. 3. Drill holes for the closer brackets according to the manufacturer’s instructions.
4. Attach the closer bracket and arm to the door and frame. 5. Adjust the tension and speed settings as required.
How Do You Install An Andersen Storm Door Closer?
To install an Andersen storm door closer, first, attach the bracket to the door frame. Then, connect the closer to the bracket using the provided screws. Finally, adjust the tension to ensure proper door closing.
What Tools Are Needed To Install An Andersen Storm Door Closer?
To install an Andersen storm door closer, you will need a drill, a screwdriver, a tape measure, and a pencil. Additionally, it is recommended to have a level and safety glasses for optimal installation.
Conclusion
To sum up, installing an Andersen storm door closer is a simple task that can greatly enhance the functionality of your door. By following the step-by-step instructions provided in this guide, you can successfully install the closer and enjoy the benefits it brings, such as improved security and energy efficiency.
Remember to double-check your work and make any necessary adjustments. With a little patience and effort, you can easily complete this project and enjoy a fully functioning storm door. Happy installing!